I love trying new-to-me crafts, so I was excited that my BORC from Plaid contained the Bucilla Weaving Loom (affiliate link here and throughout the post). Weaving isn't new to me in the sense that I've done paper weaving and basic yarn weaving, but I'd never done anything besides the plain over-under stitch and I'd never completed an actual woven yarn project.
The Bucilla Weaving Loom came with everything I needed except the yarn. I chose to use Premier's Sweet Roll Yarn (Gelato Pop and Mint Swirl, which is apparently discontinued). The loom instructions have text and pictures for the Plain Stitch (already knew that one!), the Soumak Stitch, the Looped Stitch, and the Rya Knot. Here are my first few rows.
The rows worked up quickly and the comb helped keep everything nice and straight.
Everything stayed nice and straight until it came time to take my project off the loom. In the process of tying off the bottom warp yarn, I messed up the tension a bit. I tried to fix it as I tied off the top warp yarns....
... but the finished piece ended up a bit off-kilter. I also noticed that I cut the fringe a bit unevenly. No matter. I'm happy with it and am confident that each future attempt will be better and better.
I learned a lot during this first project and thoroughly enjoyed the process. How about you? Have you tried weaving? Any tips or tricks for keeping things straight once you remove your work from the loom?
Three states (Alabama, Louisiana, and New Mexico) have all named the black bear as their state mammal. Those aren't the states that come to my mind when I think of bears, but it turns out that the American Black Bear is the world's most common bear species. It is found throughout the United States with a large population thought to be twice that of all other bear species combined. Another fascinating fact: many black bears are not black! This cute cereal box bear is a fun jumping off point for a study of this interesting mammal. Affiliate links below.
Cover the cereal box with black construction paper. The amount you need depends on the size of the cereal box. I used one sheet to cover the front and one side and a second sheet to cover the back and the other side, then cut strips from a third piece for the top and bottom.
Cut ears from black construction paper, making them about an inch longer than you want them to be. Fold over that extra inch to make a flap so you can glue the ears to the top of the box.
Cut an oval from brown construction paper and draw a nose and mouth. Glue it to the front of the cereal box. Cut a semicircle of brown construction paper and glue it to the bottom center of the front of the box to make the bear's tummy. Glue the googly eyes in place.
I've been wanting to have the My Creative Life logo made into a stamp for awhile now. I met the folks from NIO during Creativation and was able to see the stamping system in action, so I was definitely interested when they offered to send me everything I'd need to try it out with a customized logo stamp. As always, all opinions are my own.
The video below gives you a good overview of how it works. Basically, you purchase the NIO stamper (affiliate link), which comes with a code for you to design your own stamp online. You can use their many templates, or upload your own design. Once the design arrives, you simply line up the NIO over the clear polymer stamp, press down, and you're ready to stamp anywhere you'd like.
You can easily click different ink pads in and out of the NIO if you'd like to change colors. Removing the customized stamp from the NIO and putting in a new one is easy, too. This allows you to use the NIO stamper for as many stamps as you'd like to have made.
NIO sells all sorts of ready-to-stamp items, including gift bags, napkins, tags, banners, candy bar wrappers, stickers, cake toppers, and greeting cards. I gave each of them a try.
This would be so cute for a birthday, wedding, baptism, baby shower, or other special event.
Here's a sample of some of the things I made. I did try out some of the other ink colors, but I like the black best.
I'm thinking that my I'll do a return address stamp next. Or maybe a stamp featuring the best pet ever. What would you put on a custom stamp?
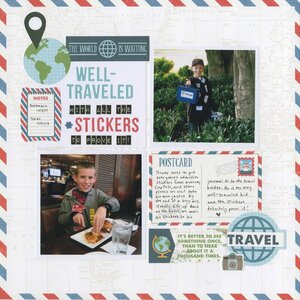
This was one of the most fun layouts I've made in recent memory. I started with two photos from our travels (one from Delaware and one from Texas) showing Trevor with admission stickers to the places we'd visited those days all over his jacket. I added a title with a variety of stickers, then added die-cuts. I ended up using 8, which is easily double the number I've ever used on a single 12" x 12" layout before. The final touch was adding my journaling to the two lined die-cuts. I love how it all came together.
While I am eager to return to a time when it is safe to travel, being under a stay-at-home order makes me appreciate the travels we have done. What fun it has been to look at previous travel pages and make more to add to the albums!
I've been busier than ever running Fun Family Crafts. It should come as no surprise that our traffic is way, way up as people have been searching for activities for kids to do during the COVID-19 pandemic. With almost 12,000 kid-friendly craft tutorials for toddlers through teens, it's no exaggeration to say we have something for everyone.
My focus for the last few weeks has been on crafts that use materials that people likely already have at home. With that in mind, here are the new roundups I've been making. First, Cereal Box Crafts. There are 58 on the site right now. One of mine is in the graphic below. Can you spot it?
Next up, Button Crafts for Kids. We have 340 button crafts ideas, which made it really hard for me to pick which to include in the roundup. As always, I tried to choose the widest variety possible. One of mine is in there.
It took me forever to deal with the Styrofoam Ball Crafts for Kids. I had to delete several dozen of my favorites from someone who recently deleted her blog and thus all her tutorials. (I HATE when that happens.) Then I had to clean up the tags for all the styrofoam projects to pick out the stryfoam ball ones. And then I had to deal with the fact that styrofoam is actually a brand name (the proper generic is polystyrene). Crafters who work for styrofoam competitors tag their project with those brand names, which never get searched. In the end, I found 71 styrofoam ball crafts. One of mine is in the graphic below.
Next was Recycled Can Crafts. We have 84 different projects. Many are variations on classic desk organizers (like R2-D2 below), but there are many other uses as well. As always, I tried to show the greatest possible variety in the graphic. One of them is mine.
I had the most fun putting together the roundup of Yarn Crafts. Even though there were 434 crafts to choose from, the ones that were bright and colorful jumped right out at me and it wasn't as hard to narrow them down as it usually is with so many options. And I LOVE the way the title block came out. Two of the projects in this roundup are mine.
As always, I made all the graphics using PicMonkey. I've been paying $6/month for their Basic plan for about 2 years and I couldn't be happier with it.
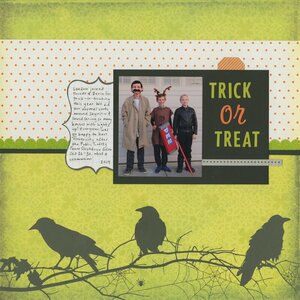
Every year, our friends Sheena, Ken, and Devin to come to our house for trick-or-treating. Some years there are other kids that join Trevor and Devin (Landon came over in 2019), but otherwise our routine is the same. We line the kids up in front of our garage for photos while we still have daylight, then we follow the same route trick-or-treating around our neighborhood. The adults chat as we walk behind the kids, greeting neighbors and checking out holiday decorations and costumes. Then we head back to our house for hot apple cider and candy trading. It's the perfect way to spend Halloween and I'm going to be really sad when the boys outgrow it. Fortunately, it's acceptable here (even expected) that teenagers will go trick-or-treating, so we might get another year or two before it ends.
There was one major difference with trick-or-treating in 2019, which I documented in my journaling. Our neighborhood had been on our second Public Safety Power Shutdown (PSPS) of October from the 26th to the 30th, with electricity returning just in time for Halloween. A few families always decorate for Halloween, but many more did than usual, and many of those incorporated lights, music, or other electrical things. One neighbor rigged up his air compressor to make hissing snakes and had rats and spiders and things on pulleys to make them scurry. Halloween felt very celebratory. It was awesome.
The new Diamond Art Freestyle program by Leisure Arts lets crafters buy gems individually to get exactly the colors you want. They have over 400 colors of gems, including metallics, aurora borealis, neon, and even glow-in-the-dark. With all the colors of sparkly gems available and two different adhesives that work on practically any surface, you can now create any design you can dream up. Today I'm sharing ideas for gift tags. First up, flowers. Scroll down further to see the instructions for the monogram tag. Affiliate links below.
Paint the tag and let it dry completely. Use the punch to cut flowers from the sandwich adhesive. Remove the white side of the adhesive and stick the flowers to the tag. Then remove the clear lining from one flower and start dotting. In this photo, you can see one completed flower. The second flower still has the clear lining on it.
When the second flower is complete, use the liquid adhesive to draw leaves and vines on the tag. Let the adhesive dry until clear, approximately 15 minutes. Dot the leaves and vines. Finally, add embroidery floss to the top of the tag.
Paint the tag and the wood letter. When the paint is completely dry, add a coat of Freestyle adhesive to the front of the monogram. Wait 15 minutes or until the adhesive is clear.
Add gems to the monogram. Glue it to the tag with Supertite, then add dots of adhesive randomly on the tag. Wait until the adhesive is clear, then add gems. Tie a loop of embroidery floss to the tag.
---------
For more ideas for using gems, check out all of my Diamond Art ideas! There is truly no limit to how you can use these.
Do you recognize this bird? It's a yellowhammer (aka, Northern Flicker) and it's the state bird of Alabama. And, as it turns out, it's a strange choice for Alabama's state bird. Nevertheless, it has been the state bird since 1927 and is a big deal in the Yellowhammer State.
I painted my yellowhammer exclusively with q-tips rather than brushes. Since they don't hold much paint and are less flexible than brushes, you end up with short strokes and streaks of color that resemble the yellowhammer's unique coloration. Give it a try!
---------
Chipboard Yellowhammer
Materials:
chipboard
microtip scissors
Folk Art paint
Q-tips
Steps:
Lightly sketch the yellowhammer's body on a piece of chipboard. I chose to simplify the feet by just showing the leg. When you are happy with your sketch, cut it out.
Using q-tips, apply black paint to the beak, front of the head, chest, legs, and along the wing. Apply yellow to the back of the head, along the belly, and down the tail. While the paint is still wet, apply a sand color over the top to blend the colors, skipping the beak, legs, and the tail.
Use a rusty orange to define the shape of the wing. Add the same color along the cheek area, on the upper leg area, and on the back of the head. Make sure to move the q-tip in the direction the feathers would be going (for example, from the top of the wing to the tip, not horizontally across the wing).
Come back in with some yellow on the face, covering most of the rust-colored streak. Add yellow to the chest. Remember, you want the colors to be streaky and blended. Let the paint dry completely.
Use a clean q-tip to add a patch of white to the yellowhammer's neck and a subtle highlight to the lower belly. Finally, add a black patch to the top of the head, an eyeball, and a streak on the cheek. Outline the wing, the white patch on the chest, and the tail. Add tiny black dots to the belly (barely touch the q-tip to the yellowhammer) and horizontal bars on the wing and tail.
While researching Alabama's yellowhammers, I learned a lot of interesting facts. Unlike many other woodpeckers, yellowhammers only hammer into rotting or hollow wood. They nest in trees, but mainly forage on the ground for insects and seeds. Some of their favorites include ants, termites, and grasshoppers. I also learned that there is another species bird known as a yellowhammer that is native to Eurasia and a member of the bunting family.
With the new Diamond Art Freestyle program by Leisure Arts, you can buy gems individually to get exactly the colors you want. There are over 400 colors of gems, including metallics, neon, aurora borealis, and even glow-in-the-dark. With so many colors of sparkly gems available and two different adhesives designed to work on practically any surface, you can now create any design you can dream up.
Today's project is a simple monogram necklace. It is very easy and takes just minutes. I used Aegean Blue #5003, but any color would be beautiful. Affiliate links below.
Choose a letter and paint it with your desired color. When the paint is dry, add a coat of Freestyle adhesive. It will go on milky white. It is ready to use when it is clear, anywhere from 10-30 minutes depending on the temperature and humidity.
Apply gems to the front of the monogram. Glue the bail to the back. When it is dry, measure enough embroidery floss for the length of your necklace, thread it through the bail, and tie it with a knot.
I'm all about looking for the bright side. And right now, the bright side is that I'm getting a lot of scrapbooking done. My BCF's and I have been doing Zoom crops regularly and it's just what I need to keep my spirits up. This layout is all about Trevor's reindeer PEZ Halloween costume.
It's weird thinking back on October and remembering the inconvenience of the Public Safety Power Shutdowns (PSPS) that were going on while I was making the costume and the ever-present fear of wildfire. It feels like a lifetime ago, yet here we are with the even greater inconvenience of a stay-at-home order and the ever-present fear of COVID-19. Fortunately, we were safe then and are safe now. Many others are not so lucky.
Every time I make an edible craft, Steve jokingly asks: "Didn't your mom tell you not to play with your food?" As far as I can remember - no, she didn't! I certainly have never told Trevor not to play with his food. Quite the opposite. We play with food all the time in Casa deRosier.
Trevor and I used the last of our seder leftovers to play a game I'm calling Tic-Tac-Matzo. It ended in a cat's game (of course), after which we split the board and enjoyed our treat.
Tic-Tac-Matzo
Materials:
matzo
peanut butter
chocolate syrup in a squirt bottle
two different markers (we used Cheerios and chocolate chips)
Steps:
Spread the peanut butter onto a piece of matzo. Add four lines of chocolate syrup to make the board. Alternate taking turns, trying to place three Cheerios or chocolate chips in a row. Split the game board when you are done playing.
---------
When you search for matzo/matzah on Amazon, you get pages and pages of unleavened bread and soup dumplings, along with plenty of cookbooks. But if you dig deeper, you find all sorts of unexpected treasures, including Tic Tac Toad. I'm a big fan of the juggling balls. And the themed pillow would definitely help with Passover reclining.
With the stay-at-home order in place, you might think that scouting is on pause. I'm happy to report that is not the case. Trevor's troop is meeting weekly via Zoom, holding games nights and other fun activities, and continuing to learn skills and work on merit badges.
I'm counseling six Scouts working on the Citizenship in the Nation merit badge. Ordinarily, Scouts keep their own blue cards (the cards they use to record progress on merit badges, so named because they are literally blue), but since we are not meeting in person, I am holding onto all of the blue cards. I made myself this pouch to hold them:
Once life is back to normal and the Scouts keep their own in-progress blue cards, I'll be able to use the pouch to hold patches. A Scout could use a pouch like this to hold blue cards, temporary patches, or a bunch of other Scout-related stuff. Affiliate links below.
Gather your materials. I used a Marvy Uchida zippered pouch that I had on hand, plus a commemorative patch from our BSA Council that fit perfectly over the logo I wanted to hide. (No offense to Marvy Uchida. I LOVE their products, particularly the Clever Lever punches and my all-time favorite pens.)
I positioned the patch over the logo, then arranged the stamps below it. I love this stamp set because everything lines up beautifully and you can see exactly where it will stamp. (Since there is only one of each letter and there are duplicate letters in DEROSIER, I just used another letter of the same size as a place holder for spacing.) When the spacing is correct, lift each letter, ink it, and stamp it onto the canvas. Don't worry about getting perfect ink coverage. You can fill in any empty or light spots with the Sharpie Extreme.
Use the stencil and the fingertip dauber to create the line of fleurs de lis. Go over them with the Sharpie Extreme.
Last October, I designed nineteen crafts for a book series that would accompany Leisure Arts' new Diamond Art Freestyle Program. The Freestyle Program is awesome. It takes everything you love about Diamond Art and lets you create your own designs on whatever surfaces you want. You can buy individual colors of gems (over 400 colors!), two types of adhesives that work on practically any surface, fabrics, tools, and accessories. The sky is the limit!
If you know exactly what you want to create, the Freestyle Program lets you jump right in and make it. If you need ideas, patterns, or templates, the accompanying books are fabulous. I designed four of the projects in the Paper Crafting book (including the rainbow card and the flower box on the cover) and fifteen of the projects in the Sparkle Holiday book (including everything on the cover except for the Christmas tree with the red background). In January, I got to see the mockups of those books during Creativation. It was so exciting! Now they are finally available for purchase.
I'd been planning to take photos of myself in a big box store holding my books as soon as they were released... but COVID-19 changed those plans. Fortunately, Leisure Arts shipped the Paper Crafting book to me. It's not the same as seeing it in the store, but it's still exciting.
Also exciting: Leisure Arts asked me to do the "Teach Me Tuesday" Facebook Live this afternoon! Join me at 2:00 PM Pacific (4:00 PM Central, where Leisure Arts is located) on the Leisure Arts Facebook page. I'll be showing off the book, and teaching you how to make some beginner projects using the two different types of adhesive on a variety of surfaces. I'll see you then!
On Thursday, our family had the honor of attending a virtual Passover Seder hosted by my friend and co-author, Adam. Over the years, I've been to a handful of Jewish weddings (including Adam's), a Jewish baby naming ceremony at a local synagogue, and a pre-Sukkot party in the sukkah in a coworker's backyard, but otherwise my knowledge of Judaism is limited to my years of Sunday School as a kid, a Judaism class I took in college, and reading the books that Adam has written. (Affiliate link because you should totally read his books.) Experiencing Passover with a real family (around 25-30 people) practicing their faith was awesome.
Steve, Trevor, and I did our best to join in with the readings, rituals, and songs. We dipped our pinkies in our drinks, broke and hid the middle piece of matzo, and flogged each other with chives (it's supposed to be green onions, but close enough). I even made matzo ball soup for the first time. In every way, we had a wonderful time.
Despite eating a good amount of matzo during the Seder, we had plenty left over. So naturally, Trevor and I made a Matzo Lion Snack. (And if you didn't think, "Of course that's what Cindy did with leftover matzo" then you aren't reading my blog often enough.)
Matzo Lion Snack
Materials:
matzo
vanilla frosting, tinted yellow
Raisin Bran
banana
pretzels
Popcorners (affiliate link, because you HAVE to try these if you haven't already. YUM!)
Steps:
Gently frost a piece of matzo. Sprinkle Raisin Bran flakes around the outer edge and use raisins for eyes. Cut a triangular banana piece for the nose. Use stick pretzels for whiskers and broken mini pretzels for the mouth. Add Popcorners for the ears. Eat and enjoy!
Grieving is always difficult, but my heart goes out to those who are mourning a loss while the world is dealing with a pandemic. People cannot come together for a funeral, nor travel to be with a widowed relative or friend. I know many are struggling to find closure without these traditional methods.
The family who received this card is mourning a relative on the other side of the world. Even if they wanted to risk their health to travel to be with family, it simply isn't possible.
If you know someone who is grieving, reach out via phone or computer, but then send a card. Fill the card with messages of hope and memories of the person who is gone. The card does not have to be fancy. It truly is the thought that counts.
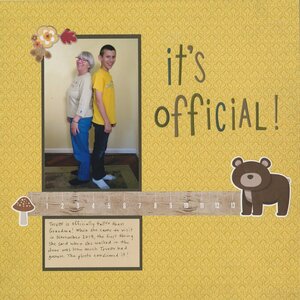
When my mom came to visit in November, she was shocked to see how much Trevor had grown in the few months since she'd last seen him. Of course, I had to take a picture to document it.
My mom has a photo of me from the late 80's, back-to-back with her mom. Grandma and I have a level balanced on our heads because our heights were virtually identical (5'2"). It would be fun to pair the photo of Trevor with his maternal grandma with me and my maternal grandma. Oddly, we never took a picture when I reached- or passed- my mom's height (4'10").
I will definitely be taking photos when Trevor reaches- and passes- my height. It won't be long. He's only an inch shorter than me at age 13. Because he has always been so small for his age, Trevor has had multiple bone scans done, and his doctor predicts his adult height will be 5'5" or so.
When I shared the felt applique bunny last week, I mentioned that it was inspired by the Easter egg wreath I was making. I've finished it and it came out even better than I'd hoped!
The wreath was part of a kit(affiliate link here and below) that included the felt (I had to cut out all the pieces), the embroidery floss, the sequins, the beads, two needles, and the interfacing that serves as the base of the wreath. The only material I needed that wasn't included in the kit was the Poly-fil. I started out by following the directions closely, but as I got the hang of it, I veered off in my own direction. While my wreath looks similar to the photograph on the front of the kit, you can spot plenty of places where I changed up the colors or patterns on the decorated eggs.
While there was a bit of a learning curve, overall this was a fairly easy project. I would recommend it to anyone age 9-plus. (If you're quite a distance on the 'plus' side of 9 like I am, I HIGHLY recommend this magnifying lamp for threading the itty-bitty beading needle.) Once I learned the basics, it was very relaxing to sew each egg.
Now that I've dipped my toe into the world of felt applique, I am dying to start another project! I particularly would like to do other seasonal wreaths so that when I take down the Easter wreath, there's another to go in its place. I'm going to do at least two more kits before I even think about designing my own felt applique project. These are the ones I'm considering doing next:
I'm also strongly considering this beautiful advent calendar. What do you think I should do next? Any of the designs jump out at you?
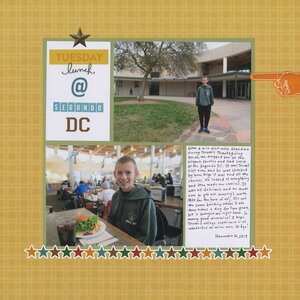
During Trevor's Thanksgiving break, I took him to lunch at the Segundo Dining Commons. That's where I ate three meals a day during my time in the dorms at UC Davis. Actually, they've built a new facility and gussied up the place since my days there from 1990-1992. But it still brought back so many good memories.
For Trevor, it was the chance to see a bit about what dorm life is like. The DC was not at all what he'd expected; the number of choices, the quality and variety of food, the options for restricted diets, and the sheer size of the facility all exceeded his expectations. He said he would be very happy to eat three meals a day there once he starts college!
We had plans to meet friends and eat in the Tercero Dining Commons on campus (where Steve ate during his time in the dorms) but COVID-19 interfered and we had to cancel. We'll make it there eventually.
Most of the stickers on this layout come from a football collection, of all things. I've been challenging myself to use (or give away) neglected supplies and I'm pleased with myself for using football-themed product on a page that has nothing to do with sports.
Today's project combines two things I love: name art and ice cream. Pair this craft with homemade ice cream. May I suggest lazzberry? It is sooooo good!
Ice Cream Name Art
Materials:
9" x 12" construction paper
pencil
markers
scissors
Steps:
Orient a sheet of white construction paper vertically. LIGHTLY write your name vertically in bubble letters with the first letter almost touching the top of the paper. Adjust each letter until it is practically round. You should still be able to make out each letter, but they should just look like ice cream scoops at first glance. Now, draw a triangle-shaped cone underneath the final letter of your name.
Color each letter to resemble a different flavor of ice cream. Notice the way I used a big chocolate chip as the D in my name. Color the cone light brown, then draw diagonal lines in a darker shade of brown to create the texture of the cone.
Finally, cut around the outside of the cone. If your name is short, you can probably hold the cone upright without the paper buckling. If your name is long and the paper wants to flop over, glue a skewer or straw to the back to add rigidity. Enjoy!
The last time I documented a day in the life of Trouble deRosier was way back in 2014 when he was a much younger bunny. Quite a few things have changed since then, so I wanted to do an update.
---------
Trouble's morning begins around 5:45 am, when I open the door to his cage. He hops out onto the carpet (we've added carpet to cover much of the hardwood floor as he's aged) and puts his chin down near my hand, asking to be petted. When I've groomed him sufficiently, he'll return the favor by licking my hand. He hops back into his cage and looks up expectantly, waiting for me to hand-feed him some pellets. I add a few more pellets (less than 1/4 c. total) to his dish and give him fresh water.
I head upstairs to my computer to start work. Sometimes Trouble follows me, sometimes he doesn't. On this particular morning (Monday 3/31), he didn't. Instead, he relaxed in his cage and played with his toys.
Trouble has trained Steve to give him a piece of Shredded Wheat each morning. When Trevor or I go in the kitchen and get out cereal, nothing happens. When Steve gets out cereal, Trouble is there like a shot.
With a full tummy, Trouble headed to his farm box for a quick snooze.
About 30 minutes later, he was back in his cage eating breakfast.
He came out of his cage and put his chin down for grooming. I took his picture instead (fully intending to groom him after snapping a quick photo)....
... but I wasn't quick enough. Trouble was offended by the fact that I ignore his request (demand) and hopped two feet away, then slowly and deliberately turned his back to me, watching me the whole time to make sure I knew how offensive I'd been.
Of course, I apologized right away (after snapping that photo) and petted him until he forgave me. Steve walked by on his way to the kitchen, passing by the piano. That's where we keep the Healthy Snacker sampler set (affiliate link) that Steve bought Trouble for Christmas. Trouble darted away from me and started circling around Steve, begging for a snacker.
Despite living with us for 9 years (during which time we have NEVER taken a treat away from him after giving it to him), Trouble still darts away with his Snacker.
I headed back upstairs. Trouble moved to the rug at the foot of the stairs, watched Steve go back to his office, and then looked over at Trevor doing schoolwork in the family room. He played in his Cottontail Cottage for awhile, then made a stop at the Hay Buffet, and visited the litterbox.
Around 9:30, Trouble joined me upstairs.
He spent some time playing in the master bedroom (allowed) and then snuck into the craft room (not allowed) before settling down beneath my office chair. Most mornings he does Predator Evasion Practice around this time, repeatedly zooming back and forth from under our bed, down the hall, then under Trevor's bed. As a prey animal, it's important to keep your escape skills sharp.
When Trouble is under my chair and wants my attention, he'll nose-bonk against my leg. I give him a scritch and that's usually good. But if I haven't gotten the correct message, or did an insufficient job petting him, he'll give a sharp tug on my pant leg. It's hard to ignore.
By the time I was ready for lunch, Trouble had moved under the folding chair which is now permanently next to my desk. The first time I put it there so Trevor and I could work together on something on my computer, Trouble made it clear that this was his new favorite nap location. And so it stays.
When I checked on him after lunch and PE (the three of us do a daily walk together after lunch now as part of Trevor's distance learning), Trouble was completely zonked.
As I went about my afternoon in and out of the craft room, up and down the stairs doing laundry, and in and out the back door to do some gardening, Trouble stayed upstairs under my desk dozing.
I picked greens (carrot tops, dandelion leaves and flowers, beet greens, and mint) and scattered them throughout Trouble's cage. I used to put his greens in his food dish, but a few years ago I learned it is best to let rabbits use their foraging skills. So now I tuck greens in and around his toys so that he can discover them.
By 7:45 pm, Trouble was ready for playtime. Here, he's trying to get me to play catch with him with his beloved Spool. It is one of his very favorite toys. (And yes, I did put down the camera and play with him.)
Trouble stayed upstairs until around 8:00 pm. There he is on the landing.
Hi, Trouble!
Around 8:30, I cleaned his litterbox, refreshed his water, and gave him his nightly banana ration (one very thin slice), which is one of his favorite treats. He hopped into his cage and immediately started foraging for his greens. Dandelions are his favorites, followed by carrot tops. He always eats those first. I locked Trouble in his cage and wished good night to the best bunny ever.