10/29/21

Coloring Linus and Sally Awaiting the Great Pumpkin

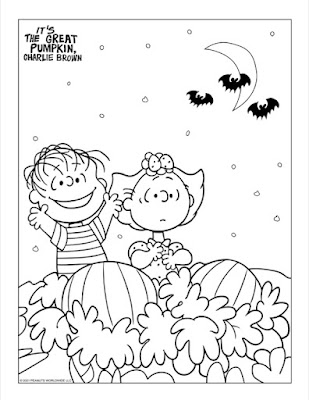
After discovering that watercolor doesn't work well on my new colored-pencil- and printer-friendly cardstock, I wanted to try markers on it. Markers make a great base for colored pencil work. I looked for a fun (and non-pirated) Halloween coloring page and printed this one of Linus and Sally awaiting the Great Pumpkin. It has a large background area that would take forever to cover with just colored pencils, so it was ideal for experimenting with a marker base.


We own It's the Great Pumpkin, Charlie Brown on DVD (affiliate link here and below) and have watched it dozens of times, but I wanted a reference photo to color my page.  This was the closest I could find to the coloring page. 


I was originally thinking that I'd get to practice shadows with this coloring page, but once I looked at the reference photo, I tossed out that idea. With the exception of the sky (which looks like watercolors), each color is a solid fill in a space. Adding shadows or shade variation would change the look of this very classic style. 

I added a quick marker base to my printed coloring page using my Prismacolor markers. As is particularly obvious in the sky, I didn't try for good coverage and made no attempt at blending. My plan was to do that with colored pencil. 


I should note that I was frustrated with the limited number of markers I have. Specifically, I don't have a deep blue, any decent skin tones, or much variety of greens. It's very hard to believe that only four months ago I said "my collection is now big enough to meet most of my coloring needs." Nope! 

Here's what my page looked like after I added colored pencil. 


I was able to fix the skin tone and the greens easily, but I'm not thrilled with the sky. I wasn't able to do as much blending as I'd expected, despite using lots of light layers. It felt like the marker had filled some of the tooth. After three layers, any additional colored pencil I attempted to add just made crumbs and didn't blend. It was frustrating, plus I had a heck of a time keeping the crumbs off of the surrounding areas that were already colored in. I've seen some artists use a makeup brush to sweep away the crumbs; I definitely need one, although I'd prefer not to generate as many in the first place. I'm going to have to do more experimentation to see if the marker base limits how much colored pencil the paper can hold.

As I've been going through my colored pencil class, I've been keeping a list of questions and problems as they arise. I've also been noting things I want to try, as well as techniques and tools that don't appeal to me. I'll share that list next week in hopes that some of you out there can help me!

10/28/21

Halloween Handprints: Witch, Frankenstein, Mummy, Skeleton, and.... Zombie!

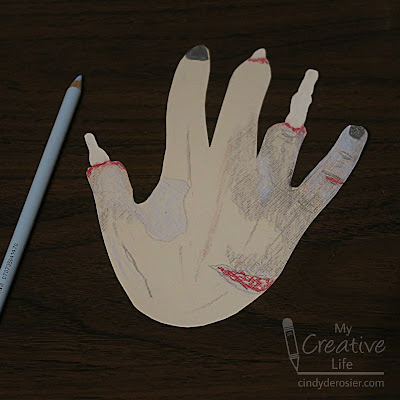
Did you guess that the fifth and final Halloween handprint craft would be a zombie? This was really fun to make, but the most difficult of the five. I don't know anything about zombies, having never watched nor read a zombie show, movie, or book. In fact, my entire knowledge of zombies comes from the 2013 Mythbusters Zombie Special. Which, I suppose, isn't nothing. But I wasn't paying much attention to the extras' hands, unfortunately.

In retrospect, I think my hand looks a little too fresh. I'm pretty sure this is the first time I've ever looked at one of my crafts and thought, "You know what this needs? More decay."


Zombie Handprint


Materials:

  • off-white cardstock
  • scissors
  • colored pencils

Steps: 


Trace your hand onto a piece of cardstock. Trim away the flesh portion of a few fingers so that the bones show. I eliminated two joints' worth of flesh on my ring finger, one on my thumb, and just a little bit on my middle finger. 


I started by roughing in the areas of bloody and peeling skin, then added dark fingernails. 


I gave the whole hand coats of greys, blues, greens, and browns. After blending the colors, I added back some lines in the skin. 

Here's how all five hands look together:


I'd originally thought I'd hang them together as a banner, then I toyed with the idea of making a handprint wreath. For now, they are taped on the closet door. 


These were a lot of fun to make, but it's time to set them aside and start working on our Halloween costumes. (Yes, start. And it involves my nemesis, the sewing machine. Wish me luck!)

10/27/21

Skeleton Handprint for Halloween

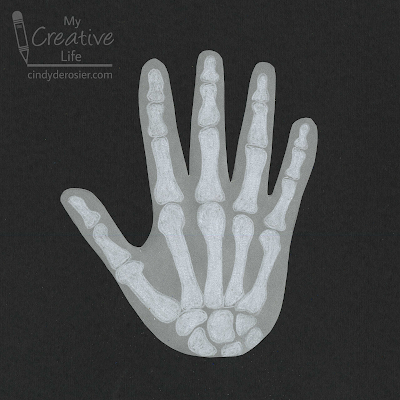
Halloween Hand #4 is a skeleton version of my hand. I've done a skeleton hand (and arm) before, but using a completely different technique. Affiliate links below. 


Skeleton Handprint


Materials: 


    Steps: 

    Trace your hand onto vellum and cut it out with the scissors. Put the printed x-ray onto the light box with your handprint cut-out on top of it. Trace each of the bones onto the vellum. 


    Remove the handprint from the light box and color in each of the bones. 


    Quick and easy and super cool. Tomorrow I'll be sharing my fifth (and final) Halloween handprint craft. Any guesses?

    10/26/21

    London 2019

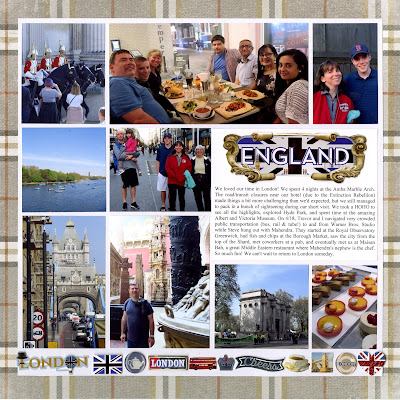
    I finished the final page from our 2019 Europe trip during the Victoria Marie online crop. Ta da!


    For this layout, I started with the photos (as always). I had a heck of a time choosing just a few pictures to represent the scope of what we did during our time in London. I prioritized the people pictures (and managed to include everyone except my dad) and then filled in as many other things as I could fit and still leave room for a title and journaling. I handwrite my journaling 99% of the time, but I opted to print it this time to fit everything in neatly. 

    My favorite thing about this page is the sticker border along the bottom. I was inspired by Victoria's Spooky Border Challenge, which had us create a festive border on a layout. We were allowed to do non-Halloween themes, so this was the perfect chance for me to use a bunch of London stickers that Paper House Productions had sent me. I didn't plan it out; I just started putting stickers down and hoped for the best. I'm really happy with it. I'm going to remember this idea and use it again in the future. It's a great way to embellish a themed page without taking the focus away from the photos. 

    I love that the whole trip is in the album now! It was such an epic vacation with so many great memories. 

    10/25/21

    Mummy Hand

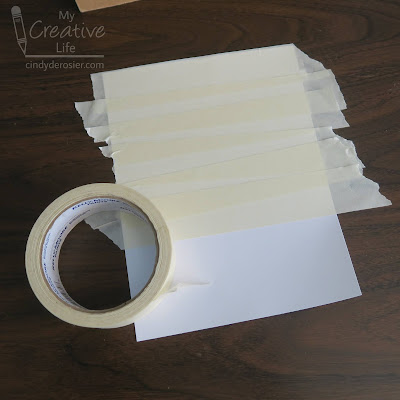
    The third in my series of "turn my handprint into a Halloween-inspired hand" is this mummy. It was the quickest and easiest of the three to make. The key is applying the tape before cutting out the handprint so that you don't have to navigate all the fingers. 


    Mummy Hand


    Materials: 

    • cardstock
    • masking tape
    • scissors
    • chalk

    Steps: 


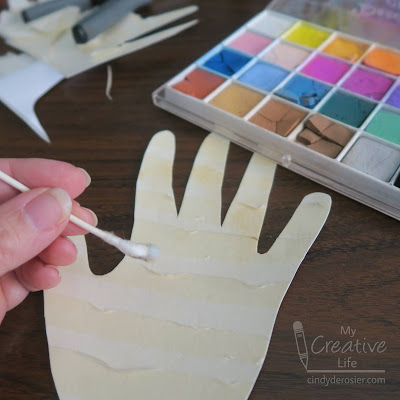
    Start with a rectangular piece of cardstock that is slightly larger than your hand. Cover it with overlapping strips of masking tape. Don't line everything up - it looks better the more carelessly the tape is placed. 


    Trace your hand onto the taped cardstock and cut it out. 


    Use your fingernails or the blades of the scissors to rough up the edges of the masking tape. Peel it back in some places. Then add brown, grey, and black chalk to the roughed-up parts where dirt would naturally collect. 


    Add some 'dirt' in other areas also. When it is suitably grungy, you're done!


    I'm running out of time to add more hands my collection before Halloween gets here. How is it already late October?!

    10/22/21

    France

    I mentioned that I didn't enter Trevor's Raptors in the GHOST Acrostic Challenge, so obviously I have to show you what I did enter in that challenge. 


    This page documents the day Trevor and I spent exploring La Havre, France. G is for grid, H is for heart, O is for one-word title, S is for stickers, and T is for trim. Or tag. GHOST is actually a pretty easy acrostic for scrapbooking. 

    With this page done, I only have a single layout left for our 2019 Europe trip. I'll share that next week. 

    10/21/21

    Trevor's Raptors

    Last weekend, I participated in an online crop with Victoria Marie Designs. The theme was Crafty Mysteries and everything was Halloween-inspired. I love Halloween, but I'm up to date with my Halloween scrapping (until the 31st when I take new photos). So I had to make the challenges work for the photos I had. Fortunately, Victoria is very flexible when it comes to what counts for her challenges! 

    The first page I completed was this:


    Trevor has always loved birds of all kinds (second only to rabbits). When he was young, my mom had him select a bird to adopt from the Alaska Raptor Center in Sitka. Since then, it's become a tradition for him to select a different species the following year. The adoption packet includes a poster of the raptor-in-residence, which Trevor hangs in his bedroom. I scanned the posters, used PicMonkey to put group pairs on a 4"x6" print, then cut them apart to make the layout. 

    I'd originally intended submit this layout to the GHOST Acrostic Challenge (G is for green, H is for heart, O is for owl, S is for stripes, and T is for tiny title), but I ended up making a different GHOST layout. So this one is now entered in the Traditions Challenge. I'm really happy with the finished page. 

    10/20/21

    Dracula Smores

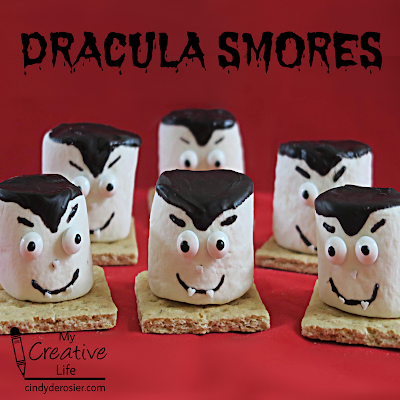
    Smores aren't just for summer. Nor are they just for camping. They are just as appropriate indoors for Halloween. Evidence: 


    I had so much fun making these! They came out exactly how I'd hoped. Affiliate links and cooking suggestions below. 


    Dracula Smores


    Materials:


    Steps: 


    Prepare the Candy Melts according to the package directions. You'll need about 1.5 discs per finished smore. (I used 8 discs for 6 smores and it was just right.)

    Dip the top of each marshmallow into the melted candy, then turn it to allow the candy to start to drip down one side to make Dracula's famous widow's peak. Stop the dripping by turning it upside down again. Within 20 seconds or so, it will firm up enough not to drip anymore. 


    Use a toothpick to dab a small amount of melted candy to the back of the candy eyeballs and place them on the face. The dip the end of the toothpick in candy and press it to the marshmallow, just above the eyes, to make the eyebrows.


    Use the toothpick to make a tiny dot for the nose and attach a white heart sprinkle. Draw a melted candy mouth with the toothpick and attach two heart sprinkles to make the fangs. I had to warm up the melted candy halfway through making my six Draculas. 

    Place the Draculas on top of graham cracker halves. You can put a dollop of melted candy down first if you want them to stay in place. I didn't, because I wanted to experiment with cooking my smores. 


    Experiment 1: Microwave. 

    I set one smore on a plate and put it into the oven for 45 seconds at 50% power. As expected, it puffed up huge. I didn't not expect the eyeballs to pop off, nor for the face to basically melt away. 


    Verdict: Quick, and easy, but with no browning it's missing most of what's good about smores. Not to mention, the end result is decidedly not adorable.  2/10


    Experiment 2: Stovetop.

    I poked a skewer into a Dracula and heated it over the stovetop, attempting to get a perfectly-golden toast while not letting anything drip or drop into the stove and make a huge mess.


    Verdict: Not as quick and easy as the microwave, and definitely less safe. The eyes slid a bit despite my efforts to keep that side up. The back of the marshmallow got some nice browning and I was able to get some gooey melting going on.  5/10


    Experiment 3: Toaster Oven. 

    I must have been feeling confident, because I put two smores on foil into the toaster oven with the setting on TOAST. Within 30 seconds, their eyes started sliding downhill and their tops were bubbling...


    ... so I took them out, laid them on their backs, and put the eyeballs back where they belonged. Then I slid them back into the toaster oven. 


    When their faces had a decent tan, I took them out and set them back up on their graham crackers. 


    Verdict: This took more effort than the other methods, but it yielded the best browning and melting. I was concerned that the hair was burnt, but it wasn't. It tasted like the sugar on top of creme brulee and was nice and crackly. Yum! I think if I'd used white candy melts to attach the eyeballs, it wouldn't be as obvious that they're drooping in the finished Dracula. Next time.  7/10

    Enjoy!

    10/19/21

    Frankenstein Hand

    I loved my witch hand so much that I thought about making enough to link them together for a banner. Later, I realized it would be more fun to have a banner with a bunch of different Halloween hands. I'm not sure how many I'll eventually do, but for now I have one more: Frankenstein! (Technically, Frankenstein's monster, but whatever.) 


    Frankenstein Hand


    Materials:

    • cardstock (light green, cream)
    • microtip scissors
    • colored pencils
    • craft glue


    Steps:


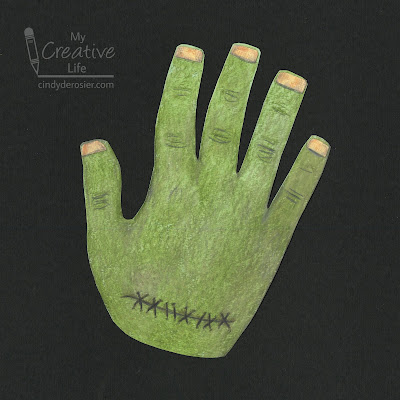
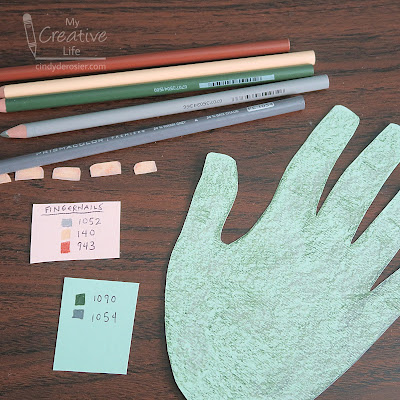
    Trace your hand onto the light green cardstock. Cut out the hand, then snip off the last 1/4" of each fingertip. Round just the corners of the snipped-off fingers. Use green and grey colored pencils to add knuckle lines and shadows, then shade in the hand.  

    Cut five tiny rectangles from cream cardstock. Each should be the width of one of your fingernails, but much shorter. Shade them with grey, cream, and brown to look like old, diseased fingernails. 


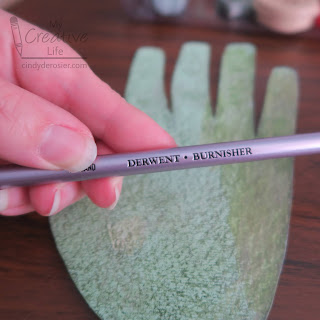
    As an aside, if you've been following my colored pencil journey, you know that I'm eager to try out what I've been learning. When I was cleaning up after finishing my pencil inventory, I found an unopened package with a Derwent burnisher and blender (affiliate link) in with my pastels and charcoal pencils. I have no idea when I got them. I tried both on the Frankenstein hand to get a feel for them. 


    You don't need to do this for your Frankenstein hand. But you can. 

    Use a dark grey to draw knuckle lines and a row of stitches. I have no idea if Frankenstein's (monster's) hands are stitched on versus already attached to 'donor' arms, but I like the look. It makes it more Frankenstein ('s monster) than random ogre.

    Finally, glue the fingernails in place. 


    I'm excited to start working on my next Halloween hand. So many ideas... I'm not sure which to do next. 


    10/18/21

    Coloring State Butterflies

    Fun fact: 48 of the 50 states have an official state insect. (The two that don't are Iowa and Michigan.) Some states have named more than one state insect, where others have multiple categories of insects. For example, Alabama has a state insect, a state agricultural insect, and a state butterfly. (Oddly, their state insect is a butterfly, but they named a different butterfly as their state butterfly.) Delaware has a state bug, a state butterfly, and a state macroinvertebrate. Tennessee has the most, having designated two official state insects, a state agricultural insect, and a state butterfly.  

    It's the butterflies that I'm focusing on today. 

    There are 29 states with either a state butterfly or state insect that's a butterfly. Seven are monarchs, and one is a Mullerian mimic to a monarch. I've made a couple of monarch crafts fairly recently, so I wanted to focus on some of the other state butterflies. And, of course, I've been working obsessively with colored pencils lately, so that's what I used. 

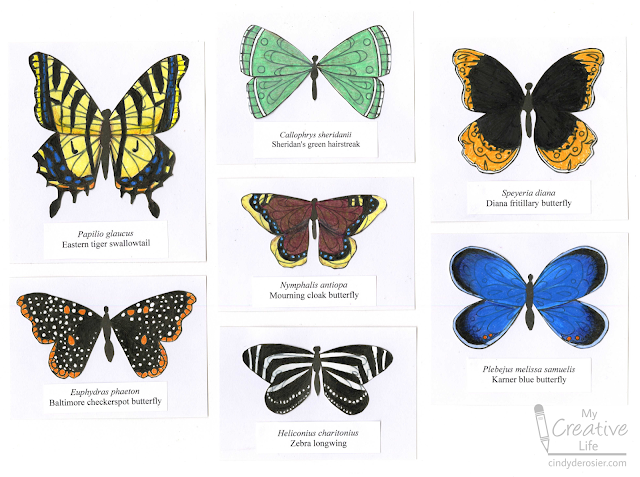
    Here are the seven butterflies I made, representing: Alabama, Delaware, Georgia, North Carolina, South Carolina, and Virginia (Eastern tiger swallowtail); Arkansas (Diana fritillary butterfly); Florida (Zebra longwing); Maryland (Batimore checkerspot butterfly); Montana (Mourning cloak butterfly); New Hampshire (Karner blue butterfly); and Wyoming (Sheridan's green hairstreak). 


    In retrospect, I made things WAY harder for myself than necessary. Rather than drawing the butterflies myself, or printing out line drawings, I used a black pen to alter an existing coloring page from a Leisure Arts coloring book (affiliate link). I went through all the state butterflies and the seven drawings on the coloring page to decide which images would work for which butterflies. Then I started blacking in the changes. It was very tedious and took much (MUCH) longer than drawing them would have. Not to mention, I was left with lines from the original designs that didn't belong. Nevertheless, I pushed on. 

    Here you can see that I've begun altering the butterfly on the bottom right of the page. I'd originally started to change it into an Oregon swallowtail (which is why you see "Oregon" written above it) but I ended up making the similar Eastern tiger swallowtail. You can see in my notes that I planned to turn the butterfly directly above the sentiment into "Arkansas or Colorado." I went with Arkansas' Diana fritillary butterfly. 


    Here are each of the butterflies fully colored, along with my notes. You can also see a few places where I swatched my colored pencils. 


    The next step was fussy-cutting all the butterflies. That took awhile, too. 


    Finally, I mounted each butterfly on white cardstock and added a typed label with the scientific name and the common name. I love the way the butterflies all look together. 


    This was a challenging project that taught me a lot. Someday I might redo these (drawing them by hand instead of starting with lines that shouldn't be there) and adding in the remaining state butterflies. But it's not going to be anytime soon. I'm officially taking a butterfly break. 

    10/15/21

    Witch Hand with a Spiderweb Manicure

    I love handprint crafts. It's so much fun thinking of clever ways to transform a handprint into something entirely different. This time, I turned my handprint into....  a hand.  


    A witch hand, to be specific. So it's not the most clever transformation of all time, but it was really fun to make. Affiliate links below. 


    ---------

    Witch Hand with a Spiderweb Manicure


    Materials:


    Steps: 


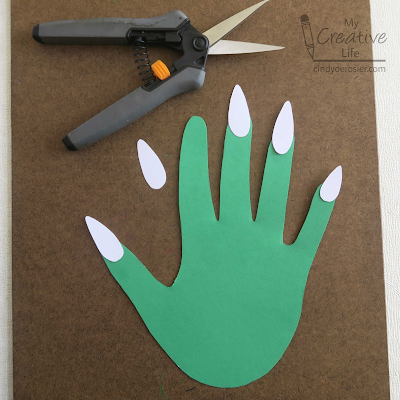
    Trace your hand on green construction paper and cut it out with microtip scissors. Cut a pointy nail for each finger from black cardstock. (I used white and ended up coloring the fingernails black with a Sharpie. Save an unnecessary step and start with black cardstock.)


    Use the back of your hand as a guide to draw knuckles, lines, and shadows on the witch's hand. Add texture to the skin by lightly coloring in small circles over the lines you've drawn. Add moles/blemishes as desired. Draw a spiderweb pattern on the fingernails using the white pen, then glue the fingernails to the hand. 

    I love the way it turned out. I'm tempted to make enough for a banner, which is exactly how I'd display them if I had a classroom's worth of witch hands. 

    10/14/21

    Printable Halloween Tags to Color

    I've worked my way through almost all of Sarah's coloring videos and have learned so much! I mentioned awhile back that I'd found her video about the best paper for printing coloring pages to be extremely helpful. Based on her recommendation, I ordered a pack of Neenah Bristol Vellum (affiliate link here and below), waited impatiently for it to arrive, and crossed my fingers that it would work with our printer. I'm happy to report that it does! 

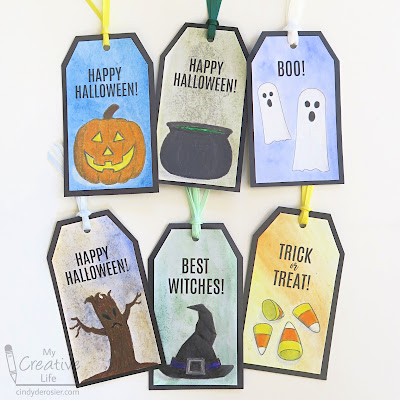
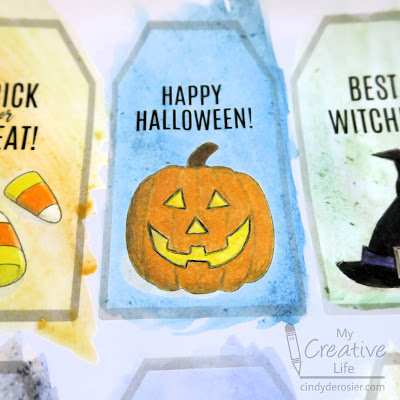
    My first project was making Halloween tags. 


    I started by designing the printable using PicMonkey. I printed the text at 100% but faded the borders and the graphics to 60%. (You can download it (for free) here.)


    I used my Prismacolor Premiers to color the images and was delighted with the way the colors laid down on the bristol vellum. I was particularly pleased with the shadows on the candy corn and the hat, as well as the shading on the 'white' ghosts. My plan was to add a watercolor background to the tags... 


    ... which ended up being a not-good idea. When I tried to go any sort of blending, the paper pilled. And my subtle grey shadows ended up looking weirdly white. 


    But no matter. I learned a lot. And by matting the tags with black cardstock and adding coordinating ribbon, the tags don't look half bad. 


    I'm going to have to do some experimenting with watercolors over colored pencil using a more appropriate paper for wet media. I also want to try using the colored pencils over watercolor to see the difference.

    10/13/21

    Candy Corn Character

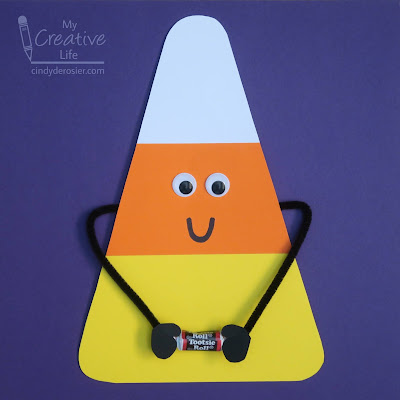
    It's a proven fact that googly eyes make everything cuter. Add them to a construction paper candy corn and you have cuteness overload. Not only is this guy adorable, but he'd like to offer you some candy. Affiliate links below. 


    Candy Corn Character


    Materials:


    Steps:


    Cut the yellow cardstock into a piece approximately 6"x4", the orange 5"x4", and the white 4"x4". Layer the pieces with a slight overlap and glue them together, as shown below. 

    Use a centering ruler (or eyeball it) to find the center of the white cardstock. Mark it with a dot. Extend that line an equal amount (about 1/4") in each direction and mark those points. Use a straight edge to draw lines from each corner of the yellow to the points you just drew. 


    Cut along the two lines to form a triangle. Then round off the three corners to make the iconic candy corn shape. 

    Glue the googly eyes in place, then draw a Sharpie mouth. Cut a pipe cleaner in half, then bend them to form arms. Glue them to the back of the candy corn. Cut two hands/gloves from black and glue them to the ends of the pipe cleaner pieces. 


    When the craft glue is dry, use a Glue Dot to attach the candy to the candy corn. If you're careful, you'll be able to remove the candy in the future without damaging your character. 

    Are you a fan of candy corn? For fun, I searched "weird candy corn" to see what came up and I was not disappointed. Perhaps I can interest you in these, um, unique flavors

    10/12/21

    The Influence of Light

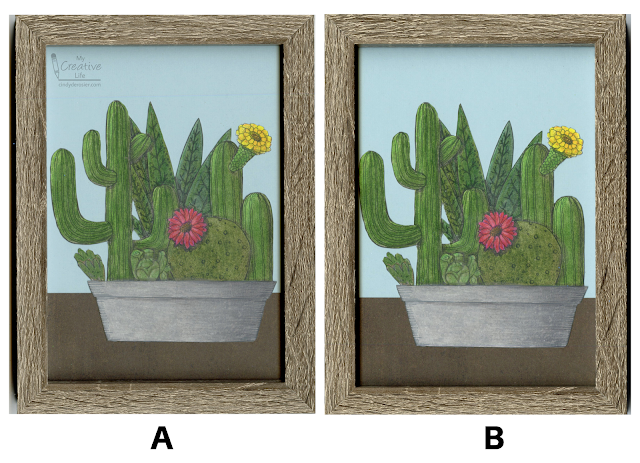
    Which do you prefer, A or B? What do you prefer about it? 


    Both A and B are scans of exactly the same thing, a framed image of a pot of cacti. Yet, the same item scanned with some subtle differences. And it's one of those differences that makes me prefer one over the other. 

    To back up a bit, I have a few more frames that match the one I used to frame the Love Grows images for my mom. So I chose another image from the same book to color and frame for her. It was a fun challenge to make the cacti all look distinct and to consider where the shadows would fall amongst so many overlapping things. I'm learning more every time I practice, so I'm not beating myself up over the mistakes. My mom will neither notice nor care. 

    I popped the completed frame on the scanner and got this:


    My eye went immediately to the cactus on the left. It looks like it's directly up against the frame, but it is not. The shadow makes it look that way. This confused me. Since the frame was directly on the surface of the scanner, the light shouldn't be directional, right? Wrong. When I turned the frame 180° and scanned again, I got this:


    The shadows are on the opposite sides, which allows the bit of blue that's actually there on the left to show. (It also shows a faint line across the blue, just above the cactus. It's actually there on the other one, but because it's in the brown and lined up with the pot, it's much harder so see. I hope it means the scanner needs cleaning and not that it is damaged or starting to fail.) 

    Here are the scans side-by-side again:


    While I prefer the alignment of A because the left side has a tiny bit of breathing room, the colors of B look brighter and more natural to me. The colors are not actually different. It seems that way because of the shadows. 

    In A, the shadows of the frame fall to the left. In B, they fall to the right. Since I colored the cacti with the light source on the left and the shadows to the right, the frame's shadows in B match those of the colored image. Of course, in real life, the location of the frame's shadows depends on where it is hung and what the light sources are. 

    Despite all the time I've spent in art museums, I've never appreciated the effort that must go into lighting the pieces correctly. I'm going to be paying close attention to that next time.