4/29/16

The Latest Round-Ups from Fun Family Crafts (Part 3)

Here's the most recent batch of Fun Family Crafts round-ups I've created. 

There are so many cute Lego crafts on our site. It was hard to pick only ten to feature. My favorite is the ridiculously simple Ninjago cupcake wrappers. I wish I'd thought of that!


Putting together the Chinese New Year round-up was surprisingly challenging. Why? Because so many of the crafts are specific to one animal in the zodiac. While I'd love to have shown some of the awesome dog, pig, monkey and rabbit crafts, for example, each of those is only suitable for Chinese New Year one year out of twelve. Instead, I had to choose crafts that would work for the holiday year after year.


I love making the title blocks for the photo collages. It's so much fun picking out the colors, fonts and styles to match each theme. Yellow, purple and green were the obvious choice for the Mardi Gras Craft round-up.


We have a LOT of Valentine's Day crafts. Well over 600, in fact. There are tons of ideas for homemade valentines, valentine boxes, gifts, decorations, treats and more.


President's Day was an interesting round-up to make. We have tons of patriotic crafts, but not all of them fit for President's Day. I needed to make sure Washington and Lincoln were well-represented, and that there were options for all ages.


The round-up of Dr. Seuss crafts was another favorite of mine. For this one, I broke the rule about limiting the round-ups to crafts that are appropriate year-round. I absolutely HAD to include the Grinch craft.


The Star Wars round-up isn't new, but I updated the graphic to make it more eye-catching for May the Fourth. 


And finally, that brings us to the Cinco de Mayo round-up, the one that reminded me that I haven't shared the round-ups I've been making since September!

 
I make all of the round-ups using the premium version of PicMonkey. I love it. The free version is great, but I appreciate all the extras the upgrade offers.

4/28/16

Little Passports - WINNER!

Thank you to all who entered to win the three-month subscription to Little Passports! I wish I could declare you all winners, but alas, I cannot. For those of you who didn't win, I'd encourage you to take advantage of the $15 off promotion that Little Passports is currently offering and get started with your Global Adventure! And don't forget about the World Coin Collection from Little Passports. This is a great option for those who don't want to commit to a subscription or prefer something less expensive. 


---------


Now it's time to announce the winner! Congratulations to... 

SHAWNEE RELEFORD

Please email me at cindy.mycreativelife at gmail.com with your address and whether you prefer the US Edition (ages 7-12) or the World Edition (ages 6-10). As soon as I hear from you, I'll pass your information along to Little Passports so they can get your subscription started. Enjoy!

Huge thanks to Little Passports for sponsoring this giveaway! And, of course, for being awesome and providing a product that Trevor loves and that has encouraged his passion for t

The Latest Round-Ups from Fun Family Crafts (Part 2)

Today I'm sharing the next batch of round-ups I've for my job at Fun Family Crafts. These are the ones I made over the winter.

First up, Advent Crafts. I'm prone to ranting when people mistake Advent with the 12 Days of Christmas and assume (wrongly) that both run from December 1-12, so it was a joy to highlight 10 crafts that are actually about Advent. Do you spot mine in there? 


Next was Ornament Crafts. We have a lot of ornament crafts. It was really hard to narrow down the choices and feature ten of the most eye-catching and diverse.


I was pleasantly surprised at the wide variety of Christmas tree crafts we have. Two of mine are in this round-up. But I barely notice them, since my eyes go straight to those tempting brownies. 


Next, Candy Cane Crafts. We have a good mix of crafts that use candy canes to look like something else, and crafts that use something else to look like candy canes.


Our Gingerbread Crafts include edible and non-edible options.


I really enjoyed doing the round-up of Nativity Crafts. I'm in love with the gorgeous silhouette version with the beautiful blue sky.


Snowflake crafts are lots of fun, especially for those of us who live in places where it doesn't snow.


Wow, I used almost exactly the same layout for the Polar Bear Crafts round-up as the Snowflake Crafts round-up. I hadn't realized that before.


One more today: Puzzle Crafts. Most of these crafts use puzzle pieces to make something else. This is an excellent resource for someone who, hypothetically speaking, receives the worst customer service ever from a puzzle company and has a lot of extra pieces laying around.


Tomorrow I'll share another batch of round-ups, which will get me caught up with all the ones I've made so far.

4/27/16

The Latest Round-Ups from Fun Family Crafts (Part 1)

Before getting to today's post, I want to remind you that today is the last day to comment to win a 3-month subscription to Little Passports! Don't miss it! Go here to leave a comment.

---------

Yesterday, I mentioned working on a Cinco de Mayo round-up for my Fun Family Crafts job. When I linked to the post about my job, I realized I hadn't mentioned my job or shown the round-ups I've been making since September. Time to fix that! 

I can't believe I haven't mentioned it, but I was promoted to Editor of Fun Family Crafts in January. My responsibilities are mostly the same, with a few more things added in. Basically, I do the day-to-day editing and scheduling, I answer questions from submitters, and I recruit awesome crafters to submit their projects. (You, perhaps?! If you have a kid-friendly craft tutorial on any topic, submit it here: http://funfamilycrafts.com/submit-a-craft/ and there's a good chance I'll feature it and drive some traffic your way!)

The workload at Fun Family Crafts is very seasonal. As you might imagine, we get a ton of submissions before major holidays. We also get a lot of submissions before days you might not consider holidays, but are major in the world of kids' crafts... like Dr. Seuss Day. During those time periods, I'm really busy with editing and scheduling. When things slow down, I switch over to maintenance and promotion tasks, such as cleaning up the search tags and creating craft round-ups. I was going to show all the round-ups I hadn't already shared in this post until I realized how many I've done! Waaaay too many for one post! Today I'll share just the ones from fall.

Let's start off with Leaf Crafts. We have over 130, with a pretty good split between crafts made from leaves and crafts made to look like leaves. My favorite by far is the bouquet of roses made with leaves. So creative and absolutely gorgeous.


I really enjoyed putting together the Peanut Butter Crafts Round-up. Two of mine made the Top 10 cut. Do you recognize them? 


We have less than 20 elephant crafts, which is usually the cut-off for a round-up. But it's a commonly searched craft on the site, so I included it. Elephant crafts are on my list of "always on the lookout for..." 


The round-up of clock crafts was one of my least favorites to do. For each round-up, I try to get as much variety in the highlighted projects as possible. With only 20-some clock crafts, it was hard to pick 10 that represented a wide range of crafts, since many of them looked very similar. But the Won Ton Clocks are awesome enough to make up for that.


Next, Popcorn Crafts. The tricky thing about this was not including anything that was blatantly holiday-specific. People craft with popcorn year-round, but they don't tend to make popcorn Christmas trees or Frankensteins year-round, so the round-up should reflect that. I did end up highlighting the popcorn Halloween costume, because how could I leave it off when it is so cool?! 


Finally, Pilgrim Crafts. Oddly, I have never made a pilgrim craft. Except as a kid, that is. But with over 40 on Fun Family Crafts, it's not a category that's hurting for options!


Tomorrow I'll share the round-ups from winter.

4/26/16

Painted Saguaro Cactus

There's a fair amount of overlap between my Fun Family Crafts job and the kids crafts I make. A few days ago, I started working on a round-up of all the Cinco de Mayo crafts we have at Fun Family Crafts. After searching through them all, I was inspired to do a cactus craft. Specifically, a painting. It's easy.


Painted Saguaro Cactus

Materials: Strathmore watercolor paper, Testors Sand CreateFX Texture Paint, Folk Art acrylic paints (green, black, white, brown, yellow), paintbrush, Sakura white gel pen

First, a disclosure: I received the paints from Testors and Plaid as part of the 2016 FaveCrafts Blogger Event. All hyperlinked items are affiliate links, which means you don't pay anything more, but I get a small commission off any purchases. As always, I only endorse products I use and love.


1. Start by spraying the sand texture paint onto the paper. I tried it on a canvas (left) and on the watercolor paper (right) and both covered beautifully. Let the paper dry. 

 
2. Use a dusty green to paint a saguaro cactus on the paper. Keep it simple with just two arms, or add as many as you like. 

3. While the paint is still wet, mix a tiny bit of black paint into the extra green you used to paint the cactus. This will be your shadow color. Decide where the light is coming from in your art, then add a shadow to your painting wherever one would naturally fall. Let the paint dry.


4. The flowers of a saguaro are large and white. During the late spring, they grow at the ends of the main spear and the arms. Add some simple white flowers to your painting, then dot the centers with yellow.

5. While the paint is still wet, add a very, very tiny bit of brown to the white paint. This is the shadow color for the flowers. Add it to the still-wet flowers where the shadows would naturally fall. Let the paint dry.

6. The spines of the saguaro grow along its ribs, so use the white gel pen to draw parallel columns of spines on the cactus. The spines follow the curves of the arms, so curve those columns of spines accordingly.  


I think my next cactus project is going to be a silhouette against a sunset. 

4/25/16

Trevor at 9

Trevor's annual birthday layout:

 
This time I described Trevor as smart, happy, creative, trustworthy, hardworking, cooperative, neat, talented, helpful, careful, responsible, cheerful, patient, mature and generous. Six of those were on last year's layout. I wonder... how many have been on the list every year? One of these days, I'm going to have to go back and check. It would be cool to use my yearly lists to do a Wordle-style layout for Trevor at 10.

4/22/16

Edible (and Healthy!) Olympic Rings Craft

After making the bracelet inspired by the Olympic flag, I wanted to see if I could make an edible Olympic ring craft. But rather than go the obvious route, like colorful sprinkles on donuts or candies on cupcakes, I set out to make a healthy version that I'd feel good about serving as a lunch or snack. Mission accomplished!


-------

Edible (and Healthy!) Olympic Rings


Materials: 5 slices of soft sandwich bread, biscuit cutters (two different sizes), whipped cream cheese or plain yogurt, blueberries, blackberries, strawberries, pineapple, and spinach (or same-color substitutions)

1. Use the large biscuit cutter to cut circles from each slice of bread. Press straight down, twist slightly, then lift up to get a clean cut. Use the smaller biscuit cutter to remove the center of each circle. (Set the small circles and crusts aside. You won't be using them. I used the small circles to make mini sandwiches and cut the crusts up for my next bread pudding.)


2. Prepare the fruits and vegetables. Cut the blackberries into quarters, dice the strawberries, mince the pineapple, cut the blue(ish) part off the blueberries, and tear the spinach into small pieces.

3. Spread a thin layer of cream cheese or yogurt on each ring, then arrange the produce neatly on top.


4. Place the rings on a white plate with blue, black and red in the top row and yellow and green below. Enjoy!


This would be a fun do-it-yourself snack for an Olympics-themed party. Pre-cut the fruits and veggies, then let the kids cut the rings, spread the cream cheese, and decorate. Yum!

I chose these foods for their colors, but also because Trevor loves them. But it's easy to substitute to accommodate allergies and preferences. There isn't a great substitute for blue without going artificial, so you're stuck with blueberries if you want to stay natural. For the black ring, try olives or raisins instead of blackberries. Raspberries and tomatoes work just as well as strawberries for the red ring. For yellow, try corn kernels or mangoes instead of pineapple. Peas, broccoli, and green grapes are excellent substitutes for spinach. 

4/21/16

No-Snow Trip

I'm happy to announce that another layout has been unburied from the half-done pile, completed, and added to the scrapbook. I'd been struggling with how to scrap last year's "snow" trip. Due to the drought, there was almost no snow. The photos were an odd mix of the browns and greens of the Sierras, snow photos from our day on the slopes, and egg dyeing and egg hunting on Easter morning. After trying and rejecting numerous color schemes, I embraced the oddness and came up with this:


Now we'll forever remember 2015 as the year of our no-snow trip.

4/20/16

Update on Little Passports 50 States Album ... and a Giveaway!

Time for another update on Trevor's Little Passports 50 states album! You may remember that Trevor's Aunt Teri gave him a subscription to the USA Edition of the Little Passports monthly kit for Christmas 2013. After an initial welcome package, Trevor received a monthly package with travel journals, stickers, postcards, 3-D models and more, focused on two different states. This continued for 25 months until he had received the kits for all 50 states. Trevor LOVED it. Seriously - best gift ever. 

After a few months, Trevor and I started removing the postcards from each kit and putting them into a 50-page album to document Trevor's first visit to each of the 50 states. Each page has the Little Passports postcard on top, journaling in the middle, and a photo of Trevor in that state at the bottom. You can see Trevor's completed pages here:


Trevor has visited two states in addition to the ones listed. We'd been waiting for the last packets to arrive to get the postcards to complete the pages. Here are Nevada and Maine:


While we are both very disappointed that we've come to the end of the Little Passports USA Edition, we are excited to keep filling in his 50 states album. If all goes as planned, Trevor should be visiting his 15th state this summer. With 35 more states after that, there will be plenty of traveling ahead for the deRosiers!

I can't say enough good things about Little Passports. It's a GREAT gift for your children, grandchildren, nieces and nephews, godchildren, or any other special kids in your life. Or, if you're looking for a one-time gift rather than a subscription, may I suggest the Little Passports World Coin Collection?

I was an avid coin collector as a kid. Trevor loves going through the coins he's gotten during our travels or the ones family members have brought back for him from places they've been. Coin collecting such a fun and affordable way to learn about the world. The Little Passports World Coin Collection includes 20 coins, a storage pouch, a magnifying glass, and a booklet with coin activities and trivia. I haven't seen it in person yet, but Trevor's birthday is coming up in June and I'll know more then. :)

In the meantime....  you might have noticed the word GIVEAWAY in the title of this post. That's right! One of you will win a 3-month subscription to the USA Edition or the World Edition, generously provided by Little Passports. For a chance to win, leave a comment by Wednesday, April 27 telling me who would receive the subscription and why you think he or she would enjoy it. The recipient must live in one of 16 countries, found on the bottom right of the Little Passports homepage. Good luck!

4/19/16

3rd Grade

We're in the final stretches of 4th grade, so I'm happy to get 3rd grade done and into the album.


I'm hoping to make a good dent in the pile of half-done layouts so that I can start with a clean slate for National Scrapbook Day. Eighteen days to go!

4/18/16

Giveaway Winners!

Time to announce the giveaway winners!


I put random.org to work selecting three comments from the 200+ left the past two weeks. Congratulations to.....
        • Kelly Sasman
        • Amy Martin Jones
        • Doreen Vasquez

By happy coincidence, each of these ladies left a comment on the Sneak Peek letting me know which goodies caught her eye and there was almost no duplication between them! So each will get 1/3 of the goodies, including one or more of the items she mentioned. Kelly, Amy and Doreen, please email your address to me: cindy.mycreativelife at gmail.com. Thanks to all who left such wonderful comments.

Olympics Bracelet

I'm not a sports fan by any stretch of the imagination, but I do love the Olympics. The Summer Games open in Rio in just over 3 months and I'm really looking forward to watching as much as I can. I *think* I have convinced Trevor to go with an Olympics theme for his birthday party this year. There are so many possibilities for fun crafts and activities.

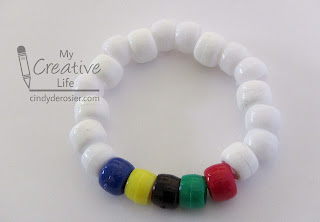
I love the symbolism behind the Olympic flag. The five interlocking rings are said to represent the 5 continents that come together for the Oympics. The colors of the flag (blue, yellow, black, green, red and white) were the colors of the flags of all nations at the time it was designed (1912). Here's a really simple and inexpensive bracelet inspired by the Olympic flag that would work equally well as a party activity or a favor. Affiliate links below. 


-------

Olympics Bracelet


Materials:


Steps: 


Cut a piece of clear stretch cord about 2-3 inches longer than the desired wrist circumference. Attach to a binder clip to one end (to prevent the beads from fall off one end as you thread them on the other). Start threading the beads on the cord, beginning with 8 whites. Then add 1 each of blue, yellow, black, green, and red. Add 8 more whites and test the fit. Add or subtract white beads until the bracelet is the correct size.

To finish your bracelet, remove the binder clip and tie the ends together tightly using a normal overhand knot (the first step in tying a shoe). Tie a second knot using a surgeon's knot. It is basically the same thing as an overhand knot but you put the end through the loop an extra time. Pull tightly to secure it. Trim the excess cord or thread it back through the beads to hide the ends. You can add a drop of glue to the knot to make sure it's extra strong, but it's not necessary.

-------

I'll announce the winners of the giveaway later today. Good luck!

4/15/16

A Day in San Francisco

Just about this time last year, Steve's manager (Andy) came to visit California. Steve works from home for a company in Ohio; Andy recently moved to Ohio after living and working in England all his life. He'd been to Southern California once before for business, but this would be his first time in Northern California. We were excited to show him the sites. Topping Andy's list of must-sees was San Francisco.

We live about 45 miles from San Francisco, so we have been there many, many times, but it was great fun to explore the city with a first-timer. At Andy's request, we started the day with a cable car ride... which was something neither Steve, Trevor, nor I had ever done! I guess when you live close enough, you don't always do the touristy things that you would when visiting on a vacation. Trevor and I started an alphabetical photo contest to pass time while we waited and continued it throughout the day. So much fun! From the cable car stop, we walked to Fisherman's Wharf, had lunch at Boudin, and watched the sea lions at Pier 39. From there, we drove to Ft. Point and toured, then walked across the Golden Gate Bridge. No matter how many times I walk across it, I'm always surprised at how cold and windy it is compared to the rest of the city! We drove out of SF over the Golden Gate, then stopped for In N Out burgers on the way home so that Andy could try another iconic California item. It was a fantastic day.


When it came time to scrap the day, I decided to go with a grid-style layout inspired by Polaroid photos. I cropped each picture, then matted it in white with a larger border at the bottom to house the journaling. I glued them haphazardly to the page (which made me twitch a bit), then added a title card in my handwriting with a laser-cut Mrs. Grossman's sticker of the Golden Gate Bridge. It was a really fun page to put together.
4/14/16

April Photo Challenge: Eye Bombing

For my April photo challenge, I decided to skip the scavenger-hunt style lists I used for January, February and March and do something different.

 
I know. It's a bit shocking. But different can be good.

 
Unfortunately, there is something wrong with my camera. I depend on it for all my blogging, so I'm somewhat lost without it. Aaaagggh!


All of these photos were taken with Trevor's camera. I'm not used to it and am frustrated trying to get shots I know I could get with my own camera.


I'm trying to keep a stiff upper lip and just deal with it.


Sometimes I'm satisfied with the photos I get.


Often, I'm not.


I probably should do something about getting it fixed or looking into a new camera, but frankly I'm hoping that woodland creatures will come in the night and solve the problem for me.


I suppose I could try to improve my skills using Trevor's camera....


"Do or do not. There is no try."


"You have learned much, young one."

-------

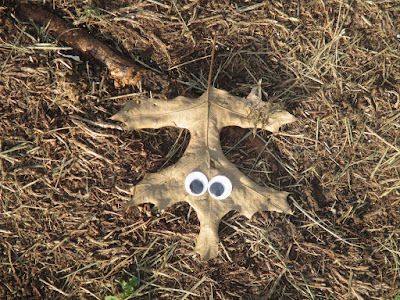
If you've never tried it, I highly recommend Eye Bombing! Get some self-adhesive googly eyes (affiliate link) or regular ones and a dry repositionable adhesive, then grab your camera and head out. I took all these photos within a few blocks of our house. As a firm believer in Leave No Trace, I put the googly eyes in place, took the photograph, then picked them back up. It was so fun looking at ordinary items we see every day and trying to find a face in them!