10/5/12

Every Two Years

Every two years, usually in early October, our lives come screeching to a halt.  We cancel plans, change our routines, and spend hours and hours around the kitchen table.  It's because of these: 


They're pistachios, still in the hull.  My parents have two pistachio trees, which produce many pounds of pistachios every two years.  (Whatever you're imagining, multiply it by about 20.)

The hulls need to be removed as soon as possible.  The process is simple, but incredibly tedious.  One by one, you take each pistachio...

 
... make a tear in the hull...

 
 ... and remove the hull to expose the nut in its shell.
 
The first hundred or so are really easy.  It goes quickly and you're convinced you could go on forever.  The next hundred are more difficult, as your fingers become sore and sticky.  The next thousand (million?) seem to take forever.  But many hands make light work, which is why we all drop everything and work together to get them done. 

Here we are, finishing up this year's crop.  (Steve was there too - I just didn't photograph him.)


And for fun, here's Trevor and Grandma hulling pistachios in 2010:


And here they are in 2008:


Once you have the hulls removed, you can eat the pistachios raw if you want - they're pretty good (though very different than the roasted ones you buy).  But you can't store pistachios longer than a week or so without roasting them.

Before we roast them, we brine them using a mix of 2 oz salt with 4 oz water.  The pistachios simmer in the brine until the water has evaporated.  Then we spread the pistachios on baking sheets and roast them in a 250 degree oven for about 2 hours, stirring them every half hour.  With the number of pistachios we have, it's an all-day process.

But it is well worth it.  In the end, we have a 2-year supply of pistachios in our pantry, with some set aside to give as gifts.  And considering that $10/lb. is about the cheapest you'll find for bulk pistachios in the shell (shelled and/or packaged are much more expensive than that), a few days' worth of labor saves us a lot of money.

 
You know, I probably should make a note on the calendar now that we'll be busy with pistachios in October 2014!

10/4/12

Scarecrow Art

Even though the temperature outside is in the high 90's, the calendar says October.  And that means that we need to get some fall art up on the walls.  So Trevor and I made some scarecrows.    


Materials: watercolor paper, pencil, black Sharpie, yellow Sharpie, watercolor pencils, paintbrush and water.


Begin by lightly sketching a scarecrow onto the watercolor paper.  Use the yellow Sharpie to add straw along his neck, under his hat, and poking through any patches.  

 
Trace over all the pencil lines using the black Sharpie.  


Lightly color your scarecrow using watercolor pencils.  


Use a fine brush to add water and what looks like colored pencil turns to watercolor paint. 

 
At this point, Trevor remembered that he had a baby puzzle shaped like a scarecrow.  He insisted I dig it out so that he could use his puzzle for color inspiration.   
 
After Trevor studied the colors carefully, he decided to go with his own ideas.  He really wanted a sunset background instead of a blue sky like mine.  I love the way his turned out!  


Happy Fall!   

10/3/12

Stamping, Stickers, and Stripes

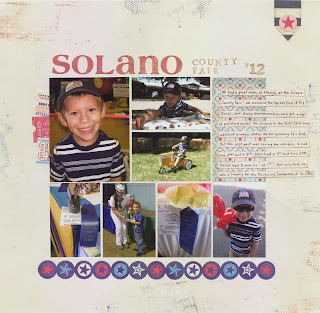
Here's my layout from the two days we spent at the Solano County Fair in August.  Other than the title, everything is from Pink Paislee's Declaration collection.

 
There are a few features on the layout I'd like to point out.  First, notice that I stamped the title words "County Fair" DIRECTLY on the layout.  I almost never do that, since the possibility of messing up is fairly high when it comes to me and stamps.  Not only that, but it was the absolute last thing I did, meaning that if I messed it up, there was no scooting things over or transferring the whole thing to another piece of background paper.  Fortunately, the stamping came out just fine.

Second, notice the tickets on the left hand side.  They are stickers that came with the collection and say things like "Music Fest" and "Drive-in Theater."  Neither of those fit my fair theme, so I carefully tucked the stickers under the focal photo so that the words were hidden.  

Finally, take a look at my journaling strips.  I didn't have an extra sheet of the background paper and couldn't cut a big enough piece from behind a photo to make journaling strips like I usually would.  None of the paper in my stash coordinated acceptably, so I found the only other paper in the collection that had the same off-white... the B side of this paper, with the diagonal stripe.


I carefully cut the paper on the diagonal to free the off-white portion of the stripe pattern and used that.  Worked like a charm!

10/2/12

Lemon Muffins

Once again, it was my turn to host the monthly brunch for my MOMS Club friends. The last few times I've hosted I've made different coffee cakes (Overnight Berry Coffee Cake and Overnight Cinnamon Coffee Cake). This time I wanted to make muffins.    

As always, I had a huge supply of lemons on hand. So I dug through my pile of recipes to see if I had a recipe for lemon muffins. I found one that looked very promising: Luscious Lemon Muffins by Mary-Lynne Mason. As always, I made a few changes. The muffins were SO good! They might even be my favorite muffin of all-time! Definitely Top Ten anyway.

 
Here's my version: 

Lemon Muffins


                                                 1/2 c. butter, softened                        1 t. baking powder
                                                 1/2 + 1/4 c. sugar                                1/4 t. salt
                                                 2 eggs, separated                                1/4 c. lemon juice
                                                 1 c. flour                                                2 T. lemon zest

Cream together butter and 1/2 c. sugar. Add egg yolks and mix well. In a separate bowl, combine flour, baking powder and salt. Add flour mixture alternately with lemon juice to creamed mixture. Stir in lemon zest. Beat egg whites until stiff peaks form, then gently fold into batter, making sure egg whites are fully incorporated. Divide batter into 12 paper-lined muffin cups. Sprinkle 1/4 c. sugar evenly over the tops of the muffins. Bake at 350° for 25 minutes or until lightly golden.


So good!

10/1/12

Yea, October!

I really like October 1st.  It marks the day that I can definitely put out my Halloween decorations without seeming weird.  It's also the start of my annual Halloween crafting. Here are some of my favorites from last year.

Dressed-up Halloween candy:


Stay tuned for more Halloween projects!