Showing posts with label Fiskateers. Show all posts

5/14/13

Challenging Challenges

They're called "challenges" for a reason, but some of the National Scrapbook Day challenges were far more difficult for me than others.  Today I'm sharing two that really pushed me out of my comfort zone.  

I made this layout for a Scrapbook.com challenge to use a punched top layer of cardstock or patterned paper with another piece of cardstock or patterned paper as the base.  I'd never done anything like this before.  I found a large circle punch and cut a bunch of holes into a piece of white cardstock.  The punch only reached so far, so I had to be creative in where I placed my pictures so that it looked like the pattern was all over the paper.  I backed it with blue patterned paper, then chalked around the cardstock to add a little color and interest.  


I made this next layout for the Fiskateer Hexagon challenge.  I don't have a hexagon punch, don't have a die-cut machine set up (I finally put my Wishblade away after not using it for about a year), and couldn't find any hexagon paper.  I did, however, discover a hexagon foam stamp.  I carefully stamped gold-on-gold all over the background, which was a major nightmare with a foam stamp you can't see through.  I added the photos, title and journaling about our 'new' year's celebration, then tucked glittery hexagon cut-outs behind that.  

 
 More NSD projects tomorrow!

5/6/13

Living Large

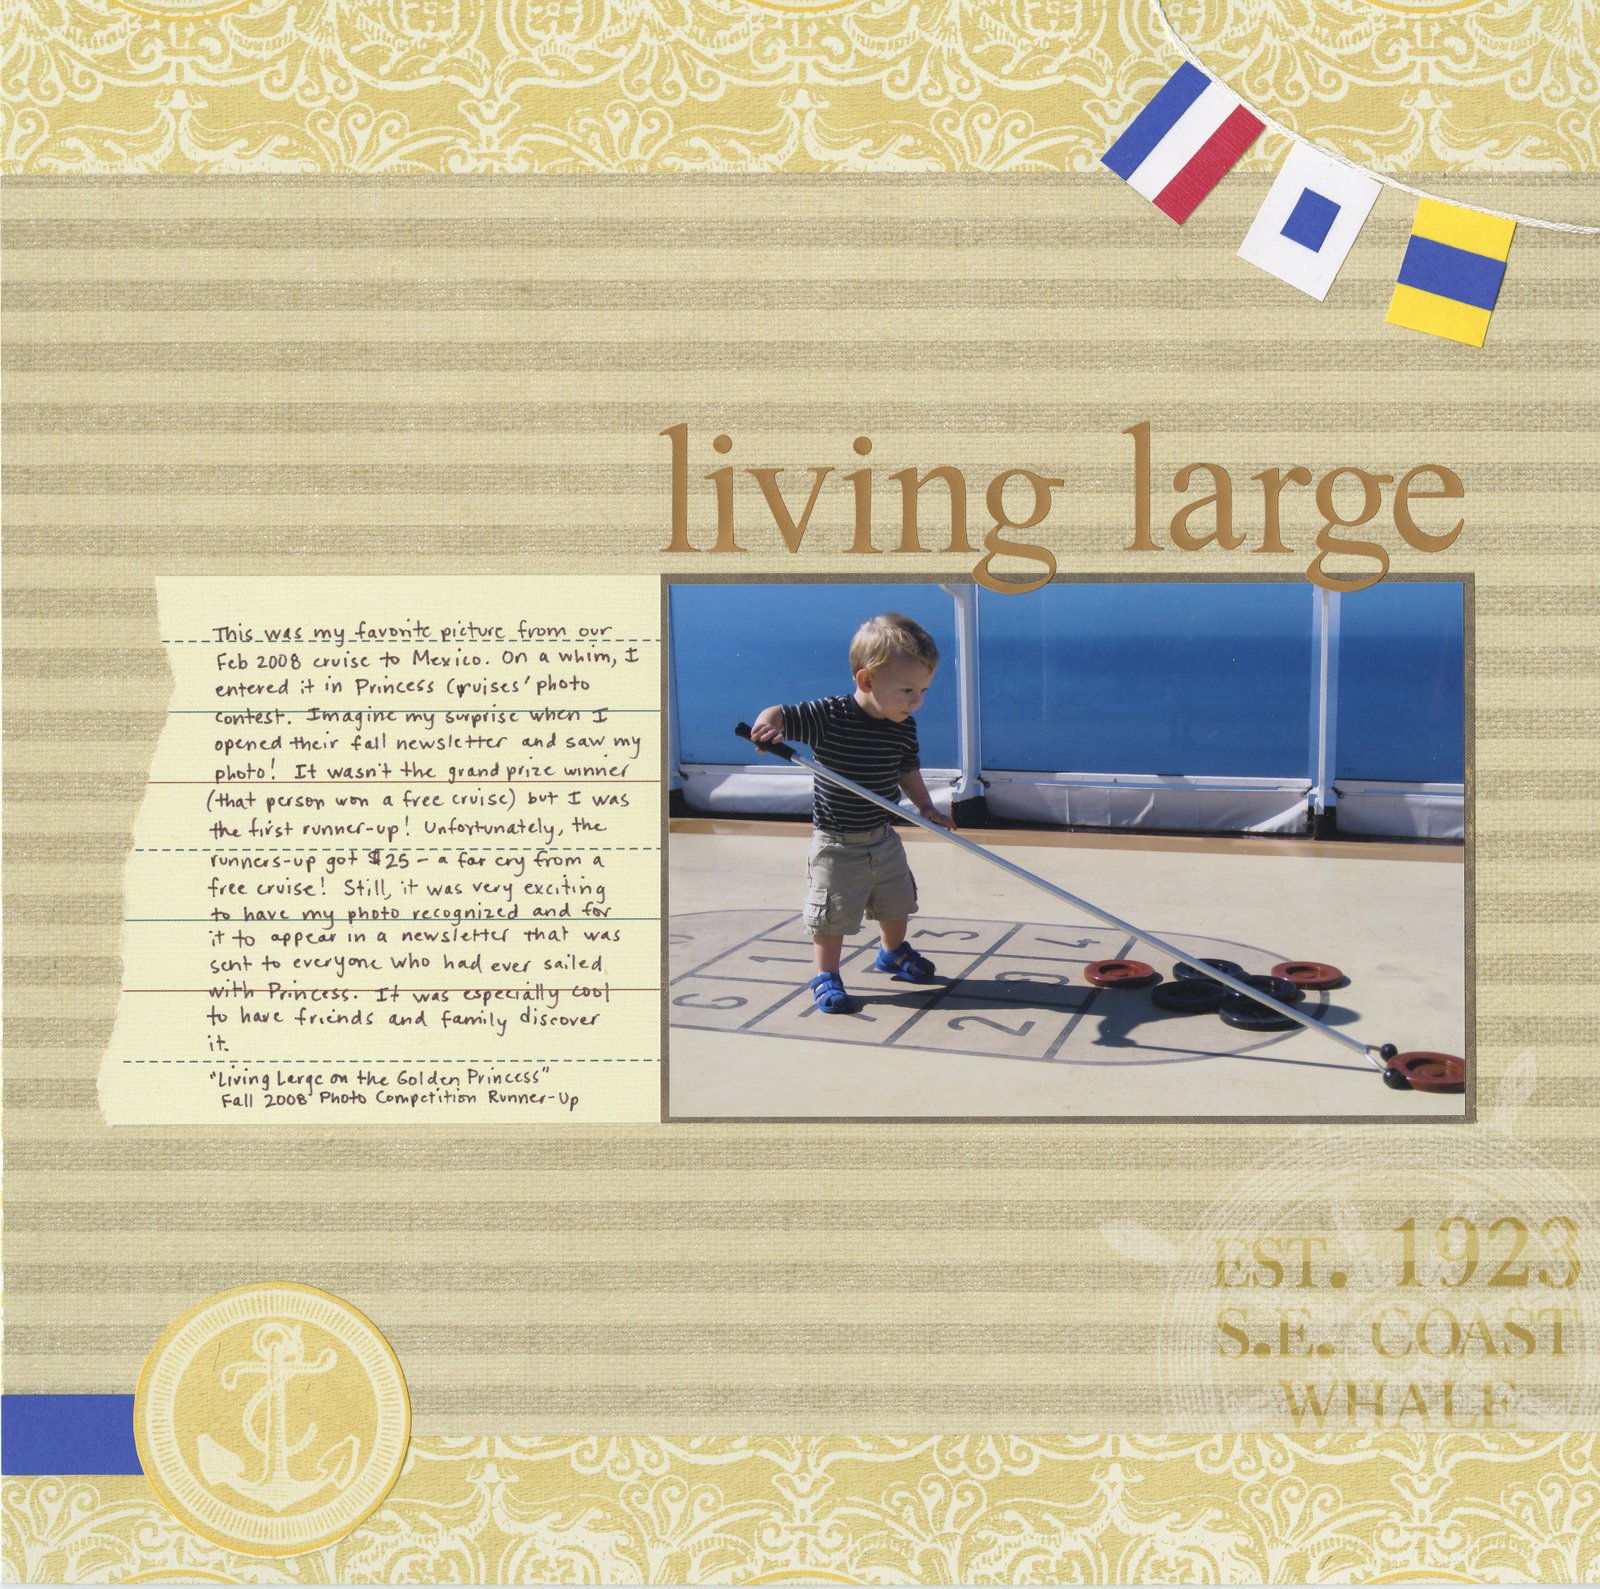
When Trevor was 20 months old, we went on a cruise to Mexico. Trevor LOVED it. He especially loved the sports deck and would spend hours playing ping pong, tennis, miniature golf, and chess with the pieces that were almost as big as him. But his favorite was shuffleboard. Every morning when he woke up, the first thing he wanted to do was play shuffleboard. When we got back from our cruise, I went through my pictures and fell in love with this one.

 
On a whim, I entered it in Princess Cruises' quarterly photo contest. Imagine my surprise when I opened their newsletter months later and saw my picture. I wasn't the winner (that person got a free cruise), but I was the runner-up. I got $25. Quite a disparity between first place and second place, but I was happy with my $25 and the knowledge that I had actually placed in a photo contest.

I scrapped the cruise shortly after returning home, before I'd learned that my photo had placed in the contest. (This is the ONLY layout I made about that cruise due to my unusual quirk.)


Fast forward almost 5 years. I've always thought that I should go back and record the story of the winning photo. I told myself that telling the story of entering a photo contest is not the same as making a second layout about a trip, so I printed an extra copy of the picture and waited for inspiration to strike.  

Inspiration took the form of a Fiskateer challenge on National Scrapbook Day. We were challenged to include an anchor on our page. I immediately knew what I wanted to do.

 
I love everything about this layout, especially the flags. Any idea why I chose the three that I did? They're the International Maritime Signal Flags for T, S and D... Trevor's initials! I was really pleased with myself for thinking of that. For the record, that series of flags can spell TSD (Tango Sierra Delta) but they can also signify "Keep clear of me; I am engaged in pair trawling" (T); "I am operating astern propulsion" (S); and "Keep clear of me; I am maneuvering with difficulty" (D). That amuses me, as I don't imagine a lot of cruise ships engage in pair trawling.

Tomorrow I'm sharing a kid's craft, then I'll return to NSD projects on Wednesday.

5/5/13

National Scrapbook Month

So, did everyone have a good National Scrapbook Day?  I sure did!  I worked for 18 hours and finished 11 layouts and 9 cards, plus I organized photos and cleaned my scraproom.  I spent time on 4 different sites and checked in with most of my scrapbook friends.

Here's the first layout I made.  It was for a sketch challenge at Scrapbook.com.


Here's a card I made for a Fiskateer ombre challenge.


I'll be sharing the rest of projects I made over the next few weeks.

In the meantime, I have some happy news for those of you who are disappointed that National Scrapbook Day is over...  May is National Scrapbook Month!  And Flamingo Scraps is celebrating by offering you some fantastic deals all month long.  Each of the designers has a special coupon code, good for all sorts of discounts.  I get to offer you 10% off your total purchase through the entire month of May!  Click the image below to take you to the store, load up your cart, then enter CINDY10OFF to get your discount.


Happy National Scrapbook Month!

4/15/13

My Latest Jewelry Project

A few facts:
  • I am a rabid Scrabble fan. I own 8 boards. Two are for my own use and six were for my classroom and the annual Scrabble tournament I held. I'm keeping all 8 boards, even if I never work as a classroom teacher again.
  • The last time I was in a thrift store, I bought an incomplete set of Scrabble tiles for $1, because a person can never have too many Scrabble tiles.
  • April 13th was International Scrabble Day.
  • Because of International Scrabble Day, Emma Jeffrey challenged all the Fiskateers to make a project incorporating Scrabble.  
  • I can't resist a challenge, especially a Fiskateer challenge.

I decided to make myself a Scrabble necklace. I dug through the tiles and found a C that wasn't too beat up. I used Diamond Glaze to create a nice domed top. When it was dry, I tackled the question of how to mount the tile. The proper thing to do would have been to use a bail, but I didn't have any and didn't want to wait until I could get to a craft store to buy one. So I decided to improvise. And for that, I turned to earrings.  

As a teenager in the '80s, I followed the mandatory dress code of pegged pants, multiple pairs of socks, striped polo and/or rugby shirts, and large earrings that matched my socks (which in turn, matched the stripes on my rugby shirt). All my earrings were in divided containers, organized by color. I still have my huge collection. Check out just a few of the fabulous earrings from the pink section.  

 
I dug through my earring collection and struck gold - literally. I found an earring piece without a mate that would work perfectly to mount my Scrabble tile. I used E-6000 to attach it and crossed my fingers. When it was dry, I added an old chain. 


And here it is! My new Scrabble necklace. I absolutely love the way it turned out!


I'm going to wear it during my next game to intimidate my opponent. Of course, my next opponent is probably going to be Trevor, who does not intimidate easily...


3/20/13

Fiskateer St. Patrick's Day Crop (Part 2)

Here are the rest of my projects from the Fiskateer's St. Patrick's Day Crop.


Challenge 4: Kiss Me, I'm Irish
Your challenge is to create a project focused on love and kisses using green as your primary color instead of the traditional pink and red.
This was challenging for me.  I decided to go super simple with a dotted paper, scalloped cardstock edge, and a punched heart.  I think it's more masculine than the typical red/pink love-themed card, which is good since it is for my husband.


Challenge 5: He's After Me Lucky Charms

That little lepruchan on the Lucky Charms cereal commercial makes me giggle, "He's after me Lucky Charms!" Your challenge is to create a project using charms.  For you papercrafters, that might mean digging into your bowl of metal to unearth some long-forgotten embellishments, and you fabric enthusiasts might find yourself reaching for a soft charm pack.  

I dug through all my stuff, hoping to unearth a charm.  There was exactly ONE charm in the whole scraproom - a Christmas tree.  It fit the green theme, but didn't exactly say St. Patrick's Day!  Fortunately, there was no theme requirement.

The charm was with a bunch of other Christmas stuff, including a half-used sticker set.  I noticed that the packaging was really cute- green with lots of holiday words watermarked on it.  It's hard to see in the picture; it's much more visible in real life.  I used the packaging to make a tag... trash to treasure!


Here's how the finished tag turned out.  I need to tuck it with the Christmas stuff or I'll forget all about it 9 months from now!


Challenge 6: As Luck Would Have It
This one is inspired by that little four-leaf clover that is said to bring you luck. Your challenge today is to create a project based on good fortune, good luck, &/or lucky 4-leaf clovers.
I pulled out some green scraps and a shamrock sticker and started playing around until I came up with this.  The inside says, ".... to have you as a friend."


I really enjoy these online crops because they inspire me to be creative and make projects I NEVER would have done otherwise.  And now I have 5 cards and a tag all ready to go.  Love that!

3/19/13

Fiskateer St. Patrick's Day Crop

You know I'm a huge fan of online crops with the Fiskateers!  When I saw that there was going to be a mini crop for the St. Patrick's Day weekend, I made some time to play along. There were only six challenges (a typical Fiskateer crop often has 12-24 challenges), so this was totally doable. 


Challenge 1: Kermit the Frog Here
Your challenge is to create something inspired by America's favorite 'GREEN' character - Kermit the Frog!  You can take this in any direction you wish.  Use the color combination of his character (lime green, with a pop of red, white and black), marry the colors of him and his lover girl Miss Piggy together on a project (green and pink), create a frog punch art embellishment, sew a frog stuffed toy, or make a card focused around his famous one-liner or a froggy-focused sentiment.
By happy coincidence, I had recently won some frog-themed patterned paper.  I cut a strip and layered it over cardstock and a dotted patterned paper.  As a final touch, I cut a party hat from patterned paper and popped it up.


Challenge 2: Somewhere Over the Rainbow
When I think of St. Patrick's Day, of course, I think of rainbows, don't you!?
Your challenge is to create something that clearly makes rainbow colors shine on your project!
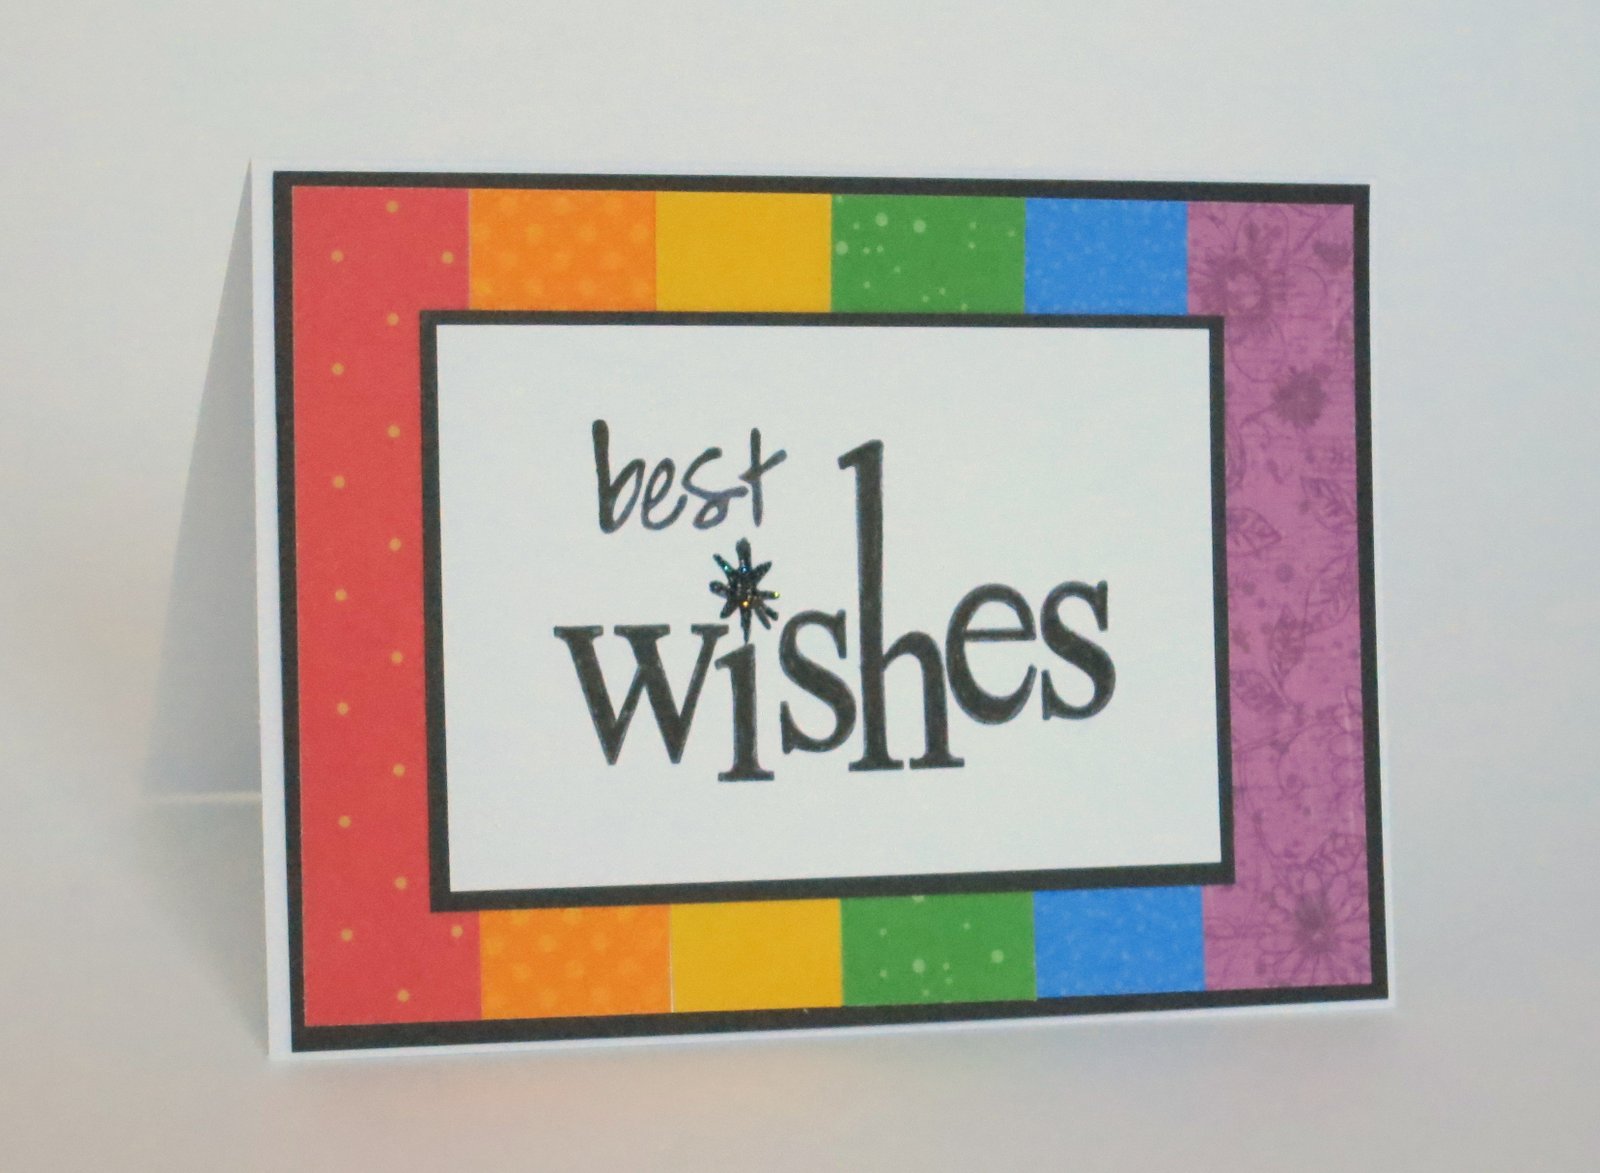
I dug through my scraps and found a rainbow of colors.  I cut them into strips, glued them to a base, and matted that with black.  I stamped a sentiment on white, matted it on black, and added it to the card.  As a final touch, I colored in the "dot" of the i with Stickles for some shine.


Challenge 3: All that Glitters is Gold
At the end of the rainbow you're sure to find a pot of GOLD!  Your challenge is to create using gold products: fabric, paper, embellishments, glitter, paint, sequins, tissue paper, etc.
I started out with the intention to make the ENTIRE card gold.  I used shiny gold cardstock as a base and stamped it with gold ink.  I stamped a sentiment in gold ink, then embossed it with gold.  I added gold ribbon.  Alas, there wasn't enough contrast for the sentiment to show clearly, so I colored the letters in with a black pen.  


Tomorrow I'll share the other three challenges.

1/23/13

Fiskateer Crop: October - December

Here are the last projects I made for the Fiskateers "Through the Year" crop.

The October challenge:
October makes me think of leaves. So, make a creation that includes at least 5 leaves (same or different). 
I mentioned that I will be making a creative gift for my sister's family after their new baby arrives in a few weeks.  For this challenge, I made a card that will go along with that gift.  I started by having Steve make a brown thumbprint (representing my brother-in-law).  I stamped my own thumbprint twice (representing my sister and my 12 year old nephew, who are almost exactly the same size).  Then Trevor stamped his thumb (representing his new baby cousin).


The November challenge:
So thankful!  Create 3 different thank you card designs. The 3 cards should be completely different from each other. 
For my first card, I used repositionable adhesive to adhere a tag to a piece of ivory cardstock, then misted with oranges and purples.  I removed the tag, then added a sticker sentiment.  I mounted the misted paper on purple cardstock, then added that to the card base.

Recognize this paper?  It's the paper I used for my Happy Holidays sign.  I stamped the background over and over with a single "thanks" stamp.  The design?  Self-scraplifted.

 
My last thank-you card is deceptively simple.  All I did was cut patterned paper to size, add the sentiment and mount it on black.  The paper already had the dots, ink, and other elements that you see.   
 
The December challenge:
The holidays are always full of delicious food. Follow this recipe to make a delicious scrapbook page layout.
3 buttons
3 different shapes
3 photos
1 yard of ribbon
1 border strip (cut, punched, ripped, etc., you decide!)
1 sticker
1 stamped image
Add in a sprinkle of creativity
Mix with a love for all crafts!
I have to admit, I freaked out a little bit when I read this.  My layouts are simple.  Really, really simple. I *might* have 3 pictures, 1 border strip, and 1 stamped image on a layout. Never more than that. I almost never use buttons (I don't like lumps), rarely put stickers on layouts (I use them on cards), and a YARD of ribbon? A YARD? A scrapbook page is 12 inches by 12 inches... where do you put a YARD of ribbon on a layout??

But, because I can't resist a challenge (especially a Fiskars challenge), I made a layout. I picked three pictures and added border strips and a title. I stamped a journaling box. Frankly, at that point, I was pretty happy with the layout and ordinarily would have called it done. But I struggled forward, adding buttons, random shapes, the required sticker, and the YARD of ribbon. And I actually really like the finished layout.


The 13th challenge:
Challenge #13—Because it’s 2013!
What’s old is new again! While you’ve been organizing (and re-messing) and sifting through all of crafty items this weekend, did you find something that you forgot you had? It’s time to use it! Create a project that includes that forgotten tool, stamp, die-cut shape, whatever! Make sure to tell us what it is you “found”!
I had an easy time with the 13th challenge. While I was struggling through the July flag challenge, I found a single sticker left on its sticker sheet. I thought I'd used all the stickers that coordinated with this fun line. I whipped up this quick birthday card, using that "found" sticker.

 
This was such a fun crop!  I can't believe how many projects I completed in such a short time. Thanks, Fiskars!

1/22/13

Fiskateer Crop: July - September

Here's the third batch of projects from the Fiskateer "Through the Year" crop.

The July challenge:
Create a project using a FLAG.  It can be a card, layout, tag, altered art, home décor—whatever suits your fancy. It can also be ANY type of FLAG – a state flag, country flag, garden flag, sports flag, holiday flag, birthday etc.
This challenge was really hard for me.  My mind immediately went to banners, but I decided against that.  (Are banners really flags?  I'm not sure.)  I got out a toothpick and set about making a flag.  Cut cardstock into a rectangle, attach a sticker or two, and glue it to the toothpick.  How hard could it be?  As it turns out, pretty hard (for me).  I couldn't get the proportions right.  And when I finally did get the proportions right, it didn't fit the sticker I wanted to use.  It was very frustrating.  With time running out, I submitted this card, even though I was not at all happy with it.


The August challenge:
After a summer of lots of parties and celebrations, we are often in need of sending out some cards of appreciation -- to say thank you, you're welcome, thinking of you etc.  Create a handmade card with a handmade, matching/coordinating envelope. It can be of any theme/size-- but they both MUST be made by hand and not premade.
I stumbled on this card sketch by Jessica Witty awhile ago and have been wanting to use it.  This was the perfect chance.  I'm down to almost nothing but scraps from Paper Loft's "Spring Fling" collection (probably about 5 years old), so it was a good choice for punching out circles.  When I made the matching envelope, I was careful to do my cuts and folds so that the decorative scroll border would follow the edge of the envelope.


The September challenge:
Back to school time: TAG you’re it!  Create one handmade tag.  It must include something orange and something green on it!
I think this is my favorite of all the things I made during this crop.  I love orange/green color combinations, I love polka dots, and I love simplicity.

 
Tomorrow: the October through December challenges, plus a 13th challenge.

1/21/13

Fiskateer Crop: April - June

On Friday, I shared my creations for the first three "Through the Year" Fiskateer challenges. Today I'm sharing the next three.


The April challenge:
APRIL SHOWERS! Think Baby, Bridal, Rain showers etc. Shower us with your use of at least 4 Fiskars tools on this project.
On the way to my sister's baby shower, my mom commented that she didn't have any girl baby shower cards.  Since I make all the cards my mom gives, this was a not-so-subtle request for more.  So I made a card for her to give at the next shower.  
I started with a shimmery pink patterned paper with dots on the front and "baby girl" printed on the back.  I used the trimmer (tool 1) to cut the background paper and to slice a thin strip of "baby girl" to use across the front.  I used a border punch (tool 2) to create the scalloped cardstock edge.  I layered the "baby girl" strip over the top and snipped it to size using microtip scissors (tool 3).  Finally, I used a heart punch (tool 4) and popped the heart up.     


The May challenge:
MAY FLOWERS! Since we know that April showers bring May flowers, use a Fiskars tool to make a flower and then use it on your project.
I've been wanting to try to make flowers from ribbon for awhile.  I decided to make an elegant silver and white flower to attach to a wine bag for the next time we gift a bottle of wine.  I used my Fiskars scissors, white satin ribbon, a Gluber, and a Prima embellishment.


The June challenge:
JUNE BRIDES!  Let's honor the June bride's white wedding dress by creating an all-white project. 
I started with a white card base and attached a piece of white cardstock that I'd run through a friend's embossing machine.  Since I already had the ribbon container out from the February and May challenges, I added a white grosgrain ribbon.  I dug through my alphabets looking for white and stumbled upon these 2008 beauties.  They were just the right size, but every letter features a winter symbol on it, so my choices of sentiment were limited to holiday themes.  It's not very "June" but I love how my card turned out and look forward to sending it next winter.


July, August and September tomorrow!

1/18/13

Fiskateer Crop: January - March

Twice a year, the Fiskateers who aren't able to attend the Craft and Hobby Association (CHA) tradeshow have a big online crop.  I love playing along with all the challenges.  This time, our theme was "Through the Year."  


The January challenge
January always seems to be a time for bridal shows, and wedding planning for all those newly engaged brides. Let’s start the challenges off with an easy one….create a wedding card for the bride and groom.
I started with some black dotted paper and silver frames that I won awhile ago.  I traced the frame on the back of the patterned paper, then cut it out to make a window.  I put the rub-on sentiment directly on the white cardstock base, then layered the patterned paper and frame over that.

This looks WAY better in person than it does in this photograph.  The frame isn't flat - it's popped up a little to provide dimension.  The whole project shimmers and shines.  The dots are little prisms that create a rainbow of colors as the card catches the light.


The February challenge:
February is the month for hearts and romance. Your challenge is to make a Valentine's card that does not have any hearts or the word love on it.
No hearts and no love... tricky!  I could have gone the easy route and made a kid valentine ("Owl always be your friend" or something similar), but wanted to try and make a Valentine for my husband without using hearts or love.  I pulled out pink cardstock and a red ribbon, as those colors scream Valentine.  Then I used a flower punch to create a tone-on-tone background for the card.  Finally, I went through my collection of stamps, rub-ons and stickers looking for an appropriate sentiment and found a "Forever Yours" rub-on.

I love you, Steve!  Pretend to be surprised when you see this again on February 14!  


The March challenge:
Have you check out the Design Team projects lately? Well now is the time to MARCH on over there and see what wonderful inspiration you find. You will find projects on sewing, cards, layouts, kids crafts, home décor and so much more. Create something that inspired you from the design projects.
I love seeing the amazing projects that the Fiskars Design Team creates.  My absolute favorite Fiskars designer is Lisa Storms.  Have you seen her work?  Amazing.  As I browsed through her stuff, I fell in love with her Easter Egg Hunt party.  She made the most adorable bunny-themed items, including a carrot garland that was so incredibly cute.  Trevor and I made this garland together, following Lisa's instructions.  We hung it over Trouble's enclosure.


Next week, I'll share my April through December projects, which includes one of the most challenging challenges I've ever done.

12/11/12

Gingerbread Birdhouse

I love decorating gingerbread houses, so when I saw that the latest Fiskateer challenge was to decorate a wooden birdhouse gingerbread-style, I knew I wanted to play along. By happy coincidence, Trevor and I had bought some super cheap wooden birdhouse ornaments on clearance recently, so I had all the supplies I needed already.

I started by painting the birdhouse with a base coat of brown paint. When that was dry, I carefully painted white everywhere the icing would be on a real gingerbread house. Then it was time to decorate! Here's my finished gingerbread birdhouse ornament. 


I made the candy cane perch by wrapping a teeny sliver of red paper around the white post, carefully gluing the ends in place. The shingles were made with the Scalloped Sentiment border punch. The small and large circles were from the Bubbles border punch. I added Glossy Accents over the top to make them shine like candies would.

 
Trevor hasn't finished his birdhouse yet. After he painted a base coat of red, he started on another project and worked on that while I did my birdhouse.  

 
He'll probably end up finishing his birdhouse in the next few days. 99% of the time Trevor finishes what he starts. For those rare times he just isn't in the mood or wants to work on a different project, that's ok with me. 

11/20/12

Fun with the Cloud Punch

When I won the Fiskars Cloud Punch, I knew I'd be punching lots of fun clouds.  (A description of how I did the sky is here.)  


What I didn't expect is how well the cloud punch works as ice cream!


Here's my latest cloud/ice cream card.  The whole thing is made with scraps.  I added Glossy Accents to the cherry to make it shine.

 
I love when a punch does double duty!  

10/26/12

3rd Annual Fiskateers ORANGE Blog Hop

Welcome to the 3rd annual Fiskateers ORANGE Blog Hop!  This weekend we are celebrating Fiskars' signature color, ORANGE.  Almost everyone is familiar with Fiskars' famous orange-handled scissors, but Fiskars makes so many other wonderful products for crafting, sewing, gardening, and more.  Each stop along our Hop will feature different Fiskars' products with a big helping of ORANGE.


Cindy #4113   www.cindyderosier.com   *YOU ARE HERE*
Groovy Deb #2644   www.ifitsgroovy.blogspot.com
Jennifer Ashley #6361   www.asecretvintage.blogspot.com
Sue in CT #6150   www.sueinct.blogspot.com
Emily K #7021   http://emily.kincke.com
Pamela #8040   www.cottagebelow.com
BerylM #6388   www.berylmorgan.com
Marianne #6701   www.number1aunt.blogspot.com


When I thought about what to make for an ORANGE Blog Hop, my thoughts immediately went to, well, oranges!  


We have a very prolific orange tree in our backyard.  At any given time, there are ripe oranges hanging there ready to be eaten.  Consequently, I've tried a lot of recipes over the years using our beautiful oranges, including orange sorbet, orange sherbet, and cupcakes baked in an orange.

By far, the strangest recipe I've tried was for an orange bread made with a whole orange... including the peel.  It actually turned out to be really tasty!  It was so good that I decided to see if there were other recipes out there using a whole orange, including the peel.  After a quick search, I found several different cookie recipes.  I read through them, made some notes, and set out to make my own version.    

I grabbed an orange from the tree.  One quirk about our tree... the oranges range in size from small to gigantic for no apparent reason.  This orange was huge!  I couldn't fit my hands around it.  Check it out next to the baking powder container.
 
I cut the orange into chunks and put those in the blender.  

 
After a quick whirr, I had this: 
 
I measured out 1 1/2 cups of the blended liquid to use in my cookies and set the rest aside to make a glaze.  


Orange Cookies

                    1 whole orange, including peel             3 c. flour
                    1 c. shortening                                     1 tsp. baking soda
                    1 1/2 c. sugar                                      1 T. baking powder
                    1/2 c. milk                                          1/2 t. salt
                    2 tsp. vanilla extract                            1/2 c. powdered sugar

Begin by washing the orange.  Cut it into chunks, removing any seeds.  Do not remove the peel!  Put the orange chunks into a blender and process until smooth.  Measure out 1 1/2 c. orange puree and set aside. 

Combine shortening and sugar.  Mix until light.  Stir in milk, vanilla and orange puree.  Add flour, baking soda, baking powder, and salt.  Let dough sit while the oven preheats to 400° F.  Drop onto cookie sheets and bake for 7-8 minutes.  Remove to a wire rack to cool.

Mix powdered sugar with a small amount of reserved orange puree to make a glaze.  Drizzle over the cookies.


I put some of the cookies on a plate to take to a potluck.  I set the rest aside and headed to the craftroom.  I got out 1/4 inch ribbon, some Fiskars stamps, a stamp block and black ink.  

 
I stamped the word friend across the length of the ribbon.

 
I tied the ribbon around the bag.  Then I made a quick tag with a Fiskars' thank you stamp, then added an orange flower and brad.  All ready to give to a special friend!


I hope this got you in an ORANGE mood!  Now hop along to the next stop, If It's Groovy

10/9/12

World Card Making Day

Saturday was World Card Making Day, so of course I had to celebrate!  We had a busy day but I found a bit of time to create.  Fortunately, cards don't take much time.  The Fiskateers had a crop going on, so I played along with 4 of the challenges.  

For the "Perfectly Punched Pieces" challenge, we had to use a punch in an unexpected way.  I used my cloud punch on pink paper, inked it, added a cone, and made this card. 


The "Boo to You!" challenge asked us to create a Halloween card.  I don't send Halloween cards, so this was a first for me.  I fussy-cut the bat from patterned paper, then popped it up over two different patterned papers.


The "It's All in Your Number" challenge required us to create a card based on our Fiskateer number.  Since I am Fiskateer #4113, I had to make a card with 4 of something, 1 of something, 1 of something and 3 of something.  I used 4 patterned papers, 1 rub-on sentiment, 1 punch (the circle), and 3 flower/brad embellishments.

 
My last card, for the "All Shaped Up" challenge is a carrot-shaped birthday card for Trouble, who is turning two next week.  Trevor made a card too.  I'll share both in a future post.