Showing posts with label Chinese New Year. Show all posts

1/9/25

Year of the Snake Craft for Chinese New Year

January 29 marks the start of the Year of the Snake. I love making snake crafts, so I couldn't pass up the chance to add a project inspired by Chinese New Year to my repertoire. Affiliate links below. 


Year of the Snake Craft for Kids


Materials: 


Steps: 


If the red paper you are using is single-sided, turn it upside down so the white side shows. If it's double-sided (like cardstock or construction paper), you're ready to go no matter what side is up. 

Starting in the center of the paper, draw a spiral. When you have just about filled the paper (or made a snake as large as you want), stop making the spiral and turn that final line into the snake's head by curving it around to meet back up with the previous loop of the spiral.

Use the scissors to cut along the line you drew. Your cut-out snake will look like this. It's hard to see the coils on the scan, but they're obvious in real life. 


In order to make it more visible for this tutorial, I cut a sliver off of the spiral to give better definition. This is totally optional. 


Before you get rid of your scraps, cut a forked tongue and glue it behind the snake's head. Then use a gold Sharpie to decorate your snake. You can use stripes, geometric patterns, or florals. When you get to the head, draw an eye on either side by making vertical lines and then putting a dot in the middle of each line. Finally, add nostrils.  


You can display your snake flat, or you can hang it. The coils will spiral down with a neat effect.

1/17/24

Chinese New Year: Welcoming the Year of the Dragon

It's time to start preparations for Chinese New Year. And by that, I mean crafts! On February 10, we say goodbye to the Year of the Rabbit and enter the Year of the Dragon. I've designed a fun dragon project that features the gorgeous Folk Art Treasure Gold. Affiliate link here and below. 

Chinese New Year craft: Happy Year of the Dragon!


Happy Year of the Dragon!


Materials:


Steps: 

Orient your paper so it is horizontal. Using Treasure Gold, paint a head just left of the center of the paper. Dragons aren't real, so you can't get it wrong! Add a long neck and horns. 


While the paint is drying, cut out features for your dragon. Again, dragons aren't real, so there is no right or wrong. I used red cardstock to cut out a pair of bushy eyebrows and spikes for the dragon's head and neck. I cut a pair of eyes and a mouth from white cardstock, then used the Sharpie to color in the black parts. 


When the paint is completely dry, use the Sharpie to outline the dragon. Add a nose and scales. 


Glue the cardstock features to the paper, add any extra details (like the whiskers), and then write your message on the right. 

Chinese New Year craft: Happy Year of the Dragon!

If you're seeing this after 2024, you can still make this project. While you wouldn't see the other zodiac animals in every year's celebration, dragons are special. Just change the message to Happy New Year! 

2/1/22

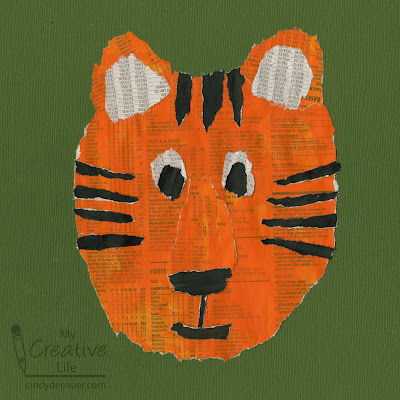
Painted Newspaper Tiger

2022 is the Year of the Tiger! Here's a craft I think you'll enjoy, whether you need a project for Chinese New Year, as an activity for your 1st grade Cub Scouts, as decorations for a zoo-themed party, or to accompany a study of tigers. It starts with a pile of newspaper and is a great way to develop fine motor skills.     


Painted Newspaper Tiger


Materials: 

  • newspaper
  • acrylic paint (orange, black)
  • glue

Steps: 

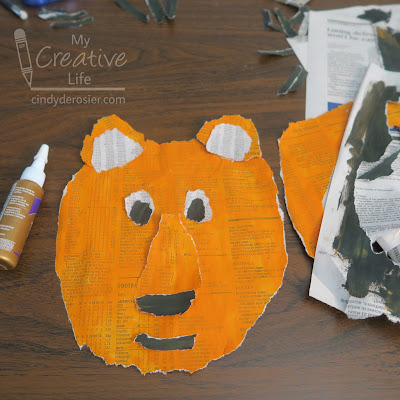
For each tiger, paint one sheet of newspaper orange and one sheet black.  Leave one sheet white. You won't need that much, but it's better to prepare extra. Try to pick a page with just text, like the sports scores, stock information, or classifieds. Just add one coat of paint - part of the charm of the project is seeing the text showing through. 

When the paint is dry, tear out a large circle for the tiger's face and two small circles for the tiger's ears. Tear slowly and carefully; newspaper tends to want to rip in just one direction, so you'll have to direct it the way you want it to go. If you mess up, no problem. That's why you painted extra. 

Tear two inner ears and two eyes from white, then two small pupils from black. 


Add a triangular orange muzzle, and a black nose and smile. Glue all the facial features into place. 


Tear strips of black to make the tiger's stripes. I used three thicker stripes along the top of his heat and four thinner stripes on each side of his face. Glue them in place. Add one very thin stripe to connect the nose to the mouth.  You can hang your tiger as is, or mount it onto contrasting paper like I did. 


Obviously, you can use this technique to make all sorts of animals. I may just do exactly that!


1/22/21

Chinese New Year Ribbon Dragon Craft

January is a busy month in the world of kids' crafts. In January, lots of people search for crafts about Arctic animals (as if penguins and polar bears somehow don't exist if it isn't winter in the US). They're also looking for MLK Day ideas, Groundhog Day puppets and treats, 100th day of school crafts, and everything having to do with Valentine's Day. Mardi Gras searches rise dramatically, as do projects featuring Presidents Washington and Lincoln. And then there's Chinese New Year. Technically, it's Lunar New Year, as many other Asian cultures celebrate it. 

Something unique to Chinese New Year is that the crafts people want follow a 12-year cycle. This year, people want Ox crafts. Last year's Rat crafts won't be popular again until 2032, an eternity (and literally a lifetime) for a child. This time next year, the Ox crafts will hold no appeal as everyone makes Tiger crafts. No other holiday is like that. Can you imagine if everyone decorated for Halloween with only witches one year, then threw them all out (or stored them for 12 years) and decorated only with mummies the following year?!

Fortunately, there are some perennial Chinese New Year decorations that make excellent crafts. Red lanterns, firecrackers, plum blossoms, and fish are great choices. And then there are dragons. Dragons are unique among the 12 animals of the Chinese zodiac in that they are the only mythical creature. As a symbol of power and luck, they are an important part of every New Year's celebration. I had so much fun designing this dragon, made with wired ribbon! Affiliate links below. 


Chinese New Year Ribbon Dragon Craft


Materials:


Steps:


Cut red cardstock to make the dragon's head, two horns, four feet, and a tongue. Cut gold cardstock to make the hair, eyebrows, nose, beard, and tail. Cut two lengths of Twisteezwire to make the mustache. (The photograph below shows most of the red and gold pieces, but is missing the tongue, eyebrows, and nose.) 


Cut eyes and teeth from white cardstock. Then cut pupils, nostrils, and a mouth from black cardstock. 


Glue all the face pieces together, then set it aside. 

Bend the wired ribbon into gentle waves to form the dragon's body. Glue the tail to one end and the feet to either side of the ribbon where it touches the table. 

Make a sharp fold to make the dragon's neck, then the glue the face to the folded portion. When the glue is dry, you can arrange your dragon however you'd like. 


Obviously, you can change out the colors, features, and proportions of the dragon to make it more or less traditional. Enjoy!

2/6/19

Chinese New Year Treat Topper - The Year of the Pig

I'm a day late for the first day of the Lunar New Year, but I understand that the celebration lasts more than two weeks. So you still have plenty of time to make a Year of the Pig Treat Topper to wish good health and happiness to your friends and family. There are affiliate links throughout this post.


---------

Year of the Pig Treat Topper


Materials:


Steps:


Fill the treat bag up to the 'neck' with red and gold foiled candies to make the body of the pig. Set it aside. Cut a rectangle of red construction paper that is the same width as the treat bag. Fold it in half to make the treat topper. Cut a semi-circular face, an oval nose, and two triangle ears from the gold paper. 


Staple the red paper over the treat bag. 


Use the Sharpie to draw two eyes on the face, two nostrils on the nose, and the inner ears. Glue the ears behind the face, then glue the face to the red paper. Use a foam dot to attach the nose so that it has dimension. Finally, write a message on the washi tape and add it to the treat topper. I used enough so that it would stretch across the front with the ends meeting up neatly in the back. 


 Wishing you all a joyous and prosperous Year of the Pig!