Showing posts with label Ohuhu. Show all posts

5/16/25

Underwater Scene: Paint Markers on Aluminum Foil

When I reviewed the new Ohuhu Nahuku Acrylic Markers, I was impressed by how well they color on paper, plastic, and metal. Ohuhu sent me a different set, the Kakaako Acrylic Markers, to try and I was eager to see if they performed as well. I'm happy to report that they impress me too. I'm not surprised, as Ohuhu's products are consistently high quality and a pleasure to use. Affiliate links here and below. 

The Kakaako set includes 30 double-ended acrylic markers: 15 basic colors, 9 metallics, and 6 fluorescents. Unlike the Nahukus with their brush nibs, the Kakaakos are what I think of as a traditional paint pen. To activate the paint, you shake the pen, then press down on the round or fine tip until the color is flowing. These pens are made to color on a wide variety of surfaces, including: paper, plastic, glass, ceramic, rocks, wood, fabric, and more. I decided to test "and more" with a more unconventional surface: aluminum foil. 


I cut an 8" square of aluminum foil, then colored the background with patches of color from four different blue pens. The paint dries fairly quickly, but there is enough open time that you can fingerpaint if you want to. I used my index finger to soften and blend the background in some places. I intentionally let the foil show through in many spots. You can't tell on the scan, but it's super shiny in real life. 


I used the round tip to add a sea floor, kelp, coral, and fish. Then I went in with the fine tips to add a bit of detail. The paint layers nicely if you let the base coat(s) dry first. 


Here's a look at the full color palette and how each looks on white and black cardstock. You can also see how the coverage is with a single coat. 


Just like the Nahukus, I definitely recommend Ohuhu's Kakaako Acrylic Markers but once again feel that using them on paper would be a waste. Try them on a wide variety of surfaces, including aluminum foil!

3/27/25

Quirky Collages to Color: Carousel Horse

I wanted to give the Ohuhu Halawa colored pencils another go, so I used them to color another super fun image from Quirky Collages to Color. This time, I colored a carousel horse, made up of all sorts of toys and games and other miscellaneous stuff. 


How many of the 60 hidden items can you spot? I'm the one who colored it and some of them are still hard for me to find!
 

Once again, I enjoyed working with the Ohuhu colored pencils. They hold a nice sharp point, which is great for coloring the tiny spaces in this collage. The color selection is great. Because they are oil-based, they don't blend as easily as the wax-based Prismacolors I usually use, but that wasn't really an issue with this image. In the future, I can see myself using both sets of colored pencils in order to take advantage of the best features of each. 

3/11/25

50 State Quarters: Coloring Pages Using Ohuhu Halawa Colored Pencils

I've finished coloring all of the 50 State Quarter coloring pages! The last four states in my 8-month long project completing the 50 pages using different art materials include Alaska, Texas, Kansas, and Ohio. I colored these four with the Ohuhu Halawa colored pencil set. Affiliate link here and below. 


Ohuhu fans like me have been waiting (im)patiently for Ohuhu to release a colored pencil set and it's finally here! Ohuhu has a well-deserved reputation for making high quality art materials at affordable prices and I'm happy to report that their colored pencils uphold that reputation. This was my first time trying them and I was really happy with their performance. I wasn't entirely happy with MY performance; I'm used to wax-based pencils, so there was a learning curve with these oil-based pencils. I intentionally tried a bunch of different techniques while coloring to see how they compare to the other brands I've used. I also tried to use as many of the colors as possible across the four pages.  

The Ohuhu Halawa colored pencil set contains 72 pencils with ultra-soft lead in a nice range of colors. At only 62 cents a pencil, they are significantly cheaper than other brands of equal quality. They're packaged more securely than pretty much anything I've ever received through the mail. That said, I did have issues with repeated breakage in one pencil. None of the others broke, even with hard pressure. I'm looking forward to coloring with them again, particularly in combination with Ohuhu's markers. 

Here are the art materials I used for the rest of the coloring pages:

Tomorrow I'll rank the 14 art materials from my favorite to least favorite for coloring the 50 State Quarters. If you've been following along, you can probably already guess what will be at the top and what will be at the bottom!

3/3/25

Painted Plastic Easter Eggs, Using Ohuhu Nahuku Acrylic Markers

The Ohuhu Nahuku Acrylic Markers perform really well on paper and a Ziploc bag. I'm happy to report that they work just as well on two more surfaces: a plastic egg and a CD. Affiliate links below. 


Painted Plastic Easter Eggs


Materials: 


I started by drawing the chick on the plastic egg. As before, the paint glided beautifully across the surface. I only had to use a single coat to get good coverage. Obviously, you can decorate the eggs with any pattern or design you want, including words and names. If you want to layer colors, let the first coat dry before putting another on top. 

Next, I decorated the CD. It is there for two reasons: first, it gave me another surface to try with the Nahukus; and second, it holds the plastic egg upright. I put a rubber band on the desktop under the CD, which lifts it just enough so that the egg nestles into the hole and doesn't topple. 

These would make really fun place cards for Easter dinner. Decorate them ahead of time and fill them with each guest's favorite candy. Or, have each person make their own when they arrive. There are lots of possibilities!

2/28/25

Doodled Animals with Ohuhu Nahuku Acrylic Markers

Ohuhu is known for making high-quality art supplies that are much less expensive than comparable brands. I own four products by Ohuhu: the Honolulu Dual-Tip Alcohol Markers; the Kaala Dual-Tip Alcohol Markers; the Marker Sketchbook; and the Pupe Paper-Friendly Water-Based Markers. I love them all. So I was delighted to have the opportunity to try out the Ohuhu Nahuku Acrylic Markers (affiliate link here and below). 

I've used acrylic markers ("paint pens") by other manufacturers, but Ohuhu's Nahuku is completely different than anything I've used before. 


I'm used to acrylic markers with a chisel or point nib, where you press down to let the paint flow into the nib the first time you use it. Instead, these markers have brush nibs. The paint flows into the brush without any pressing (though you do have to shake them). There's a peekaboo window on the side of the pen so you can see how much paint is left. Genius! 

And that paint? The pens are really juicy and the paint flows onto the surface beautifully. The colors are highly pigmented. They are gorgeous on white and even more so on black. I did a single coat for my swatch cards; as you can see, most of the colors are completely opaque on both black and white. Only the four lightest colors could use a second coat on the black. 


After swatching the colors, I couldn't wait to try the pens on an actual project. I recently found a scrap of paper from years ago where I'd doodled four animals in a distinctive style. (I wish I knew what artist had influenced my doodles so I could give proper credit. Let me know if you recognize the style.) I used the Nahukus to doodle those animals (and a few more) to fill a page. In each case, I colored the base, let that dry, added the secondary colors on top (ears, whites of the eyes, tummies, stripes, dots, etc) and let that dry. I did the outlines with a Flair pen to see how it would write on top of the paint (perfectly). 


I loved working with these markers! The paint flows so well. But using them on paper is a waste of an amazing product. You can use any markers on paper, but these pens are made to write on non-traditional surfaces, like glass, plastic, rocks, wood, fabric, and much more. 

There was an empty plastic Ziploc bag sitting on my desk, so I decided to doodle more animals there. And that's where the Nahukus really shine. The brush nib glided over the plastic like skates on ice. I did the base layers, let those dry, then did the detail layers. I only outlined two of the animals; this time, I used the black acrylic marker to see how fine of a line I could get. 

The bag is wrinkly, so the scan isn't great, but you get the idea. 


I tested the Ohuhu Nahukus Acrylic Markers on two more surfaces, which I put together into a single project. I'll show you that on Monday.

2/3/25

Faux Glitter Name Art

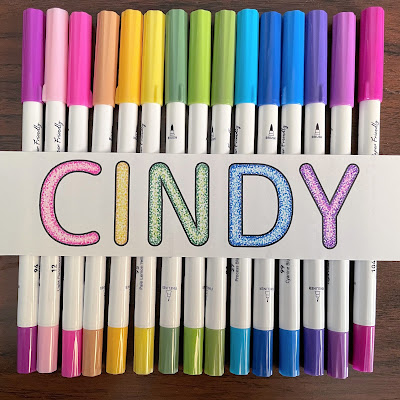
Check out my glittery name art! I love it. So pretty, right?
 

I made this name art using plain, non-sparkly pens on ordinary printer paper. There is no glitter or anything shiny or shimmery at all. Read on to find out how to make your own- it's really easy! Affiliate links below. 


---------

Faux Glitter Name Art


Materials: 


Steps: 


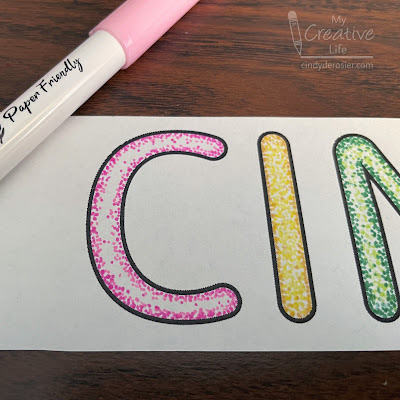
Choose three markers for each letter of your name. They should be the same basic color, with one darker, one in the middle, and one lighter. Start with the darkest one. Draw dots along the outer edges of your first letter. (I worked from right to left, of course.) The dots should be concentrated along the edges, with an occasional dot in the middle of the letter. 


Use your medium color to make more dots, concentrating them just inside the darkest color. Again, allow a few dots to go in the middle and a few along the edges. 

Add dots with the lightest color, concentrating them in the middle of the letter. 

Finally, add white dots, concentrated at the very center of the letter. 


Then move on to the next letter. Obviously, you can use the same three markers or choose another set of three. I like the variety, so I did a modified rainbow. 

Here's a closer look at my completed yellow I and the start of my pink C. 


Here are all of the markers I used to color my name. They look so pretty together! And I love the way they perform on paper. If you haven't read my review of Ohuhu's Pupe paper-friendly markers, do that now. 


You can leave your artwork like this, but the letters don't POP until you put them on a black background. Color the background black or cut out the letters and glue them to black paper. 


Looking for more name art ideas? I have a few dozen for you to choose from. I love name art. 

1/29/25

Coloring Disney Villains: Evil Queen

I took a break from coloring state quarters to do a quick Disney villain. Here's my Evil Queen: 


The image is from Art of Coloring Disney Villains (affiliate link here and below). It's a fun book filled with lots of different evil characters to color. 


Overall, I like the coloring book. There is a good mix of designs, some more simple and others more detailed. They represent a wide range of Disney movies, both older and newer. However, some of the images span across two pages, meaning some of the design is lost in the binding. The designs are printed back-to-back, so you can't color all the images if you work with markers. Fortunately, the paper is fairly thick, so I didn't have an issue with the printed design on the back showing through to my colored side. 

I started by coloring a base coat with Ohuhu Kaala and Honolulu markers, which is what you see on the left. Then I used Prismacolor colored pencils to add the tonal variation and shadows you see on the right. 


After coloring 42 pages using 12 different art materials, it is telling that I chose Ohuhu markers and Prismacolor pencils to do this page just for fun. Using the two combines the best of both worlds for me - the speed, color choice, and coverage of the Ohuhus along with the precision and ease of blending of the Prismacolors. 

I'm looking forward to coloring my next villain!

11/22/24

50 State Quarters: Coloring Pages Using Ohuhu's New Pupe

I was trying to decide what art material to use for my next batch of 50 State Quarter coloring pages when I got an email from the folks at Ohuhu asking if I'd like to review their latest markers. Would I?! Yes! I absolutely love everything that Ohuhu makes. Just read my reviews of the Ohuhu Honolulu and Ohuhu Kaala alcohol markers and you'll see! Affiliate links below.  

Ohuhu's latest set, called Pupe, includes 60 water-based markers. But these are not ordinary water-based markers. They are specifically designed to be paper-friendly, meaning they won't scratch or peel the surface of your paper, even if you color over the same spot repeatedly. This is a total game-changer!


The Pupe markers are double-sided, with a brush tip and a 0.4 mm fineliner tip. They're non-toxic, acid-free, and fade-resistant. They come in a handy carrying case. And best of all, they are extremely inexpensive. But how is the quality? Fantastic! The ink goes down beautifully and my paper held up to 3-4 layers with no issues. Both tips are comfortable and easy to use. The colors are vibrant. If I have any complaint at all, it's that I wanted a paler grey for shading. I'd happily trade one of the oranges or reds for another grey or a light tan. But other than that, I absolutely love the Pupes. Here are the pages I colored: 


I know I said I wasn't going to announce my favorite art materials until after I've done all 50 State Quarters, but I will say that the Ohuhu's Pupe set is near the top. Here are all of the materials I've used previously:

A big thanks to Ohuhu for letting me test out the Pupe set. I'll be back to them soon, but for now I need to set them aside, find a different art material, and start on my next batch of State Quarter coloring pages.

7/15/24

50 State Quarters: Coloring Pages Featuring Ohuhu Markers

In 1999, the US government launched the 50 State Quarters Program. For the next ten years, the US Mint issued five new quarters each year (one every ten weeks) representing each of the 50 states, in the order that the states entered the Union. The front of each quarter had the same portrait of George Washington that's been used on the quarter since 1932. The back of the quarters featured designs unique to each state. The program was enormously popular; in fact, roughly half of the US population collected the coins. Approximately $3 billion worth of quarters remain out of circulation and in the hands of collectors. 

I was among the 50 state coin collectors. When the program began, I was teaching 5th grade. This meant handling a surprising amount of loose change - daily lunch money, Scholastic book orders paid for entirely with coins, fundraiser payments, etc. - which gave me access to more circulating quarters than the average person. When I found a new-to-me one, I swapped it out for one of my own quarters and made a point of showing the students who were interested what the new design looked like. It was great fun seeing what each state chose to represent itself. 

Indeed, the design was up to the individual states... with some limitations. They could not feature living people or state flags. Any deceased people had to pictured doing something - not just as a head-and-shoulders portrait. Obviously, any artwork needed to work as an engraved design on a metal surface less than 1" in diameter. Most states asked its citizens to submit designs, then sent a handful of those to the Treasury Department for approval. Approved images went back to the state. From those, either the governor (33 states) or the citizens (17 states) selected the winning design. The designs are quite varied. 

There are several fun "firsts" among the 50 state quarters. Alabama's is the first to feature braille on a coin. Hawaii's is the first to show royalty (King Kamehameha I). New Jersey's is the first to feature George Washington on both sides. 

The Mint has coloring pages of each of the 50 state quarter designs available for downloading. I chose four, which I colored with my Ohuhu Kaalas. The fine tip was perfect for getting into the small spaces. Relatively speaking, that is. The "small" spaces on my coloring pages are enormous compared to the engraved designs onto the surfaces of the quarters. 

Here is my interpretation of Nevada's state quarter. Because quarters aren't in color, I had some freedom in deciding how to color the design. It would be interesting to learn what the original artist envisioned. 


In the case of the New Jersey state quarter, I know exactly what the intended colors are. It was hard to reproduce Leutze's oil painting with markers, but I did what I could and took a bit of artistic license. 


The Oregon state quarter features a real place, the beautiful Crater Lake


I like how different Wisconsin's state quarter is from the others (which are, in turn, completely different from each other).  


I've printed out another set of state quarter coloring pages. I reluctantly put away my Ohuhus and will be using something else to color these. At least, that's the plan. I may end up back with the Ohuhus after all. 

4/3/24

Butterfly Flowers Card, Featuring the Colorado Hairstreak

It's great fun discovering that one of your punches can be used for a different design that it was intended. I've used my Fiskars butterfly punch many times over the years, but this is the first time I've used it as petals. Notice that I have the butterflies facing out on the left and facing in on the right. I couldn't decide which I liked better, so I put them both on the same card!


Obviously, I could have chosen any color for the butterflies, but I wanted to use one of the most beautiful state butterflies, the Colorado hairstreak. Affiliate links below. 


---------


Butterfly Flowers Card


Materials:


Steps:


Use white cardstock to make a card in your desired size. Blend blue ink on the paper to make a sky background. 


Punch out the desired number of flower centers and color them a yellowy orange using Ohuhu markers. Punch out butterflies (5 per flower) and color them as desired. I love the purple, orange, and black (and tiny white spots) of the Colorado hairstreak, but you can model yours after another species or just use your imagination. 


Cut stems and leaves from green cardstock. Then glue everything in place. I'm still not sure whether I prefer the butterflies facing in or facing out. 


In case you were wondering, Colorado's state flower (the columbine) doesn't look like this. It would have been really cool if I could have used the state butterfly to make the state flower. If I come across a state with a coordinating butterfly and flower, I'll definitely be doing that!

12/11/23

Christmas Stocking Drawing

I prefer Christmas cookies over Christmas candy, but it was still fun to do a quick drawing of candies tumbling out of a classic red stocking with white trim. 


Start by drawing a stocking in the lower left corner. 


Then start drawing candies. Overlap them and turn them every which way. 


Then color it in. I used Ohuhu markers for everything except the writing on the plumes. I used a light blue fineliner for that. 


Two weeks until Christmas! 

12/6/23

How to Draw a Sleigh Filled with Presents

Christmas is just around the corner. Celebrate by drawing a sleigh packed full of beautifully wrapped presents. I drew my sleigh with a Micron pen on Bristol Vellum and colored it with Ohuhus (affiliate links), but you can use whatever you have on hand. 


Start by drawing the body of the sleigh toward the bottom center of your paper. It's basically a smile with a hook on one end. 


Use a straight edge to draw parallel lines below the body of the sled to make the runners. 


Curve the ends of the runners upward on one side, then draw the pieces that connect the runners to the sleigh body. 


Now load up your sleigh with presents! Start by drawing three rectangles just inside the sleigh, then work your way backwards adding rectangles. 


Now add the details. Add wrapping paper patterns, ribbons, and bows to the gifts. Add some dimension to the runners by turning each line into a cane. 


Add some color and you're done!


Still have Christmas shopping to do? If you're looking for ideas, check out my Gift Guides! You'll find ideas for almost everyone on your list. And when you do buy, I appreciate you using my affiliate links. Happy shopping!