Showing posts with label insect. Show all posts

4/6/26

Crayon-Resist Swallowtail Butterfly

I liked the results of my wax-resist Colorado hairstreak butterfly so much that I used the same technique to make a different butterfly. This time, I chose the Eastern tiger swallowtail. It is the state insect of Virginia, the state butterfly of Delaware, Georgia, North Carolina, and South Carolina, and both the state butterfly and mascot of Alabama. Affiliate links below. 


Wax-Resist Swallowtail Butterfly


Materials: 


Steps: 


Because I wanted my Eastern tiger swallowtail to be accurate, I printed out a picture first at the size I wanted my finished project to be. Then I used the window to trace the butterfly onto watercolor paper. 


Next, I used yellow, orange, black, blue, and white crayons to color in the butterfly. Since this is a wax-resist project, press hard and leave a thick layer of wax where you want the paint to resist; color lightly in the areas where you want black to cover most of your crayon marks. 


Create a wash by mixing a few drops of black acrylic paint into some water. Brush the wash over the butterfly. The paint will resist the areas with crayon. When the paint is dry, cut out the butterfly. 


The wash dried a little lighter than I wanted, but it was an easy fix. I used a black colored pencil to darken the areas that needed to pop. Here you can see the difference between the right side that I've colored and the left side that has just the wash. 


Here is is with both sides colored. 


The Eastern tiger swallowtail is such a pretty butterfly! I'm really happy with how my project turned out. 

3/23/26

Wax-Resist Butterfly

It's been a really long time since I used black paint on a wax-resist project. I decided to utilize the technique to make a realistic butterfly craft. Mine is inspired by Colorado's state insect, the Colorado hairstreak butterfly. Affiliate links below. 


Wax-Resist Butterfly Craft


Materials: 


Steps: 


Because I was making my project based on a real butterfly and I wanted it to be as accurate as possible, I started by printing out a picture of the Colorado hairstreak. I used the window to trace the butterfly onto watercolor paper. 


The next step is using a variety of crayons to color in the butterfly. Layer the colors to get just what you want. Press hard and leave a thick layer of wax where you want the paint to resist; color lightly in the areas where you want black to cover most of the crayon marks. 


Create a wash by mixing a few drops of black paint into some water. Brush the wash over the butterfly. 


When the paint is dry, cut out the butterfly. Then, use a colored pencil to draw the veins on the butterfly's wings. Press hard - this will carve out some of the wax from the thick areas, providing a nice contrast. 


I'm really happy with how my Colorado hairstreak turned out. I may end up doing something similar with other butterfly species.

4/3/24

Butterfly Flowers Card, Featuring the Colorado Hairstreak

It's great fun discovering that one of your punches can be used for a different design that it was intended. I've used my Fiskars butterfly punch many times over the years, but this is the first time I've used it as petals. Notice that I have the butterflies facing out on the left and facing in on the right. I couldn't decide which I liked better, so I put them both on the same card!


Obviously, I could have chosen any color for the butterflies, but I wanted to use one of the most beautiful state butterflies, the Colorado hairstreak. Affiliate links below. 


---------


Butterfly Flowers Card


Materials:


Steps:


Use white cardstock to make a card in your desired size. Blend blue ink on the paper to make a sky background. 


Punch out the desired number of flower centers and color them a yellowy orange using Ohuhu markers. Punch out butterflies (5 per flower) and color them as desired. I love the purple, orange, and black (and tiny white spots) of the Colorado hairstreak, but you can model yours after another species or just use your imagination. 


Cut stems and leaves from green cardstock. Then glue everything in place. I'm still not sure whether I prefer the butterflies facing in or facing out. 


In case you were wondering, Colorado's state flower (the columbine) doesn't look like this. It would have been really cool if I could have used the state butterfly to make the state flower. If I come across a state with a coordinating butterfly and flower, I'll definitely be doing that!

4/5/23

Monarch Caterpillar Craft

Sharing the photo of Eric Carle's messy studio got me thinking about the Very Hungry Caterpillar, which in turn got me thinking about actual caterpillars. There are tons of butterfly crafts (here are six of mine) but with the exception of the Very Hungry version, there are not a lot of caterpillar crafts. Since the monarch caterpillar is distinctive, beautiful, AND the larval form of the state insect of 7 states (Alabama, Idaho, Illinois, Minnesota, Texas, Vermont, and West Virginia), it was the perfect choice. 


I chose to use yellow and white paint on black cardstock for my monarch caterpillar. If you use black and yellow paint on white cardstock, you'll get better coverage. If you want to avoid paint altogether, just cut the stripes from the appropriate colors of cardstock or construction paper. 


Monarch Caterpillar Craft


Materials:

  • cardstock or construction paper
  • paint and black pen (optional)
  • scissors
  • glue

Steps:

Cut out the following caterpillar body parts from cardstock or construction paper: 1 oblong body (slimmer than the one below- I trimmed mine later), two large tentacles (filaments) and two smaller ones, four prolegs, and three true legs. Insects, including caterpillars, have six legs but only three will show on each side. 


Paint white stripes onto the caterpillar's body. At this time, add a circle of white onto each proleg. If you are using paper instead, cut strips for the body and circles for the prolegs and glue them in place. 


When the paint has dried, paint every other white stripe yellow. (Or, glue strips of yellow in place.) Let the paint dry, then use the pen to draw black lines on either side of each yellow stripe. At this point, I realized my caterpillar came out a bit more plump than the real thing, so I trimmed it. 

Glue the tentacles, prolegs, and legs into place.  


Indulge me in a brief soapbox moment regarding monarch caterpillars. You may have pleasant memories of raising monarchs as a kid. It is fascinating to see them go through their life cycle and it feels amazing to release them into the wild. This used to be a fairly common practice in elementary classrooms, but captive rearing is now thought to be harmful. Those who care about the future of monarchs should focus on efforts to protect their breeding and overwintering territories. Our kids' kids and their kids deserve to have a world filled with monarchs, too.  


3/24/22

Pretzel Monarch Butterflies

I've used pretzels to make a butterfly craft before, but that was a savory project suitable for young children. This is a sweet craft, better for preteens and up. I had a lot of fun figuring it out as I went and I'm happy with the end results. Affiliate links below. 


Pretzel Monarch Butterflies


Materials:


Steps: 


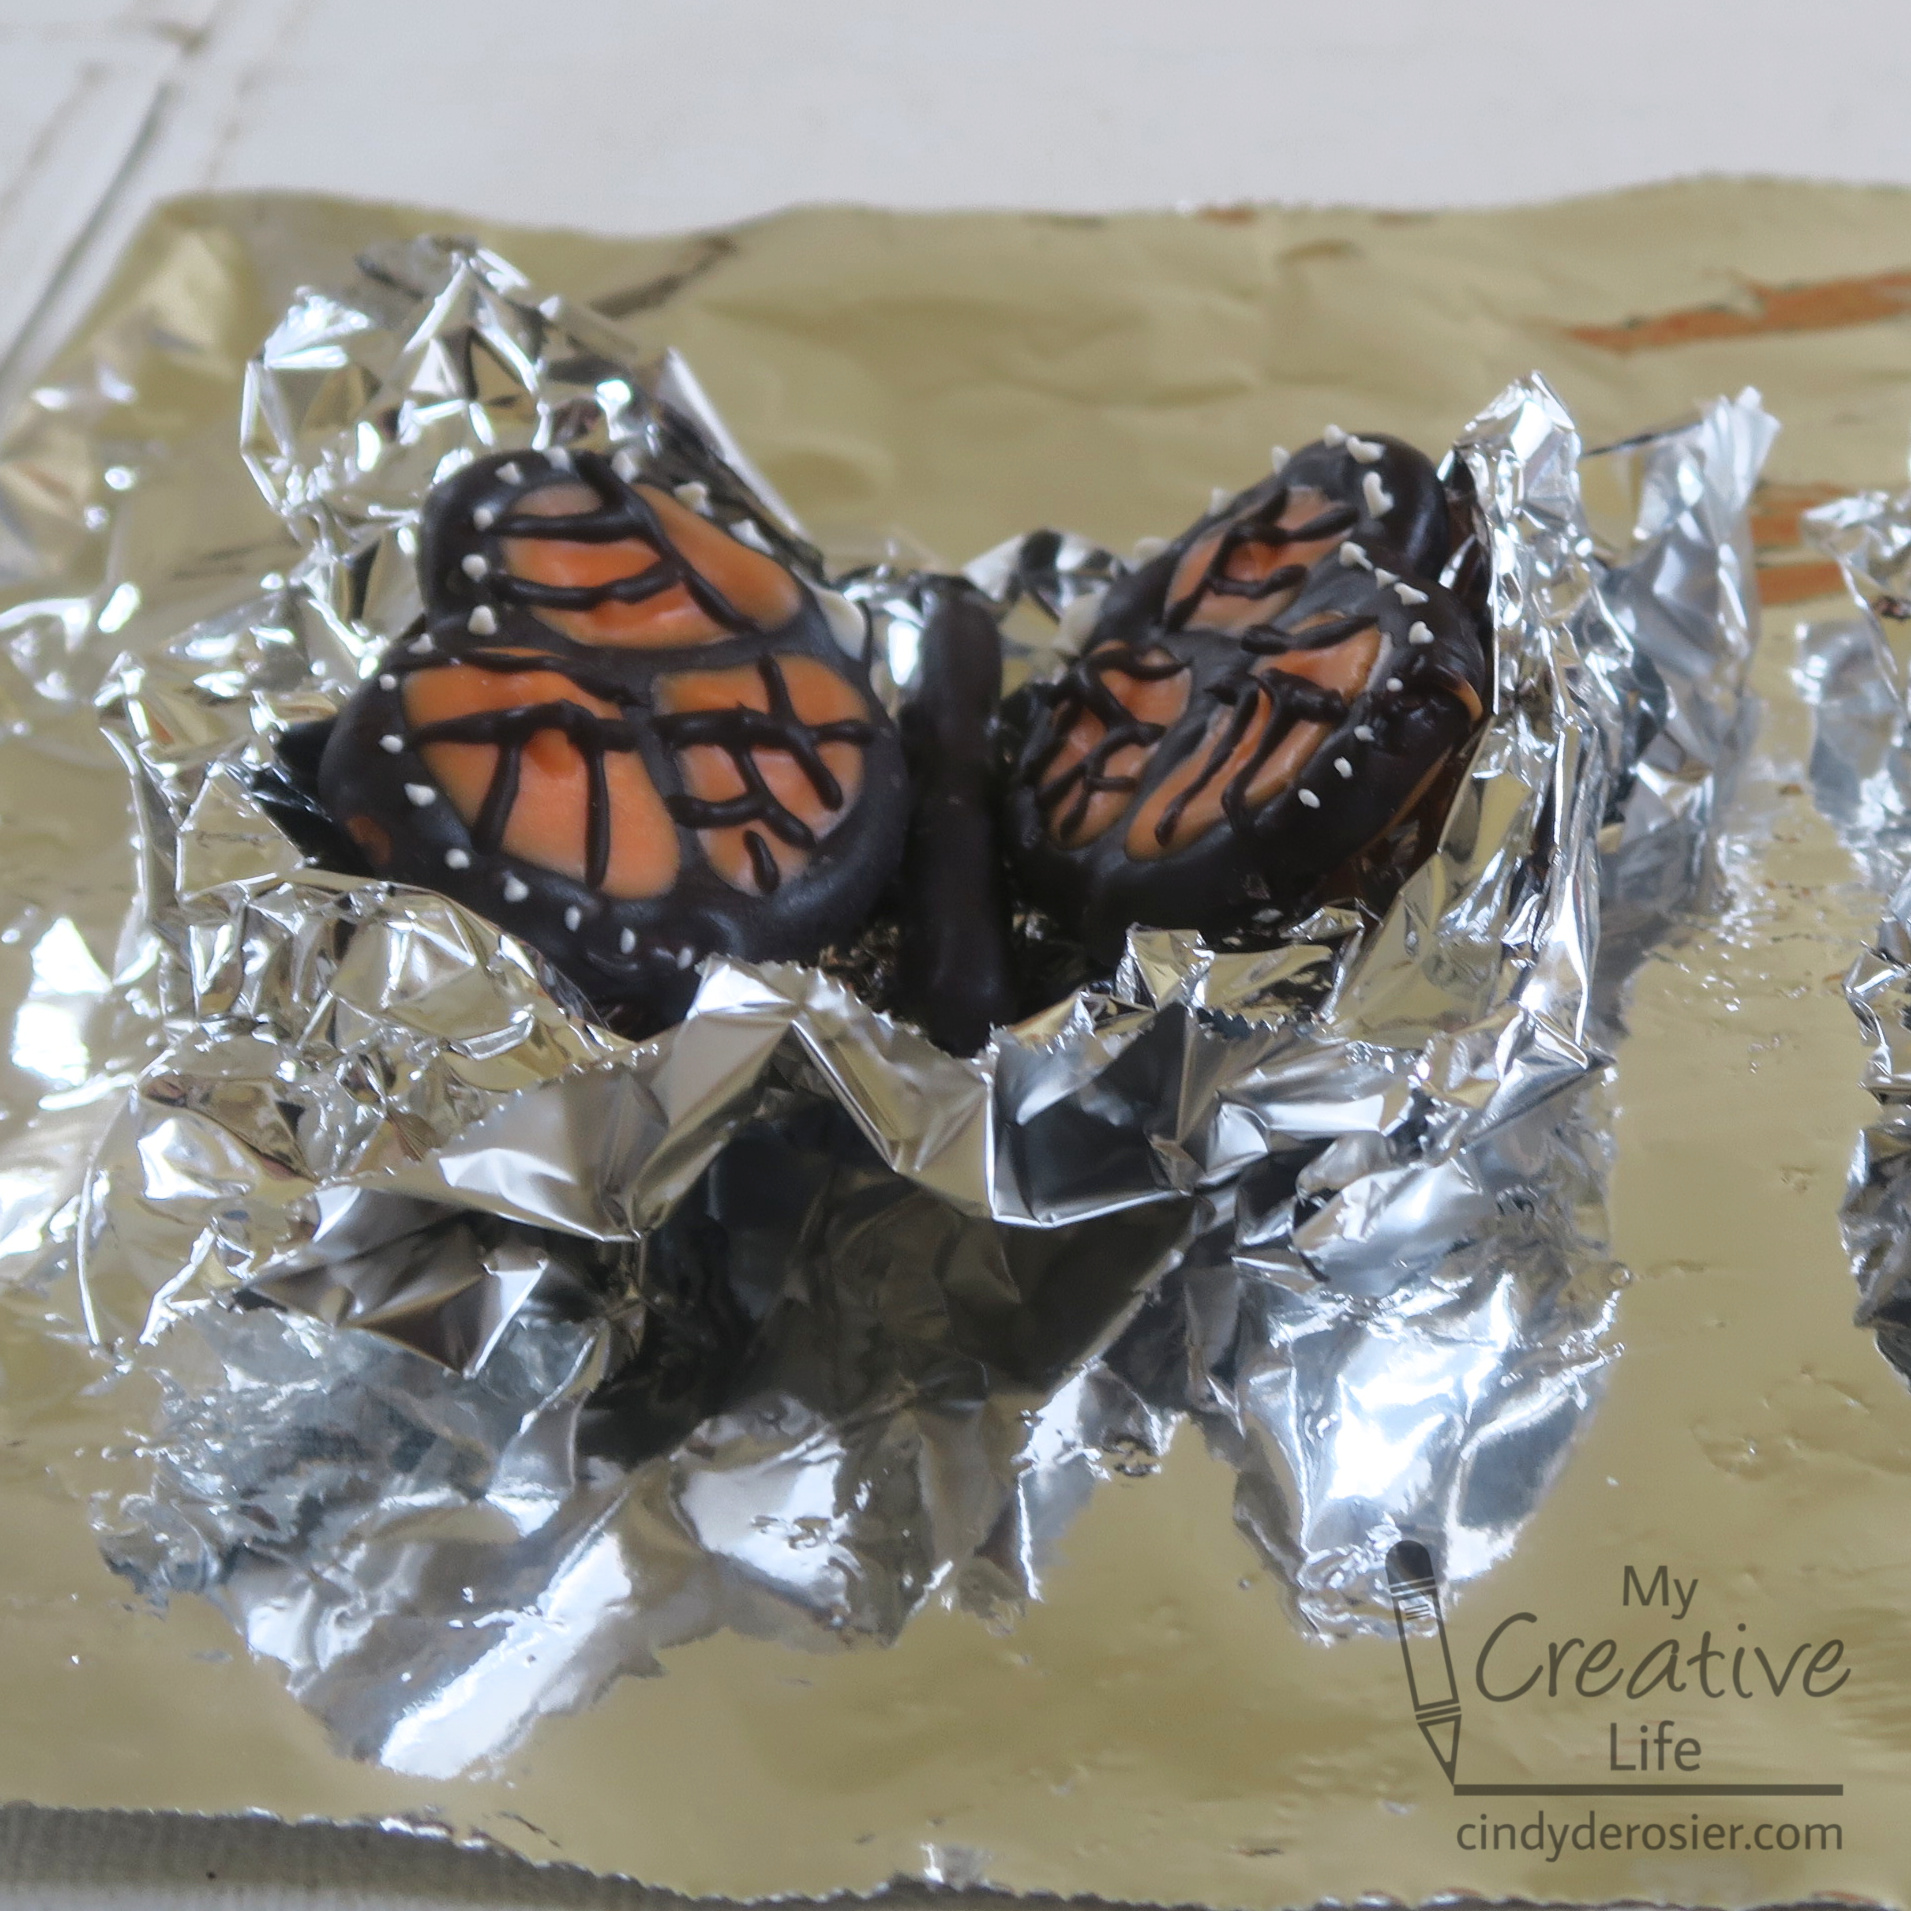
Place a sheet of parchment paper underneath a wire rack. Prepare the black candy melts following the directions on the package. For each butterfly, dip two pretzel twists and one pretzel stick into the melted black candy, then transfer them to the rack. I used a sharp knife to make the pretzel sticks shorter; whether you need to do this or not depends on the brand you use. After the pretzels have sat for 30 seconds, transfer them to a different part of the rack so that they don't stick. Let them set completely. 


You'll be melting more black candy, so don't clean that container yet. 

Move the rack, then transfer the pretzels to the parchment paper. Prepare the orange candy melts. I experimented with different methods of filling the holes of the pretzel twists with orange (see failures below). I found the easiest and most effective method was spooning a dollop of melted candy into each opening, then using an extra pretzel stick to push it over the black candy. The goal is to leave a thin border of black between the orange areas. 

In retrospect, I should have used the scribe tool to get rid of the peaks in the orange that the pretzel stick left. 


When the orange has set completely, prepare more black Candy Melts. Use the scribe tool to draw lines of black candy across the orange to mimic the patterns of a monarch butterfly. Symmetry is more important than accuracy, so work on both the left and right wings at the same time so that you end up with matching pairs. Let the black candy set. Don't clean the container or the scribe tool - you'll use both again.  


Prepare a small amount of white Candy Melts in a separate container. Use a clean scribe tool to put dots along the outer edges of the pretzels. Again, work in pairs and focus on symmetry. Let the white candy set. 


Crumple a small piece of foil into a cradle to hold the butterfly wings in the position you want. Do this for each of your butterflies. Carefully remove the pretzel twists, keeping the stick pretzels in position. Melt more black candy. Working on one butterfly at a time, use the scribe tool to paint a line of melted candy along each side of the stick pretzel, then gently place the pretzel twists back into position.  


Reinforce the wings by adding a bit of extra black candy along the point where the wings meet the body. Let the candy set completely, then remove the butterflies and place them onto frosted cupcakes. 


Happy spring, everyone! Celebrate with a cupcake. 

4/16/21

Ladybug Magnifying Glass Craft

Ladybugs are awesome. Even if they weren't as pretty as they are, they'd be awesome simply because they eat aphids. I've been fighting my annual backyard battle with aphids for the past two weeks and am thrilled when I find a ladybug who has joined me in the fight. Or, from its perspective, the buffet. 

There are already a gazillion ladybug crafts out there, but few portray ladybugs realistically, which was my goal with this craft. Affiliate links below. 


Ladybug Magnifying Glass Craft


Materials:


Steps:


Punch a 2" circle from black cardstock to make the base of the magnifying glass. Cut a long narrow rectangle for the handle. 

Cut a blue background into your desired size. (Mine is approximately 4" x 6".) Punch a 1.5" circle from the scraps. 

Punch a 1.5" circle from the green cardstock, then snip off the top and bottom. Cut the scraps into blades of grass. 


Cut three ladybug shapes from red cardstock. One should be about the same width as the green partial circle above, and the other two should be much smaller. 

Use a reference photo to draw the black details onto the ladybugs, using a Sharpie. Then add the white details with the gel pen. 


Now it's time to assemble. Glue the grass to the bottom of your background paper, making sure there's a long blade in the center. Then add the magnifying glass and handle. I tucked the magnifying glass under a few blades of grass and over some others. 


Center the blue circle onto the magnifying glass and glue it in place. 


Add the partial green circle, orienting it so that it looks like a magnified blade of grass. Glue the largest ladybug onto it, then drag its six legs. Glue the other two ladybugs to blades of grass that aren't being magnified. 


I had a lot of fun putting this together. Yea, ladybugs!

3/10/21

Pretzel Butterfly Lunch

I met a mom recently who told me she is frustrated because her 5-year old daughter never wants to stop playing in order to eat. She asked if I had any suggestions to help her get her daughter excited about mealtime. I suggested she look through my edible crafts for ideas, but I also wanted to dream up something fun for that little girl to combine her love of play with her need to eat. I think these butterflies might be just the thing.
 

I chose the ingredients and quantities based on what a 5-year old might eat for lunch. You can, of course, substitute other ingredients and change the amounts to suit your child's needs and preferences. Affiliate links below. 


---------


Pretzel Butterfly Lunch


Ingredients:


Instructions: 


(Note: Before giving the ingredients to the child, an adult should use a sharp knife to cut 2 antennae per butterfly. If the child is younger than school age, an adult will need to help spread the ricotta; older children can do this themselves.)
 
Line up pairs of pretzels to make butterfly wings. Spread ricotta on the front side of each wing, then decorate it with peanuts, dried fruit, and candies. Continue until all the wings are decorated. 


Place a baby carrot between each set of wings, then add a pair of antennae at the top. Eat your butterfly creations and any leftover toppings right away while they are fresh and delicious.


This would be really fun as part of a full day of butterfly crafts!

8/30/19

Peanut Picnic Ants

Inspiration can come from the most random things. I was eating peanuts in the shell when I realized my pile of discarded shells looked like a trail of ants. So naturally, I made this:


First, I painted the peanut shells with black acrylic paint (Plaid, of course), and set them aside to dry. I glued scraps of green, white, and red cardstock together, then cut the stack on an angle to make the wedge shape. I used a Sharpie to draw watermelon seeds. I glued the watermelon to the plate, then arranged the peanut shells to make a trail up and over the plate with the watermelon slice. Simple and cute.

This project reminds me of one of my absolute favorite books from childhood. 


I LOVED "I Can't" Said the Ant when I was a kid. I still love it.

8/28/19

Dragonfly and Damselfly Garden Stakes

As you know, I'm a Plaid Ambassador, which means that the folks at Plaid send me boxes of products to try. (I know. Coolest thing ever.) When I opened a box with two bottles of  Dragonfly Glaze (affiliate link here and throughout the post), naturally I used it to make dragonflies! (Actually, one dragonfly and one damselfly.) They look so cute bobbling around in my houseplant.


---------


Dragonfly and Damselfly Garden Stakes


Materials:


Steps:


Paint a jumbo craft stick the color you'd like your dragonfly or damselfly to be. (I made one green with mini craft sticks representing Washington's state insect, the green darner dragonfly, and one blue with standard craft sticks, representing Nevada's state insect, the vivid dancer damselfly.) Paint the mini or standard craft sticks white. When the paint is dry, give each a coat or two of Dragonfly Glaze.

When the glaze is completely dry and you're happy with the shimmer, glue the eyes and the wings to the body. Leave a small gap between the wings. When the glue is dry, place a white Twisteezwire between the wings.


Twist the two ends of the wire together close to the insect's body. Then continue to twist the two wires around each other. 


Thread the twisted wire into a clear drinking straw, then press the straw into the potted plant. Adjust the wire as desired. 


My dragonfly and damselfly will be staying indoors, but you could put these in the garden instead. A coat of sealant will help it stay intact and shimmery throughout the growing season.

5/17/19

Rose Diamond Art and a Queen Bee

Have you gotten into Diamond Art yet? I absolutely love it. I find it so relaxing. And despite my aging eyes, my awesome magnifying lamp means I can see actually see what I'm doing, day or night! I recently finished Leisure Arts' gorgeous Rose Diamond Art. I cut away the background and temporarily set the rose down onto a piece of blue cardstock to get an idea of how it would look for a project I'm considering. 

I love the rose against the sky blue and will probably proceed with the project I have in mind. But in the meantime, the rose makes the perfect accessory for my latest kids' craft, a Queen Bee. 


---------

Queen Bee


Materials: 


Steps: 


Use the scissors to cut the following pieces, as shown in the picture:
  • large yellow body
  • small yellow head
  • pointy black stinger
  • thin pink wand
  • small silver star
  • silver crown
  • 2 wax paper wings


Set aside the pink and the black scraps. You'll need them later.

Use the Sharpie to draw vertical stripes on the body. Curve them as shown. 


Assemble the bee by gluing the head in front of the right side of the body. Glue the stinger behind the left side of the body. Glue one wing to the front of the body, pointing toward the back. The other wing goes behind the body, pointing toward the front. Attach the crown to the head and the star to the end of the wand. 

Draw eyes, eyelashes, and a smile on the bee's face. 

Cut six very skinny legs from the black cardstock scraps and glue them to the body. Three go in front (the bee's right side) and three go in back (the bee's left side). I positioned the right legs to match up with the black stripes. 

Cut 3 tiny diamonds from the pink cardstock. Cut one in half vertically, then add these 'jewels' to the crown. Cut an even tinier heart to make the queen's lips. 


Note that I temporarily added black paper behind the wings in order to get them to show in the photo. In real life, they are just wax paper and look good, but they simply wouldn't photograph or scan well. 

Another project for my Invertebrates page!

1/30/15

Twisteezwire Critters

I was browsing the Twisteezwire website while writing up my review of their Mask Kit when their Puzzle Piece Bug tutorial caught my eye. I'm always on the lookout for fun crafts using puzzle pieces! (You may recall the ridiculous situation with a puzzle purchase awhile back that resulted in me having a large stash of useless puzzle pieces.) I showed the tutorial to Trevor and he was totally onboard with the idea of making puzzle piece Twisteezwire bugs. Affiliate links below. 

We each started by choosing a puzzle piece and Twisteezwire. We followed the steps to make three sets of legs to create a basic insect. We continued with the antenna. Then we used Glue Dots to attach googly eyes. With the basic technique mastered, we were able to use our own creativity to make some totally cute (if I do say so myself!) critters. Introducing....
  

Dot, the Ladybug
(by Cindy)


To make Dot, you need a red puzzle piece, 3 Twisteezwires (red, black, and white), six red beads, two googly eyes, glue dots, six black sequins, glue, and wax paper. Make a basic bug with the puzzle piece, red legs, and black antenna. Slide a bead about 1/2 inch up each leg and twist to secure. Add eyes. Create wings by looping the white wire, sliding it through a set of legs on the underside of Dot, then forming another loop. Tear two small pieces of wax paper that are slightly larger than the loops. Put glue on the back of the loops, then attach the wax paper. Let the glue dry completely, then trim the excess wax paper away from the loops. Glue the sequins to Dot's back.


Buggy, the Bug
(by Trevor)


To make Buggy, you need an orange puzzle piece, two Twisteezwires (green and orange), six orange buttons, two googly eyes, and glue dots. Make a basic bug with oversize antenna. Thread each leg through the button holes, then twist to secure. Add eyes.


Chesapeake, the Blue Crab
(by Cindy)


To make Chesapeake, you need a neutral-colored puzzle piece, Twisteezwire (blue and black), eight blue beads, two black beads, glue dots and googly eyes. Start by making a basic bug. Add a bead to each of the middle and back legs, twisting to secure. Add two beads each to the front two legs to form claws. Cut a small length of black wire for the eye stalks and attach like you would antenna. Glue googly eyes in place.


Spinner, the Spider
(by Trevor)


To make Spinner, you need a neutral puzzle piece, tan Twisteezwire, a large black pom pom, a medium black pom pom, glue, glue dots, and googly eyes. Begin by cutting the tan Twisteezwire into fourths, not thirds like usual. Attach the first three sets of legs as usual, and add the final set of legs opposite the third set, using the same technique. Bend up the end of each leg slightly to allow Spinner to balance. Glue the large pom pom onto the back of the puzzle piece and the medium pom pom onto the front. Use glue dots to attach the googly eyes to the face.

........

What do you think? Any favorites? Trevor is already talking about the next set of critters we're going to make!