Showing posts with label Christmas. Show all posts

5/14/25

Idaho, December 2024

Today's scrapbook layout is from the December 2024 visit Trevor and I took to see our family in Idaho. We stayed for five nights and packed our time with family fun - lots of games, an early Christmas celebration, and a trip to Zoo Boise where we fed anteaters. (We did not feed them ants. We fed them yogurt. They love yogurt.) We had a great time. 

Idaho December 2024 (affiliate link)

I completed this page during the National Scrapbook Day event, but it was not inspired by a challenge. If I have any complaints about scrapbook crops, it's that most of the challenges are not compatible with getting lots of photos on a page. For example, one of the challenges from this year's event required participants to fill at least 1/3 of the page with stickers and tiny scraps before adding a photo and journaling. Another challenge requires you to follow a 2-photo sketch, use shades of green, add two patterned papers featuring hearts, AND put your journaling in word bubbles. That is an incredibly difficult challenge with just two photos and literally impossible with nine. 

5/1/25

Scrapping the 2024 Christmas Card

At first, I was stumped about how to scrap our family's 2024 Christmas card. It doesn't use traditional Christmas colors and the photos were clearly not taken during the winter, so the usual Christmas papers and embellishments would look weird. I ended up layering Christmas stickers over labels in order to make this: 

Christmas Card 2024 (affiliate link)

It was really fun playing with all the stickers and I'm happy enough with the completed layout. Into the album it goes!

2/24/25

Christmas 2024

Last week was the final game of Bash Bowl VII. After two games, the score was tied. My team, Twisted Scissors, won Game 1. Our opponents, Scrappin' Banshees, took Game 2. As they say, it all comes down to this. 

Here is my contribution for Game 3:

Christmas 2024 (affiliate link)

It's busier than my layouts usually are, but I'm happy with it. I've had those patterned papers and die-cuts for years; SEI released "Holiday Cheer" in 2011. So I'm glad to finally have used them. 

Here are the elements for Game 3:


I earned three points for Twisted Scissors: one for ephemera I sprinkled at the top left and bottom right; one for a textile (that's a white ribbon above the photo); and one for the Project Life cards that I layered above the photo and that are holding my journaling. It would have been easy enough to add buttons, but I didn't want the lumps and since I wasn't going to do paper distressing anyway, it would only have meant a single extra point.

12/16/24

Merry Christmas 2024!

Happy holidays from the deRosier family!
 

I will be taking my annual blog break and will return on January 1. Wishing you a wonderful holiday season.

12/12/24

Fireplace Christmas Ornament

Part Two of my Pinterest challenge was to make a craft inspired by something on my Christmas Crafts and Gifts Pinterest board. I chose a super cute fireplace ornament by I Heart Crafty Things. I made a few tweaks and came up with this:
 

This is the original: 


As you can see, the basic concept is the same. I replaced the cardstock logs with mini craft sticks, which I decorated to look more like logs. I colored the main part of the fireplace like bricks and left the mantel wood. I shrunk the stockings significantly, added a third, and wrote in names: Trevor and his cousins, Timothy and Allison.

Below you'll find a tutorial that includes the changes I made. Definitely check out I Heart Crafty Things' detailed tutorial; Caroline includes a video plus photos for almost every step. And, of course, she is the original artist who came up with the idea. Affiliate links below. 


---------


Fireplace Christmas Ornament


Materials: 


Steps:


Paint three of the regular craft sticks and all of the mini craft sticks brown. Paint the remaining five regular craft sticks red. 

While the paint is drying, cut out the cardstock. Cut a black square that is approximately 4" and set it aside. Cut out however many stockings you want. Write the names on the stockings with the Posca pen, then glue white trim to the main part of the stocking. Tear the tissue paper to make flames. 

When the paint is dry, use the white Scribe-All pen to draw three lines down the length of each of the red craft sticks. The lines don't need to be perfect - freehand is fine. Then draw short vertical lines to represent the mortar between the bricks. Use the brown colored pencil to draw arcs at the ends of the mini craft sticks, as well as woodgrain along their length. 

Arrange four of the brick-painted craft sticks vertically to form the sides of the fireplace. Lay the final brick-painted stick across the bottom of those sticks and glue it in place. Then glue the remaining standard craft sticks side by side across the top. Allow the glue to set for a few minutes.

Glue the black cardstock to the back of the fireplace, then glue the tissue paper in place. Arrange the mini craft sticks over the tissue paper at the bottom of the fireplace. Glue the stockings to the mantel. 

Cut a length of twine and glue it to the back of the ornament to make a hanger. 

11/25/24

Quilled Cross Ornaments

Quilling is a great craft. It's inexpensive and easy to learn. The projects you make can be as simple or as complex as you want them to be. This simple quilled cross ornament is a great project for people who are totally new to quilling. Affiliate links below. 


Quilled Cross Ornament


Materials:


Steps: 


Cut four crosses from white cardstock. You will be using one whole cross plus three extra borders for each ornament. 


Glue the borders, one at a time, on top of the base cross. You’re forming a barrier that will hold the quilled shapes in place. 

If you are not able to find a die with a border like this (I wasn’t able to find this particular die for sale online to link to it), you can glue a quilling strip on its edge to form the border. This is the more traditional method for quilling. You can use that technique for any shape, which makes it a lot more versatile. 

Now start quilling rolls. You can make loose or tight curls, teardrops, marquise shapes, or a combination of them. As you complete each roll, glue it in the cross. Continue until the entire area is filled. 

You can get completely different looks depending on what rolls you use to fill the cross. The cross on the left has a variety of shapes arranged symmetrically, while the cross on the right has a single shape in different sizes. 


Open a paperclip to make a hanger. Attach it to the back with hot glue or a piece of tape. Your ornament is ready to hang on the tree or to display anywhere in your home. 

2/23/24

Bash Bowl 2024: Happy Holidays 2023

After scrapping our family photo from Christmas for Bash Bowl Game 1, I used the prompt a second time to scrap our holiday card. Between the colors I used and the fact that the photo was taken in July, this is officially the least-Christmasy Christmas layout I've ever made. 

Happy Holidays 2023 (affiliate link)

I used three of the Game 1 prompts for this page. Maybe. Let me know if you think I deserve all three points. 
  • I feel confident that the "may your days be merry & bright" sticker counts for a song lyric. That's one point. 
  • I'm fairly confident that the metallic star stickers are shiny. Two points. 
  • Do my background stripes count as a rainbow? I cut apart a striped paper and rearranged the colors into rainbow order. Without red, orange, or purple, it's half a rainbow at best. But it wouldn't be on my page that way without the prompt. I don't think half points are allowed, but I'm calling this two and a half points!
Trevor has had the previous week off from high school (college classes still met), so he and I took two local field trips as part of his Senior Project. I'll tell you about them next week. 

2/22/24

Bash Bowl 2024: Christmas 2023

Bash Bowl is back and I'm excited to be playing along! There are some changes this year: there are three 1-point elements (previously there were five) and one 2-point element per game with a 5-point touchdown (instead of 7); we do not need to submit a 'before' photo; and each game is only three days long. I'm playing for the Scrappin' Banshees this year. Goooo Banshees!

Here is the playbook for Game 1: 


I was not happy when I saw this first playbook. The pictures I printed wouldn't make sense with a rainbow, and I couldn't think of any song lyrics or quotes that fit them either. I don't use a lot of shiny stuff in general, and I don't like interactive elements that get hidden in a page protector. Ugh. I could force all of those onto a page, but I wouldn't be happy with the results. I decided to just go for a single point: shiny. 

I matted our group photo from Christmas, then used shiny gold tape and a fun patterned paper to create a background that looked like gift wrap. As I was looking for embellishments, I found a vellum sticker with Christmas song lyrics on it! I adhered it directly to the photo, added the other embellishments, and finished with the date. Two points for the Banshees!

Christmas 2023 (affiliate link)

This is a rare page from me with no journaling. But I felt like whatever I would write ("We hosted Steve's family for Christmas 2023.") wouldn't add anything to the page. One could argue that future generations won't recognize the people, but: a) I have no confidence that my only child is going to keep my scrapbooks and pass them on to those future generations; b) everyone's name appears on other pages within the same scrapbook; and c) I can just list the names here. Top row left: Steve's sister Teri, his aunt Lois, his mom Pat, his dad Dave, and Steve. Bottom row: Steve's wife Cindy (aka, me) and his son Trevor. Everyone has the last name deRosier - Pat and me by marriage and everyone else by birth. You're welcome, future generations!

12/15/23

Merry Christmas 2023!

 Happy holidays from the deRosier family!
 

I will be taking my annual blog break and will return on January 1. I hope you all have a wonderful holiday season. 

12/12/23

Edible Christmas Wreath

Three years ago, I shared an edible Advent wreath that was super fun to make and turned out really cute. Today's craft is another wreath. But this time it's a Christmas wreath and it's made from different items. See if you can guess what I used, then scroll down to find out! Affiliate links below. 


Edible Christmas Wreath


Materials:


Steps: 


Cover your work surface with parchment paper, then melt the Dark Green Candy Melts following the instructions on the package. 

Coat a pretzel ring with candy, then use the skewer to set it on the parchment. Sprinkle some nonpareils onto the pretzel, then add sugar sprinkles. If you have a partner to do this, that is very helpful. Working alone, I dipped three pretzels before doing the sprinkles for each. (By the way, you can make your own colored - and flavored - sanding sugar very easily.)


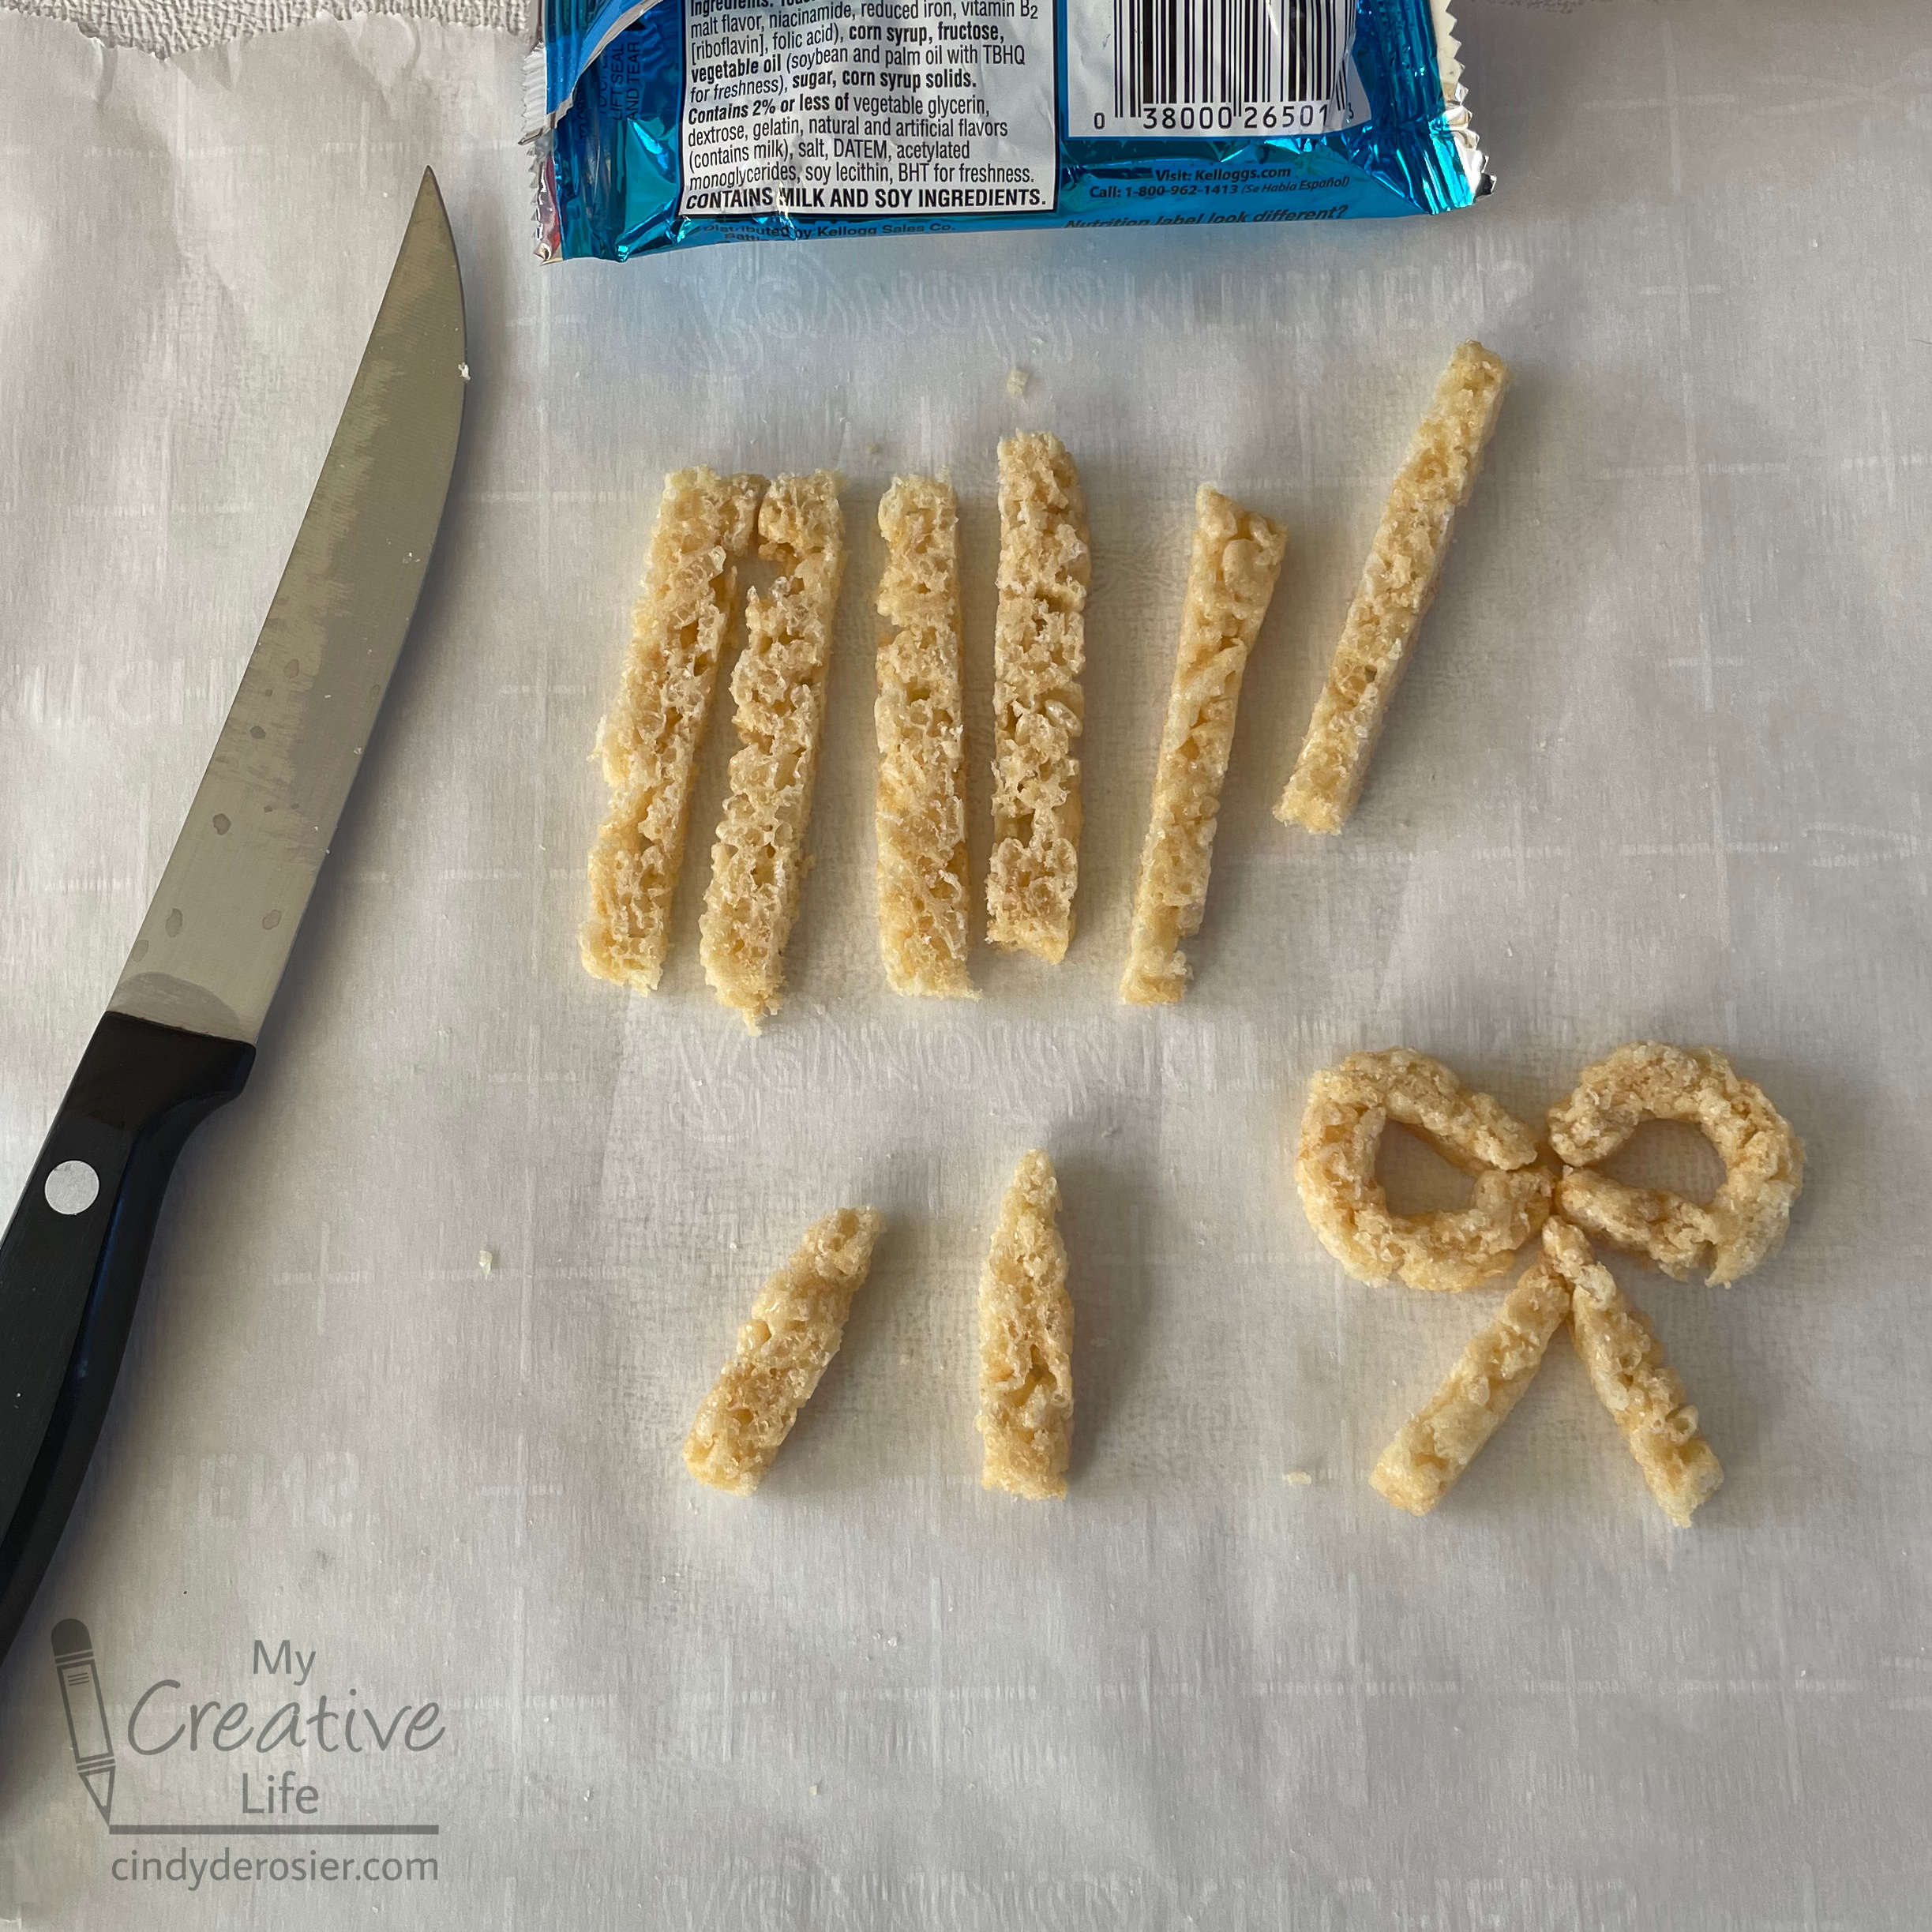
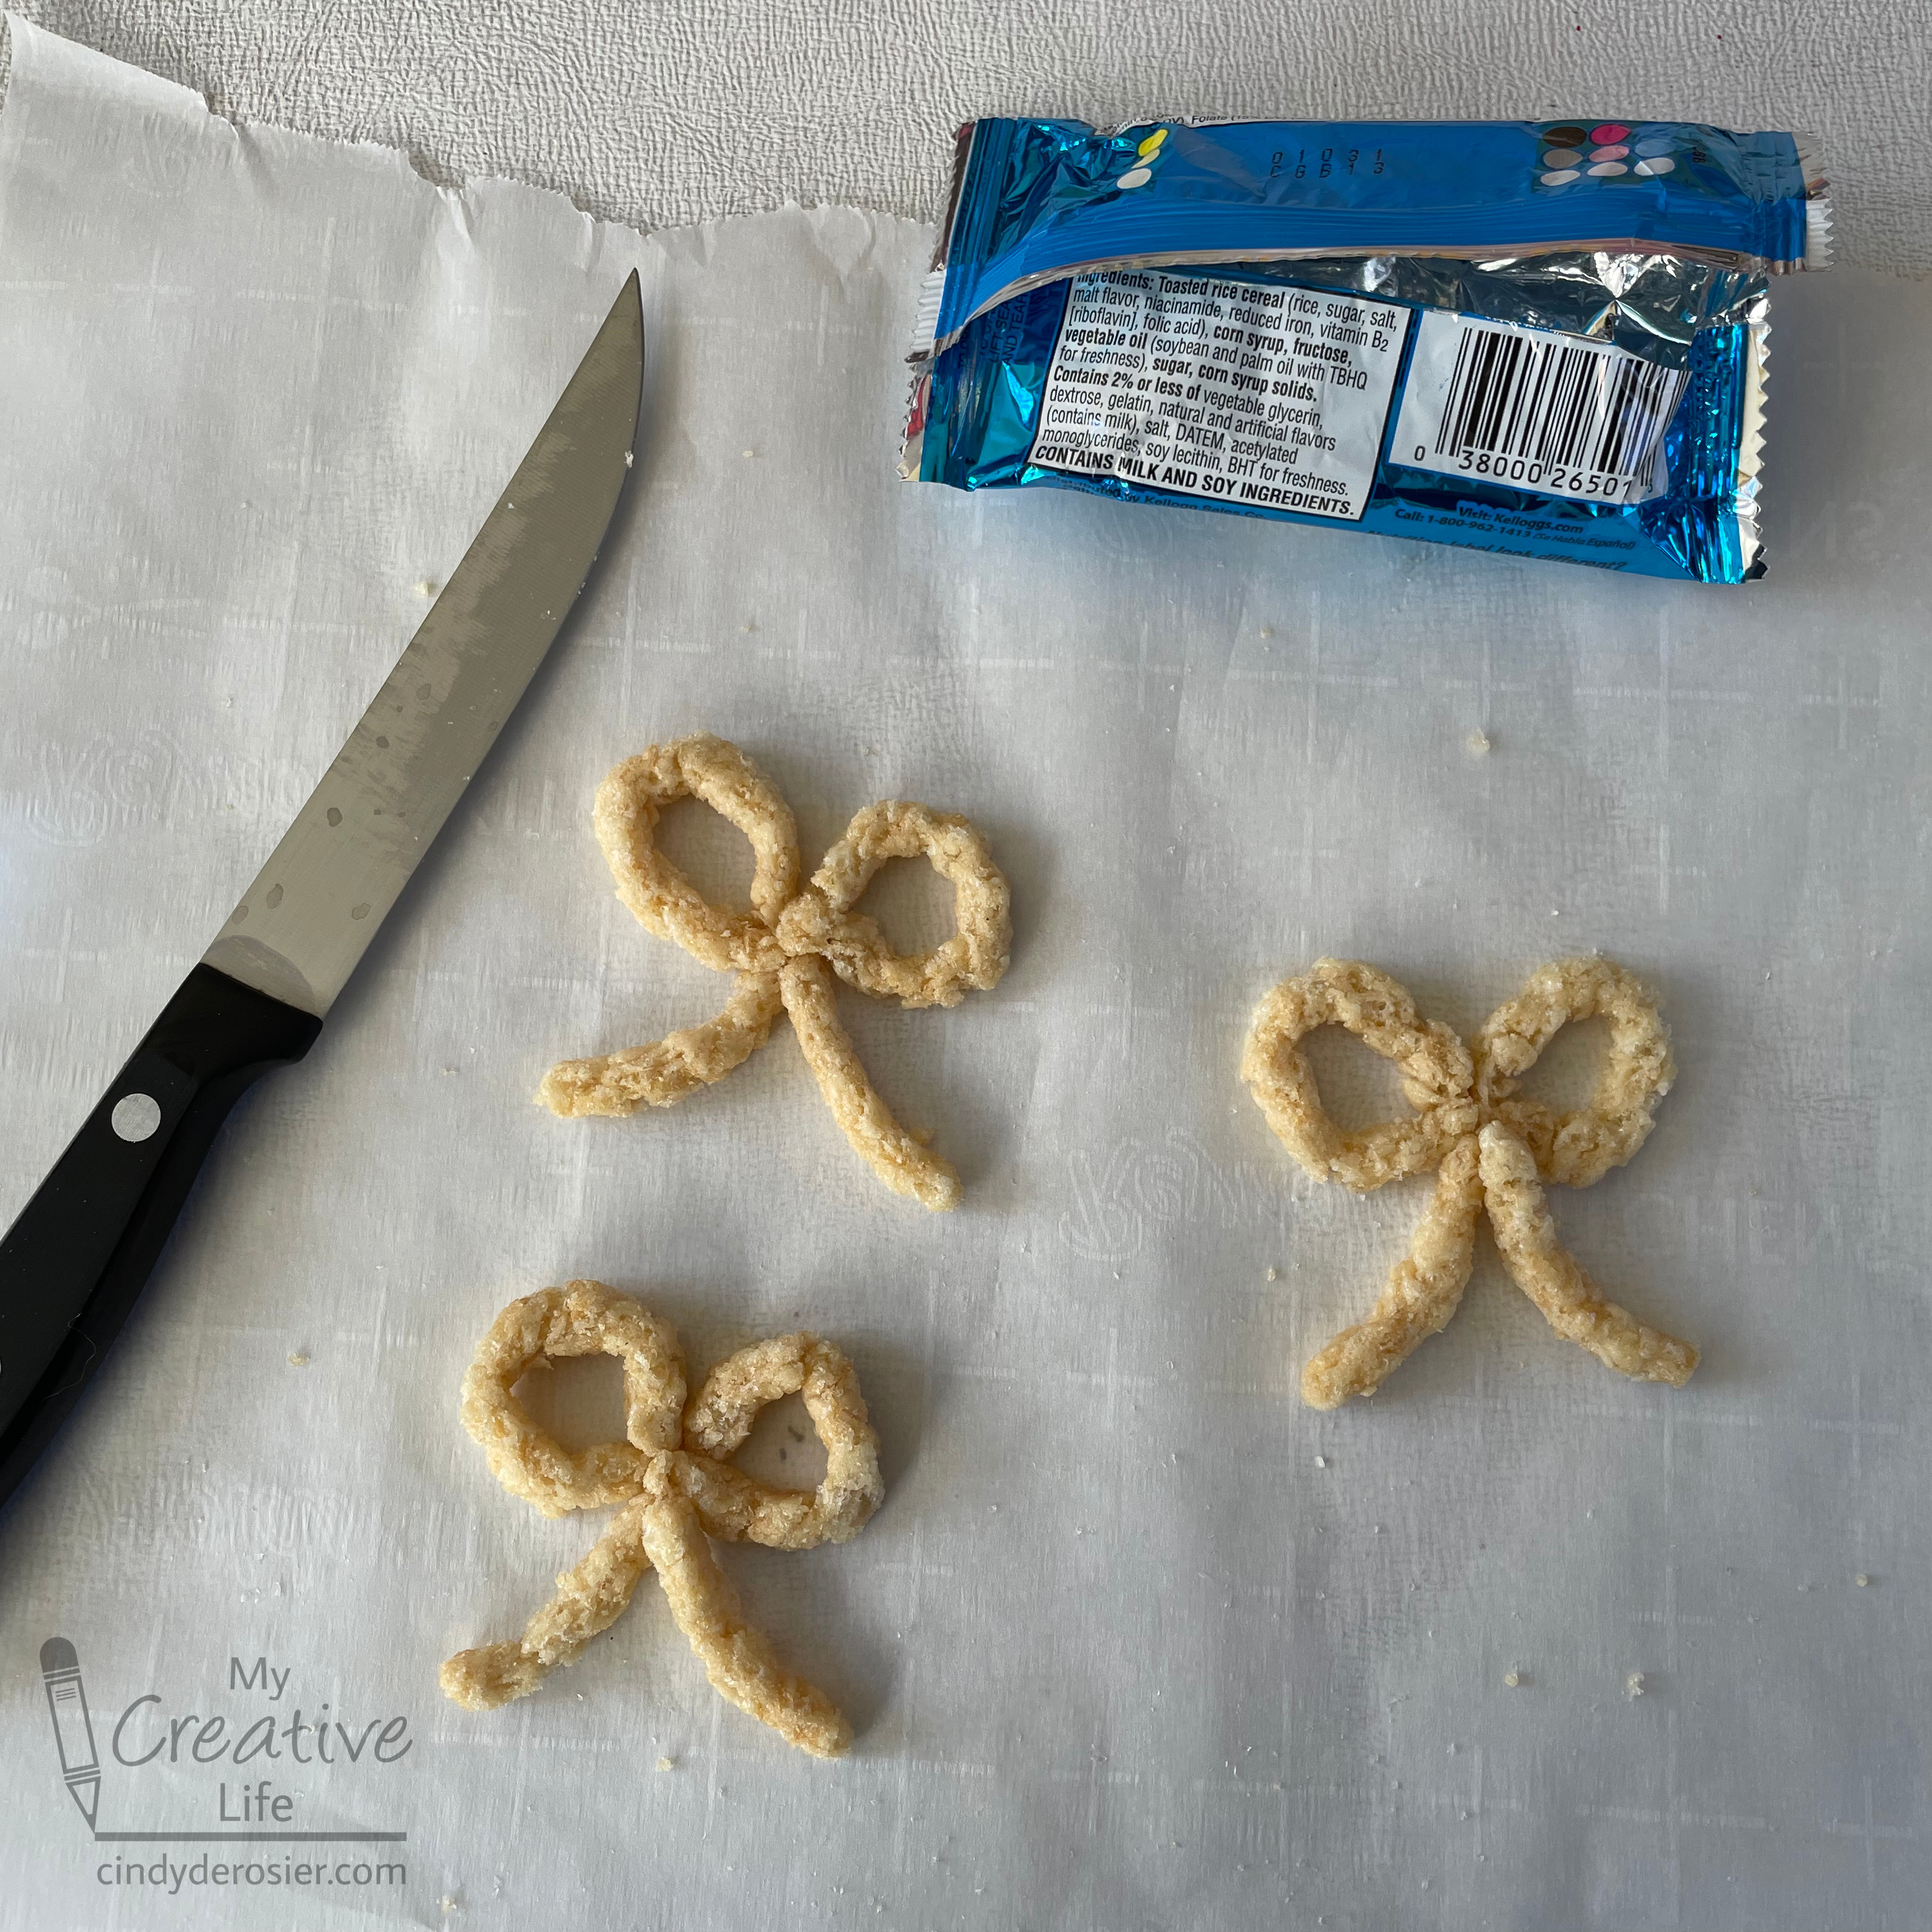
While the mini wreaths are hardening, use a sharp knife to cut a Rice Krispie Treat into thin slices. Use these to make a bow. I took three strips of the same length, curved two to make the loops of the bow, then cut the third in half to make the tails. 


Once you have the basic shape, smoosh the parts together. Then curl the ends slightly. 


Melt the Red Candy Melts, following the instructions on the package. I tried multiple techniques for coating the bows. What worked best was to pour the candy over a bow while it is flat on the parchment paper, then pick it up with skewers, briefly hold it vertically, then set it down on a clean area of the parchment. As soon as you set it down, add the red sprinkles. 

Coat Kix with the melted candy, then place them on the parchment in clumps of three. 

When everything is set, it's time to assemble. You have two choices: either keep everything separate for easy eating (people can grab a single pretzel or two from the wreath) or adhere everything together. I chose the former. The only difference is that you will need melted candy "mortar" to act as glue between everything. 

Arrange one layer of pretzels on a plate (mortar optional), then add three more layers, off-setting each layer from the previous one. Add the Kix-clusters and the bow. 


So how does it taste? Fantastic! A thin candy coating adds just the right amount of sweetness to the salty pretzels. This showstopper will be a hit at any Christmas celebration. 

12/11/23

Christmas Stocking Drawing

I prefer Christmas cookies over Christmas candy, but it was still fun to do a quick drawing of candies tumbling out of a classic red stocking with white trim. 


Start by drawing a stocking in the lower left corner. 


Then start drawing candies. Overlap them and turn them every which way. 


Then color it in. I used Ohuhu markers for everything except the writing on the plumes. I used a light blue fineliner for that. 


Two weeks until Christmas! 

12/8/23

Christmas Tree Thank You Cards

When Trevor was little, we had great fun making Christmas-themed thank you notes together. I think these handprint reindeer from 10 years ago were my very favorites. Trevor is no longer interested in making cards with me, but he knows that mailing thank you notes to people who send him gifts is non-negotiable. Now I make the cards by myself. I had a lot of fun with this design, using inks in so many different ways! Affiliate links below. 


Christmas Tree Thank You Cards


Materials: 


Steps: 


Cut a piece of cardstock in half, then fold each half to make two 4.25" x 5.5" card bases. Use a separate sheet of cardstock to make 4" x 5.25" card faces. Repeat until you have the desired number of card bases and faces. 

Use a blending brush and several shades of green inks to color the card faces. Work on a piece of scratch paper and go all the way to the edges. 


Stamp the tree onto the left side of the paper. My stamp isn't as big as the paper, so I stamped at the top first, then stamped lower and lower to extend the tree to the base of the card. 

Stamp the sentiment in the upper right quadrant, then use the same gold to ink the edges. Add dots of gold Stickles all over the stamped tree. 

When the ink is dry, adhere the card faces to the bases. 

12/6/23

How to Draw a Sleigh Filled with Presents

Christmas is just around the corner. Celebrate by drawing a sleigh packed full of beautifully wrapped presents. I drew my sleigh with a Micron pen on Bristol Vellum and colored it with Ohuhus (affiliate links), but you can use whatever you have on hand. 


Start by drawing the body of the sleigh toward the bottom center of your paper. It's basically a smile with a hook on one end. 


Use a straight edge to draw parallel lines below the body of the sled to make the runners. 


Curve the ends of the runners upward on one side, then draw the pieces that connect the runners to the sleigh body. 


Now load up your sleigh with presents! Start by drawing three rectangles just inside the sleigh, then work your way backwards adding rectangles. 


Now add the details. Add wrapping paper patterns, ribbons, and bows to the gifts. Add some dimension to the runners by turning each line into a cane. 


Add some color and you're done!


Still have Christmas shopping to do? If you're looking for ideas, check out my Gift Guides! You'll find ideas for almost everyone on your list. And when you do buy, I appreciate you using my affiliate links. Happy shopping!

11/27/23

American Gothic Santa and Mrs. Claus

I don't know what made me think of it, but I thought it would be really fun to change Grant Wood's American Gothic couple into Santa and Mrs. Claus. Indeed, it was a lot of fun. 


I started with a printable coloring page of American Gothic from the Amarillo Museum of Art. I used my lightbox and a black Micron pen to trace part of the image onto Neenah Bristol Vellum (affiliate links here and below). As I traced, I left certain areas blank where I wanted to change the design. For example, I elongated Grant Wood's dentist's chin because I wanted Santa to have a beard. I changed the pitchfork to a candy cane and left the upstairs window empty so I could add a Christmas tree. 


Here's what I had when I finished tracing and turned off the lightbox.  


I finished drawing in the details, then colored the whole thing with my Prismacolor markers. It'd been a long time since I'd used them; I'm using Ohuhus for everything now. 


I've never seen the Clauses looking less jolly, but I'm sure they'll perk up as Christmas draws near. They could do with some fattening as well. Ho ho ho!

11/20/23

Ornaments for the Four Sundays of Advent

Advent is a time of preparation for the coming of Christ, both the celebration of his birth (Christmas) and his promised second coming. The first Sunday of Advent is the first day of the liturgical year. It can fall any day between November 27 and December 3. In 2023, Advent starts on December 3. That gives you plenty of time to make your own wall hanging featuring the four Sundays of Advent. 

Starting on December 3, hang one ornament each Sunday. When all four are hanging, you'll know that Christmas is next! Affiliate links below. 


Advent Ornament Wall Hanging


Materials:


Steps: 


Write the four words representing the four Sundays of Advent on the wood slices. You can write freehand or use this transfer technique if you prefer. 


Add some Stickles to the ornaments. I like just a hint of glitter toward the outside edge, but you can add as much as you want. 

Cut four 8-inch pieces of twine. Tie them into loops, then thread them through each of the ornaments to make the hangers. 


Twist three holly berries together and set them aside. Repeat this for each of the ornaments (12 berries total).

The holly leaves I bought come attached in threes, but if you use them intact, they block the words on the ornaments. I cut them apart, stacked two leaves together, and then used a craft pick to poke a hole in them. 


Put the trio of berries into the hole you just created. Then poke those wires through the hole of the ornament. Snip off any excess wire, then use tape to cover the wires. 


Cut four 8-inch pieces of gold wire. Wrap them tightly around the branch four times, then bend up the ends to make hooks. If your branch is significantly thicker than mine, cut your wire longer than 8". 


Now cut an 18" piece of twine. Tie it to the ends of the branch to make a hanger. That's all there is to it!


Here's a close-up of one of the ornaments so that you can see the glitter:


I taught this craft yesterday to a group at church. We had a lot of fun making them and everyone's turned out great. Now we wait... for the season of waiting!

8/29/23

Christmas Tree at Night, Made with Paint Pens

It might be a little early for Christmas crafts, but this idea popped into my head while playing with the Apple Barrel Paint Pens I shared yesterday and I was eager to try it out. It's really easy to do and I love how it turned out! Affiliate links below. 


Christmas Tree at Night


Materials: 


Steps: 


Use painter's tape to form a triangle on the cardstock in the shape of a Christmas tree. Working with one paint pen at at time, add dots of color right up to the edges of the tape. 


Continue until you have filled in the inside of the triangle. Be sure that you've gone up to the edges with your dots of color. 


Peel away the tape and use the yellow paint pen to draw a star at the top of the tree. When that is dry, use a q-tip to outline the tree with yellow pastel chalk to mimic the glow the lights would be giving off. 


I added a few swipes of chalk under the base of the tree to give a hint of the ground it's sitting on. 


I'm having fun playing with the paint pens. Expect to see more projects featuring them some time in the future!