Showing posts with label cupcake. Show all posts

3/1/24

Raspberry Lemon Cupcakes

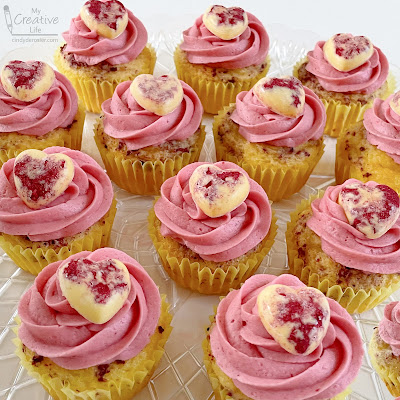
Raspberry and lemon is one of my all-time flavor combinations. Raspberry lemonade, raspberry lemon sorbet, lemon cake with raspberry coulis... seriously yum. I did some experimenting and now I have a new favorite to add to that list: Raspberry Lemon Cupcakes. 


There are three components to my raspberry lemon cupcakes: the lemon and raspberry cake part, the raspberry frosting, and the cute raspberry lemon heart toppers. I started with a box mix for the cake; the frosting is from scratch. Affiliate links below. 


Raspberry Lemon Cupcakes


Ingredients: 


Put the frozen raspberries into a fine mesh strainer over a bowl. Set it aside. 

Grind the freeze-dried raspberries to make a powder. (Or buy powdered raspberries from the get-go). I put mine in a ziplock bag and used a meat mallet to pulverize them, which was fine for this purpose. You could also use a spice grinder


Spoon some raspberry powder into each of space in the heart candy mold. 


Follow the directions on the package to prepare the lemon candy melts. Pour the candy into each mold, then use a toothpick to swirl the powder into the melted candy. Let the candy set.


Follow the directions to make the cupcakes. Before putting the batter into the oven, spoon some raspberry powder on top of each cupcake. Use a toothpick to swirl it into the batter. Don't swirl too much - you want some to be visible. 


While the cupcakes are baking and cooling, pop the cooled candy hearts out of the mold. Then start the frosting. Press the now-melted raspberries through the strainer until you have 1/3 cup of puree. (Save any extra for something else.) 

Whip 1 cup butter until light and fluffy, then add the puree. Blend in enough powdered sugar so the frosting is piping consistency. Transfer it to a piping bag. 


Pipe a swirl of raspberry frosting (naturally a beautiful shade of pink!) onto each cupcake, making sure some of the speckled cake still shows through. Put a candy heart on top of each and enjoy!


What's your favorite dessert flavor combination? Let me know in the comments!

2/8/22

Sweet Tarts Conversation Hearts Flower Cupcakes

I am a conversation heart connoisseur, if such a thing exists. Some people hunt for Girl Scout cookies this time of year, but those don't tempt me nearly as much as conversation hearts. While my absolute favorites are these classics (affiliate link here and throughout the post), I really like these as well. They're Steve and Trevor's favorites, so I used them to make these cupcakes. I love the way the pastel colors look against the chocolate frosting. 


Sweet Tarts Conversation Hearts Flower Cupcakes


Materials: 


Steps: 


For each cupcake, you need four Sweet Tart hearts of the same color, plus two that are green. You also need one white pearl. Have these ready to go. 

Follow the package directions to prepare 2 Candy Melts. Put a dollop of melted candy (about the size of a large pea) onto parchment paper, then arrange the four hearts upside down on the melted candy, with the points facing in. Put the pearl in the tiny hole at the center. Repeat until you have the desired number of flowers. Let the flowers sit 15 minutes to harden.

Gently peel the flowers off the parchment paper and place them onto the frosted cupcakes. Place the leaves on either sides of the flowers. 

12/31/20

New Year's Eve Cupcakes

I hadn't intended to return to blogging this soon, but I wanted to share the cupcakes I made for New Year's Eve using some fun items I received as Christmas gifts. Aren't they festive?! 


Among the gifts from my parents, I received this silicone number mold, treat sticks, and an 18-pack of LorAnn flavors (affiliate links here and throughout the post). I couldn't wait to try them out, and New Year's Eve seemed like as good a reason as any. 

I started by sprinkling a thin layer of sanding sugar into the mold. I used red and yellow. Since I'd never done this before, I started with just two numbers to see if it worked. (Spoiler: Yes!)


I prepped a bowl of white Candy Melts, then stirred in about 5 drops of LorAnn cherry. I spooned the melted candy into the mold, then added the sticks and rolled them to make sure they were coated on both sides. I let the candy sit for 10 minutes, then popped the numbers out of the mold. They had a bit of excess that I needed to trim off, but that was super easy to do with a sharp knife.  


I ate the trimmings, delighted that the cherry flavor was perfect. I can't wait to try the rest of my oils! My mom picked out some great flavors, very similar to what I would have chosen for myself. (If you have friends who bake, this makes a GREAT gift!) 

I made the other two numbers, frosted some cupcakes, then poked the lollipop sticks into the center. I added some gold sprinkles on top, letting them spill off onto the tray. So festive!


You can use the same idea for a graduation party, a birthday, or even a housewarming gift (with the address on the cupcakes). So many possibilities!

I hope you all have a safe New Year's Eve celebration tonight, whatever that may entail. It's going to be a quiet night at home for the three of us, with good food, games, and plenty of cupcakes.

6/30/20

Marbled Candy Melts and an Accidental Spiderman Cupcake

We did a socially-distanced cupcake drop to welcome the newest members of Trevor's Scout troop. There were some extra cupcakes, so instead of frosting them like a normal person, I decided to do some experimentation with Candy Melts (affiliate link). I was wondering if I could treat the candy like paint pouring and get some cool marbled designs.


I took the paper liners off the cupcakes and elevated them on empty K-cups. Then I poured Candy Melts over the tops, hoping they'd behave like ganache and leave a smooth, shiny coating. It was clear I needed to thin the Candy Melts a bit, so I followed these directions using shortening. My experiment was semi-successful. I had to use a toothpick to swirl the colors and to encourage it to run over the sides. Cupcakes with more of a dome would have worked better. 


Once the candy set, I moved the cupcakes into silicone cupcake baking cups. Pretty!


Steve pointed out that the blue/red swirl would be perfect for a Spiderman party theme. Total accident, but cool nonetheless. Here's a pin for you if Spiderman is your thing. 


Did you notice the cup on the right-hand side of the second photo in this post? I dripped different colors of Candy Melts into a plastic cup, swirled it around, then set it upside down on parchment paper to set. I'd hoped to be able to slide the hardened candy out of the cup intact, but it didn't work. What did work was pouring Candy Melts into a Dixie cup, then tearing it away when the candy was set. 


I had a lot of fun playing with Candy Melts, as always. There is so much you can do with them!

6/19/18

The Narwhal Party

This post contains affiliate links. 

Time to share all the fun details from Trevor's narwhal-themed birthday party


For the fourth year in a row, Trevor opted to have his party at the ice rink. It makes everything so easy for me, because all I have to do is bring the cake/cupcakes. They provide everything else. The kids skate, eat lunch, skate some more, eat cake, and skate some more. As long as they'd like, actually. Though after 3+ hours, they were exhausted!


Trevor worked with me to design the cupcakes. Through trial and error, we worked out a way to make cute and easy narwhals. We started by putting toothpicks into Zachary Fruit Slices. Then we dipped each Fruit Slice into a bowl of Candy Melts (10 black discs and 30 white discs mixed to make the perfect gray and enough for 18 narwhals). The toothpick made a very convenient handle that allowed for full narwhal coverage. After dipping each narwhal, we set them on waxed paper to dry, then added tiny black sprinkles for eyes.   


We frosted each cupcake with blue frosting, then nestled in a narwhal. We put our cupcakes directly into our 3-in-1 cupcake caddy (LOVE that thing). Here they are on the dessert table at the party, with Trevor's stuffed narwhal. It was a souvenir from when his Cub Scout pack spent the night 'sleeping with the sharks' at the Monterey Bay Aquarium a few years ago.


Rather than use a boring candle for Trevor's cupcake, I made a few changes to a store-bought whale candle pick and ended up with a narwhal. Here's the before and after:


Just use a fingernail to gently scrape the yellow star and the mouth off the candle. It flakes off easily. Glue a googly eye over the black eye, use a Sharpie to add a smile, and then gently twist a toothpick into the forehead. Remove the toothpick and break it in half. Put a drop of glue in the hole, then put the toothpick back in the hole, broken end first. 


Here's the birthday boy with the narwhal candle lit.


We added one other fun narwhal touch to the party. We started with a wooden dolphin shape and some wood dowels. We broke off the dorsal fin, then used sandpaper to smooth off the narwhal's back. We sanded off the bottlenose to make the rounded snout of the narwhal. Then, we painted it gray. When it was dry, we glued on a toothpick tusk, a googly eye, and a dowel.


The party guests could use the narwhal-topped dowels to create skewers of candy. 


We made one final narwhal item, but did not end up using it at the party. We slit an empty wrapping paper tube vertically, formed it into a tusk shape, then wrapped it with masking tape. It's now a cool ring toss game! 

As always, I loved working with Trevor to plan a fun party to match his theme idea. It turns out that narwhals make a pretty good party theme!