Showing posts with label LorAnn. Show all posts

8/10/22

LorAnn Flavoring Variety Pack, Round 2

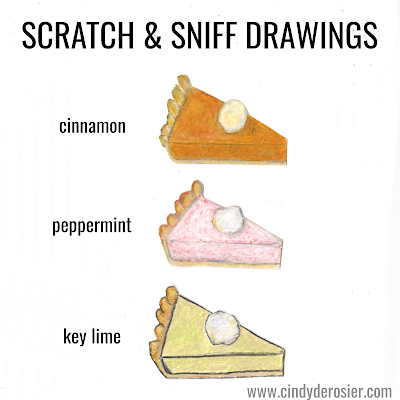
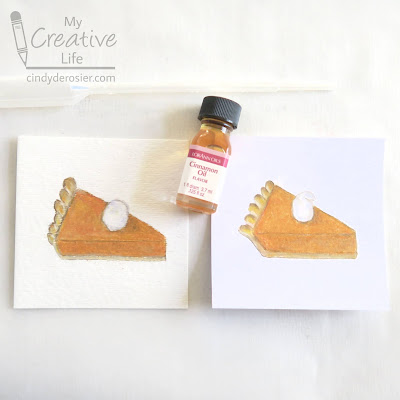
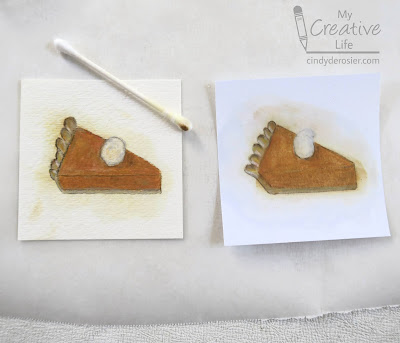
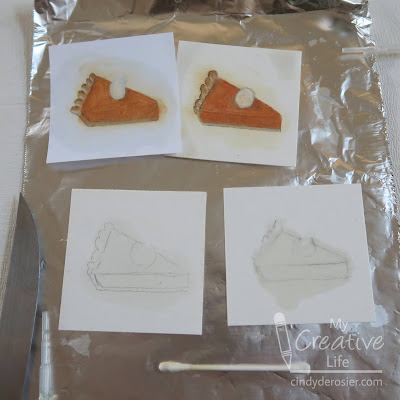
I've been obsessed with LorAnn flavorings for a while now. I've used them to flavor Twinkies for edible crafts (twice), make scratch-n-sniff drawings, flavor chocolates, glaze rolls, make minty milk, and make my own flavored sanding sugar for decorating cupcakes, just to name a few. My most frequent use it to add a drop or two to flavor water. Sometimes I add sugar if I want a sweet drink. Sometimes I add citric acid for a bit of sour. I now buy citric acid in bulk, as it is surprisingly versatile (affiliate link here and below).  

My mom gave me a fun variety pack of LorAnn flavorings and I've had the chance to use (and in some cases, use up) all of the flavors. Some were fantastic. My very favorites are Blackberry, Lemon, and Raspberry. I also love Cinnamon, Cranberry, Key Lime, Orange Cream, Pear, Pineapple, Pomegranate, and Tangerine. Some were fine, just not my favorites. These include: Blueberry, Cherry, Mango, Peach, Pina Colada, and Strawberry Kiwi. I'm not a fan of Grape, Green Apple, Red Licorice, or Tropical Punch. 

With most of my favorites gone or nearly so, I decided to order some new flavors. It's really handy to get exactly what you want with this 18-pack You Choose


I replaced my favorite flavors, then chose 14 new-to-me flavors to try. These include: Bubble Gum, Cinnamon Roll, Cran-Raspberry, English Toffee, Fruit Punch, Lemonade, Lime, Maple, Orange, Pralines & Cream, Root Beer, Strawberry, Tutti-Frutti, and Wintergreen. I'm eager to give them a go. Unfortunately, we're in the middle of a kitchen remodel, which means no cooking or edible crafts for me for awhile. I'm so eager to get a functioning kitchen back!

If you have a kitchen and are interested in trying out LorAnn flavorings, you can see a full list of the 100+ flavors here. I'll probably try them all eventually, even though there are some I know I will hate (I'm looking at you, Banana Cream and Watermelon). If you do buy flavorings, I highly recommend purchasing a set of disposable pipettes or silicone droppers as well.  

I have a couple of fun ideas for using my new flavorings, so as soon as I have a kitchen, I'll share the results of my experimentations with you!

11/18/21

Scratch and Sniff Drawings

Remember at the end of the post about drawing pumpkin pie that I said I had an idea I was excited to test? I wanted to test whether or not I could make scratch and sniff drawings. I successfully drew scented versions of pumpkin pie, peppermint pie, and key lime pie. Read on to learn how! Affiliate links below. 


I started by testing two different papers to see if either one would be better for holding scent. I was guessing that a paper designed for wet media would do a better job than one only intended for drawing. I cut small squares of Strathmore Cold-Press Watercolor Paper and Neenah Vellum Bristol and drew a slice of pumpkin pie on each, using Prismacolor Premier colored pencils. Then I got out my LorAnn Cinnamon Oil


After receiving an awesome variety pack of LorAnn Oils last Christmas, I've been using them for all sorts of edible craft projects. But I've never used them for non-edible crafting. I put a drop of cinnamon oil onto a Q-tip and gently rubbed it into the drawing. 


Oops. Apparently cinnamon oil makes a good solvent for colored pencils. 

I took a good look at the two pie slices. The bristol paper looked and felt greasy, but the watercolor paper didn't. So I proceeded with the watercolor paper.

For my next experiment, I wanted to test whether putting the scent down first and coloring over it would work better than applying scent to a completed drawing. I sketched some pie in pencil (in retrospect, I wish I hadn't), then put drops of LorAnn Peppermint Oil and LorAnn Key Lime onto separate squares of watercolor paper. Peppermint is an 'oil' (left below) and Key Lime is a 'flavor' (right below) and I was curious to see if one would work better than the other. 


I let each dry completely, then used the same colored pencils to color in the images. It worked! I used microtip scissors to cut out each pie slice, then recycled the scraps. (Our pantry has smelled cinnamony-delicious ever since. Guess where we keep the recycle bin!) 


There are a zillion more variables to test before conclusively announcing that this is THE way to make scratch and sniff drawings. How would alcohol markers perform? Pastels? Crayons? What about other paper types? I'm not sure. I may come back to this someday.

As for now, it's been a week and my drawings still have a nice scent. I'm not sure how long it will last if I keep scratching and sniffing, but as far as I'm concerned, it's already a success.

5/6/21

Patriotic Crafting: Edible US Flag

Tis the season for patriotic crafting! Memorial Day is in a few weeks, Flag Day two weeks after that, and then July 4th will be here before you know it. Here's a tray of candy-coated treats (13, to be exact) that make a festive addition to any patriotic celebration. 


One fun option for this edible craft is to flavor each candy color differently. I used my LorAnn flavors to make my flag taste like raspberry, cherry, and vanilla. There are so many possibilities - the next time I make this, I may opt for something completely different! 


Have you guessed what's underneath the candy coating? Read on to find out! Affiliate links below. 


---------


Edible US Flag


Materials:


Steps:


Arrange 13 grissini on the serving tray you plan to use. Try to choose the straightest ones. 


Cut two sheets of parchment paper, large enough to hold the grissini spaced 1" apart. Place a rack over one of the sheets. Transfer six grissini to the rack, then melt the white candy according to the package directions. Use the pipette to add the desired flavor. Thin if necessary, using EZ Thin or other method as recommended in the direction. Drizzle the candy over 100% of three grissini and 60% of the other three. Before the candy hardens, transfer them off the rack and onto the clean sheet of parchment. 


Follow the same steps with the remaining 7 grissini. Move them to a rack positioned over parchment paper, prep the red candy, and then drizzle it over the grissini. This time, you'll cover three grissini completely and 60% of the remaining four. 

While the candy is setting, prepare your sprinkles. I didn't have the star sprinkles I linked above on hand, so I picked out white hearts from a valentine mix I did have on hand. 


Prepare the blue candy, then drizzle it over the four red and three white grissini that are only partially covered. Immediately place the stars (or in my case, hearts) onto the blue area and then sprinkle generously with sanding sugar. Carefully transfer them to the parchment. 


When the candy has hardened, arrange all 13 grissini back on the tray and they're ready to serve. The fruit-flavored candy goes so well with the grissini, much like dipped pretzels do. In fact, I'd originally planned to make this with pretzel rods, but they are shorter, thicker, and more irregular than the grissini, which yield a more appealing flag shape. 


Looking for other patriotic crafts? You're in luck! A bunch of my fellow craft bloggers are sharing their ideas for fun and festive patriotic crafts. Check it out!

2/25/21

Twinkie Bird on a Stick

You had to have guessed that after making a heart from Twinkies I wouldn't just let Steve eat the rest of the Twinkies in the box without using them for a craft first, right? You know me so well. 


I had originally planned to make blue birds, but when I went through my "still need to try" flavorings, nothing made sense with blue. So I switched to pink and used grapefruit oil to flavor it. Affiliate link here and throughout the post. 

Fun fact: When I was a teenager, we had a yellow parakeet named Twinkie. He had a ton of personality. His favorite bird-approved food was oat groats, but he would regularly help himself to all sorts of human food (including chicken) if we left our plates unguarded for two seconds. 


Twinkie Bird on a Stick


Materials: 


Steps: 

Unwrap the desired number of Twinkies (one for each adult bird and one for each pair of baby birds). Insert the lollipop sticks into the Twinkies. 


Set out a set of small eyes and a yellow TicTac for each baby bird. Use a sharp knife to cut yellow M&Ms in half, then set out sets of medium eyes and an M&M half for each adult bird. 

Next, you're going to melt the candy according to the package directions and flavor it as desired. Here's where you need to learn from my mistakes: Do not leave the Twinkies on a wire rack and pour the melted candy over them. And, do not pour the melted candy over the Twinkies and then place them on a wire rack to drain. Why? Because when you remove them, a bunch stays behind. 


Now learn from my next mistake. After the wire rack fails, do not put the melted candy into a narrow glass, thinking you can just dunk the Twinkie and then lift it out perfectly covered. Instead, the stick comes out and the Twinkie stays put. 

Instead, I had the best luck putting the Twinkies onto parchment paper and spooning the candy over them, adding the eyes and beak, and giving them a good dusting of sanding sugar. Then I lifted the bird out of the puddle, dipped the uncoated back side into the puddle, let the excess drip off, and then placed the bird in a clean spot to set up. 


There are five more Twinkies in the box. Any suggestions for what I should make next? I have a few ideas, but I'd love to hear what you think. 

2/10/21

Heart Twinkie Dessert

I spy a Twinkie, turned into a heart!
 

Yes, that's really a Twinkie. And yes, it's delicious. WAY better than a plain old Twinkie.


This is about the easiest plated dessert of all time. It doesn't take any longer than scooping ice cream into a bowl and topping it with syrups and nuts. 

To make it, unwrap a Twinkie with the underside facing up. Cut it on the diagonal, right through that middle cream spot. 


Arrange the two halves on a plate with their cut sides touching. One piece will be right side up and one will be upside down. 


Cover the heart with frosting. 


Cover the frosting with flavored sanding sugar. I used cinnamon, which tastes just like Red Hots. Yum! 


You can use whatever flavor you want, which is the beauty of making your own sanding sugars. I think raspberry would be amazing.

Decorate the plate with swirls of chocolate syrup, then add nuts. In just a few minutes, you have a plated dessert that belies its true origin as a lowly Twinkie.  


Turns out, there are a lot of Twinkie-themed items on Amazon. A surprising number of them reference grandmas. In my entire life, I've never come across anyone who calls their grandmother Twinkie. Grandma, Nana, Memaw, Nanny, Granny, Grammy, Nona... never Twinkie. 

Here are some non-grandma Twinkie items for your enjoyment. The t-shirt cracks me up.


2/9/21

DIY Flavored Sanding Sugar

Sprinkles make everything a little bit more special. I know that you can make your own jimmies, quins (sugar shapes) and other sprinkles with royal icing, but I prefer to buy those. I can't justify the time and effort it takes to make them compared to how cheap they are to buy. On the other hand, I almost always make my own sanding sugars. It's quick and easy and it's way cheaper to make a rainbow of colors than to buy them. Plus, you can make shades they don't sell in store. 

I've been making my own sanding sugars forever, but only recently started flavoring them. With my latest obsession, I have tons of options and am eager to try them all! Check out my newest creations:

 
There are SO many things you can do with flavored sanding sugars, which I'll be sharing as I use them. Today I want to show you how to make them. I used regular granulated sugar for these because I like the fine consistency. If you prefer a courser sugar, use it! Affiliate link here and below. 

---------


Flavored Sanding Sugars


Materials:


Pour some sugar into the ziplock bag. I do about 1/4 cup at a time, but you can make whatever amount you want. Just make sure the bag is less than half full. Dip a clean toothpick into the gel food color, then wipe it off on the inside of the bag. Repeat until you have a decent smear of color on the bag. 


Zip the bag shut, removing all the air. Gently massage the sugar into the color. Flip the bag over occasionally and continue to massage the color and the sugar together. When you get to the desired shade, stop. If you've used all the color and you haven't reached the shade you want, just put more gel on the inside of the bag.

When you have the shade you want, use the pipette to drip 6-8 drops of flavor onto the sugar. Close the bag, then massage the scent all around. 


Then, just repeat the process to make whatever flavors and colors you want! You can reuse the same pipette many times - just use it to suck up some clean water from a cup, squirt it out, and repeat. I have dedicated pipettes for mint and cinnamon since they don't play nicely with the other flavors, but otherwise I just rinse and reuse. 

I love how my flavors look together! 


I think I need to make a sky blue next... maybe Tropical Punch flavored? I have a true red that's not in the this photo. Tomorrow I'll show how I used it for an edible Valentine's Day craft.

2/2/21

Raspberry Hot Cocoa

I used to be a hot cocoa purist - the darker and more chocolatey, the better. But I was playing around with my LorAnn oils and discovered how AMAZING raspberry hot cocoa is. These little candy hearts are tasty on their own and make the perfect delivery system for just the right amount of raspberry in a mug of hot cocoa. Mmmmm!! Affiliate links below. 


Raspberry Hot Cocoa


Materials:

Steps:


Prepare 3 oz. of Candy Melts following the instructions on the package. Add three drops of Raspberry flavor. The candy will thicken slightly, but this is fine as long as you get it in the molds relatively quickly. Only fill the molds about halfway, as thinner hearts will melt more effectively in your hot cocoa. 


After the candy has set (approximately 10 minutes), pop the hearts out of the mold. Serve 4 hearts with each 8 oz. mug of piping hot cocoa. 

1/28/21

Mardi Gras Cereal Treat, Inspired by King Cake

Ready for another Mardi Gras craft? This edible craft, which is about the size of a donut, looks like a mini king cake and features some of the same flavors. Cereal is the main ingredient in this treat... but it's not Rice Krispies! Try making your own for Mardi Gras. Affiliate links below. 


Individual Mardi Gras Cereal Treat


Materials:


Steps:

Melt approximately 4 oz. Candy Melts, following the package instructions. Pour 1.5 cups Golden Grahams into the melted candy, stirring until it is mostly coated.

Spoon the candy-coated cereal onto a piece of parchment paper, making a donut shape. 


While the candy is still melted, sprinkle green, yellow, and purple sanding sugar on top, alternating sections. Don't cover it entirely; you want some of the white 'frosting' to show through. 
 

Let the candy harden completely, then transfer the treat to a separate plate. 


To serve, cut straight down with a sharp knife to break it into pieces. This sweet donut-sized cinnamon treat will satisfy 2-4 people. 


1/27/21

Labeling My Flavorings (aka Dealing with My LorAnn Obsession)

Based on my not-subtle hint, my mom got me a You Choose pack of LorAnn flavorings for Christmas (affiliate link here and throughout the post). I'm really happy with the flavors she chose. They aren't a perfect match for what I would have chosen for myself, but it's close. I found a metal candy tin that is just the right side to hold the 18 flavors Mom gave me and the four I already had. The tin fits nicely in a kitchen drawer, so it's quick and easy for me to grab a bottle and add a drop of flavoring to a glass of water or to use in baking. 


There's only one problem.


When the bottles are in the tin, you can't see the labels. I'd be in the mood for raspberry and have to pick up a dozen bottles before finding the one I wanted. I dealt with it for a month before solving the problem with sticker paper, a 1/2" punch, and letter stickers


In just a few minutes, I labeled all my flavorings. Except one. That blank one is a duplicate (Cinnamon). Rather than label both Cinnamons, I left the one that was already open unlabeled so that after I use it up, the remaining one is labeled. 


As you can see, there are some flavors that have the same initial letter (Peach, Pear, Pineapple, and Pomegranate, for example). Worst case scenario, I find the one I want on the fourth try. Not a big deal. It did feel a little weird to label Tropical Punch as TP.

After labeling, I made myself a chart of my flavors. Most are soluble in water, which is important for me to know, since my primary use for the flavors has been to add a drop to a glass of water. After one unpleasant oil slick at the top of my drink, now I know which will blend nicely and give me a tasty drink. So far, my favorites for flavoring water are pineapple and raspberry. 


My chart also shows which flavors are appropriate to use with chocolate and Candy Melts. Some will cause thickening, but that is easily solved by adding a tiny bit of coconut oil or cocoa butter to return to the proper consistency. 

In addition to flavoring my water, I've been using LorAnn oils in all sorts of ways with great success. I'll be sharing some of my ideas in upcoming blog posts. 

1/19/21

Winter Mint Warm Milk

Last week, it was cold here (Bay Area cold, not Place-With-Actual-Winter cold). Now we're in the 70's, so it feels a little weird posting this now. But most of my readers have Actual Winter, so this for you. 

It's a toss-up as to whether hot chocolate or spiced cider is my favorite warm-me-up beverage, but I was in the mood for something different. This warm, sweet minty milk hit the spot. Affiliate links below. 
 

Winter Mint Warm Milk


Materials:


Steps:


Pour an inch of water into a bowl and an inch of sugar into a second bowl. Dip the rim of each glass into the water and then into the sugar. Set the glasses aside. 

Follow the directions to prepare the Candy Melts. Add several drops of wintergreen flavor, then spoon the candy into the molds. Do not fill the molds completely - you want thin snowflakes that will melt easily in warm milk. Allow the candy to set, then remove it from the mold. Repeat until you have 3-4 snowflakes per person. 

Gently heat the milk (use medium power in the microwave or a double-boiler on the stove), stirring frequently, just until it starts to steam. Pour the milk into the prepared glasses and serve with 3-4 snowflakes and a spoon. Each person can drop in their own snowflakes and stir to add the desired amount of mint flavor to the milk. 

12/31/20

New Year's Eve Cupcakes

I hadn't intended to return to blogging this soon, but I wanted to share the cupcakes I made for New Year's Eve using some fun items I received as Christmas gifts. Aren't they festive?! 


Among the gifts from my parents, I received this silicone number mold, treat sticks, and an 18-pack of LorAnn flavors (affiliate links here and throughout the post). I couldn't wait to try them out, and New Year's Eve seemed like as good a reason as any. 

I started by sprinkling a thin layer of sanding sugar into the mold. I used red and yellow. Since I'd never done this before, I started with just two numbers to see if it worked. (Spoiler: Yes!)


I prepped a bowl of white Candy Melts, then stirred in about 5 drops of LorAnn cherry. I spooned the melted candy into the mold, then added the sticks and rolled them to make sure they were coated on both sides. I let the candy sit for 10 minutes, then popped the numbers out of the mold. They had a bit of excess that I needed to trim off, but that was super easy to do with a sharp knife.  


I ate the trimmings, delighted that the cherry flavor was perfect. I can't wait to try the rest of my oils! My mom picked out some great flavors, very similar to what I would have chosen for myself. (If you have friends who bake, this makes a GREAT gift!) 

I made the other two numbers, frosted some cupcakes, then poked the lollipop sticks into the center. I added some gold sprinkles on top, letting them spill off onto the tray. So festive!


You can use the same idea for a graduation party, a birthday, or even a housewarming gift (with the address on the cupcakes). So many possibilities!

I hope you all have a safe New Year's Eve celebration tonight, whatever that may entail. It's going to be a quiet night at home for the three of us, with good food, games, and plenty of cupcakes.

11/6/20

Glazed Flower Rolls

I enjoy making bread from scratch, but tend to make the same favorites over and over. That's not an issue; I've made enough bread in my life to have a half-dozen tried and true recipes that I love and I don't have too much incentive to mess with perfection. 

That said, it is fun to use the same bread dough to create different shapes. This week, I challenged myself to come up with a new shape using the same dough as Rose Rolls. I ended up with these glazed flower rolls. 


To make them, I followed the recipe for Rose Rolls until the shaping step. Instead of making coils, I made rounds. Then I used kitchen shears to snip straight down six times on each roll, making the cuts an equal distance apart to form the petals. I gently pushed the petals, then rolled a small ball of dough to place in the center. 


This is how the rolls looked after baking:


When they were completely cool, I put the rolls on a wire rack, made a simple powdered sugar glaze, added food color, then drizzled it over the rolls. 


I am kicking myself for not adding LorAnn flavor extracts (affiliate link here and below) to the glazes. I have 6 or 7 flavors and they are awesome. I particularly love the raspberry and lemon extracts, which would be perfect for the red and yellow rolls. I'm thinking grape for the purple, strawberry kiwi for the pink, and orange cream for the orange. Yum! 


In searching for the LorAnn affiliate link, I discovered that LorAnn sells 'You Choose' packs ranging in size from 2 dram bottles to 100 dram bottles! While I don't think I can justify getting 100 bottles (even though they're much cheaper in larger quantities), I will be putting one of the smaller 'You Choose' packs on my Christmas wishlist for sure. I think it will be a lot of fun to see what flavors someone would pick for me (hint: not banana). There are so many things you can flavor with these oils: water (no calories, lots of flavor!), lollipops and other hard candies, frostings, and baked goods. 

You can see a list of all the flavors in the third photos for the 100 dram bottles listing. Tell me in the comments what flavors you've used or which you'd most like to try!