Showing posts with label candy. Show all posts

1/3/25

100 Grand Hidden Money Gift

For Christmas 2024, I decided to make a hidden money gift inspired by the money-themed 100 Grand Bars.  


Ordinarily when you open a fun-size 100 Grand wrapper, you get a tasty treat of caramel, crispy rice, and chocolate. If you are very careful, you can open the wrapper without tearing it, remove the candy bar, replace it with rolled-up money, and then seal it back together again using the glue that's already on the wrapper. It's surprisingly easy. If you hide the money-filled 100 Grands in a jar with regular ones your recipient won't suspect a thing until they pull out bar and it weighs less than it should! Affiliate links below. 


-----


100 Grand Hidden Money Gift


Materials:


Steps:


Carefully open a 100 Grand Bar by pulling the wrapper apart, the way you'd open a bag of chips. I was able to open three different bars without tearing the wrapper or compromising the adhesive. Remove the candy and replace it with rolled-up cash. Press the wrapper back together to adhere it. 

Fill the mason jar with a mixture of candy bars and money-filled wrappers. Pack them tightly. You won't be able to tell by looking which have candy inside and which are filled with hidden money!

3/6/24

Personalized Candy Bar

One of the highlights of our visit to Hershey, PA was the Create Your Own Candy Bar experience. Everyone in our group of 9 chose a different combination of ingredients to put in their personalized bar. Part of the activity was designing our own packaging with our names. It was so much fun. I'd been thinking about it recently and thought how neat it would be if the candy bar itself was personalized with our names. I did some experimenting and came up with this: 

Personalized candy bar, featuring your name!

My prototype is a lemon-lime candy bar with rainbow sprinkles, but yours could be literally anything. There are so many colors of Candy Melts available; pick two colors and then use LorAnn flavorings to give each a different flavor. If you're a chocolate fan, try dark chocolate with white chocolate letters and toffee bits around the edges. That would look (and taste) fantastic. Obviously, you can also add any mix-ins you want to the bar itself. The possibilities are endless!

I used a silicone mini loaf pan to make my bars because that's what I have. It was fine, but using a mold actually intended for candy bars would be better. I've put one in the materials list. Affiliate links below. 


Personalized Candy Bars


Materials:


Steps: 

Start by making your name. Melt the selected color following the instructions on the package, then add your desired flavor. Fill the appropriate letters in the mold. When the candy is set, pop the letters out onto parchment paper. 


Melt the candy you've chosen for the bar itself and add the desired flavor. Pour the melted candy into the candy bar mold (or loaf pan). Gently place the letters onto the surface of the candy. You can leave them raised or gently push them so they're flush with the surface. 


Add sprinkles, nuts, coconut flakes, or whatever you want to the edges of the candy bar. 


Don't be limited by the size of your mold. I made an oval-shaped mini version of a candy bar with just my initials and it came out well (although I was a bit overzealous with the sprinkles). 

Personalized candy bar, featuring your name!

When the candy is set, pop it out of the mold and enjoy! To give personalized candy bars as gifts, place the bars in appropriately-sized treat bags. These would make adorable (and edible!) gift tags that anyone would love to receive. 

4/26/22

Candy Cardinals

I had some extra black Candy Melts and black Sugar Pearls sitting out after I finished making the Pretzel Raccoons, so I used them to make Candy Cardinals. Can you tell what I used to make the beaks? Affiliate links below.   


Candy Cardinals


Materials:


Steps:


Melt the red candy according to the instructions on the package. Use a spoon to put a dollop of melted candy onto parchment paper, shaping it into the teardrop that makes the cardinal's head. While the candy sets, use a sharp knife to cut orange M&Ms in half. Press straight down firmly; they'll cut without shattering. 

Melt the black candy, then put a dollop onto the head to make the cardinal's face. Place two black sugar pearls and half an M&M onto the black candy to make the eyes and beak. Let the candy set completely, then peel it up from the parchment paper. 

---------


Looking for another cardinal project? I love this tissue paper cardinal craft! The cardinal is the state bird of Illinois, Indiana, Kentucky, North Carolina, Ohio, Virginia, and West Virginia, so it's an especially great choice to make if you live in one of those states. 

3/21/22

Photo Fun with Vintage Candy

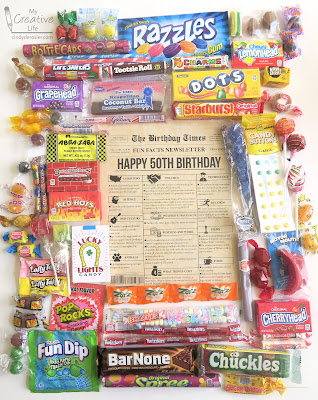
My sister gave me a box of vintage candy for my 50th birthday. What a great gift! Before trying anything, I spread everything out on the table and snapped a photo so I'd remember what was in the box. There's a fun mix of things I enjoyed as a child and candies I don't know that I've tried before. 
 

I decided I wanted a photo of just the candy without the birthday insert, so I removed the paper and rearranged the candy to fill the space. 


It was really fun trying to fit the candy together, so I challenged myself to arrange it by color in a perfect rectangle. I left out a few things that didn't have a dominant color. I think the candy looks so pretty arranged this way!


I made one final arrangement with my candy, from best to worst. I left out anything I'd never tried before. Of all the candies, Sugar Daddy is my favorite, so it's in the top left. I also love Double Bubble, Lemonheads, BarNone and Pixie Sticks. The next tier are candies I like, then ones I feel meh about. As you get toward the bottom, you'll see the candies I don't like at all. The worst of all are the banana Now n Laters, banana Laffy Taffy, and the wax lips. Gross. 


I don't think my sister anticipated that I'd have just as much fun, if not more, arranging the candy than eating it. Thanks for a great gift, Kari!

The Vintage Candy Company (affiliate link) has boxes like this for all the milestone birthdays, as well as candy by the decade. They have special occasion and holiday boxes, global boxes, and boxes featuring a flavor, like sour, spicy, or fizzy candy. They even have boxes where all the candy is sugar-free or vegetarian. Check it out!

2/8/22

Sweet Tarts Conversation Hearts Flower Cupcakes

I am a conversation heart connoisseur, if such a thing exists. Some people hunt for Girl Scout cookies this time of year, but those don't tempt me nearly as much as conversation hearts. While my absolute favorites are these classics (affiliate link here and throughout the post), I really like these as well. They're Steve and Trevor's favorites, so I used them to make these cupcakes. I love the way the pastel colors look against the chocolate frosting. 


Sweet Tarts Conversation Hearts Flower Cupcakes


Materials: 


Steps: 


For each cupcake, you need four Sweet Tart hearts of the same color, plus two that are green. You also need one white pearl. Have these ready to go. 

Follow the package directions to prepare 2 Candy Melts. Put a dollop of melted candy (about the size of a large pea) onto parchment paper, then arrange the four hearts upside down on the melted candy, with the points facing in. Put the pearl in the tiny hole at the center. Repeat until you have the desired number of flowers. Let the flowers sit 15 minutes to harden.

Gently peel the flowers off the parchment paper and place them onto the frosted cupcakes. Place the leaves on either sides of the flowers. 

2/4/22

Conversation Heart Candy Necklace

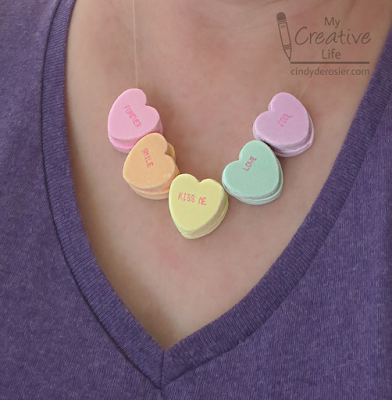
Whether you're a kid, or just a kid at heart, this Conversation Heart Candy Necklace is a really fun craft for Valentine's Day. To test its durability, I took mine on and off repeatedly, then left it on for hours. It held up surprisingly well. Give it a try! Affiliate links below. 


Conversation Heart Candy Necklace


Materials:


Steps: 


Cut a length of stretch cord large enough to fit around your neck with room to tie a knot. Select the five colors/messages you want for your necklace and set them aside. The necklace is reversible, so you're choosing two of each color (a total of 10 conversation hearts). 


Put a few Candy Melts into a small container and melt them according to the package instructions. Arrange the hearts so that half of them are message-side down. Dab a small amount of melted candy onto each, then lay the stretch cord into the warm candy. 


Immediately press the matching candy on top, trapping the stretch cord inside. Allow the candy to set up completely (30 minutes at room temperature, or 10 minutes in the fridge), then tie it around your neck. Remember - it's reversible, so you can flip the candies around if you want to send a different message. Enjoy!

1/31/22

Conversation Heart Photo Frame Ornament

It's hard to believe Valentine's Day is just around the corner. (Since we were traveling, our Christmas decorations didn't come down until two weeks ago.) Time has been flying by. And yet, some things feel like they were a lifetime ago. 

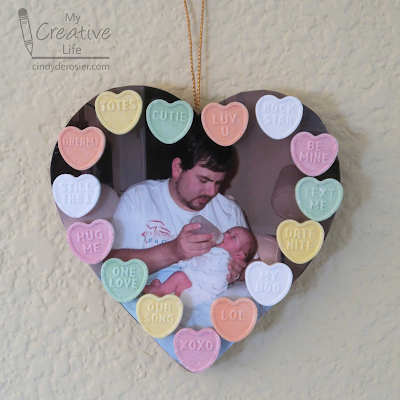
The photo I used for this project is a good example. Sometimes I feel like I blinked and my tiny baby grew up. On the other hand, it feels like a lifetime ago. Affiliate links below. 


---------


Conversation Heart Photo Frame Ornament


Materials:


Steps: 


Select a photo that is at least as large as the heart ornament. Trace the ornament on the photo, then cut it out. Set the photo aside. 

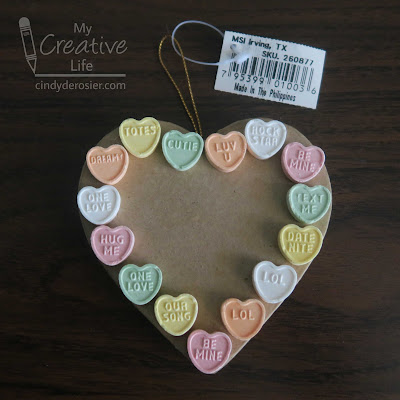
Lay out the conversation hearts along the edge of the ornament. I recommend using Heart 2 Heart candies instead of the much tastier traditional conversation hearts with the red printed messages. I'm concerned that the ink on those will run when you seal your project. Also, the Heart 2 Heart ones are double sided, so you get two choices of message for each candy. 


Remove the hearts, then glue the photo to the ornament.


Then glue the hearts in place. Let the glue dry completely. Apply 2-3 thin coats of sealant, allowing each to dry before adding the next. 


When your ornament is completely dry, hang it where it will brighten your day. 

10/13/21

Candy Corn Character

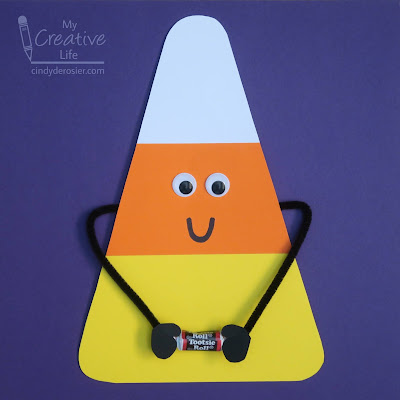
It's a proven fact that googly eyes make everything cuter. Add them to a construction paper candy corn and you have cuteness overload. Not only is this guy adorable, but he'd like to offer you some candy. Affiliate links below. 


Candy Corn Character


Materials:


Steps:


Cut the yellow cardstock into a piece approximately 6"x4", the orange 5"x4", and the white 4"x4". Layer the pieces with a slight overlap and glue them together, as shown below. 

Use a centering ruler (or eyeball it) to find the center of the white cardstock. Mark it with a dot. Extend that line an equal amount (about 1/4") in each direction and mark those points. Use a straight edge to draw lines from each corner of the yellow to the points you just drew. 


Cut along the two lines to form a triangle. Then round off the three corners to make the iconic candy corn shape. 

Glue the googly eyes in place, then draw a Sharpie mouth. Cut a pipe cleaner in half, then bend them to form arms. Glue them to the back of the candy corn. Cut two hands/gloves from black and glue them to the ends of the pipe cleaner pieces. 


When the craft glue is dry, use a Glue Dot to attach the candy to the candy corn. If you're careful, you'll be able to remove the candy in the future without damaging your character. 

Are you a fan of candy corn? For fun, I searched "weird candy corn" to see what came up and I was not disappointed. Perhaps I can interest you in these, um, unique flavors

3/10/21

Pretzel Butterfly Lunch

I met a mom recently who told me she is frustrated because her 5-year old daughter never wants to stop playing in order to eat. She asked if I had any suggestions to help her get her daughter excited about mealtime. I suggested she look through my edible crafts for ideas, but I also wanted to dream up something fun for that little girl to combine her love of play with her need to eat. I think these butterflies might be just the thing.
 

I chose the ingredients and quantities based on what a 5-year old might eat for lunch. You can, of course, substitute other ingredients and change the amounts to suit your child's needs and preferences. Affiliate links below. 


---------


Pretzel Butterfly Lunch


Ingredients:


Instructions: 


(Note: Before giving the ingredients to the child, an adult should use a sharp knife to cut 2 antennae per butterfly. If the child is younger than school age, an adult will need to help spread the ricotta; older children can do this themselves.)
 
Line up pairs of pretzels to make butterfly wings. Spread ricotta on the front side of each wing, then decorate it with peanuts, dried fruit, and candies. Continue until all the wings are decorated. 


Place a baby carrot between each set of wings, then add a pair of antennae at the top. Eat your butterfly creations and any leftover toppings right away while they are fresh and delicious.


This would be really fun as part of a full day of butterfly crafts!

2/25/21

Twinkie Bird on a Stick

You had to have guessed that after making a heart from Twinkies I wouldn't just let Steve eat the rest of the Twinkies in the box without using them for a craft first, right? You know me so well. 


I had originally planned to make blue birds, but when I went through my "still need to try" flavorings, nothing made sense with blue. So I switched to pink and used grapefruit oil to flavor it. Affiliate link here and throughout the post. 

Fun fact: When I was a teenager, we had a yellow parakeet named Twinkie. He had a ton of personality. His favorite bird-approved food was oat groats, but he would regularly help himself to all sorts of human food (including chicken) if we left our plates unguarded for two seconds. 


Twinkie Bird on a Stick


Materials: 


Steps: 

Unwrap the desired number of Twinkies (one for each adult bird and one for each pair of baby birds). Insert the lollipop sticks into the Twinkies. 


Set out a set of small eyes and a yellow TicTac for each baby bird. Use a sharp knife to cut yellow M&Ms in half, then set out sets of medium eyes and an M&M half for each adult bird. 

Next, you're going to melt the candy according to the package directions and flavor it as desired. Here's where you need to learn from my mistakes: Do not leave the Twinkies on a wire rack and pour the melted candy over them. And, do not pour the melted candy over the Twinkies and then place them on a wire rack to drain. Why? Because when you remove them, a bunch stays behind. 


Now learn from my next mistake. After the wire rack fails, do not put the melted candy into a narrow glass, thinking you can just dunk the Twinkie and then lift it out perfectly covered. Instead, the stick comes out and the Twinkie stays put. 

Instead, I had the best luck putting the Twinkies onto parchment paper and spooning the candy over them, adding the eyes and beak, and giving them a good dusting of sanding sugar. Then I lifted the bird out of the puddle, dipped the uncoated back side into the puddle, let the excess drip off, and then placed the bird in a clean spot to set up. 


There are five more Twinkies in the box. Any suggestions for what I should make next? I have a few ideas, but I'd love to hear what you think. 

12/21/20

Edible Advent Wreath

As a professional craft blogger, my job is to design creative projects and then write tutorials to teach you how to make them. Ideally, each project should make my readers want to drop everything and immediately start crafting. For that reason, seasonality is huge. If I publish an adorable Halloween costume on November 1 or a great idea for valentines on February 15, chances are very poor that anyone will drop everything to make them. Just like you'll never see a magazine with Thanksgiving recipes in the December issue, I have the most success when I share projects at least a month ahead of when I expect people would want to make them.

And yet, today I'm sharing an edible Advent wreath. Advent started on November 29. Yesterday was the fourth (and final) Sunday of Advent. Advent ends in in just a few days. By all counts, this is a terrible time to be sharing an Advent idea. 


And yet, the reality of my life as a craft blogger is that what I share IS my life. I'm sharing an Advent wreath because our family celebrates Advent. Yesterday was the fourth Sunday of Advent, so all four candles are lit on my edible wreath. In an ideal world, I would have dreamed up this project two months ago then promoted it in early November. But that's not what happened. 

Thankfully, the projects I share here will live on here, on Pinterest, in Google Images, and elsewhere. So even though I'm late to the game this time, I'm hoping this tutorial will inspire someone in 2021 and beyond. And maybe someone in 2020; after all, Advent doesn't end until Christmas begins. 

---------

Edible Advent Wreath


Materials:


Steps:


Pour approximately 2 cups of flake cereal into bowl. Pick out anything that isn't a flake (such as raisins, or in the case of the cereal I used, dried strawberries)

Prepare the green Candy Melts according to the package directions. I used about 15 wafers. Pour the melted candy over the cereal, stirring until it is completely coated. Spoon it onto a piece of parchment paper, forming the shape of a wreath. Let the candy set for 2 minutes, then apply the round red sprinkles to make the berries. Set the wreath aside to set completely. 

Prepare the blue (or purple - your choice) Candy Melts according to the package directions. I used 4 wafers. Pour the melted candy onto a piece of parchment paper, then roll the Pocky in it to coat. I recommend making extras, but remember to keep at least one Pocky the original pink. 

Prepare the yellow Candy Melts according to the package directions. I used 2 wafers. Drop a tiny puddle of melted candy onto a piece of parchment paper, then drag your scribe tool (or a toothpick) through it to make a candle flame. You'll only need four, but I recommend making extras so you can choose the best ones. 


When everything is completely set, use your scribe tool to make holes where the candles will go. Then use a sharp knife to trim your Pocky candles to the desired length. (I trimmed off the uncoated area you see in the photo below.) You can also use the knife to shave off any puddling on the Pocky candles.


Choose your four best flames and peel them off the parchment paper. Remelt the remaining yellow candy. Add a small dollop of candy to the back of each flame, then attach them to the Pocky candles. When the candles are secure, remelt the extra green candy and put a dollop on each hole, then put the candle in place. 


Happy Advent, everyone!

10/19/20

Candy Corn Black-eyed Susan Edible Flowers

Candy corn seems to be a polarizing treat - people either love it or they hate it. I'm one of the rare people in the middle. I like it, but not enough to buy it over a different sugary treat. No matter your stand on candy corn, I think you'll agree that it is beautiful when you turn it into flowers. Specifically, Black-eyed Susans.  


Candy Corn Black-eyed Susan Edible Flowers


Materials: 


Steps: 


Place a piece of parchment paper on your workspace. Follow the instructions to melt the yellow Candy Melts. Place a small dollop (about the size of a nickel) of yellow candy on the parchment paper, then arrange seven pieces of candy corn to make the petals. Repeat until you have the desired number of flowers. Let the candy set for 15 minutes. 


Pour the jimmies onto a cutting board and chop them into small bits, the way you would mince garlic. 

Melt the cocoa Candy Melts according to the package instructions. Dip a piece of candy corn into the melted candy and then press it to the center. Remove the piece, then sprinkle the wet candy with the minced jimmies. 


Let the candy harden for 15 minutes and your beautiful Black-eyed Susans are ready to serve!


Fun fact: The Black-eyed Susan is the state flower of Maryland. I'm going to be on the lookout for them the next time we visit the Old Line State!

6/22/20

Rice Krispie Treat Cactus

Summer is officially here! It's a great time to give this fun edible cactus craft a try. Affiliate links below. 


Rice Krispie Treat Cactus


Materials: 


Steps: 


Use a sharp knife to cut a rice krispie treat into three vertical strips. Then cut one of the strips in half horizontally. 


Attach one of the small pieces to the top of the middle strip, then bend the remaining two pieces to form the cactus arms. Round the edges of each piece, then make sure they fit together smoothly. Put the pieces on parchment paper, then coat them with green Candy Melts.  


Melt together eight yellow Candy Melts and one light cocoa. Spread this on the graham cracker. 

When the cactus pieces have set up, use green Candy Melts to 'glue' the pieces together. Let them set up.


Use a sharp knife to trim the bottom of the cactus so that it is completely flat. Use green Candy Melts to attach it to the graham cracker. 

Put an unwrapped pink Starburst in parchment paper and flatten it with a rolling pin.


Cut the flattened Starburst into thin strips. Roll a strip to make the center of a flower, then roll a second strip around the center. Bend the edges out slightly to make petals. One Starburst will make three flowers. Attach the flowers to the cactus with green Candy Melts. 


It's as yummy as it is cute! Any suggestions of what I should make next? I have a bunch of ideas, but I do take requests. 

6/15/20

Rice Krispie Treat Pool Table

My latest Rice Krispie Treat + Candy Melt creation is a pool table. I had a lot of fun figuring out how to make it. I'm particularly pleased with how the cue stick turned out. Can you guess how I made it? Read on to find out! Affiliate links below. 


Rice Krispie Treat Pool Table


Materials: 


Steps: 


Unwrap two rice krispie treats (or cut two rectangles if you made your own RKTs). Use a rolling pin to flatten one of them. 


Place the flattened RKT on parchment paper, then cover it with green Candy Melts. I spooned it over the top, then used an offset spatula to smooth it out. Let the candy set. 

Spread a puddle of melted Dark Cocoa Candy Melts onto the parchment paper, then dip the edges of the green RKT into the puddle. 


Cover the unflattened RKT with Dark Cocoa Candy Melts. 


Break a piece of spaghetti in half, then roll it in the puddle of Dark Cocoa Candy Melts. Dip the tip of one end into powdered sugar.

When the candy has set, you're ready to assemble your pool table. Use a glob of melted Dark Cocoa to attach the tabletop to the base. Then dip each Sugar Pearl into a tiny bit of melted Green and place it on the table. Lean the cue stick against the table.


* While searching for this link, I discovered that Wilton has flavored Sugar Pearls! I found Orange Sherbet, Bubblegum, and Green Apple. I cannot wait to my hands on some! I also found pineapple- and flamingo-shaped sprinkles that are totally adorable. Ooh, and airplanes. So many fun choices!