Showing posts with label literature. Show all posts

12/1/22

Goodnight Moon Craft

Today's project is the third in my series based on crowd-sourced responses to ten questions. For this one, I asked my friends to name a popular children's book. Goodnight Moon (affiliate link here and below) was the top answer by far. 

In designing this craft, I wanted to make something that was interesting and recognizable from Goodnight Moon, yet not so challenging that the only children who could make it had already outgrown the book. There are a lot of ways to adapt this to make it easier or more challenging to match the abilities of the child(ren) making it. For example, adults can pre-punch the shapes if little hands aren't big or strong enough to punch. You can switch out the tape for paper (although kids LOVE playing with tape). You can skip the stripes on the yellow curtains, or draw them more as scribbles. 


---------

Goodnight Moon Craft


Materials:


Steps: 


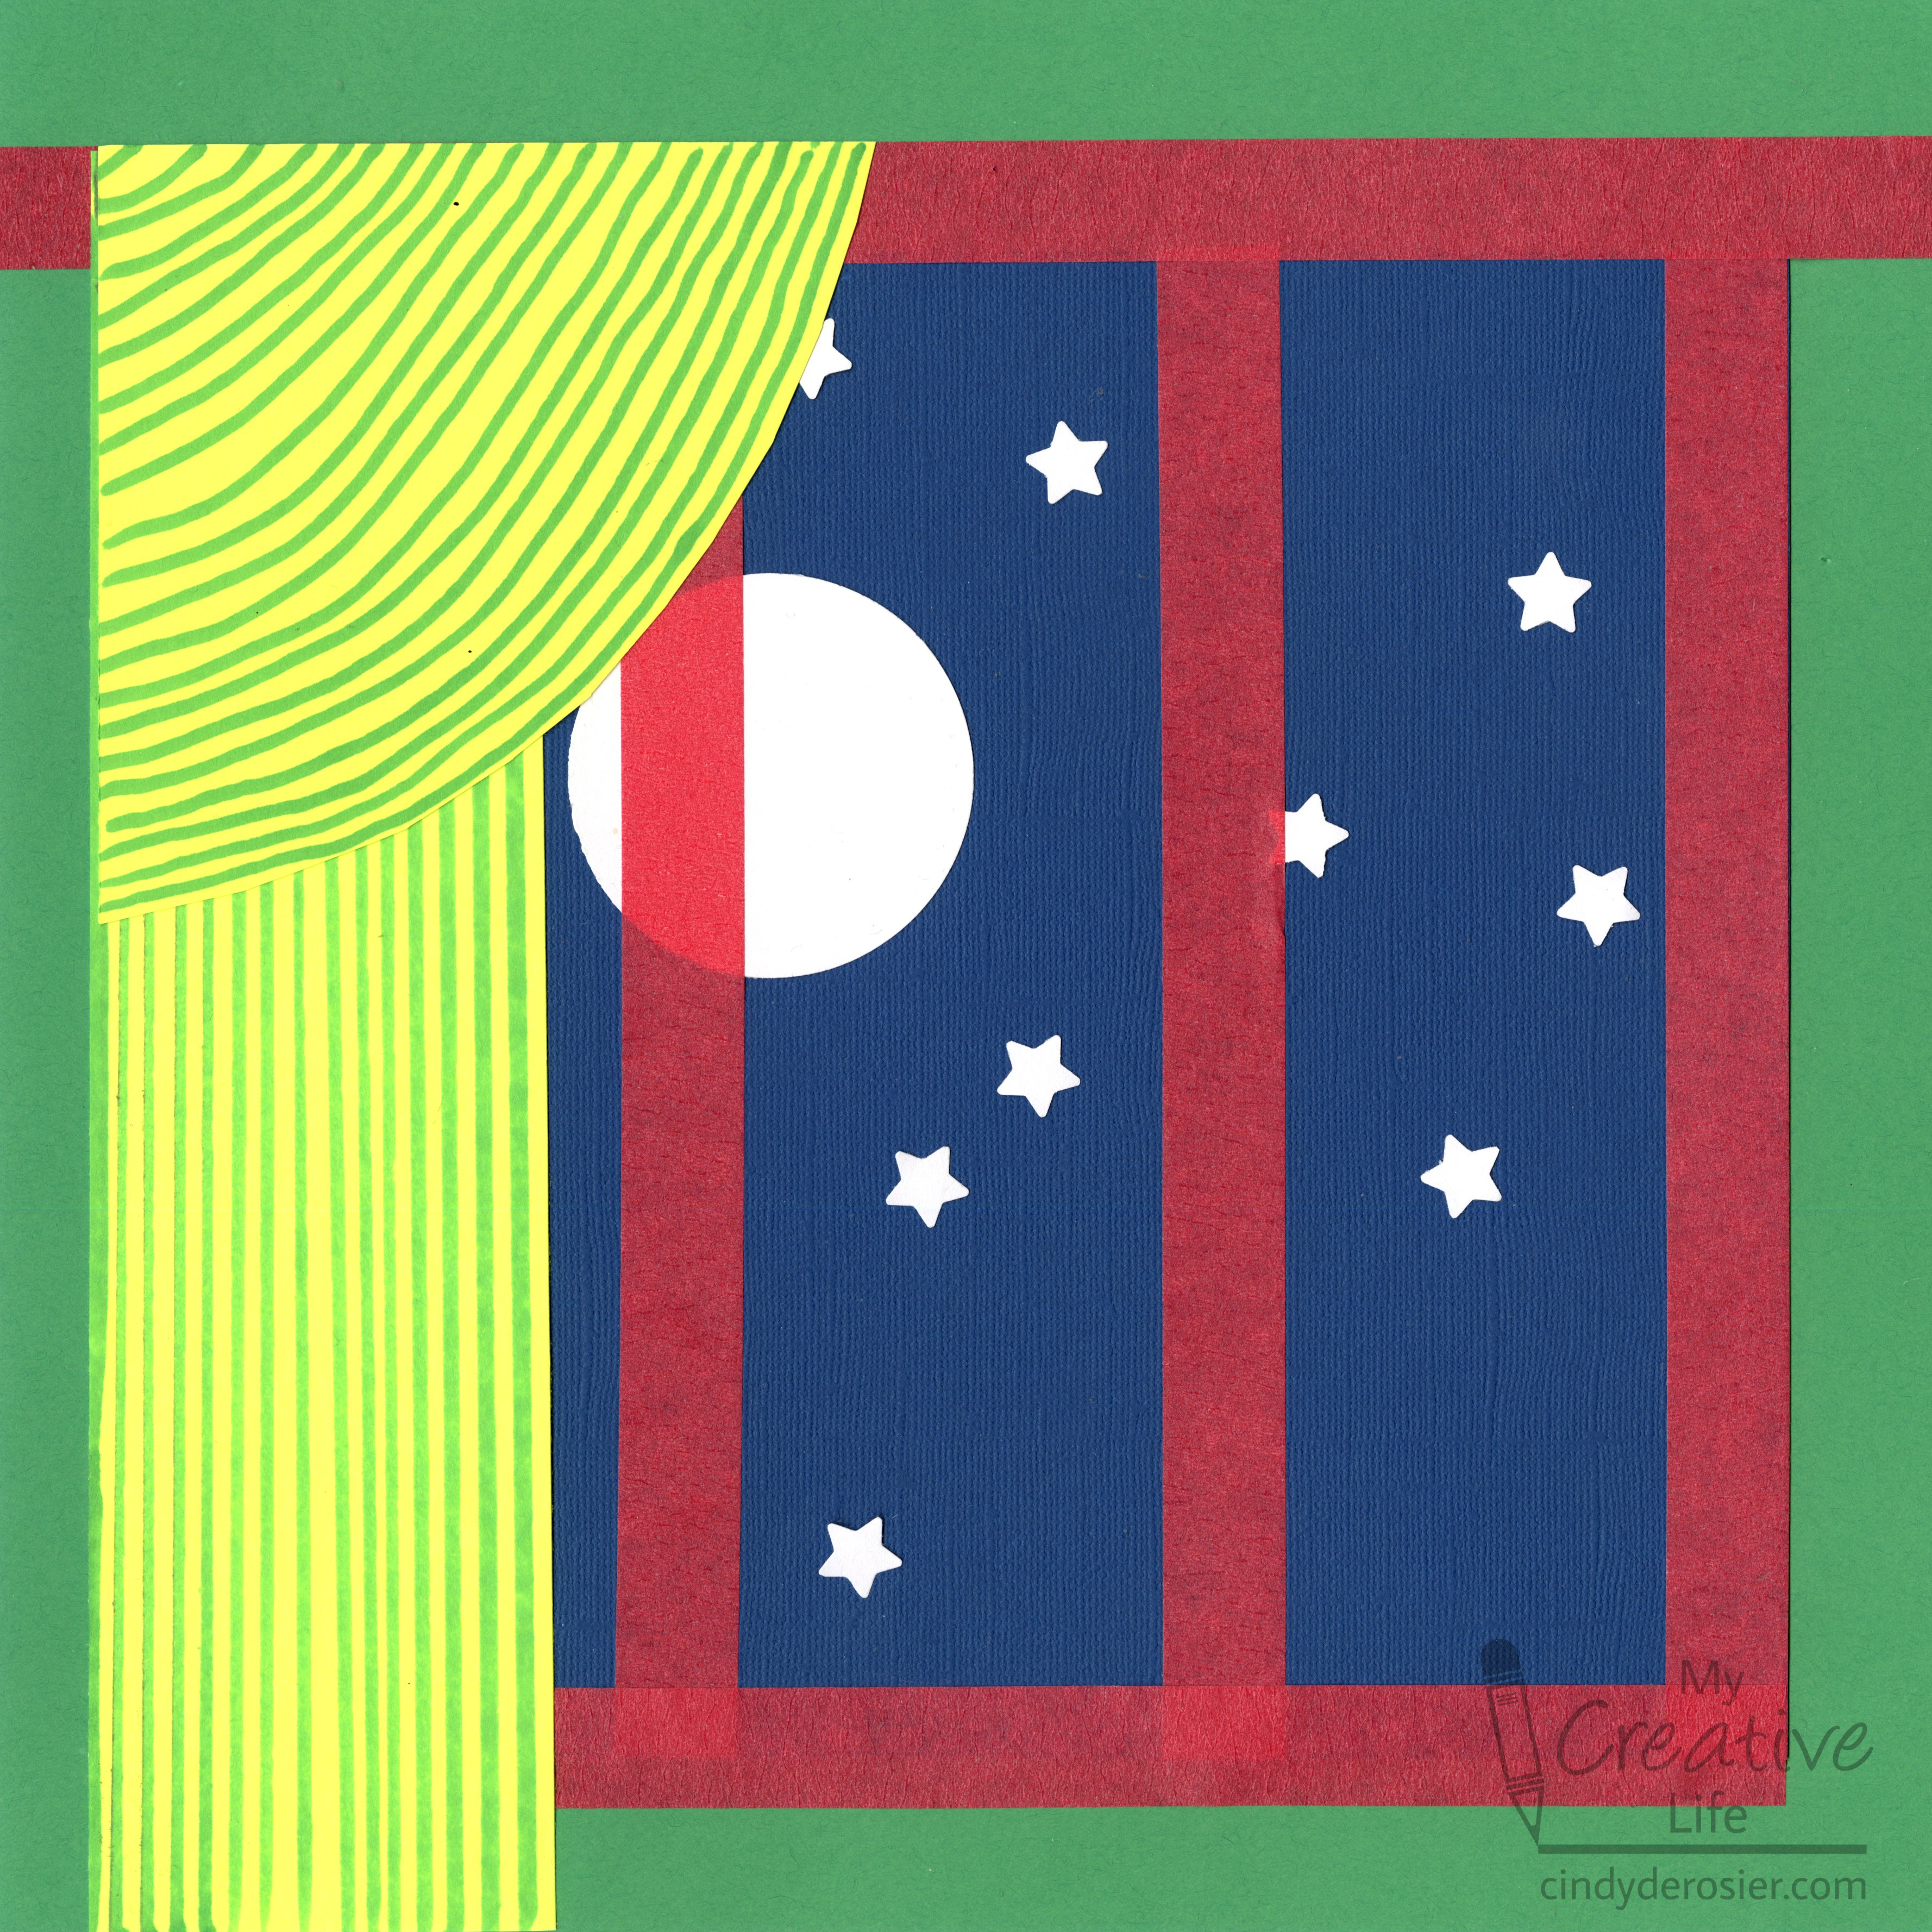
Cut the blue cardstock to approximately 10" square. Punch out one white moon and as many white stars as you'd like. 


Glue the moon to the blue paper, slightly left of center. It should not be too close to the left edge where the curtain will go. Glue the stars randomly where you want. Again, anything too far to the left will be covered. 

Add four vertical strips of tape to the blue cardstock: one on the left side, one on the right side, and two evenly spaced between them. Tuck the edges of the tape behind the blue cardstock. 


Put glue on the back of the blue cardstock and center it on the green cardstock. Add a piece of tape across the top of the blue paper for the curtain rod. It should extend off the edges of the green cardstock. Tuck the edges of tape behind the paper. 


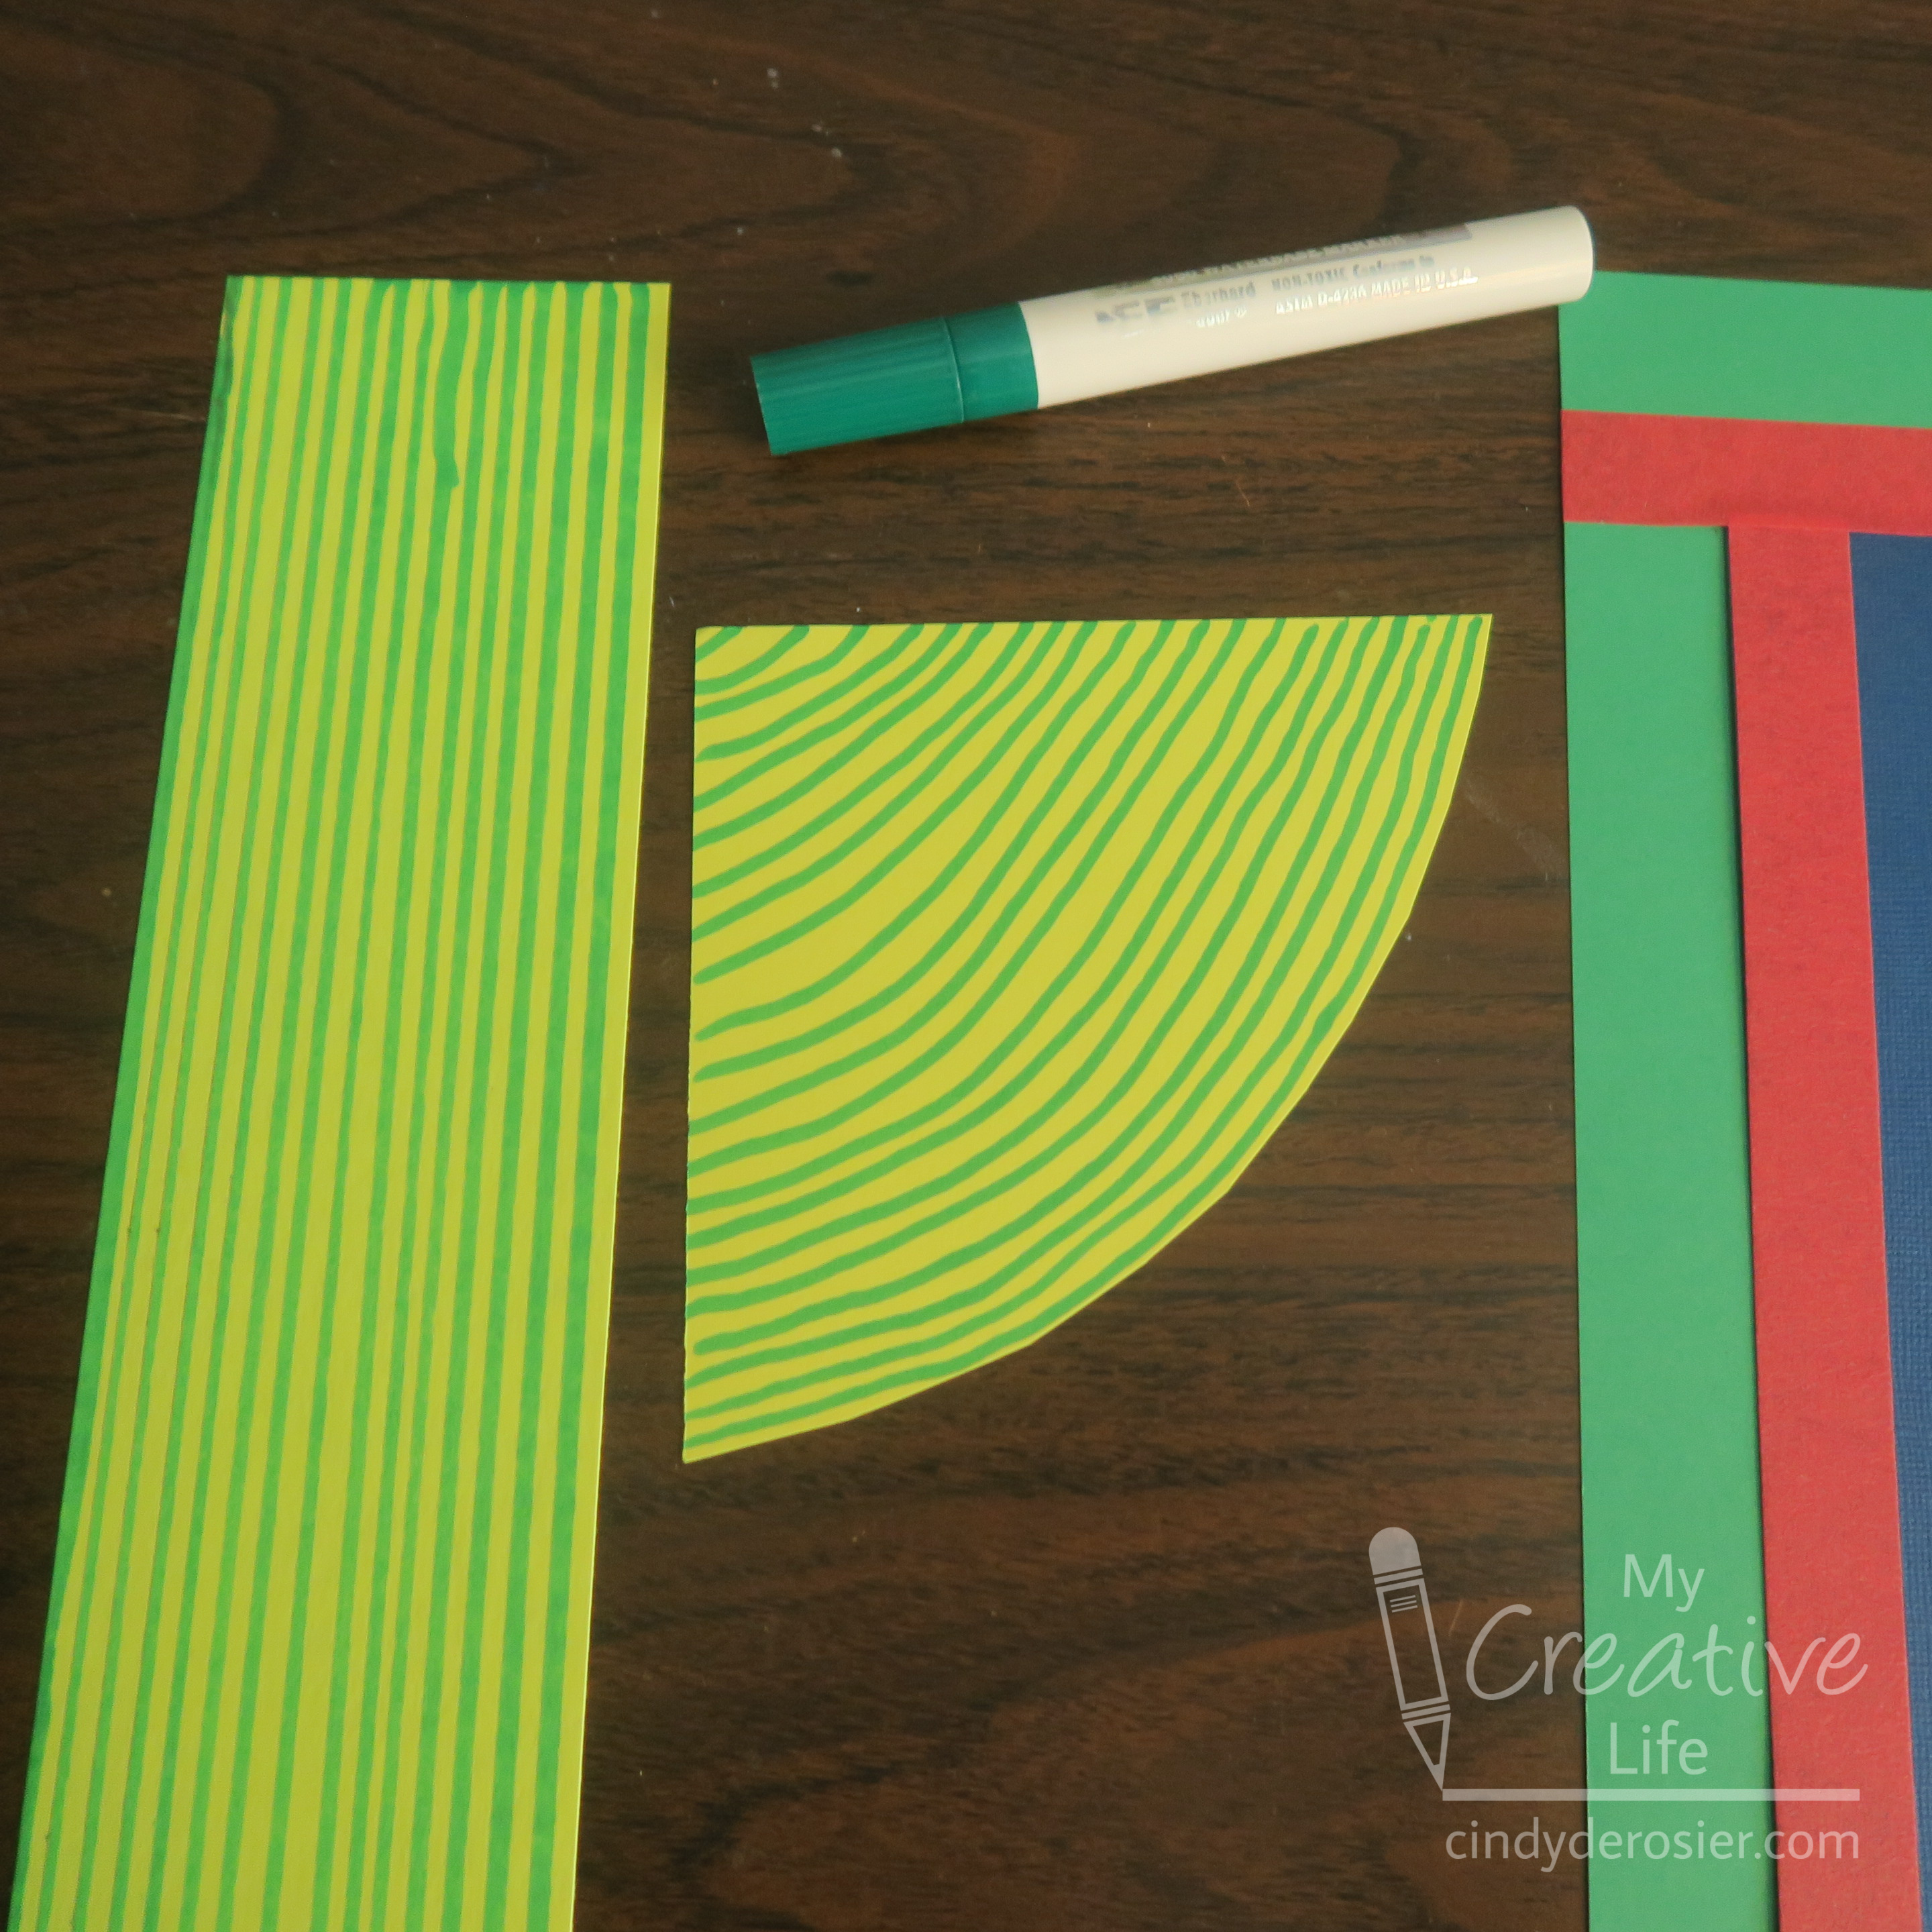
Cut a rectangle of yellow cardstock that is approximately 11" long. Cut a second piece of yellow that is shaped like a large wedge of pie. These two pieces will be the curtains. Place them on your craft to see if you like their size and adjust as necessary. Then draw narrow green lines on the curtains. It's easiest to use a fine-line pen and a ruler for the rectangle and to freehand the wedge. 


Glue the curtains in place. That's all there is to it!


Not only would this be a fun craft to do WITH kids, it would be great to do FOR kids. Pop this into a frame to hang in the nursery. Or create a smaller version to use as a card. There are lots of possibilities. 

2/20/19

Cat in the Hat Fascinator for Dr. Seuss Day

Dr. Seuss Day (aka Read Across America Day) is celebrated annually on March 2, the birthdate of the beloved children's author. Schools, libraries, and community centers plan fun events that celebrate reading and often include Seuss-themed crafts and treats. I've come up with a simple fascinator-style hat made of recycled materials that's inspired by The Cat in the Hat. I'll be sporting my new hat on March 2 for sure! Affiliate links below.


---------

Cat in the Hat Fascinator


Materials:


Steps:


Use the foam brush to put a coat of gesso on the cardboard tube and the juice lid. When it is dry, put gesso on the other side of the juice lid.


Paint the tube and the lid with Wicker White. You want full coverage of the tube and both sides of the lid. 

Next, tape off the sections of the cardboard tube that will remain white. A standard cardboard tube is 4.5" and the Cat in the Hat's hat has 5 bands of color (red, white, red, white, red), so each band will be 0.9". By happy coincidence, I had 0.94" painter's tape on hand, which is plenty close enough. I used an engineering scale and pencil to mark the tube before I realized my tape was the right size; if I was teaching this in the classroom, I'd have the kids do the measuring as a skill practice and introduction to a different type of measuring device than a standard ruler. 


Paint the top, middle, and bottom sections red and let the paint dry completely. Remove the tape, then glue a piece of cardstock to one end of the tube. 


When the glue is dry, use scissors to cut the cardstock into a circle. The tube provides a guide for the scissors to follow. Glue the tube to the juice lid and let it dry completely. 


Finally, glue a plastic hair comb or bobby pins to the bottom of the juice lid (hair combs are more secure, but bobby pins are cheaper - your call). Your fascinator is ready to wear!

As I was writing this post, I realized what I need to make my fascinator even better. There, I've fixed it! 


I wish I'd thought of this back in my teaching days. It would have made Read Across America day even more fun! 

9/6/16

"The Kissing Hand" Cardboard Tube Raccoon

Are you familiar with The Kissing Hand, by Audrey Penn? If not, drop everything and go read it. Then buy it for the young child in your life. It's that good.

The story is about Chester, the raccoon cub who suffers from separation anxiety when it's time to go to school. His mother kisses his palm and tells him that whenever he is feeling a little lonely and needs love from home, all he needs to do is press his hand to his cheek and know that Mommy loves him. Separation anxiety was a major issue in our house for years. I'm so thankful for this book and many other things that helped Trevor feel confident when he is away from us. Right before school started, Trevor was away from us for 5 nights, which is the longest he's ever been away. We were all a little nervous about how that would go, but it was great. While he was gone, I thought back to little preschool Trevor who was so afraid to go to school without Mommy. He's come a long way.

While Trevor was gone, I dreamed up this project:


Just like in the book, the raccoon has a heart representing Mommy's kiss on his paw. 


Materials: cardboard tube, paint, black Sharpie, colored pencils, cardstock, googly eyes, glue, heart sticker

Start by painting a cardboard tube grey. When the paint has dried, use a dry foam brush or sponge to add streaks of greys and tans to the tube. You want a mottled look, just like a raccoon's fur. 


When the paint is dry, use the Sharpie to draw the raccoon's mask and nose. 


Use a white colored pencil to shade the area above the mask and to the sides of the snout to give it dimension. Then use short, quick strokes to add whiskers. Then add a white line across the bridge of the nose. 


Cut rounded ears and two arms from grey cardstock. Shade the inner ears with black colored pencil and the arms with both black and tan. Cut a pair of hands from black cardstock. Put a small heart sticker on the palm of one hand. Glue each hand to one of the arms. When they are dry, glue the ears inside the tube. Then put glue on the upper arms, leaving the ends loose. Use a rubber band to hold the arms in place while the glue dries.


I'm really happy with how this turned out. Easy, right?!


Give it a try! If you make your own version of Chester, be sure to let me know. I'd love to see it!