Showing posts with label patriotic. Show all posts

7/24/26

Liberty Bell Watercolor Painting

In case you missed it, the US Mint is producing the first non-round coin since 1915, when the $50 octagonal Panama-Pacific coin was introduced. This new coin is shaped like the Liberty Bell. The price? $19,600. It contains one ounce of gold, the current value of which is $4,053. They're only producing 2026 of them, so apparently the scarcity makes up for the extra $15,500? Hard pass, obviously. 

Instead of buying a chunk of gold shaped like the Liberty Bell, I recommend keeping $19,550 in the bank and putting the rest toward some fun art supplies. Then use them to make a painting of the Liberty Bell. Affiliate links below. 


Liberty Bell Watercolor Painting


Materials: 


Steps: 


Find a reference image of the Liberty Bell. I used the picture on the Wikipedia page. Sketch the basic shape of the Liberty Bell onto your watercolor paper. Only include the basic shapes; ignore all details. Fill in the basic shapes with a combination of brown and black. 


When the first layer is dry, add the next layer. I put streaks of browns and black onto the yoke, then painted the bell with blue, grey, and brown. I added some of the details, like the metal bars connecting the bell to the yoke, and the supports at the base of the bell. 


When that layer was dry, I added metallics to the bell. This was my first time using the Soho metallics - they're awesome! I added streaks and patches of gold and bronze to the top, bottom, and right side of the bell, then added silver and white to make the reflection. Then I painted the background light blue. 


Then I added the famous crack. 


For the final step, I used brown and black colored pencils to add in the last details. I chose not to write the text on the bell, but I did add the lines. I was worried that the colored pencils might not work well on top of the metallics, but it wasn't an issue. 


This was a fun project to do. I really enjoyed experimenting with the metallics and am excited to use them again. Next time, I want to try more of the colors. 

7/8/26

Red, White, and Blue Patriotic Frozen Drinks

When we were invited to a 4th of July party, I asked what we could bring. Suzzi requested a red, white, and blue drink. Last year, she made one using colored beverages with different densities and it was a hit. I wanted to try something different. Rather than relying on density, what if I froze the layers? One problem: we'd need to transport frozen drinks for an hour in the summer heat. If they melted, I'd be showing up at a 4th of July party with a light purple drink instead of a red, white, and blue one. 

I'm happy to report that my drinks arrived frozen and were indeed red, white, and blue. Unfortunately, there was a different problem I hadn't anticipated. Read on to find out what I did, versus what you should do if you want to make this drink in the future. Affiliate links below.


Red, White, and Blue Patriotic Frozen Drinks


Materials: 


What I Did: 


First, I prepared the blue raspberry lemonade Kool-Aid according to the package directions. I cleared space in our freezer, then set the cups into bread pans that would keep them upright while freezing. I filled each cup 1/3 of the way full with the Kool-Aid and put the pans in the freezer. 


When the Kool-Aid was slushy, I added cute patriotic paper straws. This was a big mistake, so don't do that. I let the blue layer freeze completely, then added the white (Limeade) layer and let that freeze completely. 


I made the Cherry Kool-Aid and packed it into a Thermos. We put the bread pans into a cooler and crossed our fingers that the layers would stay frozen during the drive. When we got to the party, I set out the drinks and added the final layer, which remained liquid. They looked so pretty!


It should have been obvious, but freezing paper straws in a drink is a bad idea. You couldn't sip through them since they were frozen in a block of flavored ice. As the drinks thawed, they began to disintegrate. Most of us ended up using a fork to free the straw and then drank the resulting slushie. The good news is that the three flavors go together really well!


What I Would Do Next Time: 


First, I would buy slushie straws instead of paper straws. That's what I put in the materials list at the top of the post. I would not freeze the straws into the drink. In fact, I would not freeze the drinks like this at all. Instead, I would use my beloved Cuisinart ice cream maker to make a slushie of each color and store those in the freezer until it was time to serve them. I'd pack in the blue and tamp it down, pack white on that, and top with red, and THEN add the straws. I don't know how well slushies would travel, but I think this would work well at home. If you give it a try before I do, let me know how it goes!

6/14/23

Patriotic Craft Stick Flag Drink Coaster

It's Flag Day here in the United States. The Second Continental Congress passed the Flag Resolution on June 14, 1777, giving us a flag with thirteen alternating red and white stripes and thirteen white stars in a field of blue. It's changed 26 times since then. Our current 50-star version, adopted in 1960, is the 27th official US flag and the longest-used version. 

In honor of Flag Day, I created a cute flag drink coaster, perfect for Independence Day or other patriotic parties. The flag isn't accurate, as it is missing 6 stripes and 32 stars. If you're looking for an accurate flag craft, you can find some on my Patriotic Crafts page. Affiliate links below. 


Patriotic Craft Stick Flag Coaster


Materials: 


Steps: 


Paint the craft sticks. One will be entirely white and two are 2/3 white. Two are entirely red and two are 2/3 red. The four partially painted craft sticks are 1/3 blue. Let the paint dry completely, then seal the sticks with Outdoor Mod Podge. 

Glue small rhinestones to the blue portions of the sticks. I used five on the blue/red sticks and four on the blue/white sticks. 

Arrange three mini craft sticks vertically on your work surface and add glue. One by one, transfer the painted craft sticks onto this base. 


That's all there is to it. Enjoy your patriotic drink coasters!

12/15/22

Presidents Day Craft: Presidential Seal and Oath of Office

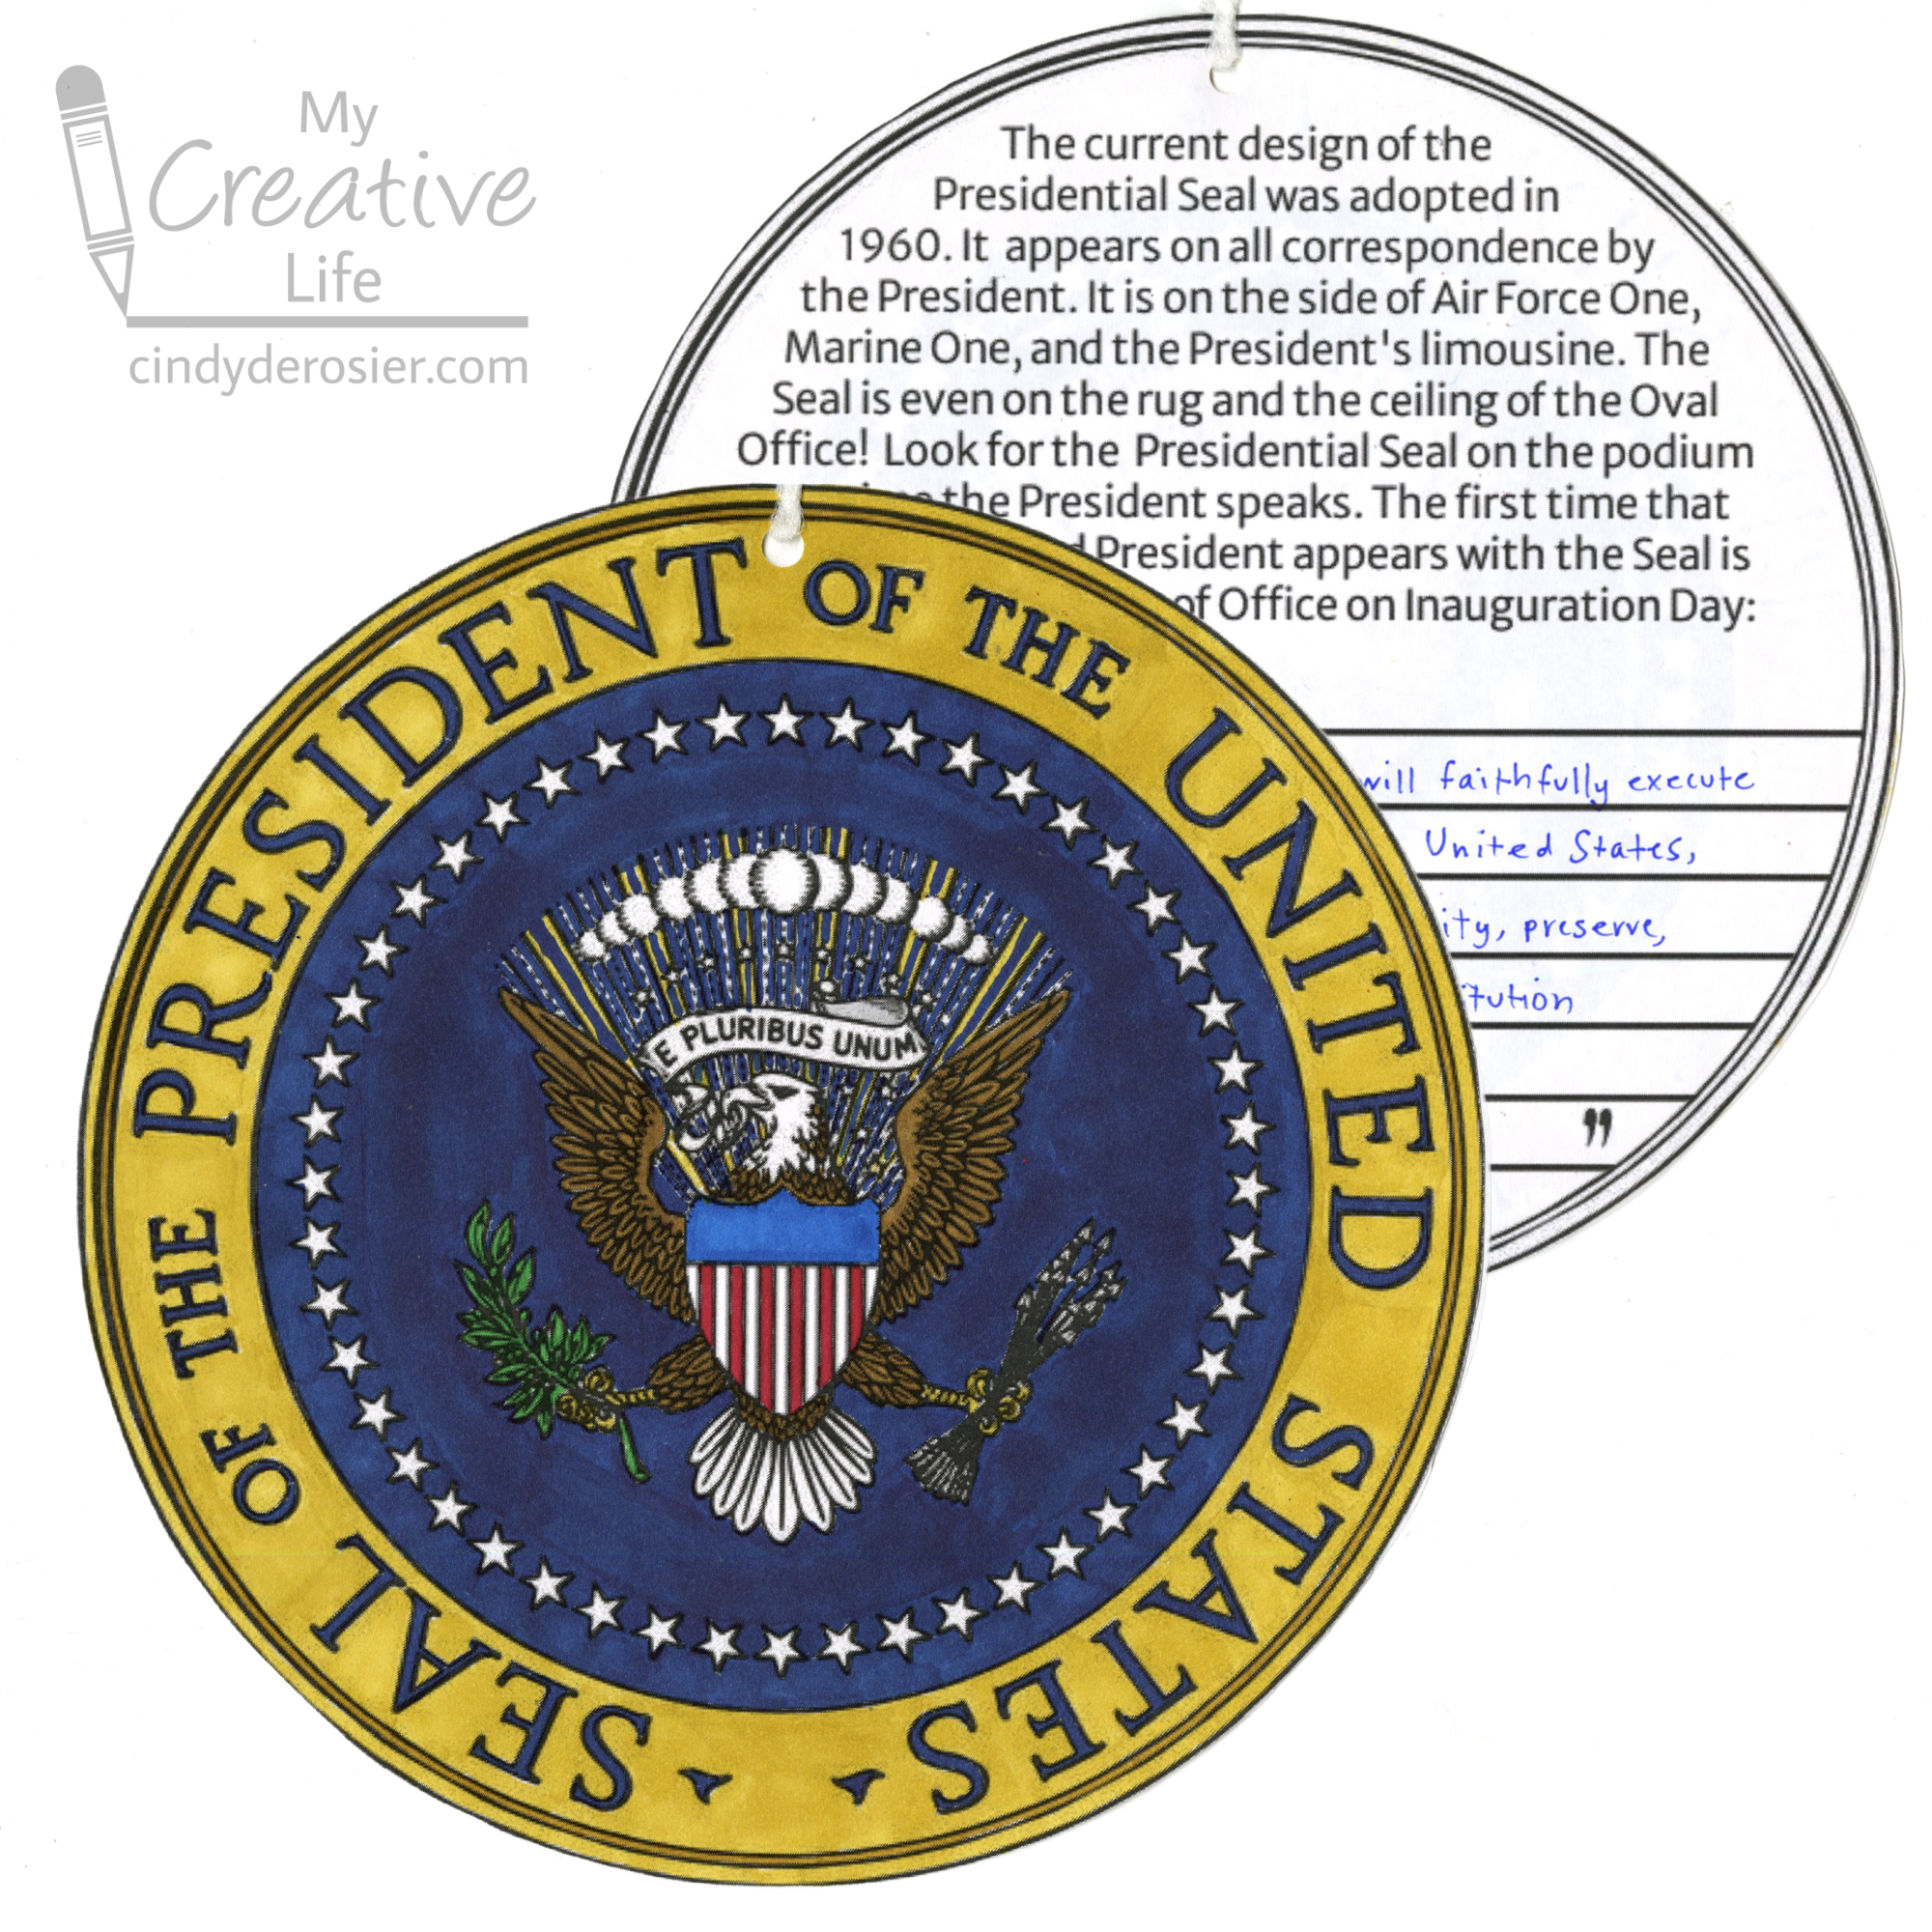
For the tenth and final question in my craft series based on crowd-sourced responses, I asked my friends to name an under-rated holiday. To choose what to make, I looked at which of the holidays mentioned is most in need of a classroom craft and I decided on Presidents Day (no apostrophe). Yes, plenty of Presidents Day crafts exist already, but they are overwhelmingly about Washington and Lincoln and almost exclusively target early elementary age. I wanted something for upper elementary that focuses on all presidents, not just the two best-known. I decided to create a coloring page of the Presidential Seal, paired with information about the Seal and the Presidential Oath of Office on the reverse. 


I started with this image from the State Department and made a few digital tweaks (specifically to the shield) to turn it into a coloring page. 


The folks from Ohuhu just sent me their new Kaala series dual-tip alcohol markers to try out, so that's what I used for coloring. I've been wanting to try Ohuhu for a long time because I've heard great things. And now I know that everything I've heard is true! I love these markers. The Kaala series has 150 colors (168 pens) in four different sets (Basic Tones, Illustration Tones, Skin Tones, and Landscape Tones). The color range is beautiful, although I only used 8 for this project. Seven are listed below, plus I used a cool grey to shade the E PLURIBUS UNUM banner. 


The Kaalas feature a fine tip for drawing (perfect for coloring in the letters in the seal and the tiny spaces between the stars) and a slim broad tip for coloring larger spaces and making angled lines. The markers are labeled on both the color-coded top and with a sticker along the side, which I loved. 

After coloring, I created a second printable for the reverse. I added some information about the Presidential Seal, then left space for students to write the Presidential Oath of Office


Here's how it looks filled in:


After students have colored the front and written on the back, they can turn them into a mobile. Cut out both parts and sandwich them together with a little bit of glue. Punch a hole and add a piece of yarn to hang the mobile. 


I loved trying out the Kaala markers and can't wait to use all of the colors. And that isn't all that Ohuhu sent me! Expect to see a lot of projects using Ohuhu products in 2023! 

12/12/22

Statue of Liberty at Sunset Painting

Today's project is the eighth craft in my series based on crowd-sourced responses to ten questions. This time I asked my friends to name a US landmark. Mt. Rushmore was the most frequent answer, but I shared a Mt. Rushmore craft idea last year. So I went with the second most popular answer, the Statue of Liberty. 

I started by thinking back to my visits to the Statue of Liberty. I first visited New York City and the Statue in 1989, when I was 17. In the spring of 2001, a fellow teacher and I took students to Washington DC and New York City, which included a visit to Lady Liberty. My most recent time seeing the Statue was in 2014, when we sailed into NYC at sunrise. While each visit was fantastic, I realized I've seen the Statue at dawn and in the daylight, but never at sunset. That was the inspiration for my project. 


Statue of Liberty at Sunset Painting


Materials: 


Steps: 

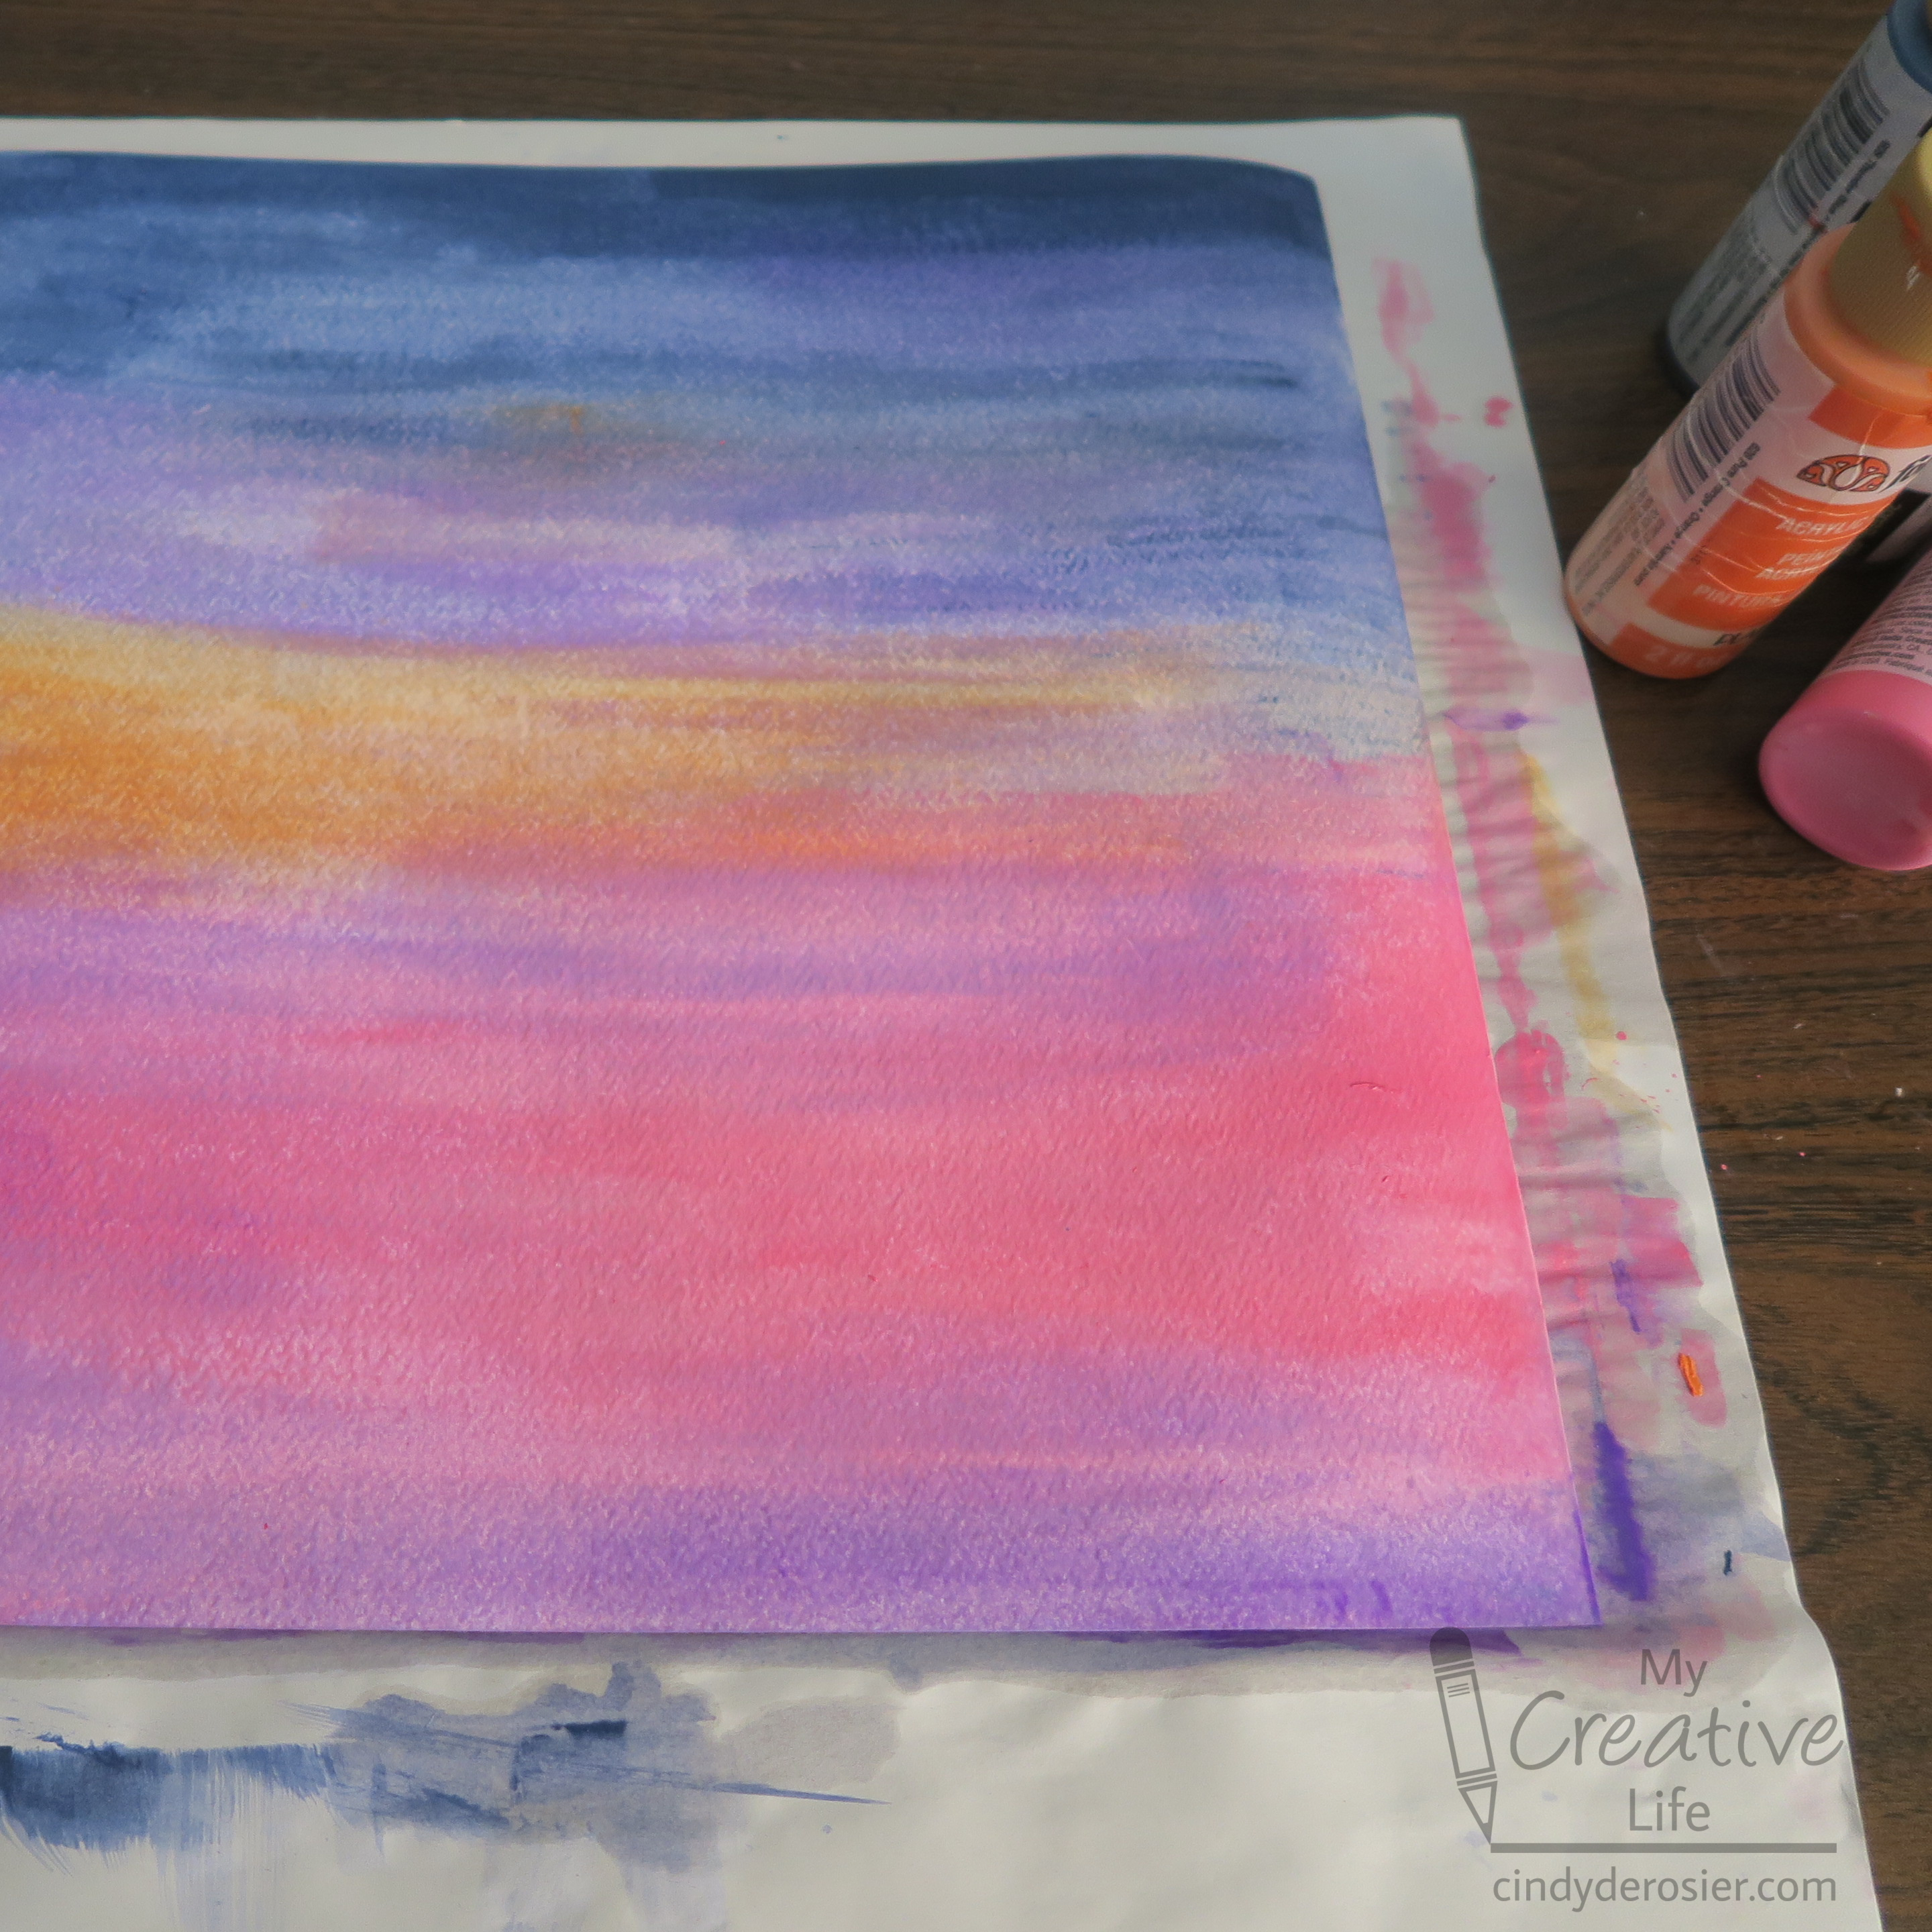
Use a large brush to wet the watercolor paper, then add horizontal streaks of blues, purples, oranges, and pinks to make a sunset. There's no right or wrong. Continue until you're happy, then set it aside to dry. 


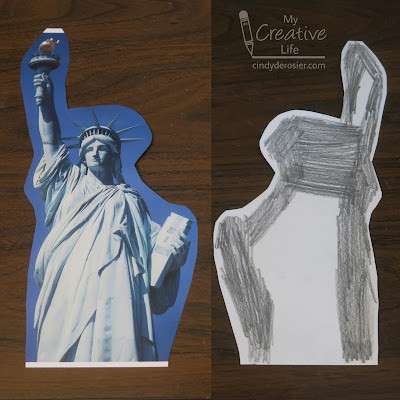
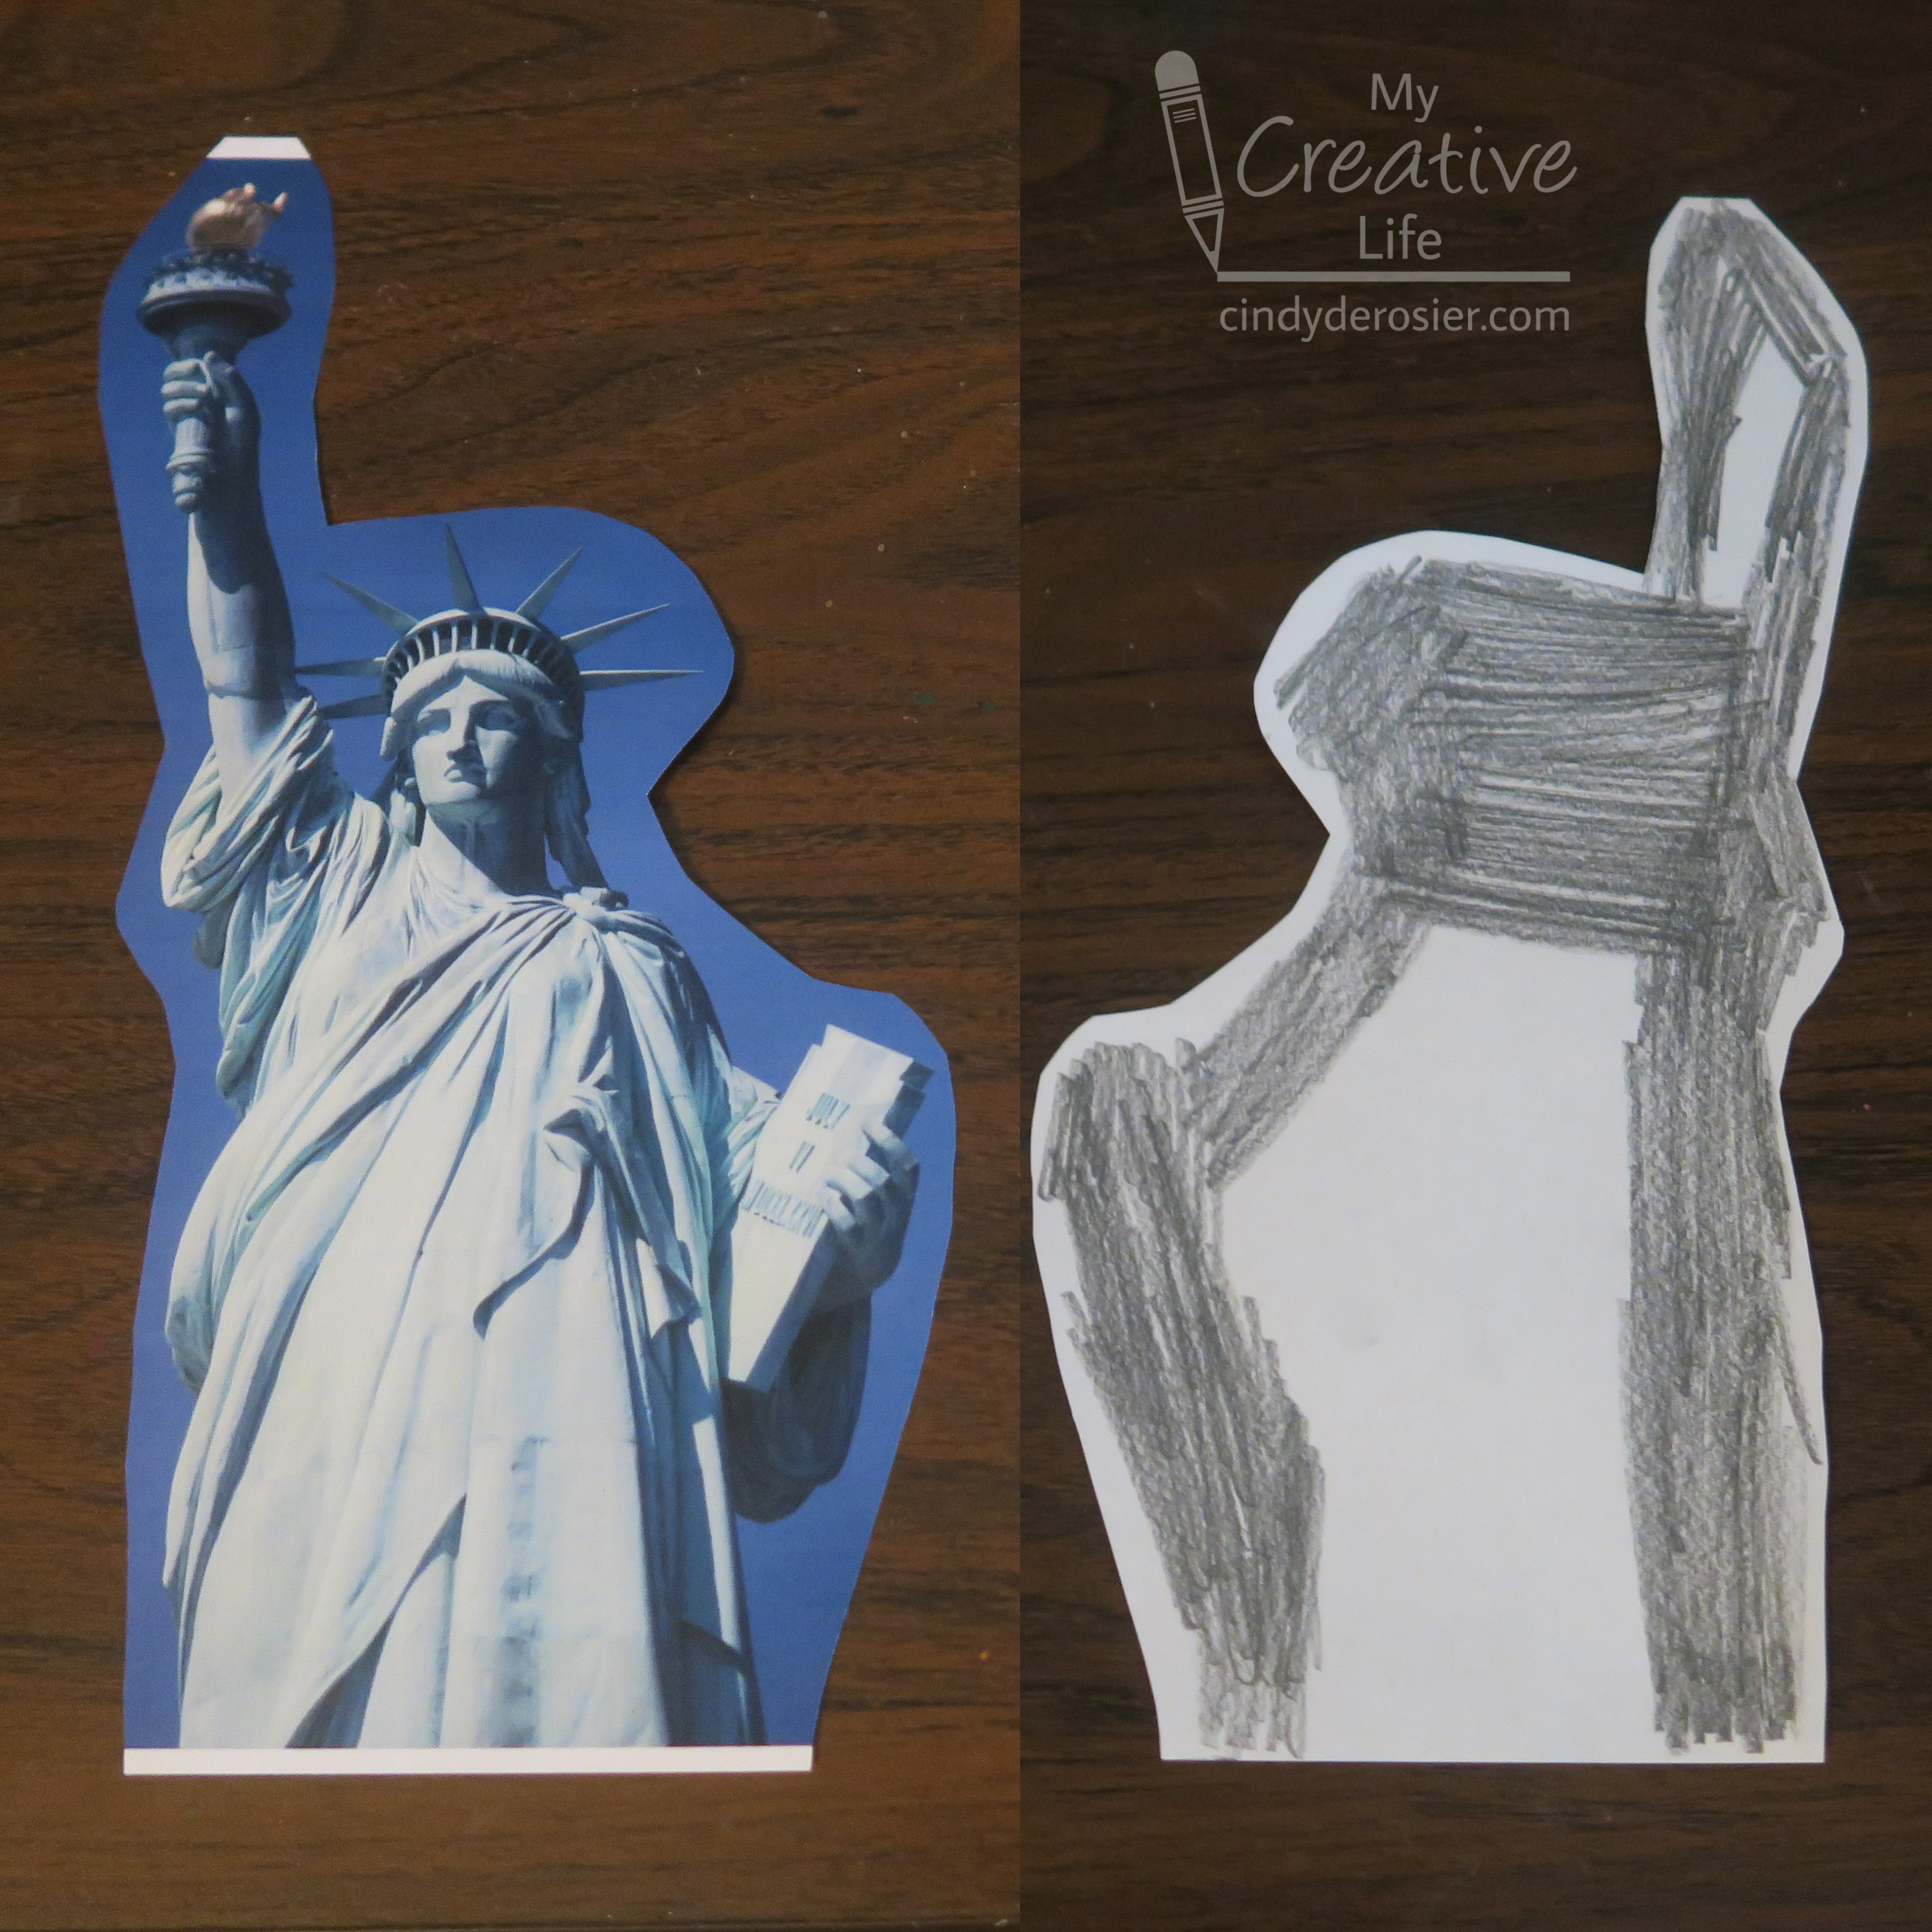
Print out a photo of the Statue of Liberty, then trim away the background. Turn it over and scribble on the back with an ordinary pencil. You'll be using this to transfer the image to the paper, so you only need to color the edges, as shown below. 


Tape the edges of the watercolor paper to the desk to keep it from moving, then use paperclips to secure the image to the paper. 


Trace along the outline of the Statue with a pencil, pressing firmly. Lift a corner to make sure the line is transferring well. 


When you've traced the entire outline, remove the paperclips and set the image aside. Fill in the traced area with black paint. 

 
I really enjoyed this project. It makes me wish I were still teaching 5th graders specifically so we could do this project and I could display a whole bulletin board's worth of these. 

6/6/22

Patriotic Denim Heart

When I get a hole in the knee of my jeans, I move them from my Wear-in-Public pile to my Only-While-Gardening pile. When I get a hole anywhere north of the knee, I see what I can salvage for a craft. Today's project, a flag-inspired stuffed heart, uses a leg. 


I worked on this for a few minutes here and there over about a week, never spending more than 10 minutes at a time. While it's not my usual style, I like the rustic, handmade look for this project. Embrace imperfection, right?! Affiliate links below. 


Patriotic Denim Heart


Materials:


Steps: 


Make a heart pattern on scratch paper. When you are happy with your pattern, pin it directly to a pant leg, making sure the side seam is out of the way. Cut out the heart. You will have two identical pieces with their right sides already facing out. Do not separate the pieces. Add Wonder Clips around the outside so that they don't shift. 

Cut the hem off the denim pant leg and set it aside. 

Thread a needle with all six strands of red embroidery floss. Remove the clips closest to the point of the heart, leaving the ones nearer the top in place. Flip the back piece of denim backward so it is out of the way. Starting at the point of the heart, use a backstitch to sew a horizontal stripe through ONE piece of denim. Leave a tiny seam allowance on each side of the stripe. Continue moving up the heart until you have red stripes that go from one side to the other on the bottom half of the heart. I have four stripes, but the number you have will depend on the size of your heart and how close together you sew them. If you want it to be flag-accurate, make three stripes. I was winging it; if you want to plan ahead or don't trust that you can sew in a straight-ish line, you can use tailor's chalk pencils to draw guidelines.  

 Here, I'm finishing up my final full-length red stripe. 


Start the next red stripe in the middle of the heart and continue to the right edge. Do the same for the remaining red stripes. As you can see, I left clips on the upper left. You can also see the hem that I cut to length. I eventually pulled out the gold thread since it didn't go with my project. 


Next, using all six strands of white embroidery floss, sew a white stripe between each pair of red stripes. 


Move the clips to the right side. Still using all six strands of the white embroidery floss, sew French knots in the blue field. I ended up with 18 instead of the actual 50 on the flag. (Fun fact: The 18th state is Louisiana, which we visited in 2019.) 


Move the clips back to the left. Fold the hanger (hem) in half and place it at the top between the layers. Thread the needle with blue, then backstitch through all the layers to secure it in place. When the hanger is secure, switch to a whip stitch and sew clockwise around the edge of the heart. Stop at the top row of white stars. Stuff the heart with fiber fill, pushing it into the point.  


Sew the opening closed by continuing the whip stitch until you reach the hanger. Switch back to the backstitch and sew across the hanger once more to reinforce it. 


The edges of the heart will naturally fray. If it's unevenly frayed, you can trim the too-frayed areas or scratch at the not-frayed-enough areas. Have fun sewing!

2/12/21

Mount Rushmore: Guess the Presidents Craft

As Presidents' Day nears, I've come across a lot of crafts inspired by Mount Rushmore. Most of them involve gluing coins or doing rubbings of coins on paper to represent the four presidents carved into the iconic monument in South Dakota. Unfortunately, only three of the four presidents at Mount Rushmore actually appear on United States coins. Very few people mention in their tutorials that they are portraying the wrong man. As for the rest, I don't know if it's worse if they don't know they have the wrong person, or they know they do and are pretending they don't. 

Here's an idea for a project inspired by Mount Rushmore that not only identifies the presidents correctly, but teaches the reason why each was selected for the carving. Before reading any further, read the clues and see if you know the faces of Mount Rushmore! Affiliate links below. 


Mount Rushmore: Guess the Presidents Craft


Materials:


Steps: 


Print out the photo of Mount Rushmore so that it fills most of a sheet of paper. Trim two index cards into 3" x 1.5" pieces. (Adjust the size if your printout is significantly larger or smaller than mine.)

Score each index card at 0.5" to form the flaps. 


At the top of each flap, write WHO AM I? and then draw a dotted line across the score line. Below the line, write the clues:

  • I represent BIRTH. I became the first president of the United States in 1789 and led the new country through its infancy. 
  • I represent GROWTH. I doubled the size of the United States with the Louisiana Purchase.
  • I represent DEVELOPMENT. My progressive policies and many anti-trust suits were critical in developing the US. I established the National Park System, too. 
  • I represent PRESERVATION. I kept the country united during the Civil War, abolished slavery, and modernized the United States economy. 

On the back of each flap, write the answer. It should be right-side up when you flip the tab up, so you'll be writing it in the opposite direction as the clues. 

  • George Washington
  • Thomas Jefferson
  • Theodore Roosevelt
  • Abraham Lincoln
 

Apply adhesive to the back side of the tabs and place each clue over the proper face. Be sure that the face is fully covered and that it will be fully revealed when you lift the tab. 


Here's a fun fact for you for Presidents' Day from History.com

Presidents' Day never falls on the actual birthday of any American president! Four presidents (George Washington, William Henry Harrison, Abraham Lincoln and Ronald Reagan) were born in February, but their birthdays all come either too early or late to coincide with Presidents' Day, which is always celebrated on the third Monday of the month.

6/14/19

Sparkly Patriotic Photo Frame

For those who don't know, June 14 is Flag Day. Back in my teaching days, when June 14 fell on a weekday, we'd do a flag-inspired craft. Today’s craft is perhaps too time-consuming for school, but it's perfect for camp or home. Affiliate links below. 


---------

Sparkly Patriotic Photo Frame


Materials:


Steps: 


Paint upper left corner of the frame blue. Paint stripes down the right side, alternating red and white. There will be 13 stripes in all (7 red, 6 white). Paint the left side of the frame so that it matches the stripe pattern on the right. 

I didn't do any measuring, but if I were teaching this project to kids, I would have them use a pencil and ruler to plan out their stripes. Divide the height of your frame by 13 to get the approximate width for each stripe. It doesn't need to be exact, as should be obvious by the fact that I just eyeballed it. 


To apply the bling, work on one small section at a time. I divided the blue into three areas. Apply a generous amount of craft glue and then add gems, sequins, and other bling. Don’t overlap the materials and don’t worry about small gaps. Using the stylus makes this much easier than picking up the little pieces and trying to place them perfectly. 

When you finish a section that borders a white stripe, cut a length of pearl trim to fit the spot. Add a line of glue and put the pearl trim in place. Then continue with the next color. 


When you have filled in every section as well as you can with rhinestones, sequins, and gems, it’s time to fill in the tiny spaces with Diamond Dotz. Add a dots of glue, then place the Dotz.


Allow the glue to dry completely. Your sparkly frame is ready to fill with your favorite photo!


Obviously, this craft is perfect for any patriotic occasion. It makes a wonderful gift for a veteran or active-duty service member, too!