Showing posts with label vellum. Show all posts

5/30/24

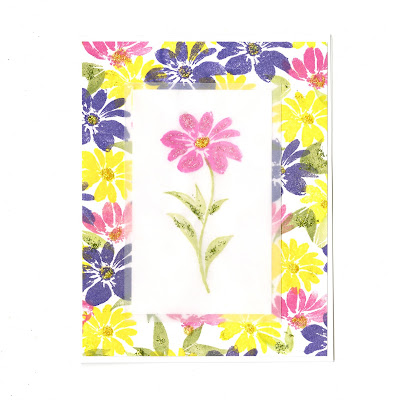
Stamped Floral Card

For the Patterned Paper with a Twist challenge on National Scrapbook Day, we had to make a project using homemade patterned paper. This is my card:

Stamped Floral Card (affiliate link)

I used a Gina K. stamp set (three flowers and two leaves) and five colors of ink to create my own patterned paper. I stamped an extra flower (plus stem) onto vellum, then added Stickles to give my stamped images some sparkle. I really enjoyed making my own stamped patterned paper. This is definitely something I'd like to do again. 

While I like the color combination of yellow, pink, and purple, I wish I'd used my wedding colors. I hadn't realized I'd be running this post on my 20th anniversary! Happy anniversary, Steve. I can't wait to see what the next 20 years have in store for us. Whatever it is, we'll do it together. I love you!

1/24/23

Washi Tape Valentine Heart Suncatcher

I made another project this week to add to my huge collection of Valentine's Day decorations. This is what it looks like on the wall...


... but it's intended as a suncatcher. Look how pretty it is in our bedroom window, against the bright blue sky. 


The whole project takes about 10 minutes and the end product is so pretty. Note that I used a 20+ year old scrap of patterned vellum, which is really hard to find. It's also hard to find the same washi tapes I used. Below, you'll find affiliate links to non-patterned vellum, different Valentine's Day washi tapes, and other products you'll need to make this.

---------


Washi Tape Valentine Heart Suncatcher


Materials: 


Steps: 


Make a heart pattern, then trace it onto the vellum with the Sharpie. 


Arrange the washi tape in an order you like. Apply the first tape horizontally across the center of the heart (I started with the eye-catching "i ♡ you" tape), allowing the ends of the tape to hang over the edge of the outlined heart slightly. Add each tape above that one until you have filled the top portion of the heart. The size of your heart and the width of your washi will determine how many rows that is. 


Keeping the tapes in the same order, fill in the bottom of the heart. You'll end up with the tapes mirrored across the 'equator' of the heart. Press all the tapes down firmly. 


The black Sharpie line will show through the washi. Cut just inside this line. Then tape your suncatcher to a window and enjoy!


Obviously, you can use this technique for any holiday or occasion. Just change the washi tape and the shape of the vellum. It's such a quick and easy project, one I'll definitely be doing again. 

10/27/21

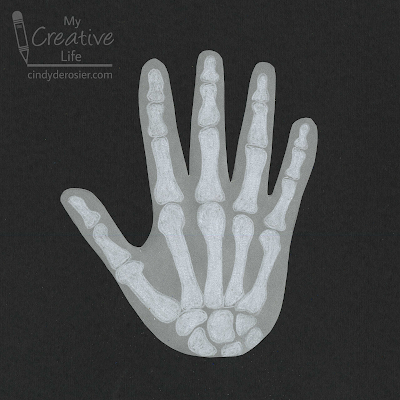
Skeleton Handprint for Halloween

Halloween Hand #4 is a skeleton version of my hand. I've done a skeleton hand (and arm) before, but using a completely different technique. Affiliate links below. 


Skeleton Handprint


Materials: 


    Steps: 

    Trace your hand onto vellum and cut it out with the scissors. Put the printed x-ray onto the light box with your handprint cut-out on top of it. Trace each of the bones onto the vellum. 


    Remove the handprint from the light box and color in each of the bones. 


    Quick and easy and super cool. Tomorrow I'll be sharing my fifth (and final) Halloween handprint craft. Any guesses?

    11/16/20

    X is for X-Ray Fish

    Another major project completed! With today's x-ray fish, I now have a kid-friendly animal craft for each letter of the alphabet.  
     

    Creating an x-ray fish was a bit of a challenge. Step 1 was learning more about this interesting fish. Step 2 was deciding what media to use to show the translucent skin of the x-ray fish. Once I settled on vellum, it was just a matter of sketching, coloring, and layering. Affiliate links below. 


    X is for X-Ray Fish


    Materials:


    Steps:


    Start by finding a picture of an x-ray fish to use as a reference. On a piece of scratch paper, sketch the body shape, along with the position of the eye, backbone, and internal organs. 

    Cut out your sketched fish, then trace it onto a piece of vellum. Cut it out and set it aside. Use the vellum scraps to cut a backbone. I used the microtip scissors, but using scalloped pinking shears is faster, easier, and more effective. Next, cut out the the fish's organs. Treat the brain, digestive tract, and everything else in there as one piece. Finally, cut out an eye. 

    By the way, I didn't notice that I'd shaped the caudal fine (tail) incorrectly until after taking this photo. Fortunately, it was a very easy fix. 


    Use a yellow colored pencil to add a band of color to the fins, as shown below. Then, use a black colored pencil to color in the center of the eye, the bans on the fins, and the small spot on the body behind the eye. With a white colored pencil, color in the outer portion of the eye and the tips of the fins. Then lightly draw ribs and the lines on the tail. Finally, use a brown colored pencil to lightly add shadowing between each of the vertebrae. 


    Now, adhere the pieces together. I recommend vellum adhesive or a spray adhesive. If you don't have either one, spread a very small amount of liquid glue with your fingers. It will show through vellum, so try to keep it to areas where it will best be hidden (behind the eye, fins, backbone, etc). 


    The slightly darker areas you can see on my x-ray fish are actually fingerprints, not adhesive. They weren't visible until I put the pieces onto true black cardstock and scanned (as opposed to the poorly lit photo of the pieces sitting on cheap black construction paper). The fingerprints don't really bother me, but if you want a pristine x-ray fish (or just want to feel extra fancy), consider wearing these. Or, if you ever need to surreptitiously collect someone's fingerprints, encourage them to make an x-ray fish and then abscond with the finished project. 

    5/17/18

    Cardboard Tube Honey Bee

    What do Arkansas, Kansas, Louisiana, Maine, Missouri, Nebraska, New Jersey, North Carolina, Tennessee, Utah, Vermont, and Wisconsin have in common? Here's a hint:


    Each of them has named the honey bee as their state insect! (Well, technically, the honey bee is the State Agricultural Insect of Tennessee, which apparently loves insects so much that it has four different official state insects.) What these 12 states lack in originality, they certainly make up for in non-controversial decision-making. Just about everyone can agree that the honey bee is critical to agriculture and a good insect to have around. (Apparently, however, people cannot agree whether to spell it honeybee or honey bee. I am convinced by this argument and will henceforth include the space.)

    Learn how to make your own honey bee using a cardboard tube!


    ---------

    Cardboard Tube Honey Bee


    Materials:

    • cardboard tube
    • scissors
    • acrylic paint
    • black cardstock
    • craft glue
    • vellum (affiliate link)


    Steps:


    Cut the cardboard tube in half. You will only need one piece.


    Shape the tube so that the bee has three distinct body parts... sort of like a snowman! (Disregard the penny- I thought I'd need it for counterbalance and didn't take a photo without it.)


    Paint the bee with a base coat of yellow. Go over the head area with black. Blend some black with yellow and use it to paint the top of the thorax. Use the same mix to add stripes to the abdomen. 


    Cut a stinger from cardstock and glue it in place. Cut a pair of wings from the vellum. Make a tiny fold at the narrow ends of each wing and glue just that part to the thorax. 


    Cut eight small strips of black cardstock. Two are antennae and six are legs. Glue the antennae to the head and the legs in pairs along the thorax. The hind legs should be where the thorax and abdomen meet.


    Finally, cut two large ovals for the honey bee's eyes. Glue them to the head. That's all there is to it!


    If you live in one of the 12 states with the honey bee as your state insect, it's a no-brainer that this is the perfect project to do with the kids, whether they're your children, grandchildren, students, etc. But no matter where you are, kids will enjoy making a honey bee craft and learning more about this useful and fascinating insect.