Showing posts with label Scrabble. Show all posts

6/3/19

Scrabble Tile Pendants

I love to craft with friends, even when they're 3000 miles away! Jessie, my friend and roommate at Prime Con, lives across the country from me, but that didn't stop us from collaborating on a project: Crocheted Necklaces with Scrabble Tile Pendants. Read on to learn how I made the pendants (affiliate links below), then hop over to Jessie at Home to see how she created crocheted necklaces for each of the pendants I made! Here's a sneak peek of one of the completed necklaces.


---------


Scrabble Tile Pendants


Materials: 


Steps: 

Before getting started, invert your Diamond Glaze (with the lid still on) and set it in a narrow glass or something else that lets it sit upside down. Leave it for at least 30 minutes. Do not shake! 

Select your letters, then set them on a smooth, flat surface. Hold the tip of the Diamond Glaze just above the center of the tile and squeeze gently. Allow the Diamond Glaze to pool toward the edges. If you squeeze slowly, it should make a dome on the tile without spilling over the edge. 


If it gets too close to an edge and isn't reaching one or more of the corners, use a toothpick to gently guide it into place. 


Continue adding Diamond Glaze until you have a dome. Hopefully there are no bubbles (that's why we inverted the Diamond Glaze), but sometimes they show up for no good reason. If they do, gently poke each bubble with a toothpick. Sometimes I use a needle if I have one handy. 

Without moving, jostling, or otherwise disturbing the tile, let it sit for at least 24 hours. It will look opaque at first (like the letter V below) but will dry crystal clear. 


When your tiles are completely dry, turn them over and use Supertite glue to add jewelry bails. I used three different styles of bails for the pendants I made for Jessie and her twins, Kyla and Vada.


Now head over to Jessie at Home to learn how to turn these pendants into gorgeous beaded necklaces!

3/20/19

Scrabble Tile Hanging Welcome Sign

I love Scrabble. I have a huge bag of Scrabble tiles and racks that I got at a thrift store years ago (in addition to the 8 Scrabble boards I own) and was recently digging through them for a collaborative project I'm doing with a friend. After setting aside the letters I needed for that project, I decided to make a welcome sign. Affiliate links below. 


---------

Scrabble Tile Hanging Welcome Sign


Materials: 


Steps: 


Use the craft drill to bore holes 1/4" from each end of the rack. I put a piece of cork beneath the rack, then set it on top of a cardboard box. Oh, the horror stories I've heard about people using the craft drill on their dining room table! 


Paint the blank tile pink and set it aside to dry. Punch a star from the black cardstock. Arrange the Scrabble tile in the rack to spell WELCOME, centering them as best you can. Remove one tile, add Supertite glue, then replace it. Do this for the remaining tiles. 


Thread the ends of the twine down through the two holes on the rack. Tie a knot in each end. Tie another knot at what will be the top of the hanger to form a loop. Now it's time for glue. Put a dab of glue above the two end knots, then pull snugly against the rack. Add a very small amount of glue to the top of the rack directly to the left of the W and to the right of the E. Press the twine to the glue. This will help it hang upright without tilting. Finally, fold the loop over to make a bow shape and glue it in place.  


Glue the black star to the front of the now-pink tile, then glue the tile to the wooden bead.

When everything is dry, it's time to hang your sign. I originally planned to hang the wooden bead on a nail, then hang the welcome sign on that. It worked fine, but I ended up preferring to use a small picture hanger. I put the sign up first, then added the bead to the hanger. 


It occurred to me while I was writing the post that I could have added a second rack that hangs below the first to create WELCOME FRIENDS. My sign is already glued in place, but if I ever make another I'm going to do it that way. 

I'd planned to end my post after the last sentence, but I couldn't get the WELCOME FRIENDS idea out of my head, so I make a really quick digital mock-up. 


I like it. I just might have to make one. 

4/27/17

Scrabble Key Ring

I am crazy about Scrabble and naturally assume everyone else is, too. But even those who don't love Scrabble would probably love this monogram key ring. Affiliate links below. 


Scrabble Key Ring


Materials:


Steps: 


Choose a Scrabble tile and lay it face up on a flat surface. Without shaking, carefully invert the Diamond Glaze and hold it upside down. Gently squeeze on scrap paper to make sure there are no bubbles. Squeeze the Diamond Glaze onto the Scrabble tile slowly but steadily, continuing until it reaches the edges of the tile (without going over the sides) and forms a dome. Leave the tile undisturbed for at least 24 hours. 

When the Diamond Glaze is completely dry, attach a gold bail to the back of the tile using E-6000. Allow that to dry.

Attach a lanyard clip to the bail and a split ring to the lanyard clip. 


---------


I made this trio of keychains for my Snap roommates and Secret Sister.


Here are some other Scrabble-themed tutorials you might enjoy:


4/15/13

My Latest Jewelry Project

A few facts:
  • I am a rabid Scrabble fan. I own 8 boards. Two are for my own use and six were for my classroom and the annual Scrabble tournament I held. I'm keeping all 8 boards, even if I never work as a classroom teacher again.
  • The last time I was in a thrift store, I bought an incomplete set of Scrabble tiles for $1, because a person can never have too many Scrabble tiles.
  • April 13th was International Scrabble Day.
  • Because of International Scrabble Day, Emma Jeffrey challenged all the Fiskateers to make a project incorporating Scrabble.  
  • I can't resist a challenge, especially a Fiskateer challenge.

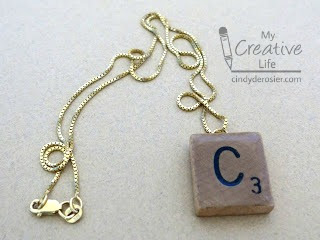
I decided to make myself a Scrabble necklace. I dug through the tiles and found a C that wasn't too beat up. I used Diamond Glaze to create a nice domed top. When it was dry, I tackled the question of how to mount the tile. The proper thing to do would have been to use a bail, but I didn't have any and didn't want to wait until I could get to a craft store to buy one. So I decided to improvise. And for that, I turned to earrings.  

As a teenager in the '80s, I followed the mandatory dress code of pegged pants, multiple pairs of socks, striped polo and/or rugby shirts, and large earrings that matched my socks (which in turn, matched the stripes on my rugby shirt). All my earrings were in divided containers, organized by color. I still have my huge collection. Check out just a few of the fabulous earrings from the pink section.  

 
I dug through my earring collection and struck gold - literally. I found an earring piece without a mate that would work perfectly to mount my Scrabble tile. I used E-6000 to attach it and crossed my fingers. When it was dry, I added an old chain. 


And here it is! My new Scrabble necklace. I absolutely love the way it turned out!


I'm going to wear it during my next game to intimidate my opponent. Of course, my next opponent is probably going to be Trevor, who does not intimidate easily...