Showing posts with label invertebrate. Show all posts

5/24/19

Snail Name Art

I love name art. This time, I used my name to create the patterns on a snail's shell. 


---------

Snail Name Art


Materials:

  • construction paper - kraft, green, blue
  • scissors
  • pencil
  • brown marker
  • craft glue

Steps: 

Cut the kraft paper. You'll need a flattened oval for the shell, a rounded head, a pointed tail, and two antennae. Use the pencil to draw a swirl on the shell. 


Trace your swirl with the brown pen. Now fill in the spaces between the swirl by writing your name in capital letters. Each letter should stretch to fill the vertical distance. Keep repeating your name, without leaving spaces, until you reach the end. Write lightly; you might need to make adjustments. 


When you're happy with how it looks, trace over your name using the brown pen. Add eyes and a smile to the snail's face. Glue the parts of the snail together.

Glue a strip of green construction paper to the blue, then position the snail to cover the line where the grass meets the sky. 


Couldn't be easier! 

1/24/19

Invertebrate Crafts for Kids

My page of Invertebrate Crafts is live. It turns out I've done 21 invertebrate crafts, including five spiders, four bees, two butterflies, two fireflies, a mosquito, a crab, an octopus, a jellyfish, a dragonfly, a caterpillar, and a generic bug. I actually have quite a few cards and some layouts with butterflies or other invertebrates on them, but I decided that a card with butterflies is not the same thing as a butterfly craft.

As with the bird crafts, I made a collage of my invertebrate crafts that I'd intended to use for navigation before realizing it was too busy for that purpose.


Instead, this is my navigation image. You can click on it to see the six crafts pictured above, the spider that provides the background for the image, and the other 14 other invertebrate crafts.


Now, what animal category to complete next? I'm thinking fish. I don't think I have too many of them and I am putting off dealing with the hundreds of mammals!

9/16/13

Mini Ball Pan Attempt #1: Caterpillar Cake

Time to share our first adventures with the present I bought myself a few weeks ago! We FINALLY finished eating our zucchini cookies and zucchini cobbler, so I could justify making another dessert. I washed my new pan, greased it, made my batter, and consulted the directions that came with the pan to see how much batter to put in each cavity. The directions said to "put 2/3 cup batter into each cavity (about 2/3 full)." As I got out a 2/3 c. measuring cup, Steve commented that he couldn't believe I was actually going to measure. I almost never measure anything, so it was indeed worth noting. I filled the 2/3 cup with batter and started to pour it in the pan. It was immediately apparent that something was hideously wrong. There was no way 2/3 c. of batter was going to fit. Even 1/3 c. was too much. I double-, triple-, and quadruple-checked the instructions. I didn't read it wrong - it definitely said 2/3 cup. I checked the Wilton directions online and they said 2/3 c. too. I filled each with about 1/4 cup and popped them in the oven. This is what came out:


Clearly, 1/4 c. of batter was too much. OK, good to know for next time.  

We used a serrated knife to level off the bottoms, then arranged the cupcakes on plates. Trevor had requested that we make caterpillars, so that's exactly what we did. We used a star tip to apply green frosting, then added candy eyeballs, pretzel antennae, a red licorice smile, and grape licorice feet (affiliate links). 

By the way, we actually researched caterpillars to learn how many legs they have. We learned that they have 6 true legs (which they keep in adulthood as butterflies or moths) and up to five pairs of prolegs. These false legs help them move and cling to plants. Never let anyone tell you that cake decorating isn't educational.

Here's Trevor's caterpillar:  

 
Here's mine. Trevor took the picture and he kept telling me to get lower and lower until I was laying on the table like this.  

 
Here's a close-up of Trevor's caterpillar. "Hello!"


I made WAY too much green frosting, so expect a different green cupcake project from us in the near future.

4/18/11

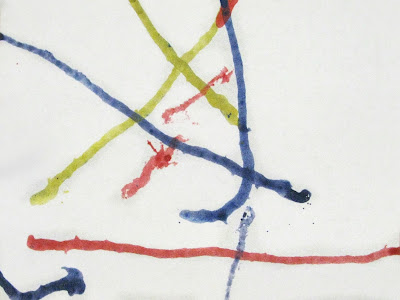
The Most Horrifyingly Awesome Art Project Ever

Check out this lovely art that Trevor and I made:


Here's a closer look:


Can you guess how we made it? Here's a hint:


Do you know yet? As you can see, it involved three colors of paint, some tweezers, and one more important item:


A maggot! To make the project, we picked up the maggot with tweezers and dropped him into one of the paint colors. Then, using the tweezers, we placed him on the paper and he immediately squirmed all over. Ours kept trying to zoom right off the page:


Isn't it awesome?! And horrifying?! Horrifyingly awesome?! I thought so too.  

Now surely by now you're asking where we did this. Obviously (I'd hope), not at home. This was one of the projects we did at Picnic Day, the annual open house at the University of California at Davis, where Steve and I both went to college. Each department has family-friendly projects that help teach about what they do. Maggot Art took place in the Entomology Department, where we also saw a hive of bees in action, tasted honey from different parts of the United States, and collected ladybugs to take home. Sadly, we didn't watch the Cockroach Races, as the area was quite crowded. What a spectacular day!