Showing posts with label pumpkin pie. Show all posts

11/12/21

How to Draw Pumpkin Pie

I'm a huge fan of integrated curriculum. Art pairs well with literally every other subject area, and I'm particularly fond of using art projects to reinforce math vocabulary. Many teachers draw pie as a way to teach students about pi, but there's no reason to stop there. Back in my teaching days, I enjoyed giving my students drawing instructions using geometry terms they'd recently learned. This slice of pumpkin pie provides an excellent example of a scalene triangle. 


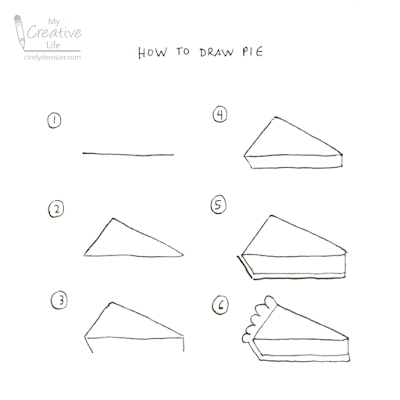
How to Draw Pumpkin Pie


  1. Draw a horizontal line segment in the center of the paper. 
  2. Use that line segment as the base of a scalene triangle. The base should be the longest side of the triangle. This is the top of your pie. 
  3. Add two short line segments onto the base of the triangle. The one on the left should angle down and to the right. The one on the right should be vertical. 
  4. Draw a horizontal line connecting the two new line segments. It should be parallel to the original line segment. Now you've finished the pie filling. 
  5. To draw the bottom of the crust, find the obtuse angle you made in the previous step. Draw the same angle slightly below the other one, extending the line segments the same length as the others. 
  6. Finish the crust by drawing a series of scallops along the shortest side of the scalene triangle.  


This drawing gave me an idea I'm excited to test. If it works, I'll share the results with you next week. If it doesn't, forget I said anything. 


11/15/18

Cinnamon-Scented Pumpkin Pie Ornament

Who out there loves pumpkin pie?


I don't love it, but I don't hate it. But what I do love is the smell of pumpkin pie spices. Trevor and I found a way to have the smell of pumpkin pie spice in the house with nary a pie in sight. 


---------


Cinnamon-Scented Pumpkin Pie Ornament


Materials:


Steps:

Use the pencil to mark the center of the short side of the sponge. Draw straight lines from that center mark to each of the opposite corners to form a pie-shaped wedge. Cut out the wedge. 


Use your Frisbee to mix orange paint with cinnamon. The spice will darken the paint slightly and give it a delicious smell. How much should you add? That will depend on your paint. We did about 50/50 paint and cinnamon. 


Use the foam brush and a pouncing motion to push the paint into the top and sides of the sponge. Ideally, your sponge is orange and not purple like the one Trevor had to use. If your sponge is not orange, be sure to pounce the paint into all the crevices. 


Let the paint dry. Trace the painted sponge onto a rectangle of kraft cardstock. Roll the far side around a pencil until it reaches the edge of where you traced the sponge. 


Remove the pencil, then cut out the pie crust. You'll make a straight cut from the point all the way through the rolled-up crust on both sides. Then gently unroll the cardstock, add glue, and roll it back up. Add a generous amount of glue to the bottom of the sponge and glue it to the crust. It should fit perfectly!

Dip a cotton ball in cinnamon oil and glue it to the pie. 


Trust me when I say this smells amazing. You can use it as a centerpiece or table decoration, or thread fishing line through the crust and hang it wherever you'd like the scent of pumpkin pie!

11/13/15

Pumpkin Pie Craft

In my line of work, I see A LOT of turkey crafts tutorials this time of year. I also see numerous Pilgrim crafts, leaf crafts and cornucopia crafts. You know what I almost never see? Pumpkin pie crafts. Time to change that. Affiliate links below. 


---------


Pumpkin Pie Craft


Materials:


Steps: 


1. Cut out the pieces for the pie. Start with the bottom crust. It is a long, tan rectangle with a slight angle cut from one end. Cut a slightly smaller rectangle from white, adding the same angle cut from one end. The two rectangles should layer with a little bit of tan showing on the bottom and right of the white. Cut an obtuse triangle from white for the top part of the pie, then cut a wavy strip of tan for the edge of the crust. It should be the same length as the shortest side of the obtuse triangle. 


2. Paint the white rectangle orange. Put a drop or two of brown into the remaining orange paint, mix, and paint the obtuse triangle. 

3. Create a background using the blue and brown cardstock. I actually made my pumpkin pie craft into a card, so I glued a blue rectangle and a brown rectangle onto a white card base. If I were making it as stand-alone art, I would use a solid piece of blue and glue a brown rectangle to it to represent the tabletop. 

4. Glue the pie pieces to the background. Stretch out the cotton ball slightly, then glue it where whipped cream would be.

That's all there is to it!