Showing posts with label pie. Show all posts

10/20/22

Paper Plate Lattice Pie

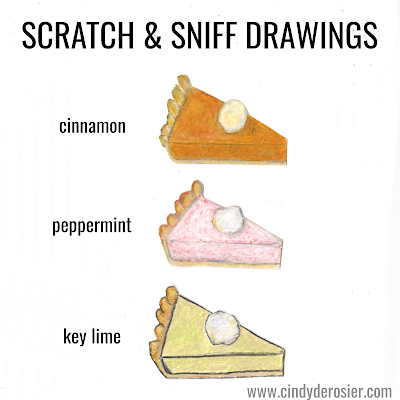
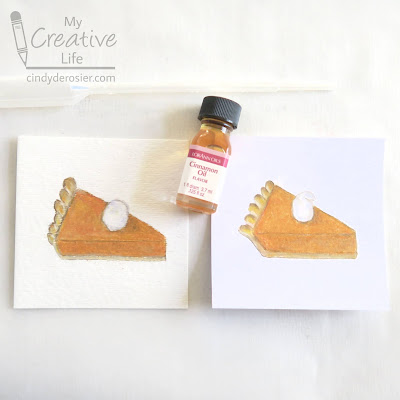
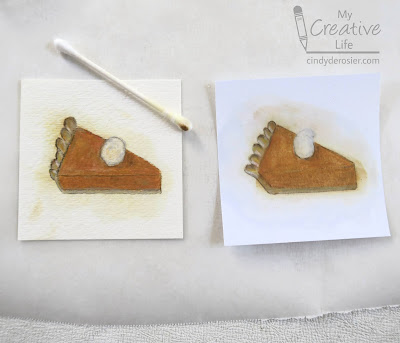
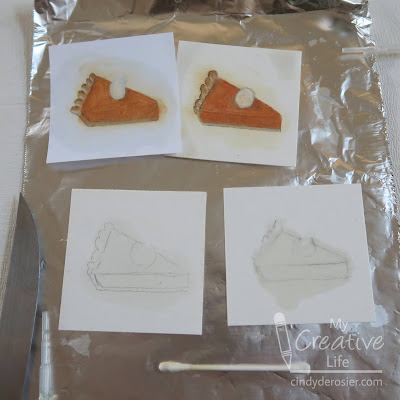
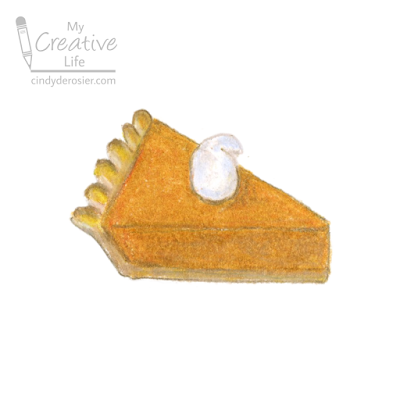
I had the paper plates out to make my Football Fan, so I went ahead and turned a pair of plates into a cherry lattice pie. As one does. If you prefer a blueberry pie, switch out the red paint and red pom-poms for blue. By the way, you can add scent to this project if you really want to go all in. Use the same technique as I did for my scented pumpkin pie craft, but swap out the cinnamon oil for cherry. Affiliate link here and below. 


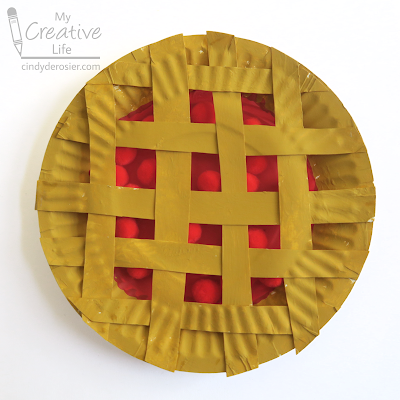
Paper Plate Lattice Cherry Pie


Materials: 


Steps: 


Paint the center portion of the front (eating side) of one paper plate red. Paint the edges of that same plate with Yellow Ochre (or the crust color of your choosing). Paint the back (non-eating side) of the other plate completely with Yellow Ochre. 

When the paint is dry, cut the solid plate into about twelve 1/2" strips. Keep the strips in order. 


Glue a bunch of pom-poms to the red portion of the plate. Now is the time to add cherry oil if you want the scented version. 

Now you'll make the lattice top. It's basically the same procedure as with real pie dough, but less fragile (and less tasty). Skip the first (shortest) strip. Starting with the second strip, apply glue to ONE end, then glue it to the plate so that its length fits. Skip the third strip, then glue ONE end of the fourth strip in place. Continue until you have five or six somewhat evenly spaced strips, glued just on one side. Let the glue dry completely. 


Rotate the pie 90°. Once again, skip the smallest strip. Take the next strip and weave it over and under the half-glued strips. Add a drop of glue under each end to secure it. Repeat the process with more strips. I ended up using only four strips for this step, because I wanted more of the cherry pom-poms to show through. 


When the lattice is complete, glue down the loose ends from the first set of strips. Now go bake a cherry pie to go along with this craft!

11/18/21

Scratch and Sniff Drawings

Remember at the end of the post about drawing pumpkin pie that I said I had an idea I was excited to test? I wanted to test whether or not I could make scratch and sniff drawings. I successfully drew scented versions of pumpkin pie, peppermint pie, and key lime pie. Read on to learn how! Affiliate links below. 


I started by testing two different papers to see if either one would be better for holding scent. I was guessing that a paper designed for wet media would do a better job than one only intended for drawing. I cut small squares of Strathmore Cold-Press Watercolor Paper and Neenah Vellum Bristol and drew a slice of pumpkin pie on each, using Prismacolor Premier colored pencils. Then I got out my LorAnn Cinnamon Oil


After receiving an awesome variety pack of LorAnn Oils last Christmas, I've been using them for all sorts of edible craft projects. But I've never used them for non-edible crafting. I put a drop of cinnamon oil onto a Q-tip and gently rubbed it into the drawing. 


Oops. Apparently cinnamon oil makes a good solvent for colored pencils. 

I took a good look at the two pie slices. The bristol paper looked and felt greasy, but the watercolor paper didn't. So I proceeded with the watercolor paper.

For my next experiment, I wanted to test whether putting the scent down first and coloring over it would work better than applying scent to a completed drawing. I sketched some pie in pencil (in retrospect, I wish I hadn't), then put drops of LorAnn Peppermint Oil and LorAnn Key Lime onto separate squares of watercolor paper. Peppermint is an 'oil' (left below) and Key Lime is a 'flavor' (right below) and I was curious to see if one would work better than the other. 


I let each dry completely, then used the same colored pencils to color in the images. It worked! I used microtip scissors to cut out each pie slice, then recycled the scraps. (Our pantry has smelled cinnamony-delicious ever since. Guess where we keep the recycle bin!) 


There are a zillion more variables to test before conclusively announcing that this is THE way to make scratch and sniff drawings. How would alcohol markers perform? Pastels? Crayons? What about other paper types? I'm not sure. I may come back to this someday.

As for now, it's been a week and my drawings still have a nice scent. I'm not sure how long it will last if I keep scratching and sniffing, but as far as I'm concerned, it's already a success.

11/12/21

How to Draw Pumpkin Pie

I'm a huge fan of integrated curriculum. Art pairs well with literally every other subject area, and I'm particularly fond of using art projects to reinforce math vocabulary. Many teachers draw pie as a way to teach students about pi, but there's no reason to stop there. Back in my teaching days, I enjoyed giving my students drawing instructions using geometry terms they'd recently learned. This slice of pumpkin pie provides an excellent example of a scalene triangle. 


How to Draw Pumpkin Pie


  1. Draw a horizontal line segment in the center of the paper. 
  2. Use that line segment as the base of a scalene triangle. The base should be the longest side of the triangle. This is the top of your pie. 
  3. Add two short line segments onto the base of the triangle. The one on the left should angle down and to the right. The one on the right should be vertical. 
  4. Draw a horizontal line connecting the two new line segments. It should be parallel to the original line segment. Now you've finished the pie filling. 
  5. To draw the bottom of the crust, find the obtuse angle you made in the previous step. Draw the same angle slightly below the other one, extending the line segments the same length as the others. 
  6. Finish the crust by drawing a series of scallops along the shortest side of the scalene triangle.  


This drawing gave me an idea I'm excited to test. If it works, I'll share the results with you next week. If it doesn't, forget I said anything. 


6/11/21

S'mores Pie

The idea of a s'mores pie popped into my brain a few weeks ago and I haven't been able to shake it. So I made one to share with friends. 


I started with a graham cracker crust, filled that with a layer of whipped ganache, and then added a sort of marshmallow cheesecake layer. 


I sprinkled marshmallows on top...


.... then used my heat gun to toast the marshmallows. We've found dozens of uses for the heat gun in the year and a half since I've had it, but this was the first time I used it for food. It worked like a charm!


It was good. Not amazing, but definitely good. The tang of the cheesecake layer was a bit out of place. And that layer was definitely out of proportion - way too much compared with the chocolate and graham cracker. The next time I make this, I might skip the cream cheese entirely. Ooh, maybe replace it with a marshmallow ice cream? And I want to add more graham cracker - maybe as a crumble beneath the top marshmallow layer.  We'll see. This recipe definitely has possibility. 

Here's the recipe as I made it. If you have other ideas for improving my pie, let me know in the comments!


---------


S'mores Pie


Graham cracker crust:
 
I used a store-bought graham cracker crust. Because we were taking this to a friend's house, I wanted to use a disposable pan so I could leave them the leftovers. When I make graham cracker crust from scratch, I combine a sleeve of graham crackers (crushed into crumbs) with 3 T. brown sugar and 6 T. melted butter. 

Ganache:

Heat 1/2 c. heavy cream for 45 seconds in the microwave. Add one 4 oz. bar of Ghiradelli 70% Cacao, chopped into small chunks. Let sit for 3 minutes, then stir until it is smooth. Put it in the refrigerator for 15 minutes to chill. 

Marshmallow cheesecake layer:

Whip 1 c. heavy cream. Set it aside. In a separate bowl, combine 8 oz. of cream cheese and 2 c. of mini marshmallows. Heat for 30 seconds in the microwave, stir, then heat for 30 more seconds. Whip for 2 minutes or until smooth and glossy. Fold in the whipped cream. 


Remove the ganache from the refrigerator. Without cleaning the beaters, whip the ganache until it has doubled in volume and lightened in color. Spoon the whipped ganache into the graham cracker crust. Spread it into an even layer that covers all of the crust. Spoon the cheesecake layer on top of the ganache layer. Refrigerate at least one hour or overnight. 

Sprinkle 1.5 c. mini marshmallows on top of the pie, then use the heat gun to heat them. The marshmallows will swell and brown. When they're evenly toasted, cut the pie into slices and serve. 

3/29/19

Bunny Week, Day 5: Bunny Raspberry Hand Pies

Steve mentioned that he'd been craving pie, so I made him a treat for the conclusion of Bunny Week. They're raspberry hand pies and they're delicious. (For humans, that is. Don't feed pie to your bunny. Here are some ideas for bunny-safe treats.)


Start by rolling out your favorite pie dough. Use a bunny-shaped cookie cutter and arrange the bunnies on a Silpat-lined baking sheet. Spread raspberry jam in the center of half of the bunnies, including the ears. Do not overfill them, but don't skimp either. The bottom left is the correct amount. 


Get a small dish of water. Use your finger to thoroughly moisten around the edges of an un-jammed bunny, then place it on top of a jammed bunny. Do not skimp on water! This is what seals the pies and keeps the jam in. I experimented with different ways to crimp the bunnies closed (fork tines head on, fork tines from the side, finger pinch, and rolling) and they all worked equally well. The water is the key, not the crimping. 


Bend the middle two tines of a plastic fork up, leaving the outer tines intact. Pierce each bunny to make eyes. 


Bake your hand pies at 400°F for 10-15 minutes. Let the pies cool until they are safe to touch, then use an edible marker to add a nose and mouth to each bunny. 


Happy Bunny Week, everyone! 

3/2/18

Pie for Dinner

This post contains affiliate links. 

Do you celebrate Pi Day? This fun 'holiday' is celebrated on March 14 (aka 3.14). What better way to celebrate Pi Day than with pie for dinner?! This is the menu from the Pie for Dinner get-together I hosted:


We started the evening with pulled pork hand pies and apple pie faux-tinis. I made the hand pies by putting pulled pork in pie crust, folding it over, and crimping the edges. The hand pies were dry, but tasty. I should have added sauce. The faux-tinis were each four ounces apple cider, 1/2 oz. cinnamon Torani, and 1/2 oz. vanilla Torani in martini glasses with cinnamon sugar rims. They were delicious!


I made three pies for the main dinner: a chicken pot pie, a double-crust vegetable quiche, and Crazy Crust Raspberry Pie


There were some questions about whether raspberry pie is an entree rather than a dessert, but I assured everyone that it's not much different than serving Jello Salad at dinner; we've already established that Jello Salad is a salad, and as such, belongs on the dinner table. 


Dessert was one of my favorites, a grasshopper pie. 


There's no need to make six different kinds of pie for Pi Day. One pie is still a celebration! Enjoy!