Showing posts with label turkey. Show all posts

11/16/21

Turkey Lollipop Cupcake Topper

Pumpkin pie is ok, but frankly I'd rather have a turkey lollipop in a cupcake as my Thanksgiving dessert. Affiliate links below. 


Steps: 


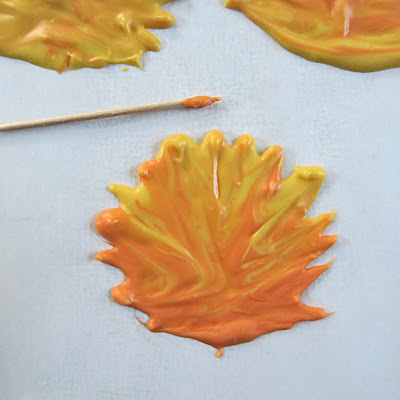
Put a sheet of parchment paper down on your workspace, then prepare the yellow and orange Candy Melts following the directions on the package. Spoon a quarter-sized dollop of orange Candy Melts onto the parchment paper, then add a nickel-sized dollop of yellow directly on top. Drag the toothpick through the candy to blend the colors and make the feathers. Repeat this process for each of the turkeys you'll be making. 


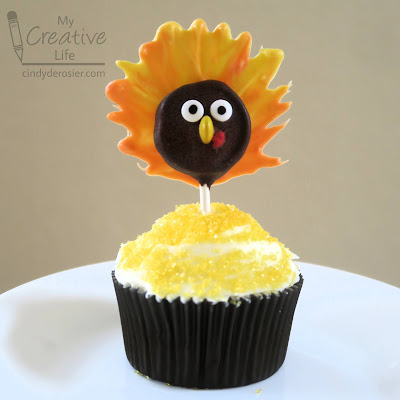
Prepare the rest of your supplies: unwrap the lollipops you'll be using, set out pairs of candy eyeballs, pick out pairs of red mini hearts, and use a sharp knife to cut the mini M&Ms in half (just press straight down, slowly and firmly).  Melt the Dark Cocoa candy melts according to the directions on the package. Dip a lollipop into the melted candy, turning to coat it on all sides. Place it on top of one of the turkey feathers, then place the the eyes, M&M (beak), and hearts (wattle) onto the face. The M&M should be sitting cut-side down and the two teeny hearts should be right up against each other without a gap. 

Repeat this for as many turkeys as you need. Let them set at room temperature for at least 15 minutes, then poke each lollipop turkey into a frosted cupcake. 


What about you? Would you rather have pumpkin pie or a turkey cupcake following the big meal? Or maybe both? Of course, you could pop these turkeys into slices of pumpkin pie or whatever else you're serving. Lots of possibilities!

11/15/21

Handprint and Footprint Turkey

We're fifteen days into November and I haven't posted any turkey crafts yet. Time to change that! Today's project is a turkey made from handprints and a footprint. 


Handprint and Footprint Turkey


Materials:

  • construction paper or drawing paper (white, red, orange)
  • paint (brown, rust, orange, yellow)
  • foam brush
  • scissors
  • googly eyes
  • glue

Steps:


Put a sheet of white paper onto a hard floor (not carpet). Use brown paint and the foam brush to apply paint to the bottom of one foot, then step onto the paper to get a good footprint. Set the paper aside to dry, then wash your foot but not your paintbrush.
 
Put a second sheet of white paper onto a hard surface, like a table. Or the floor. Paint rust-colored paint onto one hand (it will mix with the brown already on the brush), then stamp it on the bottom left of the paper with your fingers pointing to the left. Add more paint to your hand and stamp five more times, rotating your hand 20°(ish) each time. You'll end up with a semi-circle of red-brown turkey feathers. Don't worry if there are gaps; they'll be filled with the next two layers. 


Without cleaning your hand or the brush, paint your hand orange. Stamp it the same way as with the rust- a total of 6 times, with each handprint rotated 20° clockwise. Do the same thing with yellow. Since all the layers are still wet, the colors will blend.  


Now you can wash your hand and the brush. Take a break; the footprint and handprints need to dry completely before you can continue. 

When the paint has dried, cut out the footprint, leaving a small border of white around the edges of the print. Do the same with the handprint feathers. Then cut out an orange triangular beak and a red wattle. Glue the footprint to the feathers, then add the googly eyes, beak, and wattle. 


Tomorrow I have a fun edible turkey craft to share. 

12/23/20

A New Batch of Roundups

When I'm not working on My Creative Life, I'm busy running Fun Family Crafts. Here are the latest batch of kids' craft roundups, starting with Hot Cocoa Crafts and RecipesI had a lot of fun putting this one together. One of my projects is in the graphic below. Can you spot it? 


We have over 100 Santa crafts at Fun Family Crafts. A few of those are mine, but only one is in the roundup. Do you see it? 


I love this adorable collection of colorful, googly-eyed turkey crafts


I didn't think of clocks as being seasonal until I started working at Fun Family Crafts. Clock crafts tend to get a lot of traffic this time of year because of their connection with New Year's Eve.  


Finally, cow crafts. I only used six projects in the graphic, despite the fact that we have way more than that on the site. A lot of the cow crafts on Fun Family Crafts are photographed as part of a group with other farm animals and couldn't easily be cropped to show just the cow. I think the 6-project graphic is still effective. 


As always, I made all the graphics using PicMonkey.   

11/18/20

Heart Turkey Magnet

I was joking about making place cards for Thanksgiving since it will only be the three of us this year, but then I noticed that the wood hearts sitting near my desk would make awesome turkeys. The next thing I knew, I had this:


The turkey is not connected to the place card; it's leaning up against it. It's actually a refrigerator magnet that my theoretical guests could take home after the meal and put on the fridge. Affiliate links below. 


Heart Turkey Magnet 


Materials:


Steps: 


Paint two hearts brown and set them aside.
 
Cut two pieces of embroidery floss, each around 3 inches. Tie a pony bead to one end of each piece to make the turkey's legs. Cut seven pieces of ribbon, each approximately 3 inches. These will be the tail feathers.  


With the heart upside down, glue the legs and the tail feathers to the turkey body. Add glue to the second heart and sandwich it against the first, trapping the ribbon pieces and embroidery floss between the two. 

Cut out a beak and a waddle from cardstock. Glue them and the googly eyes to the turkey's face. Adhere a magnet to the back and the turkey is done. 

11/12/18

Turkey Paper Chain

Our family loves decorating for holidays, particularly at this time of year. I love that our house goes directly from Halloween decorations, to Thanksgiving, to Christmas. And no matter what the season, my favorite thing about decorating is pulling out our artwork through the years and reminiscing. Homemade decorations are the best.

Our latest homemade Thanksgiving decoration? A chain of turkeys.


Follow the easy steps below to make your own. The materials list includes affiliate links.


---------


Paper Chain Turkeys


Materials:


Steps: 

Fold a piece of brown construction paper in half lengthwise, then in half widthwise twice. If you open up the paper you'll see 8 rectangles.


Refold the paper lengthwise, then use the existing fold lines to create an accordion fold. You can think of this as a Z (or an M or a W). Draw a turkey body on the top square. The head and the body should not quite reach to the edges of the paper, but the wings must touch the edges. This is how the turkeys will hold hands. (Or wings, in this case.) This concept is tricky for some children, so I always demonstrate what happens when the wings don't touch the edge before they get out scissors. 


Cut through the layers, following your pencil line. 


You'll end up with two strings of turkeys. Set one string aside, share with a friend, or tape the two strings together to end up with a longer paper chain. 


Glue googly eyes, beaks, wattles, and tail feathers to the turkeys. Anything goes. I chose to layer orange, pink, and yellow feathers.


Did you notice that one turkey's feathers are different than the others'? I noticed while the glue was still wet, but liked it and decided to keep it that way. It adds personality, I think. 


The last step is to hang your paper chain and enjoy!

11/9/12

Thanksgiving Napkin Rings

Trevor and I have been busy making Thanksgiving napkin rings. Aren't they cute?!


Materials: cardboard tube, brown paint, cardstock scraps (brown, yellows, oranges, and reds), scissors, glue, and googly eyes.  


Use the scissors to cut a 1-inch ring from the tube. Paint it brown, inside and out. Set it aside to dry. Use the brown cardstock to cut a pear-shaped turkey body. Add googly eyes, a triangle beak, and a wattle.  

 
Cut triangle feet. Bend one corner of each triangle up and apply glue. Attach to the back of the turkey body.

 
Glue the turkey body onto the dry cardboard ring. It should stand up. Here's Trevor with his.


Cut a variety of turkey feathers from the cardstock scraps. Attach to the back of the cardboard ring.

 
 Add a napkin and they're ready for the Thanksgiving table!  

 
I made the turkey at the top of this post. This turkey was one of Trevor's. Like the orange napkins? They're the ones Trevor made for the tablesetting contest he entered. Not only are they perfect for a bunny-themed luncheon, but they're great for all the fall holidays too!