Showing posts with label Santa. Show all posts

11/27/23

American Gothic Santa and Mrs. Claus

I don't know what made me think of it, but I thought it would be really fun to change Grant Wood's American Gothic couple into Santa and Mrs. Claus. Indeed, it was a lot of fun. 


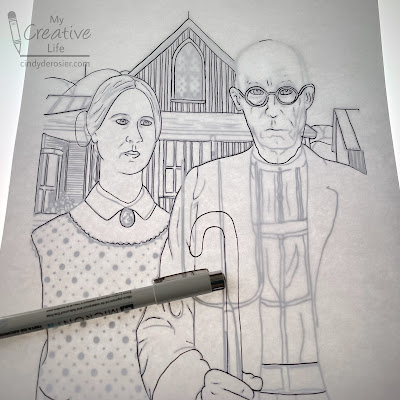
I started with a printable coloring page of American Gothic from the Amarillo Museum of Art. I used my lightbox and a black Micron pen to trace part of the image onto Neenah Bristol Vellum (affiliate links here and below). As I traced, I left certain areas blank where I wanted to change the design. For example, I elongated Grant Wood's dentist's chin because I wanted Santa to have a beard. I changed the pitchfork to a candy cane and left the upstairs window empty so I could add a Christmas tree. 


Here's what I had when I finished tracing and turned off the lightbox.  


I finished drawing in the details, then colored the whole thing with my Prismacolor markers. It'd been a long time since I'd used them; I'm using Ohuhus for everything now. 


I've never seen the Clauses looking less jolly, but I'm sure they'll perk up as Christmas draws near. They could do with some fattening as well. Ho ho ho!

12/5/22

How to Draw Santa, Inspired by Picasso

Today's project is the fourth in my series based on crowd-sourced responses to ten questions. For this one, I asked my friends to name a famous artist. The top answers were Van Gogh, Monet, and Picasso. We already have 10 kid-friendly crafts inspired by Van Gogh at Fun Family Crafts, but only one each that is Picasso-inspired and Monet-inspired. I chose Picasso and put a fun holiday twist on it. 


Santa Painting, Inspired by Picasso


Materials: 

  • paper
  • colored pencils
  • Sharpie
  • acrylic paint

Steps: 


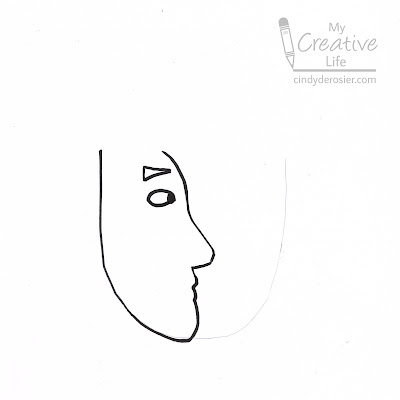
Lightly draw a U with a pencil in the center of the paper. On the left side of the U, draw a side view of a person looking to the right. Trace over your drawing with a Sharpie. 


On the right side of the U, draw a face that is looking forward. Trace it with Sharpie. 
 

Draw a second U just outside the border of the first U. This is Santa's beard. Then add the trim of his hat on top of his head. Draw the hat and the pom pom. Finally, give Santa some shoulders. I forgot to scan my paper at this point, but I think you'll be able to get the gist from the completed picture.


Now, paint. I started with the face, choosing two cool blues and a pale pink. Then I painted the red hat and suit. Then I painted three swaths of color in the background: green on the right, a blue-grey on the top, and black on the left. 

When all the paint was dry, I traced over the black lines with a Sharpie, then used colored pencil to add the grid on the green and the lines and dots on the black. 

It's a very simplified interpretation of Picasso's style. It's also a simplified version of Santa! I thought about including his mustache and making his beard shaggier, but after looking at a lot of Picasso's work, neither fit the style. Since the prompt was Picasso and not Santa, I went with the less hairy version of St. Nick. I like it. 

12/23/20

A New Batch of Roundups

When I'm not working on My Creative Life, I'm busy running Fun Family Crafts. Here are the latest batch of kids' craft roundups, starting with Hot Cocoa Crafts and RecipesI had a lot of fun putting this one together. One of my projects is in the graphic below. Can you spot it? 


We have over 100 Santa crafts at Fun Family Crafts. A few of those are mine, but only one is in the roundup. Do you see it? 


I love this adorable collection of colorful, googly-eyed turkey crafts


I didn't think of clocks as being seasonal until I started working at Fun Family Crafts. Clock crafts tend to get a lot of traffic this time of year because of their connection with New Year's Eve.  


Finally, cow crafts. I only used six projects in the graphic, despite the fact that we have way more than that on the site. A lot of the cow crafts on Fun Family Crafts are photographed as part of a group with other farm animals and couldn't easily be cropped to show just the cow. I think the 6-project graphic is still effective. 


As always, I made all the graphics using PicMonkey.   

12/18/20

Hidden Money Santa Gift

'Tis the season for figuring out the next money gift for my nephew, Timothy! I was doing some experimenting and came up with this cardboard tube Santa. 


This isn't what I'm giving Timothy, because I couldn't bring myself to spend $15+ shipping him a box that contains a cardboard tube. I'd rather spend 55 cents to mail him something flat and equally creative. I'll share that after he's had a chance to open it. Next December when I'm desperate for another idea, I'm probably going to be kicking myself for sharing this, but hopefully one of you needs this now!


Hidden Money Santa Gift


Materials:

  • money
  • cardboard tube
  • craft knife
  • red craft paint 
  • black Sharpie
  • gold cardstock
  • red felt
  • cotton ball
  • craft glue

Steps:


Hold the money up against a bright window with a piece of scratch paper over the top. Trace around the face. Cut the face out of the scratch paper, then use that to trace the face onto the cardboard tube. 

Use the craft knife to cut the face opening from the cardboard tube. Paint the tube red. I painted both the inside and the outside of the tube to give it a more finished look. 

Use the Sharpie to draw a belt. Cut out a small square from the gold cardstock, then color the center portion black to make the belt buckle. Glue it in place.  

Cut a triangular hat. Pull apart a cotton ball, using one portion to make the pom pom at the top of the hat, a second piece for the hat's trim, and the remainder for Santa's hair and beard. Glue everything in place. 

Finally, roll the money and slide it into the tube so that the president's face lines up with the opening. It will stay in place, but you can add a piece of scotch tape for extra security if you wish. 


11/30/20

Heart Santa Magnet

The Heart Turkey has a friend. Meet Heart Santa!

 
They both are made with wooden hearts and they're both refrigerator magnets, though you could easily turn them into napkin rings or ornaments. 


Paint one heart red and one with your desired skin tone. Set them aside to dry.
 
Cut two pieces of embroidery floss, each around 3 inches. Tie a pony bead to one end of each piece to make Santa's legs.

Cut a hat from red construction paper or cardstock. From the scraps, cut a tiny round red nose. Cut a thin black strip for the belt, a small yellow square for the belt buckle, then an even smaller black square for the center of the buckle. 

Tear the cotton ball in half. Shape one half into a beard, then divide the other half to make the fur trim of Santa's hat, the pom pom on the end of the hat, and two eyebrows. 


Orient both hearts so they are upside down (point at the top, rounded area at the bottom). Glue the googly eyes to the center of skin tone heart. Add the eyebrows, nose, and beard. Glue the trim and pom pom to Santa's hat, then glue the hat to his head. Glue the belt to the red heart, then add the buckle and the inner buckle. Glue the head onto the body. Glue the legs behind the body, trapping them beneath the magnet.


A typo while I was writing this post turned Santa into Satan and left me giggling on and off for ten minutes. This led me to wonder if there are any kid-friendly Satan crafts out there. Alas, there seem to be only Satan-as-serpent crafts and printables about avoiding temptation. But my search yielded this hilarious news story about Satan in Vancouver Island, BC. It's literally old news (2019) but even if you saw it last year, it's funny enough to read again. You're welcome.

11/25/19

Christmas Signs Using Die-Cuts

A painted wood sign + Christmas die-cuts = the easiest Christmas decoration ever! Affiliate links below. 


Happy Holidays Santa Sign


Materials:


Steps:


Paint the arrow and let it dry completely. Add a layer of Mod Podge and position the die-cuts. After the Mod Podge is dry, add a coat over the top to seal the die-cuts.

12/3/18

Santa in the Chimney Craft

Steve and Trevor are well-trained to check with me before throwing anything out that might possibly be reused or turned into a craft. This chimney used to be a plain red gift bag that Steve received. Now it's filled with tasty truffles and ready to give to someone special!


I do most of my crafting at home, but occasionally I load up all the supplies I think I'll need for a project and complete it while I'm waiting after driving Trevor somewhere. Such was the case with this. I found a quiet corner to work during Trevor's Scout meeting. I was very pleased that I did indeed manage to bring everything I needed. That doesn't always happen, as my crafts often evolve as I make them!

The materials list below contains affiliate links. I receive a small commission on any purchases at no extra cost to you.

---------


Santa in the Chimney Craft


Materials: 


This is what the gift bag looked like when I started.


I used the ruler and the white pencil to mark every centimeter to a height of 13 cm. on both sides of the bag.  


Connect the marks to make horizontal lines, then trim off the top half of the bag. But don't throw it out!


Add staggered vertical lines to mimic the look of brick.


Remove the extra red paper from the trimmed-off handle section. Glue it to the inside of the bag to hide the kraft interior. If you want, you can draw bricks on it before gluing it in place. I didn't. There won't be quite enough red paper to fully line the inside, but you really only need to line the top inch or so. 


Now, tackle the boots. I folded a scrap of black construction paper in half and cut out a boot shape, giving me two matching boots. I originally thought I would cut a teeny square out of the center of a small square of gold paper in order to make the buckle, but I came to my senses and realized you can get the same look by layering a small black square on top of a slightly-larger gold square with no need to snip out any interiors. MUCH easier. Glue the squares in place to make the buckles.


Glue the boots to the inside top of the bag, leaving most of the boots sticking out. Add a bit of cotton (I used 1/4 of a cotton ball for each boot) where the boots touch the chimney. 


Fill the bag with truffles or other holiday treats and you have a gift that anyone would love! 

11/29/16

Yarn Santa Ornament

Remember yesterday's yarn hat ornaments from Yarn Whimsies for the Holidays (affiliate link)? With just a few more steps, you can turn a white hat and a red hat into Santa!


Yarn Santa Ornament

Materials: 

  • cardboard tube
  • scissors
  • skin-tone paint
  • yarn (red and white)
  • craft glue
  • googly eyes
  • filament or thread

How to Make It:

  • Cut the cardboard tube into three rings, each approximately 3/4" tall. Set aside two rings. Paint one ring and the rest of the cardboard tube the color you want Santa's skin to be. Set it aside to dry.
  • Use one of the unpainted rings to make a red hat ornament, following these directions. Set it aside. Make a white hat ornament with the other unpainted ring, stopping just before pulling all of the yarn through the center of the ring. Instead, pull half of the yarn through the ring and leave the other half where it is.


  • Glue googly eyes onto the flesh-colored ring and slide it around the yarn you pulled through the ring.


  • Glue Santa's face to his beard. Cut a nose and ears from the extra painted cardboard tube and glue them in place. Cut tiny pieces of white yarn to make eyebrows and a sliver of red yarn to make a mouth. 


  • Glue down Santa's hair, then give it a trim. Trim the beard also.


  • Now he's looking more like Santa.


  • Glue the red hat in place, then add filament to hang the ornament. Simple, very inexpensive and cute!