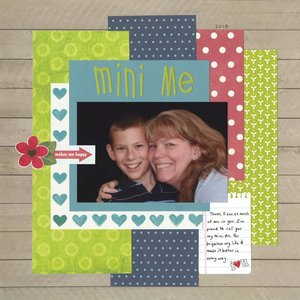
This is the second of the three layouts I finished away from home. I'm particularly proud of this one because I made do with random scraps of paper, a very incomplete alphabet sticker sheet (look closely and you'll see that I had to frankenstein some of the letters I needed), and very limited embellishment choices.

10/12/18
Mini Me
 Cindy deRosier has a masters in Education and taught 4th and 5th grade for 11 years. She uses that experience to blog about crafts and family-friendly educational travel. She spent many years as the Editor of Fun Family Crafts, a website with over 12,000 kid-friendly craft tutorials. Cindy is the co-author of "What Would Jesus Patent?", does freelance writing and designing, loves jigsaw puzzles, is an avid scrapbooker, and has been to all 50 states.
10/11/18
Bear Valley 2018
Usually when I get together with my friends to scrapbook, I will bring a huge stack of photos and spend the day cropping them down, deciding on their physical layout on the page, and selecting patterned papers for each page. I can do all of these easily while chatting. I bring home the big stack of incomplete layouts to do the title work, embellishing, and journaling later. In the case of the title and embellishing, this is because I don't want to schlep every letter sticker and embellishment I own to a crop. With journaling, I have to concentrate in a way I can't when I'm chatting.
Or so I thought.
During our most recent scrapping get-together, I challenged myself to completely finish at least one layout, including journaling. I brought along a few sticker sets and some all-purpose die cuts and forced myself to use them instead of waiting to see if there was a better option at home. I did my journaling on strips, which I glued to the page, instead of writing directly on the layout. That way I could correct a mistake if I needed to, since I wasn't giving 100% of my focus to the journaling.
I am really happy with how my layout turned out.
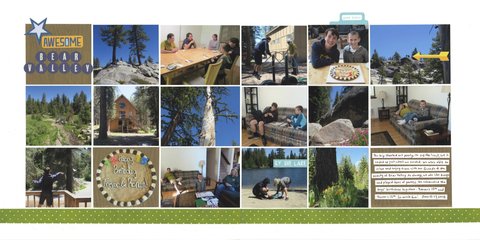 Bear Valley 2018 (affiliate link)
Or so I thought.
During our most recent scrapping get-together, I challenged myself to completely finish at least one layout, including journaling. I brought along a few sticker sets and some all-purpose die cuts and forced myself to use them instead of waiting to see if there was a better option at home. I did my journaling on strips, which I glued to the page, instead of writing directly on the layout. That way I could correct a mistake if I needed to, since I wasn't giving 100% of my focus to the journaling.
I am really happy with how my layout turned out.
I was so proud of myself for successfully finishing a page away from home that I kept going and ended up with two other pages 100% done. I'll share those soon. Yea, me!
Cindy deRosier has a masters in Education and taught 4th and 5th grade for 11 years. She uses that experience to blog about crafts and family-friendly educational travel. She spent many years as the Editor of Fun Family Crafts, a website with over 12,000 kid-friendly craft tutorials. Cindy is the co-author of "What Would Jesus Patent?", does freelance writing and designing, loves jigsaw puzzles, is an avid scrapbooker, and has been to all 50 states.
10/10/18
13 Helpful Tips for Visiting a State Capitol with Kids
Since 2014, our family has visited 20 of the 50 State Capitol buildings. I've learned a lot during those visits and have 13 tips to make your family's Capitol visits as fun, educational, and hassle-free as possible.
 Sacramento, California
There are many excellent reasons to visit Capitol buildings when you travel. First, and perhaps most obvious, visiting a Capitol is very educational. Even if you don't take a tour, simply entering the building and poking around a bit reveals so much about the history, economics, resources, and values of that state.



Des Moines, Iowa
But whenever possible, take a tour. Many Capitols offer guided tours and they are always free. I've often called ahead, but none have required reservations for a small family group like ours. Most tours are geared toward kids 4th grade and up. If your kids are 10+, definitely take guided tours whenever they're offered. They often take you into parts of the building that are off-limits without a guide.

Lincoln, Nebraska
When a guided tour isn't available, ask at the information booth about a self-guided tour. Most states will provide you with a guidebook that tells you everything you'd hear if you were on a guided tour.

Boise, Idaho
Check the website ahead of time to see if there are special activities for children. We've found scavenger hunts, trivia questions, I-Spy challenges, crossword puzzles, word searches, state symbols coloring pages, and all sorts of other printable materials for kids of all ages. Sometimes there's a small prize for completing them.

Salt Lake City, Utah
Start and end your visit in the Welcome Center, if there is one. This is where you'll find hands-on activities that make the Capitol come alive for kids. By visiting first, they can preview some of what they're going to learn on the tour. Afterward, they'll appreciate the games, models, and toys more after seeing the information firsthand.

Harrisburg, Pennsylvania
When you visit, be sure to tour the grounds as well! Some Capitols have beautiful gardens, interesting statues, inspiring monuments, and other surprises. You'll likely find squirrels, birds, or other local wildlife, too. (We've seen bunnies more than once!)

Charleston, West Virginia
Be prepared when you visit a Capitol. Security varies widely from state to state; you can walk right in to some, others have metal detectors, and some have security that is similar to what you'd experience at the airport. Carry photo ID - passports are best. Leave pocketknives and similar items in your hotel room or in the car.

Columbus, Ohio
Talk with your kids about the architecture of the Capitol when you visit. Some resemble the US Capitol, with house chambers on either side of a central rotunda with a dome. Others look completely different. See if you can figure out what or who influenced the design.

Santa Fe, New Mexico
Hunt for art throughout the Capitol. You'll find it all over the place, and not just in frames hanging on walls. Check the carpets, door knobs, stair rails, and other fixtures. Look at the ceilings and check the elevators. You might be surprised with what you find.

Carson City, Nevada
Don't skip the gift shop! It's a great place to find inexpensive souvenirs from the city you're visiting, like a state flag (typically about $3), a pencil, a postcard, or locally made candies or other edible items.

Phoenix, Arizona
If you want your visit to be 100% free, skip the gift shop and stop by the information desk to get a souvenir stamp from your visit. Each state has one. You don't need to buy the book in order to get the stamp (although we love ours).

Annapolis, Maryland
Virtually all Capitol buildings are open to the public during normal business hours. Many are open for limited hours on the weekends as well. Check the website ahead of time to determine when a particular Capitol is open. (Typing "visit ____ Capitol building" will usually bring you to the relevant page.)

Denver, Colorado
Expect construction, be flexible, and allow plenty of time. About a third of the Capitol buildings we've visited were under construction at the time. It makes sense, as many of the buildings are well over 100 years old and under constant use. Allow plenty of time to find your way to the entrance, as it might not be where you think it is due to construction!

Indianapolis, Indiana
Figure out your parking ahead of time. Many Capitol buildings are in the heart of a major city, which means parking can be limited. Some have underground parking, others have designated lots for visitors, and some have ample street parking nearby. I almost always call or email to ask where to park. Knowing ahead of time has saved us money, reduced stress, and eliminated bickering about where to park. Better yet, consider public transportation. Capitol buildings are a major destination no matter what city they are in; you can usually find a bus, tram, light rail, etc. that will take you there.

Dover, Delaware
Our family has had so much fun visiting the Capitols. We've enjoyed each and every one we've toured. Ideally, we'll make it to the remaining 30 someday. I hope I've inspired you to plan a Capitol visit for your own family!
Cindy deRosier has a masters in Education and taught 4th and 5th grade for 11 years. She uses that experience to blog about crafts and family-friendly educational travel. She spent many years as the Editor of Fun Family Crafts, a website with over 12,000 kid-friendly craft tutorials. Cindy is the co-author of "What Would Jesus Patent?", does freelance writing and designing, loves jigsaw puzzles, is an avid scrapbooker, and has been to all 50 states.
10/9/18
Dia de los Muertos Calavera Mask
I had so much fun making a Paper Plate Calavera last year that I decided to make a calavera mask this year. I love how it turned out!

It's really easy to do. The only limit is your own creativity! I've included affiliate links below. I'll receive a small commission for anything you purchase after clicking a link, at no extra cost to you.
---------
Calavera Mask for Dia de los Muertos
Materials:
- scratch paper
- pencil
- scissors
- heavy white cardstock
- pens
- 8" craft stick
- craft glue
- black tissue paper (optional)
Steps:
Fold the scratch paper in half and draw the shape of a skull on it. When you are happy with the shape, cut along the line you've drawn, keeping the paper folded. If you want to make tweaks to the shape, refold the paper and cut small amounts off of the areas that aren't quite right.
Open the paper and mark where the eye holes should go. Fold the paper and cut out the eyes. With the paper still folded, cut a small semi-circle along the fold for the nose.
When you are happy with the shape of the skull, trace it onto the cardstock.

Cut out the skull. Microtip scissors work great for getting in small areas like the eyes and nose. I ended up changing my mind about a round nose. Below you can see the upside down heart design that I drew (and would soon cut).

Now use the pencil to start designing! I put the teeth in place first, then outlined the eyes with petals. Next, I added flowers to the top, the chin, and where both ears would be. Once I'd drawn these features and was happy with their placement, I went over them with pens. Then I filled in the empty spaces with designs, making sure to maintain vertical symmetry. There's no right or wrong - have fun!
When you are happy with your design, glue the stick to the back and your mask is ready to use. Trevor thought it was funny to hold the mask far away from his face so that I could see his smile through the nose hole.

If you plan to display your mask rather than wear it, you can add black tissue paper to the backside to cover the eye and nose holes.

Give it a try! It really is a lot of fun to make your own calavera.
Cindy deRosier has a masters in Education and taught 4th and 5th grade for 11 years. She uses that experience to blog about crafts and family-friendly educational travel. She spent many years as the Editor of Fun Family Crafts, a website with over 12,000 kid-friendly craft tutorials. Cindy is the co-author of "What Would Jesus Patent?", does freelance writing and designing, loves jigsaw puzzles, is an avid scrapbooker, and has been to all 50 states.
10/8/18
The Wood Badge Whatsit Box Prizes
This is the patrol flag that Steve's Beaver Patrol made at Wood Badge.

Did you notice that question mark hanging from red yarn on the right? It's an award for a daily challenge that the Beavers won. Each day during Wood Badge, there is something called a Whatsit Box with a mystery item inside. The patrol that comes the closest to guessing the item gets to display an award on their banner. Knowing that I am crafty, Steve volunteered me to figure out and make the awards tokens. They'd need 6 - one of each day of training and it should have something to do with a Whatsit Box. A question mark seemed perfect.
About a week before the tokens were due, I swirled several colors of Model Magic and pressed them into a question mark candy mold (affiliate links here and through the rest of the post), confident that they'd work perfectly. I let them dry, then pried them out of the mold.

Alas, Model Magic is great for many things, but not for being pried out of a deep mold. The question marks were pretty, but they emerged with small tears and were definitely not sturdy enough. Drat.
For Attempt #2, I used Sugru. If you've never played with Sugru, let me tell you that it is really neat stuff. It is moldable glue that dries strong, bonds permanently to almost everything, and is waterproof. The fact that it bonds to everything meant that I couldn't press it into a mold, let it cure, and pry it out later like I did with the Model Magic. Following the manufacturer's instructions, I coated the mold with oil, pressed the Sugru into the oily mold, and waited for it to cure. Unfortunately, no matter how much oil I used, there always seemed to be a small spot that stuck. Aargh.

At this point, I should explain that when I agreed to make the Whatsit prizes, I didn't fully understand what I was making. I actually thought they would be attached to the Whatsit Boxes, which would then be the prize for the winning patrol. Because of this (incorrect) assumption, I didn't ask the important questions nearly soon enough in the process. How big should the award be? Does it need to be weather-resistant or will it stay indoors? Will it be attached to anything? Once these were asked and answered, I realized the perfect material was upstairs in the craft room. It's a childhood favorite that continues to be one of my go-to craft supplies - Shrinky Dinks!
I started by creating a template of a last question mark. I traced it onto white shrink film using a Sharpie. I used Staz-On ink and the question mark from this stamp set to stamp all over the front.

I used a different ink color for each of the six question marks. (By happy coincidence, I own six colors of Staz-On!). Then I carefully cut them out with my beloved microtip scissors and punched a hole in the top of each.
It only takes about a minute in the toaster oven to shrink plastic. I did them one at a time so I could deal with any necessary flattening. Here you can see the size difference between the original plastic and the shrunken shape.

The final step was threading coordinating yarn through each question mark. Because the hole was pretty small after shrinking (and yarn is tough enough to thread even through a big hole), I used a yarn needle, which made it super easy.
 Cindy deRosier has a masters in Education and taught 4th and 5th grade for 11 years. She uses that experience to blog about crafts and family-friendly educational travel. She spent many years as the Editor of Fun Family Crafts, a website with over 12,000 kid-friendly craft tutorials. Cindy is the co-author of "What Would Jesus Patent?", does freelance writing and designing, loves jigsaw puzzles, is an avid scrapbooker, and has been to all 50 states.
Subscribe to:
Posts (Atom)