10/12/20

Wizard's Workshop Watercolor

Kids have the best imaginations. This fun project challenges them to think what a wizard would keep on a bookshelf. A pile of bones? A skull under glass? Lots of spell books? Potions and a magic wand? A jar of eyeballs? Perhaps all that and more, or something completely different! Affiliate links below. 


Wizard's Workshop Watercolor


Materials:


Steps:


Use a ruler to draw a bookshelf on the watercolor paper. You can make it as tall/short and wide/narrow as you want, with as many shelves as you'd like. I used the ruler to draw the floor boards and books, then did everything else freehand. 

Fill the shelves with whatever you think would be in a wizard's workshop, sketching lightly with a pencil. When you are done sketching, trace over everything with a Sharpie. (I used brown.) Do not use a water-based marker!


This was my first time trying out Sharpie pens and I loved them! If you've never tried Sharpie pens, they are different from the Sharpie markers you've used a hundred times. The fine tip is just the right size for detailed drawing, and the ink doesn't bleed or soak through paper. The ink dries immediately and doesn't smear when you brush your hand over it (perfect for us lefties!). And Sharpie pens are acid-free, so you can use them on scrapbook pages, too. 

After you've traced over everything, erase the pencil lines. Then use watercolors to bring it to life. I started with the bookcase and floor, then did the broom, then the cauldron. 


Next was the books, bottles, jars, and wand. After that, the walls. The last thing I did was to fill in the back of the bookshelf.

By the way, I used my beloved travel watercolor set for this project, even though I only traveled from my upstairs craft room to the downstairs living room to paint. I originally bought it exclusively for travel, but I love it so much that I got rid of my other watercolors and just use this. In looking for the link, I discovered there is a 48-color set. Now I'm totally tempted. Because twice as many colors is probably twice as awesome, right?

I had so much fun creating this! If you or your kids paint a wizard's workshop, email a photo to me or leave a link in the comments. I'd love to see what other people dream up!

10/9/20

Future Pegasus

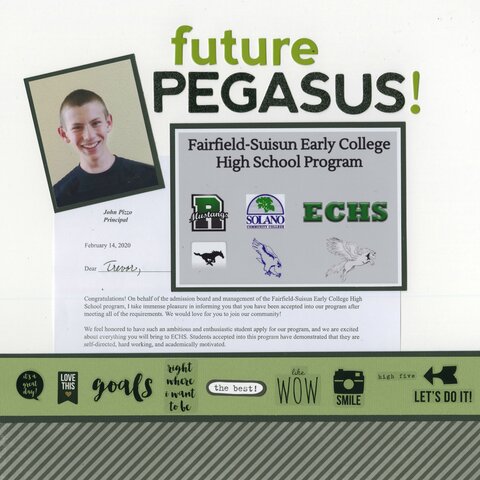
Trevor is a member of the freshman class of Early College High School. This innovative program takes place entirely on the local community college campus. The students take the standard high school classes, as well as at least one college class each semester. ECHS is a perfect fit for Trevor and we've been hoping and praying for years that he would be admitted. We were all so excited and happy for him when his acceptance letter arrived in February. I used the letter as the journaling in this layout. 

Future Pegasus (affiliate link)
The ECHS mascot is the Pegasus, explained visually in the main photo (actually a slide from the presentation we attended for prospective students). ECHS students are technically enrolled at Rodriguez High School (the Mustangs), even though they won't necessarily ever set foot on campus. Their classes are all at Solano Community College* (the Falcons). When you combine Mustang and Falcon, obviously you end up with Pegasus. I love that.
*At least they will be, once we beat this pandemic. 

10/8/20

Crayon Melt Skull

Crafting with the warming tray is so much fun that you can't stop with just one project! I filled a paper with purples, blues, and greens to make a background for a paper skull. 


To make the background paper, I used the same technique as with the iguana. Plug in the warming tray, put a piece of paper on top, peel the crayons, place them on their sides, and glide them across the paper. I layered five different colors on top of each other. 

Here you can see how the same finished paper looks sitting on the table and held up to the window. 


To make the skull, I folded a piece of copy paper in half and cut out the general shape of a skull, including the eye sockets, nose, and mouth. When I was happy with it, I used it as a tracer on a second piece of paper. After cutting out the final version of the skull, I used the paper scraps to make teeth, which I glued behind the skull. Then I glued the skull to the background paper. 

There is no end to the things you can do with a warming tray!

10/7/20

Popcorn Cake

When I was a kid, my friends knew that when they came to my birthday party, they'd be served a money cake. My friend Rachael had a similarly-distinctive cake at her birthday parties: her mom always served a popcorn cake. Mrs. Sato made her version of a popcorn cake in a bundt pan. It had colorful mini gumdrops throughout. She served it in thick wedges we ate with our hands, like a popcorn ball. It was delicious. 

I've been thinking about that popcorn cake recently. I've never been served a popcorn cake by anyone but Mrs. Sato, and Steve and Trevor had never had one. I'm not sure of her recipe, but it was basically rice krispie treats with popcorn instead of cereal, so I started from there and did some experimenting. I didn't have gumdrops on hand, but I had M&M's, so I made a chocolate version and added a drizzle of ganache and sprinkles to my popcorn cake. 

While the ganache looks pretty and tastes great, I honestly think the cake doesn't need it. Give it a try and tell me if you think the chocolate adds anything, or if the plain cake is the way to go. 


Popcorn Cake


12 c. popcorn
1-2 c. candy (M&M's, gumdrops, etc)
16 oz. marshmallows 
3/4 c. butter, divided


You will need approximately 12 cups of popcorn to make a cake. If you use microwave popcorn, this is 2 bags. Carefully pick out any unpopped kernels. Pour the popcorn into a springform tube pan. It should fill the pan completely. You may need to add more popcorn. 


Transfer the popcorn to a large bowl. Check again for any unpopped kernels (they like to hide). 

Generously grease the pan with 1/4 c. butter, making sure to cover every surface, including the tube. This will seem like a lot of butter. That is ok. Put any extra butter into a saucepan, along with the remaining 1/2 c. butter. Melt the butter and the marshmallows together over medium low heat, stirring frequently. Remove the marshmallow mix from the stove and pour it over the popcorn. Stir completely until all the popcorn is coated with marshmallows. Stir in the candy. 

Cover your hand with a piece of plastic wrap, then press the popcorn into the buttered tube pan. 


Let it sit for 10 minutes, then release the spring and invert the cake onto a cake stand. Let it cool completely.


This is the way Rachael's mom did (just imagine those M&M's are gumdrops). Feel free to serve it like this, or add the ganache, sprinkles, and candles.  


This cake brought me right back to Rachael's June birthday parties in the 1970's. Good times. 


10/6/20

Craft Stick Scarecrow

When I was a kid, I loved making things out of popsicle sticks. That's what we called them in the 1970's. I wouldn't have had the slightest idea what someone meant if they said 'craft stick.' The ones I used at home were stained from having once been inside actual popsicles, so it was quite a treat to go to camp and use clean sticks that came from inside a box rather than inside a popsicle! On special occasions, the camp counselors would bring out the 'big popsicle sticks,' aka tongue depressors. They might have been sold as craft supplies back then, but when we crafted with them, they came out of a box labeled as medical supplies, not as craft materials. It was so exciting to use two different sizes of popsicle sticks - there were so many different things we could build!

Crafters today have so many more options when it comes to craft sticks: everything from 2.5" mini craft sticks to gigantic 10" craft sticks (affiliate links here and throughout the post). I used the two largest sizes to make this adorable scarecrow.  


Craft Stick Scarecrow


Materials:


Steps: 


Paint most of the 8" craft stick with the shirt color (I used Yellow Citron) and the ends a burlap color (I used Country Twill). Paint the 10" craft stick Country Twill where the face will be, Yellow Citron where the shirt will be, and a blue for the pants (I used Dark Hydrangea). 


When the paint is dry, add details with Sharpies. I started with blue to draw the waistband, belt loops, pocket, and a leg-dividing line on the pants. Then I used green to draw the collar, pockets, sleeves, and buttons of the shirt. With a paler green, I drew diagonal lines to make a plaid on the shirt. Then I drew on orange patches and 'stitched' them with brown. I added black eyes, an orange nose, and a red mouth, then 'stitched' the nose and mouth. Finally, I used gold and yellow to make the hair and the straw coming out of the sleeves and the top of the shirt. 


Cut a cardstock hat. Glue it to the scarecrow's head, then glue the arms behind the body. 


My scarecrow will be an indoor decoration, but if you want to make an outdoor version for the garden or to put in a potted plant (or anywhere else there would be moisture), seal the scarecrow with multiple coats of Outdoor Mod Podge

This would be a great project to do as a family. Imagine how cute all the scarecrows would look holding hands, suspended as a banner!

Looking for other fall decor? Check out these great ideas from my fellow craft bloggers.