5/11/21

Pandemic Organizing

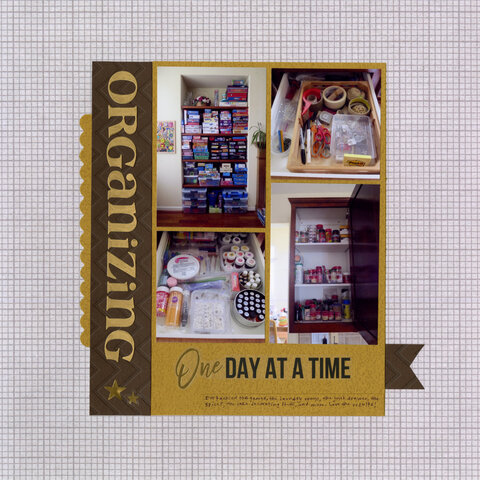
Since we haven't gone anywhere in 14 months (and counting), you'd think that our house would be cleaner than ever. Nope! But I'm happy to report that it is more organized. At least, certain parts of it are. I've been tackling small areas like shelves, drawers, and cabinets, one at a time. It's been very satisfying. In the layout, you can see our newly organized board games (we love games - go here and scroll down to see our favorites), the kitchen junk drawer, the spice cabinet (now organized by savory, sweet, and spicy to make things easier to find), and the sprinkles drawer (which has my LorAnn flavorings, candy eyeballs, and a bunch of other stuff for edible crafting).   

Organizing, One Day at a Time (affiliate link)

I made this layout for the Collage Challenge at Victoria Marie Designs. I create photo collages on 90% of the layouts I make, so it wasn't much of a challenge for me. Instead, I challenged myself to build the layout around the "One Day at a Time" sticker. I'm really happy with how it came out. So much so, that I turned it into a sketch. 


I used PicMonkey, of course. Playing on PicMonkey is literally one of my favorite things to do. I like it almost as much as actually scrapbooking. 

5/10/21

Nut Butter Bear Edible Craft

These edible bears are fun and easy to do. And they are adorable, if I do say so myself. Which I do. Affiliate links below. 


Nut Butter Bear


Materials:


Steps:


Spread peanut butter onto one rice cake and three popcorn mini cakes. 


Put a dollop of Nutella off center on two popcorn mini cakes to make the ears. Stick them in place (the peanut butter will hold them nicely). 

Put a smaller dollop of Nutella directly in the center of the third popcorn mini cake. Position it on the face to make the bear's snout.


Drag a toothpick through the Nutella on the snout to make the bear's smile. Add two candy eyeballs. 


Since I suspect someone will point this out, this project is not appropriate for people with nut allergies or for groups where you don't know for certain that no one has nut allergies. You can make an equally adorable bear using other types of spreads. For example, try Monkey Butter in place of the peanut butter and Apple Butter for the Nutella. There are lots of other possibilities. Don't be afraid to be creative!

5/7/21

Solar

Steve has spent the better part of a year designing, building, and installing solar for our house. It's been a labor of love, but one with lots of unforeseen obstacles. I'm proud of him for working so hard and not being defeated by the challenges along the way. 

Solar (affiliate link)

I made this layout for the Color Inspiration Challenge at Victoria Marie Designs. This is the color palette we had to use. Again, it was ok to substitute or interpret as desired:


It took me awhile to figure out what to do for this challenge. But once I thought about that packet of die-cuts, the page came together quickly. I proud of myself for (temporarily) letting go of how literal I usually am when scrapbooking, as evidenced by the popsicle on its side! I wanted that color there and decided to just go for it. Very out of character for me! But that's the whole point of a challenge. Mission accomplished. 

5/6/21

Patriotic Crafting: Edible US Flag

Tis the season for patriotic crafting! Memorial Day is in a few weeks, Flag Day two weeks after that, and then July 4th will be here before you know it. Here's a tray of candy-coated treats (13, to be exact) that make a festive addition to any patriotic celebration. 


One fun option for this edible craft is to flavor each candy color differently. I used my LorAnn flavors to make my flag taste like raspberry, cherry, and vanilla. There are so many possibilities - the next time I make this, I may opt for something completely different! 


Have you guessed what's underneath the candy coating? Read on to find out! Affiliate links below. 


---------


Edible US Flag


Materials:


Steps:


Arrange 13 grissini on the serving tray you plan to use. Try to choose the straightest ones. 


Cut two sheets of parchment paper, large enough to hold the grissini spaced 1" apart. Place a rack over one of the sheets. Transfer six grissini to the rack, then melt the white candy according to the package directions. Use the pipette to add the desired flavor. Thin if necessary, using EZ Thin or other method as recommended in the direction. Drizzle the candy over 100% of three grissini and 60% of the other three. Before the candy hardens, transfer them off the rack and onto the clean sheet of parchment. 


Follow the same steps with the remaining 7 grissini. Move them to a rack positioned over parchment paper, prep the red candy, and then drizzle it over the grissini. This time, you'll cover three grissini completely and 60% of the remaining four. 

While the candy is setting, prepare your sprinkles. I didn't have the star sprinkles I linked above on hand, so I picked out white hearts from a valentine mix I did have on hand. 


Prepare the blue candy, then drizzle it over the four red and three white grissini that are only partially covered. Immediately place the stars (or in my case, hearts) onto the blue area and then sprinkle generously with sanding sugar. Carefully transfer them to the parchment. 


When the candy has hardened, arrange all 13 grissini back on the tray and they're ready to serve. The fruit-flavored candy goes so well with the grissini, much like dipped pretzels do. In fact, I'd originally planned to make this with pretzel rods, but they are shorter, thicker, and more irregular than the grissini, which yield a more appealing flag shape. 


Looking for other patriotic crafts? You're in luck! A bunch of my fellow craft bloggers are sharing their ideas for fun and festive patriotic crafts. Check it out!

5/5/21

Faber-Castell Watercolor Paint-by-Number Kits

One of the many new products I saw at Creativation that piqued my interest: watercolor paint-by-number kits from Faber-Castell. (Affiliate link here and throughout the post.) Their kit is completely different (read: better) than any other paint-by-number kit I've seen. Before I explain how, let me show you my completed painting:


The painting is 12" x 12" and that is a stretched canvas that is ready to hang.  

I've never seen paint-by-numbers with anything other than the conjoined strip of low-quality opaque paint, applied to a canvas with the numbers painted directly on each spot. This is completely different. Because it is watercolor, the paints are in a palette. Also because it is watercolor, the paint is translucent. Therefore, the numbers are not printed directly on the canvas where they would show through. Instead, the numbers are printed on a separate, full-size page (folded in the photo below). The kit also includes a brush. The handle is triangular, which means it doesn't roll when you set it down. Nice!


There is one weird flaw about this kit that I want to point out. The paints are not arranged in numerical order. As it turns out, it wouldn't have been an issue with this design because it's obvious that the sky (#5 on the chart) wouldn't be purple (in position 5 on the palette), for example. But on other designs it might be an issue. I used Sharpies to properly number my paints so I wouldn't mess up. 


A handy feature of the kit is that the palette lid functions as a place to mix colors. You can see that I've mixed up a pale orange and a pale pink on the lid. 


Overall, I found the kit easy and enjoyable to use, and I'm happy with the finished painting. It comes with everything you need and is beginner-friendly. While it is marketed to adults, preteens and teens will love it too. 

There are six different designs to choose from. 


These watercolor paint-by-number kits have a good price point for what you get, making them an excellent choice to give as gifts or to buy for a group paint night. Overall, two thumbs up!