Showing posts with label bear. Show all posts

3/14/25

Sewing a Sock Bear

I got a hole in one of my socks, so I did what anyone would do: cut it up to see if I could turn it into a sock bear. As one does. 


Is a sock bear a thing? There are sock monkeys, of course, and you might remember Sock Lion. Sock Bear is significantly less sophisticated, but I kinda like him. This post contains affiliate links. 

I started by cutting the sock with the hole into a simple tube with two ears, as shown below on the left. 


I turned the sock inside out and then sewed the ears together. 


That is not what I should have done. I should have sewn the tan felt onto the ears when they were open flaps. It would have been a lot easier. I backstitched a mouth onto an oval of tan felt, then sewed the brown fabric button to that. Then I sewed the snout to the sock. 


Then it was time for the googly eye buttons. I stuffed my bear with Poly-Fill, then thought about how I was going to close it to keep the stuffing in. I wanted it to stand up, so I decided the best solution was to sew an extra piece of sock around the opening. 


It's a simple project as it is, but if I were doing this with kids (a Cub Scout Bear den, for example) I would make it even easier. The biggest change would be using hot glue for most, if not all, of the sewing. I'd probably still have them sew the mouth, but you could use a brown Sharpie instead. 

11/22/21

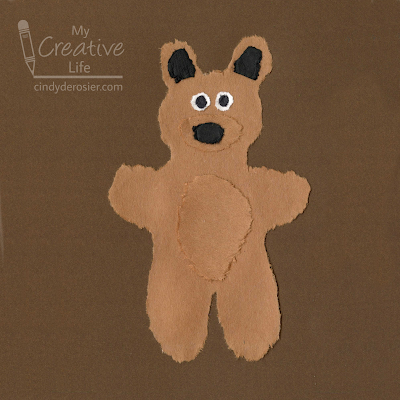
Torn Paper Bear

One of my most popular crafts of all time is this torn paper panda. I don't know if it's popular because it's a panda or because of the unusual technique used to make it, but either way, it generates a lot of traffic to my blog. Part of what makes this project unique is that the cheaper the paper you use, the better it turns out.  

I found some scraps of very inexpensive brown construction paper and thought they'd be perfect for turning into a fuzzy bear. I love how my bear turned out!


Torn Paper Bear


Materials:

  • construction paper (brown, black, white)
  • q-tips
  • a bowl of water 
  • glue

Steps: 

Dip a q-tip in water and "draw" the outline of the bear onto the construction paper. You can draw freehand, or you can create a template first. 


Trace the outline at least twice (more times if you're using higher quality paper). You should be able to see the outline on the back of the paper. If you can't, wet the q-tip again and retrace.   

While the paper is still wet, gently tear out the shape. The paper falls apart easily along the wet line and leaves a fuzzy texture.  

Continue using for the rest of the body parts: brown ovals for the snout and the belly, white circles for the eyes, black circles for the pupils, a black oval for the nose, and black gumdrop shapes for the inner ears.  

Let the paper dry completely, then glue everything together. 


5/10/21

Nut Butter Bear Edible Craft

These edible bears are fun and easy to do. And they are adorable, if I do say so myself. Which I do. Affiliate links below. 


Nut Butter Bear


Materials:


Steps:


Spread peanut butter onto one rice cake and three popcorn mini cakes. 


Put a dollop of Nutella off center on two popcorn mini cakes to make the ears. Stick them in place (the peanut butter will hold them nicely). 

Put a smaller dollop of Nutella directly in the center of the third popcorn mini cake. Position it on the face to make the bear's snout.


Drag a toothpick through the Nutella on the snout to make the bear's smile. Add two candy eyeballs. 


Since I suspect someone will point this out, this project is not appropriate for people with nut allergies or for groups where you don't know for certain that no one has nut allergies. You can make an equally adorable bear using other types of spreads. For example, try Monkey Butter in place of the peanut butter and Apple Butter for the Nutella. There are lots of other possibilities. Don't be afraid to be creative!

4/29/20

Cereal Box Black Bear

Three states (Alabama, Louisiana, and New Mexico) have all named the black bear as their state mammal. Those aren't the states that come to my mind when I think of bears, but it turns out that the American Black Bear is the world's most common bear species. It is found throughout the United States with a large population thought to be twice that of all other bear species combined. Another fascinating fact: many black bears are not black! This cute cereal box bear is a fun jumping off point for a study of this interesting mammal. Affiliate links below.


Cereal Box Black Bear


Materials:


Steps:


Cover the cereal box with black construction paper. The amount you need depends on the size of the cereal box. I used one sheet to cover the front and one side and a second sheet to cover the back and the other side, then cut strips from a third piece for the top and bottom. 

Cut ears from black construction paper, making them about an inch longer than you want them to be. Fold over that extra inch to make a flap so you can glue the ears to the top of the box. 


Cut an oval from brown construction paper and draw a nose and mouth. Glue it to the front of the cereal box. Cut a semicircle of brown construction paper and glue it to the bottom center of the front of the box to make the bear's tummy. Glue the googly eyes in place. 

3/19/20

Life-Size Grizzly Bear Paw Craft

When I realized that Montana was the only state with no craft suggestions, I made it a priority. I checked their state symbols and the first thing that popped up was a grizzly bear, Montana's state animal. Cool! It's California's state animal, too.

I don't like to reinvent the wheel, so I always check to see what crafts are out there before I spend time duplicating someone else's efforts. A quick search revealed that there are tons of grizzly bear craft ideas for kids, most of them using a paper plate, cardboard tube, or paper bag to make the bear's face or body. I wanted something different, so I started researching grizzly bears in hopes of finding inspiration. When I learned that a grizzly's paw can be 12 inches long with claws up to 4 inches, I knew what I wanted my craft to be.


---------

Life-Size Grizzly Bear Paws


Materials: 

  • two sheets of brown 9" x 12" construction paper
  • one sheet of tan 9" x 12" construction paper
  • pencil
  • scissors
  • brown marker
  • glue
  • tape


Steps:


Orient the brown construction paper vertically and trim around 2 inches off the top, curving as you cut to round it off. Trim a tiny bit off the bottom corners to round them. Repeat this on the second sheet of construction paper. (You can cut both at the same time to be sure they're exactly the same. For young children, have them draw the cut lines first, then connect the two pieces of paper with paper clips on the sides and bottom before they cut.)


Cut two 8" x 1" strips from the tan construction paper and set them aside. Cut ten claws (elongated narrow triangles) from the remaining construction paper. The claws should be around 4" long. 

To draw the features on the bear paw, imagine it like a dinner plate. Using a pencil first so that you can adjust your lines if needed, draw an egg at the bottom left, a taco at the bottom right, a steak in the middle that stretches from end to end, and five marshmallows touching each other along the top. When you're happy with the lines, trace over them with the brown pen. Then cut a bit out around the toes. This is the right paw. 


To make the left paw, draw the same features but in mirror imagine. Trace over the lines in pen, then cut out the toes. 

Turn the paws upside down. Glue the claws behind each of the toes. Tape just the ends of the tan strips to the paws to make a handle. 


When the glue is dry, your completed paws will look like this. 


 I tried to get Trevor to act ferocious for the camera, but he kept laughing. 


This craft is a fun jumping off point for an in-depth study of this fascinating animal. Stores may be sold out of hand sanitizer and toilet paper, but there are plenty of toys, books, puzzles, and other materials to keep kids busy and learning.  

2/4/19

Bear and Cat Valentine Treat Toppers

I've been out of sorts since learning that there won't be any Sweethearts Conversation Hearts this year. I'd been a victim of the Great Necco Wafer Panic, unable to buy one of my favorite candies in 2018. And now this. Sigh.

Not only do I love Sweethearts, but they're a February staple for a kids' craft blogger. Fortunately, Brachs is still producing conversation hearts. I bought a big bag. While they're quite not as tasty as Necco's Sweethearts, they're a fine substitute and my Valentine's Day will not be ruined after all.

I did some experimenting with two sizes of treat bags to see approximately how many conversation hearts each would hold, then whipped up some treat toppers to fit each size. Read on to make your own. There are affiliate links in this post.


---------


"You're a PURRfect Friend" Cat Treat Topper


Materials:


Steps:


Fill a treat bag halfway with conversation hearts and set it aside. Cut the white construction paper into a piece approximately 3" x 6.5". Fold it in half. Cut a semicircle and two triangles from the grey construction paper, then punch a pink heart nose. Draw eyes and whiskers.


Glue the cat's face to the folded construction paper, curling the ears forward slightly. Staple the topper to the treat bag. Cut a piece of pink construction paper and write "You're a PURRfect friend!"


Glue the cat's nose in place, then glue the message to cover the staple. 


---------

"You're a BEARy Great Friend!" Bear Treat Topper


Materials:


Steps:


Fill a treat bag partway with conversation hearts and set it aside. Cut the white construction paper into a piece approximately 5" x 8". Fold it in half. Cut a semicircle and two round ears from the brown construction paper. Draw eyes and a nose, and darken in the inner parts of the ears. Glue the bear's face to the folded construction paper, curling the ears forward slightly. Fold over the top of the treat bag and staple the topper to it. Cut a piece of lavender construction paper and write "You're a BEARy great friend!" Glue the message to cover the staple.

9/23/16

Two-in-One: Cardboard Tube Bear or Dog

My latest cardboard tube project is a bear:


Or a dog. It's the same tube. I just changed out the ears.


Materials: cardboard tube, paint (dark brown, white), scissors, craft glue, googly eyes, black mini pom pom

Paint the cardboard tube dark brown. Add a drop of white paint to the brush and wipe it on the inside of the tube until no more comes off. This will be the muzzle and tummy. When the paint is dry, cut one of the halves open.


Use that open piece to cut the muzzle and tummy from the light brown interior. Use the dark brown part to make rounded ears for the bear, or pointy ears for the dog. Cut a slit halfway up the center of each ear. Slide the ears of choice onto the edge of the tube.


Glue the muzzle and tummy in place, securing them with a rubber band until the paint is dry. Add the googly eyes and pom pom nose. Done!