3/11/21

I Love You the Whole World

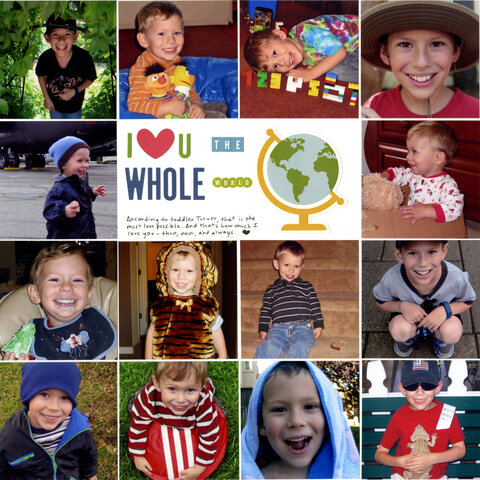
For the Slam Dunk challenge during the Victoria Marie Designs crop, we were required to find a layout we had made ourselves that could be considered a slam dunk, then use it as inspiration to create another scrapbook page. This is what I made:

I Love U the Whole World (affiliate link)

And this is what inspired it:

I Love Your Smile (affiliate link)

It's not a direct lift, obviously, but it does have a lot of elements in common. Beyond the square photos, grid design, and mixed font title, both layouts are made using photos I printed but never used on a page. It was so much fun going through the extra photos and seeing my beautiful boy over the years. 

The title comes from something Trevor and I used to say to each other when he was a toddler. I would say, "I love you!" and he would say, "I love you a lot!" and we'd go back and forth until he would say, "I love you the whole world!" and that ended it because there was nothing bigger than the whole world.

Trevor is 14 now and I still love him the whole world.

3/10/21

Pretzel Butterfly Lunch

I met a mom recently who told me she is frustrated because her 5-year old daughter never wants to stop playing in order to eat. She asked if I had any suggestions to help her get her daughter excited about mealtime. I suggested she look through my edible crafts for ideas, but I also wanted to dream up something fun for that little girl to combine her love of play with her need to eat. I think these butterflies might be just the thing.
 

I chose the ingredients and quantities based on what a 5-year old might eat for lunch. You can, of course, substitute other ingredients and change the amounts to suit your child's needs and preferences. Affiliate links below. 


---------


Pretzel Butterfly Lunch


Ingredients:


Instructions: 


(Note: Before giving the ingredients to the child, an adult should use a sharp knife to cut 2 antennae per butterfly. If the child is younger than school age, an adult will need to help spread the ricotta; older children can do this themselves.)
 
Line up pairs of pretzels to make butterfly wings. Spread ricotta on the front side of each wing, then decorate it with peanuts, dried fruit, and candies. Continue until all the wings are decorated. 


Place a baby carrot between each set of wings, then add a pair of antennae at the top. Eat your butterfly creations and any leftover toppings right away while they are fresh and delicious.


This would be really fun as part of a full day of butterfly crafts!

3/9/21

Canceled by COVID

When all normal activities came screeching to a halt in March 2020 and vacations and other special events were canceled, I started thinking about how I wanted to convey that in my scrapbook album. I toyed with the idea of just putting a single sheet of plain black cardstock chronologically in the album to represent the pandemic, but that seemed far too bleak. Life continued, of course, just in a different way. We filled our days with family walks, lots of books, games nights, cooking all meals from scratch... all things we love. 

Still, I did want a page that acknowledged that life was not the same, and that events we had been looking forward to for a long time were canceled. This is what I made:

Canceled by COVID (affiliate link)

It has the black background I'd imagined, but the text breaks it up and the colorful stickers give it life and help tell the story. The way I did my journaling was inspired by the Flip It Out challenge at the Victoria Marie Designs crop, which required an interactive element that flips or moves. The card flips open like a door....


... revealing the sold out toilet paper, just like you'd find in an actual store! Fortunately, we always keep plenty (of everything, including toilet paper) on hand, so that wasn't an issue for us. I'm really happy with this page. 

3/8/21

Drawing a Cross with Easter Lilies

Just like we did during Advent, our church is doing special activities via Zoom leading up to Easter. After yesterday's church service, I taught the congregation how to draw this cross with Easter lilies.

Easter lily drawing
 
To make your own, you need white drawing paper, a pencil, a ruler, and colored pencils. I made my step-out drawings with Sharpie so they would show up on camera, but I definitely recommend using pencil and sketching lightly.  

Orient your paper vertically. Draw the two open blooms in the top-right and bottom-left quadrants, each with six petals that overlap one another. Draw the side view of a lily in the bottom-right quadrant. 

how to draw Easter lilies - first step

Draw a stem that starts at the base of the upper-right lily and continues diagonally down to the left. It should pass behind the lily at the bottom left. Add a stem connecting the lily on the right, then another stem extending to the left, with the unopened blossom at the end. 

Add stamen to each of the open blooms. 

Easter lilies with cross - stems

Draw long, narrow leaves along each of the stems. 

Easter lilies with cross leaves

Place a ruler horizontally across the paper, adjusting it so that it sits where you want the crossbar of the cross to be. Draw lines on either side of the ruler, lifting your pencil when you cross any part of the lily. Connect the two sides to complete the crossbar. 

Turn the ruler 90° to draw the main post of the cross. Again, draw lines on both sides of the ruler, lifting your pencil when you cross any part of the lily. You should be here:

Easter lilies with cross uncolored

Use a brown pencil to outline the cross, then draw grain on the wood. Color in the wood with various shades of brown. Color the stems, leaves, and stamen green and the anthers orangey-yellow. Outline the lilies (I used purple on this sample, but black, blue, and grey are all good choices). Lightly draw lines on the petals of the lilies with light grey to give dimension, then add a little bit of shadowing in the center of the open flowers. 

Easter lilies with cross

Finally, color in the sky blue background. Or....

Easter lily drawing

.... use microtip scissors to cut out your design and adhere it to a sheet of cardstock, which is what I did with the sample I made as I was teaching. We agreed that it the lilies really pop against the black and it is a great choice for Good Friday. 

learn how to draw Easter lilies on the cross

I made my drawings on 8.5x11" copy paper, but you could easily draw this much smaller to create a beautiful card to send for Easter. Either way, give it a try!

3/5/21

The Perfect Name

Back in 2012, I made a layout telling the story behind Trevor's name. In that journaling, I mentioned that many of the names we liked were too common for our taste, but I didn't get into what exactly that meant. I've been wanting to make a layout that included a chart of the popularity of the name Trevor and explain where I consider the perfect names to fall: not too common and not too obscure. 

I decided to make that page for the 30-Minute Relay Challenge during the Victoria Marie Designs crop. The ultimate goal was to compete a page in under 30 minutes, with the following components making up the 'relay' portion: prep photos (10 minutes), grab supplies (5 minutes), sketch a design (5 minutes), and complete the page (10 minutes). I didn't worry about breaking my time down like that, but I did finish the page within the time limit.  

The Perfect Name (affiliate link)

I used a photo of Trevor from 2019, because that's the last year listed on the printout of the Social Security Administration chart. I put a little star by his birth year (2006) and gave myself plenty of space to write my story. I'm so happy with this page.
