
This post contains affiliate links.
Patches are a big deal in the Boy Scouts of America. On his uniform, a Boy Scout displays the BSA emblem, the US flag, a council patch, unit numbers, his rank patch, his patrol emblem, a badge of office, and merit badges. But for most Scouts, that long list represents only a small portion of the patches he owns. Scouts get patches for outings, events, and activities, too.
So if most patches don't go on the uniform, where do they go? Some Scouts sew all their patches onto a blanket. Others put them on a backpack or a jacket. I imagine a lot of Scouts just let the patches pile up in a shoebox or drawer.
The option that made the most sense to Trevor and me is to store them in a binder. They sell binders with a label on the spine specifically for holding Scout patches. While they look very nice, we went a cheaper route and got a plain heavy-duty binder and a pack of trading card pages. We sorted the photos and put them in pockets... which worked well until we turned the pages and the patches slipped out. So frustrating.
The solution came from a tool that is common in the scrapbook industry:
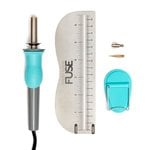
This is the Fuse tool. It functions similarly to a wood burner to melt page protectors to 'lock' the pockets. We put the patches in place, heated up the tool, and did a quick zip to seal them up. It's a bit hard to see, but you can just make out the horizontal lines above the penguin and cake patches, as well as the diagonal line separating the two.

Here's a typical page in Trevor's album. As you can see, we labeled the page with the rank and year, then filled in the extra pockets with a Cub Scout emblem and strips of cardstock to match the rank color (in this case, Bear is blue).

The patches are securely locked in place, but if he ever wants to remove one, we can easily cut or slit the pocket and get a patch out.
Some of the patches don't fit nicely in pockets. For example, the loops on the temporary hanging patches don't fit the pages we bought. We either folded the flap under (as in the 'Knights of the Round Table' patch above) or let it stick out and fused diagonally around it.

2) The design must promote the theme of "90th Anniversary"
3) The following must be incorporated into the patch
3) The following must be incorporated into the patch
a. "Camp Wolfeboro"
b. Use the Pine Tree from the Camp Logo
c. "XC Anniversary" or "XC years" or "90th Anniversary" or "90 years"
d. "MDSC" or "Mt Diablo Silverado Council"
e. "Since 1928
4) The design can include up to six colors
b. Use the Pine Tree from the Camp Logo
c. "XC Anniversary" or "XC years" or "90th Anniversary" or "90 years"
d. "MDSC" or "Mt Diablo Silverado Council"
e. "Since 1928
4) The design can include up to six colors
I used PicMonkey (of course!) and came up with this design:

It was a lot of fun to put together. They haven't announced a winner yet, but I'll let you know when I do!

I love that design! And what a clever way to display all those patches.
ReplyDeleteSo clever to use that tool for the patch storage!! I might have to do that with a project I have been working on!! I loveeeeee your patch design too!! Good luck!!!!!!!!
ReplyDeleteVery cool! Did your patch design get chosen?
ReplyDeleteNope.
Delete