Showing posts with label 1980's Craft Flashback. Show all posts

6/27/24

Friendship Bracelets

Look what I found recently - a whole bunch of friendship bracelets!


In my teens and early twenties, I worked as a camp counselor and then as a rec leader. Between those two jobs in the 1980's and 90's, I made a lot of friendship bracelets. This is a very small sampling of what I made. Since the point of friendship bracelets was to give them away, I didn't keep most of my creations. Among those that I did keep, I wore them on my wrist until they disintegrated, or used them for other purposes, including as lanyards to hold a whistle around my neck. 

It's been a good 20-30 years since I've made a friendship bracelet and I would struggle to remember how to make all of the patterns I used to know. Fortunately for the kids (and camp counselors) of today, there are books with lots of friendship bracelet patterns in them (affiliate link here and below). Plus, it's really easy to find videos online to learn. Back in the pre-Internet dark ages, we had to pass that knowledge from counselor to counselor, or figure it out on our own! They even sell friendship bracelet kits now (affiliate link here and below), which come with a handy board for making them. And check out the expansion packs! In my day, we safety pinned embroidery floss (purchased individually at a fabric store) to our pant leg while we worked in order to get the necessary tension. What a difference!

5/12/22

Great Greetings: 42+ Years of Cardmaking

I made this card last week. But I could have made it in 1980.  


I'm not sure I have the year exactly right, but I was around 8 when I received the Great Greetings card 
making kit. I absolutely LOVED it. It was made by Tomy, the same company that made Fashion Plates. It was essentially the same toy, but with seasonal greeting card elements instead of clothing elements. 


You choose your sentiment(s) and images, add a sheet of copy paper, then close the lid and use the special crayon to transfer the design to the paper. It's pretty much impossible to get a clean rubbing, but it's easy to cover when you color it. 


I experimented with cardstock and other heavier papers I didn't have access to in 1980. They didn't work well, unfortunately. The designs didn't transfer completely no matter how much pressure I applied. 

When I came time to color my card, I thought it was appropriate to use the Eagle Prismacolors I used in 1980.  


They covered the extra transfer marks really well. Unfortunately, I wasn't able to do any blending or shading because the copy paper wouldn't take multiple layers. 


After coloring, I trimmed the edges and glued it to a card blank. I should put it in the mail to whoever gave me such a great gift 42-ish years ago! Too bad I don't remember who that was. 

Great Greetings is no longer sold, but there are many versions of Fashion Plates available. I would have loved some of those as a kid. 

11/5/15

Pac-Man Marshmallow Treats

Marshmallows + Candy Melts + Candy Eyeballs = Pac-Man marshmallows! Now I have an edible Pac-Man set to go with the definitely not-edible Pac-Man rubber finger tips. This post contains affiliate links.


---------

Pac-Man Marshmallows


Materials: 


Steps to make the ghosts:


Melt one color of candy in a small bowl. Drop a marshmallow in and swirl it around until it's completely covered. Lift it out with a fork and let it drain slightly. When it's done dripping, transfer it to waxed paper. Let it cool for a minute or two, then put the eyeballs in place. If they slump downhill, remove them and wait another minute and try again. Or leave them that way, like my Clyde (orange). Repeat for the rest of the ghosts.


Steps to make Pac-Man:


Compress one marshmallow vertically until it is more round than cylindrical. Use kitchen shears to snip out a triangle from one side. 


Dip it in yellow and swirl to coat it completely. Lift Pac-Man out with a fork, allowing all the extra candy to drip off. Put it on waxed paper and let it cool for a minute or two before adding a single eye. 

Oh, and don't rinse out the bowls of melted candy yet. Tomorrow I'll show you how to use up the little bits that were left over.

8/6/14

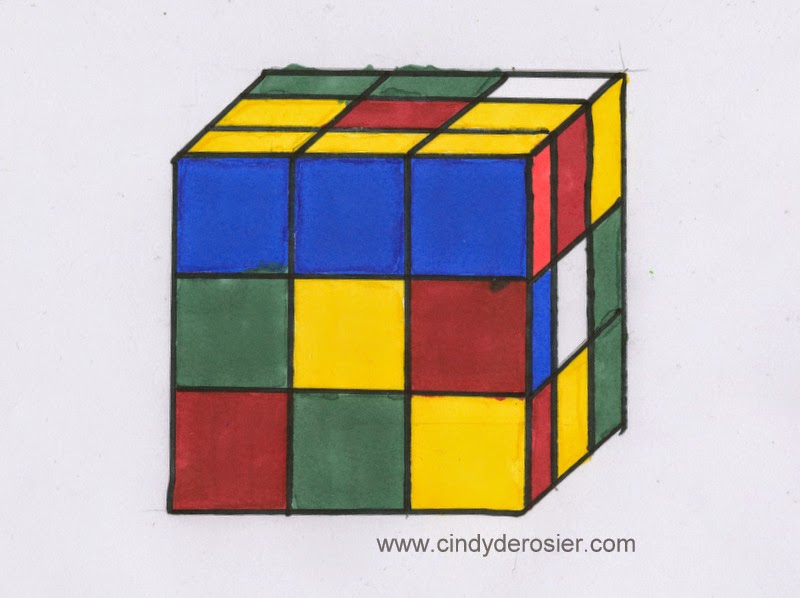
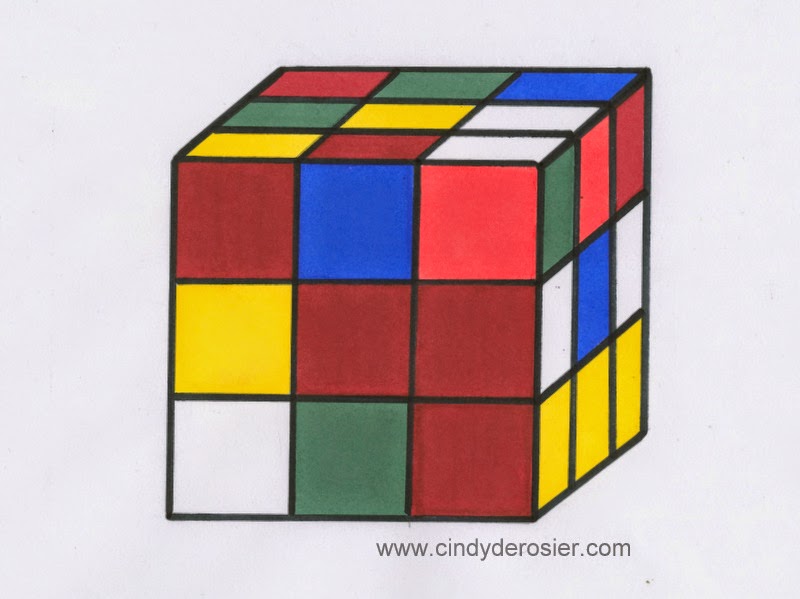
The Cursive Project: Rubik's Cube

When Trevor made his A-Z list for The Cursive Project, it was no surprise that he put "rabbit" down for Letter R. But we've done tons of rabbit crafts together (listed here under B for bunny), so I told him to think of a second choice for Letter R. He chose Rubik's Cube.

After finishing his Rr cursive page, he zipped to the games cabinet and pulled out the Rubik's Cube. He was mesmerized.


Meanwhile, I got out a square Kleenex box, with the plans that we'd add gesso, paint it black, then cut colored squares of craft foam and glue them in place. Turns out that a square Kleenex box is not really square. Close, but not nearly close enough for an object that really has to be a cube. Darn. All attempts to find a cube-shaped box failed, so I told Trevor that instead of making a craft version of a Rubik's cube, I'd teach him how to draw one. He loved the idea.

Step one: Trace something square on a piece of white paper. (Trevor is using an empty Godiva chocolates box that I found while digging around looking for a cube-shaped box.)


Step two: Move the box up and to the right without rotating it, and trace again. Use a ruler to connect each corner of the first box with the corresponding corner of the second box. Erase any lines that wouldn't show if the cube were solid and not see-through. (Trevor, like most kids his age, had already learned how to do this during a geometry unit at school.) 

Step three: Measure each side and make marks to divide it into thirds. (The Godiva chocolates box was exactly 9 cm. across, which meant Trevor made marks at 3 cm" and 6 cm".)


Step four: Connect the marks to form the squares of the Rubik's Cube. 


Step five: Color each square blue, green, yellow, red or orange (or leave it blank for a white square), leaving each pencil line white. If you care about accuracy, use an actual Rubik's Cube as a sample so that you don't inadvertently invent an impossible configuration.

Step six: Use a ruler and a black Sharpie to trace over the pencil lines, which should fill in any white spaces. Do touch-ups as needed. 


Done!


Here's a closer look at Trevor's drawing:


This is mine. I've already added an orange Prismacolor art marker to my Amazon wishlist, as the orange we used on these is clearly not orange. It didn't look that bad as we were coloring, but I hate the way it looks on the monitor. I'm going to add a brighter red to my wishlist too. 


I'm thinking we should frame these and put them on display next to these guys:

(Tutorial here

And some of these: 


(Tutorial here)

I could have a lot of fun redecorating a room with 80's-inspired crafts!  Hmm... something to ponder...

5/22/13

Blinky, Pinky, Inky, and....

At least once a month, a friend hands me something unusual and asks, "Can you use this in your crafting?"  It's never normal stuff, like fabric scraps, or glitter, or egg cartons.  No, it's weird stuff.  Like this:

 
It's a full box (12) of extra large rubber finger tips.  And by "extra large" they mean "far too big for human use."  Someone at a friend's work purchased this huge size and couldn't use them. Since she didn't know any giants, she passed them along to me.

They sat on the back corner of my desk for at least 8 months.  I knew there was a craft in there somewhere, but I just couldn't find it.  One day, I was tired of them sitting on the desk, so I opened the box and lined up 4 of them in plain sight where they would inspire me.    


Within minutes, I knew what to make.  I grabbed the paint and did a test run to see if acrylic paint would stick to the rubber.  Yes!  I grabbed my beloved microtip scissors and carefully cut little triangles out of the bottom of the four finger tips.  Then I painted them.  One red, one pink, one green, and one orange.  When they were dry, I added googly eyes.

I rooted around the craftroom to find some yellow cardstock and a clear lid to make a quick accessory.  Then I lined them all up to take this picture.  


Obviously, the Pac-Man needs work.  Eventually, I'll probably think of a cute way to make a Pac-man that will stand up.  I might need to resort to clay or something similar.  In the meantime, I'm really happy with my Blinky, Pinky, Inky, and .... do you remember the orange ghost's name? It's Clyde.  Just a little '80s trivia for you.  If you got it right, you're totally tubular.

8/17/11

Ribbon Barrette Tutorial

Several of you asked me for a tutorial about how to make the Ribbon Barrettes.  Ask and ye shall receive! Affiliate links below. 


Ribbon Barrettes


Materials:


Steps: 


Layer the two pieces of ribbons and center them at the top (the side that opens) of the barrette.


Step 2: Keeping the ribbons together, weave the left side of the ribbon toward the right.  This is a bit tricky at the beginning, but will become easier as the ribbons get shorter. 


Step 3: Weave the right side toward the left, then the left side toward the right.  Pull tight each time, making sure there are no twists. 


Step 4:  Continue the weaving.  It will make a pattern that alternates colors.  Stop when you can no longer get any ribbon through the opening.


Step 5:  Tie a knot and trim the ribbons to length.  You can add beads at the ends of the ribbons if you like.  I prefer to leave mine plain.


Quick and easy!  Enjoy!

8/5/11

Crafts of My Childhood- Friendship Pins

Around the same time I was wearing ribbon barrettes, I was making and trading Friendship Pins. They were huge in the early 1980's. My friends and I spent countless hours making them for each other. We proudly displayed them on our jackets or Kangaroos.


There are only two supplies needed- safety pins and seed beads.


I pulled these out on a day when Trevor was too sick to go out, but not too sick to do some crafting. He was very excited. As I poured out the beads, I noticed this warning:


Not intended for children under 15? Does that seem a bit extreme to anyone? What kind of a lunatic 14-year-old would eat beads? During the course of my teaching career, I taught about 500 different 11-year-olds. There wasn't a single one who would have EATEN these. I was fairly certain my 5-year-old could be trusted not to eat them either.

So throwing caution to the wind, I showed Trevor what to do. He was giddy. He happily made many, many friendship pins. (And he didn't eat a single bead.)


We kept making these together until we ran out of safety pins. And then we bought more safety pins. We've had so much fun making them together. Of course, the best part about Friendship Pins is that they are for giving away. Trevor gave most of his pins to his best friend Kylinn. I put some of mine in the mail to my childhood best friend, who is celebrating her 39th birthday today. I hope they make her smile and remind her of some great times we had together in the early '80s.

7/28/11

Crafts of my Childhood: Ribbon Barrettes

Hey look!  It's me at my 10th birthday party!


This was 1982 and I was rocking my homemade ribbon barrettes.  I LOVED my ribbon barrettes, as did just about every girl who was 10 years old in 1982.  I had several pairs, all carefully coordinated with my favorite dresses.  I stopped wearing my ribbon barrettes about a year or so later and I have no idea where they went.

I really wanted to make ribbon barrettes again.  As for who would be wearing them... they don't exactly seem appropriate at 39, nor are they something I'd put on my only child, who is a boy.  Fortunately, I have goddaughters who will look adorable in them!

I decided that Ellia would get yellow barrettes and Kylinn would get purple barrettes.  I brought my supplies with me to Trevor's swim lessons, where I could work on ribbon barrettes at the same time I was watching him.  The first barrette took me an entire swim lesson, as I tried to remember exactly how I'd made them some 29+ years ago.  The three subsequent barrettes took approximately 1/2 swim lesson each.

Here are Ellia's: 
 

And Kylinn's:


About a month ago, I altered a small box for the Flamingo Four at Flamingo Scraps.  I'd already decided to give it to Kylinn.  Now I realized it would make a perfect jewelry box for her ribbon barrettes.

So, of course, I had to make one for Ellia too:


It was so much fun making the ribbon barrettes.  I have two more blank sets of barrettes just waiting for ribbons.  Hmmm.....