Showing posts with label Cailei. Show all posts

3/27/23

Non Voyage

We were really disappointed when we had to cancel our trip over winter break, but there was a major upside: we had fourteen unscheduled days at home to do whatever we wanted. We definitely took advantage of that found time! We visited museums in Sacramento and here in Fairfield. We cooked from scratch, completed three puzzles, read, did a bunch of art (me) and played video games (Steve and Trevor), stayed up late (Trevor) and slept in late (also Trevor). We got our COVID booster shots. Steve and I went wine tasting. And we rang in the new year with friends Rebecca and Cailei. 

Non Voyage (affiliate link)

I had originally planned to title this layout "14 Found Days at Home." That ended up being my subtitle. When I came across the "Bon Voyage" die cut, I did some creative surgery to remove the B, then added an N sticker and made my title "Non Voyage." I'm incredibly pleased with myself. Adding UN above the "Pack Your Bags" sticker is the pièce de résistance. 

8/11/20

Happy #Quaranteen Birthday

Celebrating anything under quarantine is far from ideal, but we made the best of it for Trevor's 14th birthday with a 'when life gives you lemons... share them with friends' theme. This is the layout I made from his special day.

Happy #Quaranteen Birthday (affiliate link)

I'm so thankful for friends who helped make his day special (from a distance). 

10/24/18

12th Birthday Party

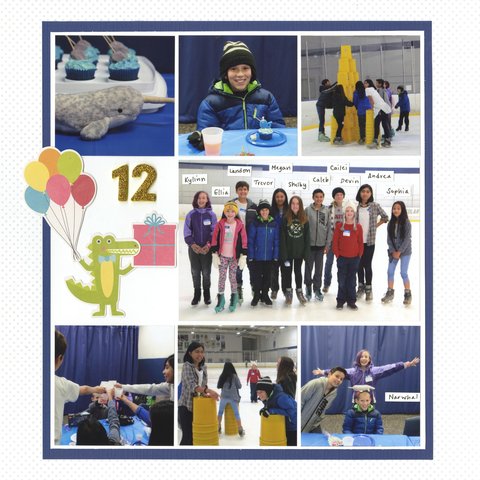
One of my favorite things about blogging is that I can tell more of the story and include more photos of an event than I can squeeze onto a scrapbook layout. So while I want the important photos and the story to appear in the album, it helps knowing that the details are preserved here on the blog. Because I shared so many details from Trevor's narwhal-themed ice skating birthday party back in June, I didn't feel compelled to include close-ups of the narwhal items we made on the layout. Instead, I packed it with photos of Trevor and his friends having fun.

12th Birthday Party (affiliate link)


I debated whether to include the grinning alligator on a page about a narwhal-themed birthday, but I couldn't resist. He fit the space perfectly and looks so cute holding the present and the balloons. 

You may have noticed that the only journaling I did was to label the kids (and Narwhal). The photos answer the rest of the basic questions:
  • What: Trevor's birthday party
  • Where: ice rink
  • When: Trevor's 12th birthday

You might argue that, years from now, one of Trevor's descendants won't know when his birthday was and thus what year this took place. Nor will they know which ice rink we visited. But I'd argue that both of those questions are answered by other layouts in the same album. For the record though, I'll note both of those here, with the optimistic (though perhaps unlikely) expectation that my blog will be accessible to future generations: This party took place at Vacaville Ice Sports on June 8, 2018, the day after Trevor's 12th birthday. And it was awesome. 

7/2/15

Black Velvet Fireworks Paintings

Fun fact: Other than school pictures, Trevor has never had a his picture taken professionally. He's never been to a portrait studio and probably doesn't know they exist. Steve takes all of Trevor's portraits here, with a black velvet backdrop. We take our own family portrait for our Christmas card, too, using his camera's self-timer. 

Every once in a while, Steve cuts off a chunk from the roll of black velvet because it's no longer pristine enough to use as a backdrop. He recently gave me a few yards, suggesting that I should come up with a craft using it. Hmm... what to do with black velvet? Paintings, obviously! But what to paint? Not Elvis. Not dogs playing poker. How about fireworks?! Yes!

I did a quick Google search to look at images of fireworks and was totally inspired. I particularly loved photos where the fireworks were reflected in water. Amongst the many photographs, I saw a few paintings as well. This one caught my eye. I thought it would be a lot of fun to make our own versions when our friends Rebecca and Cailei came over. (It's pretty much a given that if you come to my house, you'll be: a) doing a craft; b) eating something experimental; or c) involved in some sort of competition. My friends know to expect any one of those... or all three!)

Here's how my painting turned out:


Black Velvet Fireworks Paintings


Materials:


Begin by using the toothpick to drag a line of white paint horizontally across the velvet. (I drew my line too high. It looks best if it is right at the bottom third.) Use a paintbrush to create the fireworks. My technique was to dip in paint, dab on the velvet, then drag outward repeatedly, so that the paint was primarily in the center of the fireworks.


Each time you create a burst, make a horizontal reflection in the water with the same color. Lower fireworks reflect closer to the white line, while higher fireworks reflect lower on the paper.


Keep adding different colors of fireworks and reflections. Don't be afraid to layer them over each other.


When you're happy with your fireworks, add contrails or stars using the toothpick. Done!


Here are the rest of the paintings. This is Rebecca's:


This is Cailei's:


And this is Trevor's:

I love how these turned out! I still have a lot of black velvet left. Any suggestions of what we should paint next?

2/7/14

The 10 Minute Dollar Bill Dispenser

I've now shared four different ways I've given money as a gift, including the Cardboard Tube Dollar Bill Dispenser, the Tissue Box Dollar Bill Dispenser, the Knitting Kit, and Spelling with Dollar Bills.  All of them were extremely well-received.  The Dollar Bill Dispensers, in particular, have been pinned hundreds of times and been viewed many, many times.

I've now made each style of Dollar Bill Dispenser multiple times.  I've gotten faster over time, but both of them have painting and paint-drying steps that just can't be hurried.  So I decided to challenge myself to see if I could make a version of the Dollar Bill Dispenser in only ten minutes.


Ten Minute Dollar Bill Dispenser


Materials: 


  • empty Kleenex box 
  • wrapping paper 
  • Scotch tape
  • tissue paper
  • crisp dollar bills
  • index card
  • border punch
  • Sharpie


Step 1: Tape the dollar bills together end-to-end using Scotch tape.  I've gotten really fast at this over the past three months, but having mint-condition dollar bills is what really makes a difference.  Get new bills from the bank and you won't waste any time smoothing, unfolding, or lining up the bills.


Step 2: Use the border punch to put a decorative edge on the short side of the index card, write the word "PULL" on it, and tape it to the last bill.


Step 3: Wrap the Kleenex box in wrapping paper, keeping track of which side is the top.  (I use a post-it flag.)  After the box is wrapped, use the scissors to poke through the wrapping paper to reveal the opening of the Kleenex box.

Step 4: Roll up the dollar bills into a tight roll.  Hold the roll in your hand with the PULL tab facing up.  Place the tissue paper over the opening of the Kleenex box.  Gently push your hand into the Kleenex box, forcing the tissue paper into place and depositing the bills in the box.

Step 5:  Adjust the tissue paper to make it look ok and to make sure it isn't blocking the PULL sign.  The gift is ready to give!


This is a gift that's truly fun for all ages. Kids, teens, adults... everyone is delighted by a Dollar Bill Dispenser!

2/2/12

Tissue Paper Hearts

Today I'm sharing one of my all-time favorite crafts: Tissue Paper Hearts. They are so pretty and so easy to make. Affiliate links below.


Tissue Paper Hearts


Materials: 


I save all the tissue paper we receive. If it is too wrinkled or torn to be reused for gifts, I cut it into squares. I keep all the Valentine's colors in this tub. (I also have a tub for ocean colors.)


Steps:

Paint a little bit of liquid starch onto a small area of your paper. Lay a piece of tissue paper down on the moist area, then paint over the top with more liquid starch.  Do not use too much starch- it should be moist, not puddly.

Continue until you have filled the page.  


Allow the paper to dry overnight. Check the paper- all pieces of tissue paper should be sealed. If any are loose or any ends are sticking up, paint some liquid starch over that area and allow to dry thoroughly. The paper will curl a bit as it dries. This is fine. You won't notice the curling when you cut out your shapes. If it bothers you, you can turn the paper upside down and iron it on a low setting or press it beneath heavy books. 


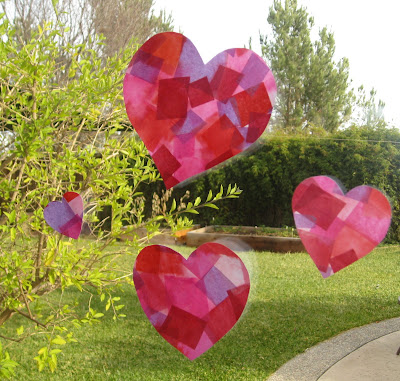
Draw or trace hearts on the back of the paper, then cut them out. Now display your hearts! I like taping them to windows. I love the way the colors seem to glow.


I hope you enjoy making these as much as I do!