Showing posts with label Oreo. Show all posts

1/7/22

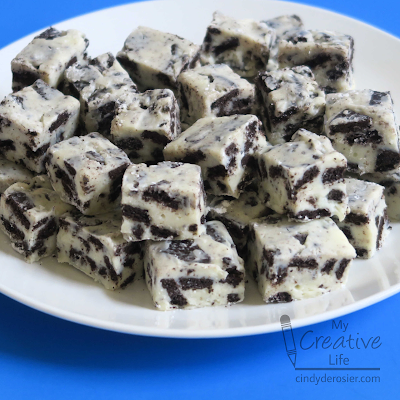
Cookies n Creme Microwave Fudge

I'm a big fan of microwave fudge for a quick and easy potluck dessert. This cookies n creme version is packed with Oreos and is always a hit.  


Before sharing the recipe, I know there will be people who argue that microwave fudge is not 'real' fudge. I disagree. Having made stovetop fudge from scratch, I recognize that a lot more time and skill goes into making it that way, but that doesn't make an easier version invalid. I like cooking from scratch, but I also I embrace cake mixes and the bread machine and the microwave as handy shortcuts to use sometimes. 

This recipe shortens and simplifies the fudge-making process, eliminating the possibility of the most egregious of fudge shortcomings: graininess. Using sweetened condensed milk saves you from having to cook the sugar to a precise temperature with the perfect amount of stirring at just the right time.  


-------


Cookies n Creme Microwave Fudge


Ingredients:

 
22 Oreos, chopped into chunks
1 14-oz can sweetened condensed milk
1 11-oz pkg Ghiradelli white chocolate chips 
1 tsp. vanilla extract

Steps: 


Line an 8x8" pan with parchment paper and set it aside. Chop the Oreos into chunks about the size of a dime.

Pour the sweetened condensed milk into a microwave-safe bowl and heat it for 1 minute at 50% power. Pour in the white chocolate chips and stir until completely melted. If necessary, return to the microwave for another 30 seconds (at 50% power) and stir until the mixture is smooth. Add the vanilla extract and the chopped Oreos. Spoon the mixture into the parchment-lined pan, pressing to fill the corners. Refrigerate 30 minutes or until firm.  

Lift the parchment out of the pan and cut the fudge into small squares. 


12/14/18

Oreo Penguins

When our plans to make an Oreo Christmas tree were thwarted, we made Oreo Penguins instead. 


As you can see, they're adorable but far from perfect. A friend once told me that what she loves the most about my blog is that you don't have to have any talent to make the things I share. She immediately blushed and apologized profusely for implying I don't have any talent, but I thought it was hilarious. It's totally true that my projects are not likely to grace the pages of a magazine (except this once!). My projects are doable and rarely require any special skills or expertise. I consider my talent to be thinking up the ideas, figuring out how they're done, and writing clear instructions, rather than the actual execution of the project. Particularly when it comes to edible crafts! So regardless of whether you have any talent or not, go ahead and give these Oreo Penguins a try! Affiliate links below. 


---------


Oreo Penguins 


Materials:


Steps:


Set the Silpat mat on the table with the cooling rack directly above it. Place 4 White Fudge Oreos on the rack, with enough space between them that you can fit your fingers. Use scissors to cut 4 small squares of aluminum foil. Put them on top of one another and fold them in half vertically. Cut the stack of squares into a half teardrop so that they're vaguely heart-shaped when you unfold them. Separate them and press them onto the Oreos, with the end press down the front. In the photo below, you can see three Oreos with the foil positioned on them, plus one piece of foil that I haven't unfolded yet. 


From another angle, with the fourth Oreo now covered:


Melt about 15 black Candy Melts according to the package directions. Drizzle the melted candy over the tops, trying as best you can to avoid the foil-covered area. 


Let the candy set for just a minute or so, then use the tab of foil at the bottom to lift the foil straight up. If you wait too long, you end up with a rough edge instead of a nice smooth line between white and black. If don't wait long enough, you have to be really careful that the extra candy on the foil doesn't slop onto the white portion. How long it takes the candy to set up depends on your room temperature and humidity, so I can't give you a more accurate guess. 

Transfer the penguins to a plate. If you drizzled aggressively, you may end up with a few penguins that are stuck to the cooling rack. Push up from the bottom of the rack with one hand as you're gently pulling up with the other and it should pop free. If you happen to break one doing this, you have my permission to eat it. None of mine broke, so unfortunately I didn't get to eat one. 

Move the now-empty cooling rack, then peel the dripped candy off the Silpat and put it back into the bowl. Remelt the candy. Set up your next four Oreos and repeat the process of adding the foil, drizzling the candy, and then peeling the foil. 


Continue working, four at a time, until all your Oreos are covered. You may need to add more Candy Melts to the bowl. 

In a separate bowl, melt 3 white wafers. Use a toothpick to dot melted white candy onto the backs of the candy eyeballs, then place them on the penguins. They'll set very quickly, so make sure you put them where you want them and don't try to move them. Add a dab of white candy below the eyes and place a sunflower seed beak there. 

Here are some of the penguins I made. As you can see, they are FAR from perfect.


But they are fun! I learned a lot as I went - what consistency is best for the melted candy, where to position the foil and when to remove it, what happens if you try to dip the penguin in the candy melts instead of drizzling, etc. I figured out what to do as I went. Like anything, the more Oreo Penguins I made, the better they turned out. And for a Scout cookie exchange, these imperfect (yet charming) penguins were perfectly fine.  


And I did eventually get to eat one. Delicious!

3/14/12

Edible Art: Ice Cream Flowerpots

Recently, Trevor has been spending a lot of time going through our cookbooks. One day, he announced that he wanted to mark the pages of some recipes he wants he try. I gave him a set of post-it flags and left the room to put away laundry. When I returned, I found this:

(Affiliate link here and below)

He used an entire brand-new set of blue post-it flags, plus part of a pack of yellows. Here's another view:


Trying all those recipes should keep us busy for the next few years!  We decided to start with these Ice Cream Flowerpots from Disney's Family Cookbook.


Ice Cream Flowerpots


Materials:


Let the ice cream soften slightly, then fill each cup about 2/3 full of ice cream. Insert the straw into the ice cream to form the stem of the flower. (I cut our straw in half, so we only needed one straw for the two of us.)

Twist 4 Oreos to separate their halves. Place the non-frosting sides into a ziplock bag and crush to make crumbs. Pour the crumbs on top of the ice cream to create the look of soil. Place the cups in the freezer.

Make your flower. The cookbook shows a beautiful Oreo center with gumdrops around it. This did not work for us and was incredibly frustrating. No matter how careful we were, the Oreos cracked.

After breaking a dozen Oreos, I finally got fed up and used two yellow Fruit Slices to make a center. It looks somewhat lame, but at least there was no frustrating cracking.

Attach a toothpick to your flower. Slide the toothpick into the straw. Add a green Fruit Slice to mimic a leaf. Eat and enjoy!

(Trevor's on the left and mine on the right.)

  
We had a lot of fun making our flowerpots, but it was annoying that we weren't able to make an attractive flower that wouldn't crack. We brainstormed what would make a better center and came up with Sunkist Fruit Gems. So the next day, we bought a pack.

This time, Trevor decided he wanted graham cracker dirt instead of Oreo dirt.

Success! The Sunkist Fruit Gems worked a million times better than the Oreos.

 
(Trevor's on the left, mine on the right)

(Steve's.  He was bummed to have missed our first attempts.)

I love the way the flowers look with the Sunkist Fruit Gem centers! Despite the frustrations along the way, this was a really fun project and definitely one we'll do again.