Showing posts with label glitter. Show all posts

9/25/24

Glitterific Art in the Sketchbook

Every once in a while, I get a shipment of fun goodies as a Plaid Creator. My latest box had the six new pastel colors of Glitterific (affiliate link here and below). I tested them out by playing around in the sketchbook.  


I started by painting a double-page spread with black acrylic paint. Then I added THRIVE using Folk Art White Gesso


Then I used the same gesso to stamp flowers on the page. 


While that was drying, I went to the paint shelves to find a pastel matte acryric to match each color of Glitterific. 


I painted over the gesso with matte acrylic. 


Finally, I added the Glitterific on top of the letters... and then went a little crazy and dabbed it all over the pages.  


It's hard to see in the photo, but Glitterific is well-named. So much glitter and so terrific!

11/20/23

Ornaments for the Four Sundays of Advent

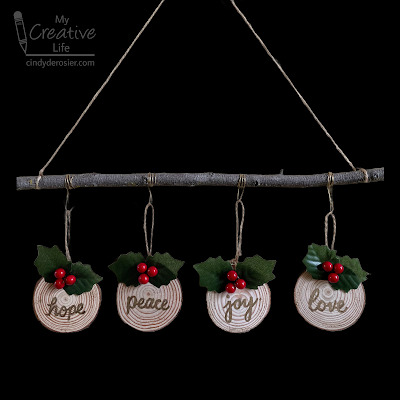
Advent is a time of preparation for the coming of Christ, both the celebration of his birth (Christmas) and his promised second coming. The first Sunday of Advent is the first day of the liturgical year. It can fall any day between November 27 and December 3. In 2023, Advent starts on December 3. That gives you plenty of time to make your own wall hanging featuring the four Sundays of Advent. 

Starting on December 3, hang one ornament each Sunday. When all four are hanging, you'll know that Christmas is next! Affiliate links below. 


Advent Ornament Wall Hanging


Materials:


Steps: 


Write the four words representing the four Sundays of Advent on the wood slices. You can write freehand or use this transfer technique if you prefer. 


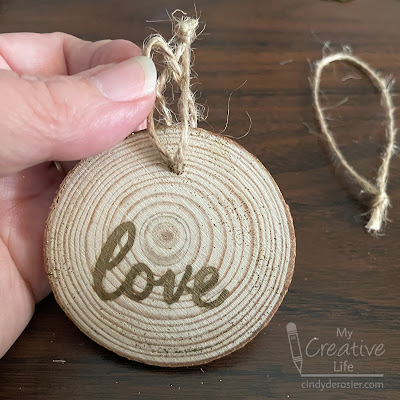
Add some Stickles to the ornaments. I like just a hint of glitter toward the outside edge, but you can add as much as you want. 

Cut four 8-inch pieces of twine. Tie them into loops, then thread them through each of the ornaments to make the hangers. 


Twist three holly berries together and set them aside. Repeat this for each of the ornaments (12 berries total).

The holly leaves I bought come attached in threes, but if you use them intact, they block the words on the ornaments. I cut them apart, stacked two leaves together, and then used a craft pick to poke a hole in them. 


Put the trio of berries into the hole you just created. Then poke those wires through the hole of the ornament. Snip off any excess wire, then use tape to cover the wires. 


Cut four 8-inch pieces of gold wire. Wrap them tightly around the branch four times, then bend up the ends to make hooks. If your branch is significantly thicker than mine, cut your wire longer than 8". 


Now cut an 18" piece of twine. Tie it to the ends of the branch to make a hanger. That's all there is to it!


Here's a close-up of one of the ornaments so that you can see the glitter:


I taught this craft yesterday to a group at church. We had a lot of fun making them and everyone's turned out great. Now we wait... for the season of waiting!

6/22/23

Sparkly 49ers Sign

I rarely work with bling, yet I have an enormous supply of sparkly, glittery things that have been sitting in the craft room forever. Time to use some of it up! This wooden arrow is decorated with gold paint, gold glitter, and leftover Diamond Dotz, It’s super sparkly; the photo doesn’t do it justice.

You may recognize the 49ers logo from a diamond Art kit I completed a couple of years ago. I had enough extra Dotz to make a second logo. Self-adhesive canvas with a printed grid makes it really easy. Affiliate links below. 


Sparkly 49ers Sign


Materials:


Steps: 


Sand the wooden arrow until it is smooth. Add a coat of Treasure Gold. When that is dry, add a generous coat of gold glitter glue. 

Create the logo or design of your choice by applying the Diamond Dotz to the canvas. When it is complete, carefully cut it out with microtip scissors and glue it to the arrow with a strong craft glue.  

6/15/23

Vase Transformation (Paint + Bling)

I’ve had a sponge-painted green vase for a really long time. I don’t remember where it came from, but I do know it came to me already painted. I think it was done commercially, but I’m not sure. I'm not the one who painted it and I don’t think I’ve ever used it. I decided to give it a makeover to take it out of the 90’s and make it a bit more modern. Here’s the before and after:


I’m not sure you can tell in the photo, but it’s super sparkly. I started by covering the glossy surface with a thin coat of gesso. (Affiliate link here and throughout the post.) Then I painted the vase black before adding two coats of Extreme Glitter. It was challenging getting into all the tiny crevices between the flower petals, but I used the tiniest brushes and did my best. 

I painted the petals white, the center yellow, and the stem and leaves green. (The stem extends most of the way around the vase and there are leaves on the back. When the paint was dry, I was ready to apply rhinestones. I used self-adhesive green gems for the stem and leaves. I used a strong glue for the flower center and petals. I painted a thin coat of glue on one small section at a time, then added the gems before moving on to another section.


I’m happy with the transformation. The vase looks a lot more modern and is striking on its own. It will look even better filled with flowers.  

10/12/22

Paper Plate Football Fan

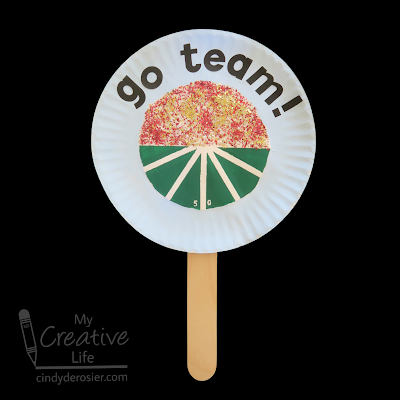
Have you seen the football field cookies that are so popular? They're the inspiration for my project,  a football fan for a football fan! Affiliate links below. 


Paper Plate Football Fan


Materials: 


Steps: 


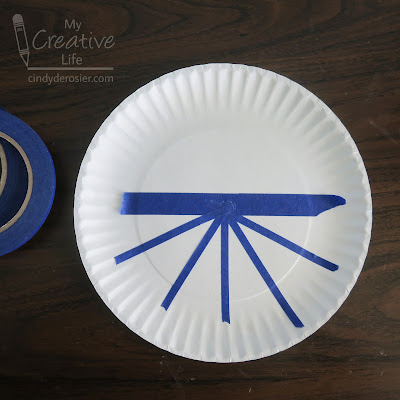
Apply a piece of painter's tape across the middle of the paper plate to establish the horizon. Add five pieces of 1/4" painter's tape radiating down from the center of the plate to form the yard lines.  


Paint the smooth section below the horizon line with green paint. Remove the tape. Paint the bumpy perimeter of the paper plate with light blue paint. 

When the paint is completely dry, rub a thin, even coat of tacky glue to the smooth section above the horizon line. Sprinkle on glitter in your team colors, covering the gluey area. Allow the glue to dry. 


Use a white pen to mark the 50-yard line. 


Add letters to spell out a message on your fan. You can put, "Go team!" like I did, or use the specific name of the school, city, or mascot. 

Glue a 10" craft stick to the back. Now you have a football fan that will help any football fan stay cool while supporting their team!

10/24/19

Sparkly Unicorn Diamond Art

I'm doing something I've never done before - posting a Christmas gift on my blog before giving it to the recipient. In this case, however, the recipient is my 6-year old niece, Allison, and I'm fairly confident she doesn't read my blog unsupervised. Not only that, but I kinda already told her what the gift would be. In fact, I posted a picture of Allison (and my godson Teagan) helping me with Allison's gift when we visited back in July.

So Allison knew that I would be taking the completed unicorn Diamond Art and turning it into something sparkly and fabulous for her, but she didn't know exactly what. Neither did I, to be honest! I debated all sorts of options before settling on wall art. I think she's going to like it. I wish you could see just how sparkly it is! Affiliate links below.


---------

Sparkly Unicorn Diamond Art


Materials:


Steps: 

Complete the unicorn, following the instructions on the package. Use microtip scissors to carefully cut it out. 

Paint the wood canvas with black paint. When it is dry, add a coat of Extreme Glitter. The more coats you add, the more sparkly it gets. I did two coats and got tons of sparkle. (Allison likes sparkle. It's practically a requirement for being a 6-year old girl to love glitter in all its forms.)


Cut the cardstock to size, then use a strong craft glue to attach it to the inside of the wood canvas. Use the same glue to attach the unicorn, alphabet letters, and heart(s) to the cardstock.


Diamond Art makes a fantastic gift for practically anyone on your gift list. My favorite diamond art manufacturer, Leisure Arts, has a huge (and growing) number of designs to choose from. If someone on your list would prefer to receive a completed design instead of doing it themselves, you have plenty of time to make this thoughtful gift before the holidays.

1/10/18

Q-Tip Snowflake

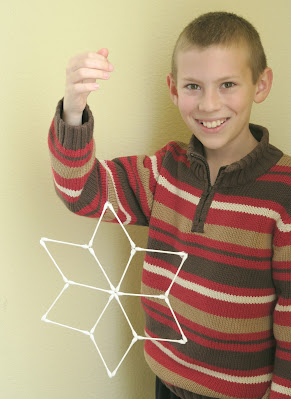
Not all of my craft ideas are original. Most are, but occasionally I have to recreate someone else's project, without the benefit of actually knowing how they made it. Take, for example, this Q-Tip Snowflake I made:


Many years ago, we featured "Snow Swabs" at Fun Family Crafts:


The original source, Spoonful.com, is gone, leaving us with a dead link. As Editor, that leaves me with a choice: remove the feature entirely, or try to figure out how it was made and post my own tutorial? 

I hate removing crafts from the site, so this time I tried to make my own version. I knew from the title that each 'spoke' of the snowflakes were q-tips, but that's all I knew. What are those colorful blobs at each intersection? The photo is too small to enlarge. Now that I've made my own, I *think* those blobs are hot glue with glitter sprinkled into them, which is different than what I did. Here's my version. Affiliate links below.


---------


Q-Tip Snowflake


Materials:


Steps:


1. On a piece of wax paper, arrange the q-tips into a six-pointed star. 


2. Put glue at each intersection. Too little and the snowflake won't stick together. Too much and the glue will form unsightly pools. (Ask me how I know.) Let the glue dry overnight. 


3. Carefully peel the wax paper from the back of the snowflake. If necessary, add extra glue to reattach weak areas and/or use microtip scissors to trim away glue pools. Once it is secure, tie a piece of fishing line around the snowflake. Have a trusty assistant hold it up to make sure it is actually sturdy. 


4. Now it's time to decorate! I used Star Dust Stickles to add glitter to the snowflake, then glued a silver sequin at each intersection. 


Of course, both the glitter and the sequins are difficult to see in my photos, but they do add a nice sparkle in real life. Hang your snowflake in the window and enjoy!