Showing posts sorted by relevance for query paper plate. Sort by date Show all posts

6/15/15

Paper Plate Spacecraft

One of the best parts of my Fun Family Crafts job is getting to see so many cool kids' crafts. Almost every day a submission comes in that makes me want to stop working and immediately zip into the craft room to create. I can't always do that, of course. It's often days, weeks or months before I actually make the project that inspired me. And in that amount of time, the project morphs from the original inspiration into something quite different.

I saw this super cute paper plate project awhile ago and wanted to make my own version. But instead of looking out the porthole and seeing a whimsical alien, I wanted to create a more realistic scene. Here's what I came up with: 


As you can see, it is entirely different from the inspiration piece! I only used a single paper plate and didn't use aluminum foil at all. I'm really happy with how it turned out.

Paper Plate Spacecraft


Materials: 

  • paper plate
  • chipboard
  • gesso
  • paint
  • silver Sharpie
  • foam brush
  • stencil brush 
  • hole punch 
  • cardstock
  • foam adhesive dots


Cut a circle of chipboard the size you want Earth to be. Put a coat of gesso on both the chipboard circle and the paper plate. When that is dry, but a coat of black paint on the inside portion of the paper plate. Use the stencil brush (or an old toothbrush) to splatter bits of yellow paint onto the black. Set it aside to dry.

Time to paint Earth. I used four colors: dark blue, tan, green and white, in that order. Start by painting dark blue on the entire circle. Add areas of tan and green to suggest the shapes of the continents. No need to perfectly replicate their shapes, though I did consult some NASA images before painting. Use a stiff, dry brush to add white haphazardly over the other colors. When that is dry, use foam adhesive dots to attach it to the paper plate.


Paint the edge of the paper plate silver, being careful to create a crisp line between the silver and the black.

While the paint is drying, punch holes from cardstock. Color them with the silver Sharpie. Glue these to the silver portion of the paper plate to create the rivets on the porthole. 


I think it would be a lot of fun to create an entire paper plate solar system, as seen from a spaceship! I'm adding that idea to my mental list of approximately 2 million projects that I hope to eventually do...

6/9/15

Paper Plate Bunny

Have I really NEVER written a tutorial for a paper plate bunny? It's hard to believe, considering I've shared 15 bunny crafts and a handful of paper plate crafts over the years. Time to fix that. 

Trevor made this adorable paper plate bunny recently to enter in the county fair's paper plate contest. Materials: paper plate, foam brush, gesso, paint, chipboard, scissors, buttons, Sharpie


Begin by putting a coat of gesso on the paper plate. This step is important if you have a shiny, slick paper plate. You can skip it if you're using a very inexpensive plate with no coating. While the gesso is drying, mix paints to create the color(s) you want for your rabbit. Trevor mixed black, white and tan to get the grayish-tan of Trouble's fur. When the gesso is dry, pounce paint onto the plate to create the look of fur.


Use the same technique to paint the chipboard.


When the paint is dry, cut out ear shapes from the chipboard. Use a hot glue gun to attach the ears to the plate. Draw a bunny mouth, then glue the button eyes and nose in place. Draw in bunny whiskers and that's all there is to it!

9/25/17

Paper Plate Beaver

Part of my job at Fun Family Crafts is to make sure we have the widest possible variety of craft tutorials. Rather than add to a topic that is already has dozens of great ideas, I'm always looking to see what we don't have represented. We literally have thousands of animal crafts, yet exactly one of those is a beaver. So I made a paper plate version of this fascinating rodent. 


----------


Paper Plate Beaver


Materials:

  • paper plate
  • brown paint
  • scissors
  • construction paper (brown, black, white) 
  • black pen
  • craft glue


Steps:


Paint the paper plate brown, then set it aside. While it is drying, cut out two small circles (eyes) and one oval (nose) from the black construction paper. Cut two rounded ovals (ears) from the brown construction paper. Cut two rectangles (teeth) from the white construction paper. 

When the paint is dry, cut the bottom of the paper plate to form the beaver's cheeks. Discard the smaller piece.


Glue the ears behind the paper plate at the 2:00 and 10:00 positions. Glue the nose to the front of the plate, slightly below center. Glue the teeth behind the bottom of the plate. 


Experiment with where you want the eyes. I think that close together is cuter...


... and farther apart is more realistic. 


Use the marker to add whiskers. 


Here's some fun facts about the American Beaver.

  • Beavers are the largest rodents in North America and second largest rodents in the world (the largest is the capybara).
  • A beaver’s incisors are harder on the front than on the back. This way the back wears faster, creating a sharp edge that lets a beaver cut easily through wood. 
  • Beavers are herbivores. They eat aquatic plants and the soft inner bark of trees. Beavers store green branches underwater so they can eat them throughout the winter.
  • The world’s largest beaver dam is in Alberta, Canada and measures 2,790 feet long.  
  • Beavers can hold their breath underwater for up to 15 minutes.
  • Oregon and New York have both named the beaver as their state animal. 

9/24/21

Paper Plate Halloween Wreath

 Check out my new Halloween wreath! The base is a paper plate.


---------


Paper Plate Halloween Wreath


Materials:


Steps: 


Cut the center out of a paper plate so that you have a ring. Then cut the Halloween papers into 1.5" x 8" strips. I used 25 strips for my completed wreath. 


Cut a V in the end of each strip, if desired. Glue the strips to the paper plate, letting a bit of the strip hang over the edge. Overlap the next piece slightly. 


Continue until all the strips are glued. Flip the wreath over. Use scissors to trim the excess paper so that the opening of the wreath is even. 


Decorate the wreath with papers and stickers. I cut the HAPPY HALLOWEEN strip from one of the patterned papers, then added the five stickers. 


Because it's made from a paper plate and strips of patterned paper, the finished wreath is very light and easy to hang. Mine is resting on a small Command hook.


I'm really happy with my new Halloween wreath!

9/3/21

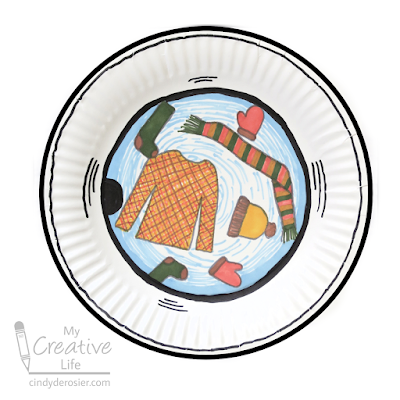
Paper Plate Washing Machine Craft

A big part of my job at Fun Family Crafts is scouring the internet to find clever and creative craft tutorials to feature. Because we only publish crafts that include tutorials, I can't feature a craft that doesn't have a materials list and an explanation of the steps to make it. When I come across a craft without a tutorial, I first attempt to contact the creator and convince them to add a tutorial. Unfortunately, this is rarely successful, particularly if the post is old and/or in a foreign language. When that happens, I make my own version of the project and write up a tutorial. 

Such is the case for this clever paper plate washing machine craft. The post is in Korean; I hoped when I ran it through a translator there would be a tutorial, but there wasn't. So I took the idea and put a fall twist on it. 


Paper Plate Washing Machine Craft


Materials:

  • 9" plain paper plate
  • markers
  • 11" x 14" drawing paper
  • tacky glue


Steps: 


Draw and color articles of clothing on the non-eating side of the paper plate. (I know it looks like I used the eating side, but it's an optical illusion.) 


Outline the edge of the plate and the center section with black. Add a black half-circle handle and some black motion lines. Then color the area behind the clothes with blue to indicate moving water. 


Set the paper plate on a piece of drawing paper and draw the washing machine around it. I started with a large square that was slightly bigger than the plate, then added the feet and then the vent at the bottom right. Then I added a rectangle on top with the various dials and knobs. The final step is to glue the paper plate to the drawing paper. 


I drew fall-themed clothes, but you can adapt this for any season or holiday. It would be really cute with Santa and the elves' clothes at Christmas, or swimsuits and towels during the summer. There are a lot of fun possibilities!

Shop!

2/15/21

Paper Plate Rainbow Craft

Kids of all ages are fascinated by rainbows. Start with a science experiment to see firsthand how light passing through water makes a rainbow, then create this cute paper plate craft as a reminder that rainbows only appear in the sky when it's sunny and rainy at the same time! Affiliate links below. 


Paper Plate Rainbow Craft


Materials:


Steps:


Cut one paper plate in half. Remove half of the center of a second paper plate. Cut out clouds and raindrops from grey construction paper. 


Paint the half paper plate yellow, then paint a rainbow on the 'handle' of the second paper plate. When the paint is dry, glue the two plates together, securing them with binder clips while the glue dries. Paint the sun's face. 


Cut a length of yarn long enough to go from the sun, up to the clouds, and then back to the sun. Glue the center of this piece of yarn onto the craft stick. Cut six lengths of yarn and glue raindrops to each. Glue the other end of the yarn to the craft stick. 


Glue the two loose yarn ends to either side of the rainbow. Finally, glue the clouds over the craft stick to cover it.


When the glue is dry, your paper plate rainbow craft is ready to hang!

7/13/15

Paper Plate Sunflower

With Trevor on summer break, I'm struggling with finding time to work in between taking him to all his various activities. While I'm fortunate to have a completely flexible work schedule, both jobs require that I work from a computer with internet access, a full keyboard, and a good-sized screen. I also need quiet and relatively few distractions. For those reasons, I can't work when sitting poolside during Trevor's daily 30-minute swim lessons. I can't work during ice skating, golf camp, baseball games or Cub Scouts events. However, I can craft during most of those. 

I try to bring a tote with craft materials to all of Trevor's activities. Two weeks ago, I shared the button bracelets that my friends and I made during a baseball practice. Today, I'm sharing the paper plate sunflower that I made during a day-long playdate. The inspiration came from a project in Amanda Formaro's book Paper Fun Mania called Paper Plate Weaving. I made some changes to turn it into a beautiful, summery sunflower. This easy, portable craft was perfect for pulling out during Trevor's activities.   


Materials: paper plate, yellow paint, scissors, tape, brown yarn, dowel, green yarn

The first step was painting the paper plate yellow. If I'd had a yellow plate, I would have used that, but I didn't. I did that the evening before so it would be dry to go into my craft tote.

Our first adventure of the day took us to the library for a scavenger hunt. Once Trevor and his friends Ronan, Evan and Lauren checked in with the librarian, they did not need supervision, so I sat down with Evan and Lauren's mom, Dawn. While we chatted, I cut 19 deep slits (about 2.5") into the plate all around the perimeter. No measuring. Eyeballing it is totally fine, as long as they're somewhat evenly spaced and there are an odd number of slits. I poked a hole in the center of the plate with the scissors. Then I snipped out the material between the slits to make the long petals of the sunflower.    


After the kids finished their scavenger hunt and got their prizes, we walked to a sandwich shop and then took our lunches to a park. After we finished eating, I thought about pulling out my crafting since the kids were happily playing, but it was way too windy to keep the plate steady enough for weaving. 

Fortunately, our next activity was out of the wind at the trampoline place for a 1.5 hour play session. While the kids bounced and played, I began the weaving portion of my craft. I taped one end of the brown yarn to the back of the plate, then brought it directly across and put it through the opposite slit. I repeated this, moving over one slit each time, until every slit was filled. I put the end of the yarn through the hole and taped it on the back. I tied a new piece of yarn near the center of the plate, then started weaving in a clockwise direction.


I was almost done when the kids' play session was up. Once home, I finished the last bit of weaving, wound green yarn around a dowel, and then attached that to the sunflower. It was the perfect craft to do while chatting and watching Trevor and his friends. It required almost no concentration, was easy to put down and pick back up as needed, and I didn't need to keep a close eye on what I was doing. Thanks to Amanda for another awesome craft idea!

9/1/20

Paper Plate Apple Basket

Apple season is almost here! Plan the ultimate fun family day this fall with a visit to a farmers market or you-pick orchard, some apple-themed books, an apple taste test, and this cute craft. Affiliate links below. 


Paper Plate Apple Basket


Materials:


Steps:


Cut one paper plate roughly in half. Keep the smaller piece and set the larger one aside. Use the smaller piece to trace a line on the second paper plate. Cut along that line, then up and around the inside of the corrugated section of the plate to make the basket. 

Use the scraps to cut out apples, leaves, and stems. You're aiming for around 6 each. The apples won't be fully round if you use just the scraps from the two paper plates. It's not what I did, but I recommend using construction paper for the apples. It is much easier. You can still cut the leaves and stems from the paper plate scraps. 

Paint the two basket pieces and the stems brown. Paint the leaves green. Paint the apples a mix of red and green. 


When the paint is dry, put a line of glue along the edge of the basket front. Position it in front of the main part of the basket and use binder clips to hold it in place while it dries. 

Glue the stems and leaves to the apples. 


Glue three apples to each other and use binder clips to hold them in place while they dry. (You don't need the clips if you use construction paper instead of the paper plate scraps. 


Glue one row of apples to the back portion of the basket and one row to the front. This gives it a dimensional look. When the glue is dry, you can carry your basket or hang it up!


9/25/23

Paper Plate Apples with Peekaboo Seeds

 Tis the season for apple crafts! 


Paper plate make great apples and they're even more fun when they're hiding a surprise inside! Those are real apple seeds, arranged just the way they were in the apple they came from. Affiliate links below. 


Paper Plate Apples with Peekaboo Seeds


Materials:


Steps:

Carefully cut an apple in half horizontally and observe the star pattern that the seeds make. Remove the seeds. Rinse them and set them aside to dry. 

Choose the color(s) for the apple(s) you're making. I made a solid red, a solid green, and a solid yellow, but you can mix colors to mimic different varietals. You can see examples of that with this apple craft, which uses the same tissue paper technique. 

Tear the tissue paper into strips. Use a paintbrush to moisten the back of a paper plate (the non-eating side) with a little bit of undiluted Sta-Flo, then place a piece of tissue paper on it. Paint over the top with more starch. Repeat until the back of the plate is covered. Set it aside to dry. Glue the apple seeds to the front (eating side) of a second paper plate. 

When everything is dry, carefully trim off any excess tissue paper from the apple and then cut it in half. Arrange those pieces on top of the plate with the seeds. Use a craft pick (adults only!) to poke a hole through the bottom of each side of the apple, then use a brad to attach each piece.  


Cut apple stems from brown cardstock and glue them to the back of the apple. Fold a piece of green cardstock in half, then cut an arched shape (rainbow, hilltop, etc) along the fold. Open it up and glue the leaf to the back of the apple. 

Pair this craft with fun and educational children's books about apples!

10/4/13

Paper Plate Pumpkin

Trevor and I participated in a run last weekend called SoFitCity. It's a friendly competition between all the cities in our county to see which city can get the most participants out running and having fun. It's sponsored by the local hospitals and benefits our county library, so it was a win all-around.


Because Trevor had been very sick just a few days before the run (and because crafting and blogging do not keep me in the best shape), we did the Family Fun Mile rather than the 5K Trevor originally wanted to do. It was a good decision. Both of us were able to finish strong and feel good about it. Here's Trevor crossing the finish line.    


After the run, we headed over to the Kids Zone to check out their many games, crafts and other activities. We did a few crafts together, then Trevor headed into a bounce house while I moved on to a nearby craft table. He bounced and I made this:  

 
It's a paper plate, colored with an orange crayon.  I cut out the face and stapled a toilet paper tube to the top. Simple + fast + inexpensive + non-messy = perfect for an event with hundreds of kids.  

When I brought it home, I started thinking about how I would have done it differently if it were a project for just one child (vs. 400+), near a sink (vs. in a mall parking lot), with plenty of drying time (vs. no location to set projects to dry). Here's what I came up with: 


Materials: paper plate, black construction paper, toilet paper roll, orange paint, green paint, scissors, tape, stapler. 

Begin by cutting out a face from the paper plate. Use the scraps to cut white fangs and set them aside. Paint the paper plate orange and the toilet paper roll green. When they are dry, tape the fangs to the back side of the paper plate, then tape construction paper over that. Staple the toilet paper roll to the top of the pumpkin.  
Another fun Halloween project!

1/18/21

Paper Plate King Cake

I've never celebrated Mardi Gras. Growing up Lutheran, I knew that Lent followed the time after Epiphany and preceded Holy Week on the liturgical calendar, but Lent was just a season for us. My family didn't not abstain from sugar or soda or meat or TV or whatever like my Catholic friends did. Because we didn't abstain from anything, there wasn't a reason to have a big party and feast before the depravation began. Hence, I always thought of Mardi Gras as a Catholic party, one to which I might have been welcome but wasn't really invited. 

We spent Christmas 2019 in New Orleans and my perspective on Mardi Gras completely changed. Visiting Mardi Gras World in particular opened my eyes to the joy and spectacle of the holiday. We tried king cake for the first time and watched the massive floats being built and I began to understand Mardi Gras as a cultural celebration rather than (or in addition to) a religious one. I made a king cake necklace soon after we got home and I look forward to February 16 when I'll wear it again. At home, of course. 

Wisely, New Orleans will not be celebrating Mardi Gras 2021 with parades or gatherings, to avoid the spread of COVID-19. Instead, people are encouraged to celebrate at home. I'm going to be sharing a few ideas for a family-friendly Mardi Gras celebration at home. First, a paper plate king cake craft. Affiliate links below. 


Paper Plate King Cake


Materials:


Steps:

Paint the outside edge of the paper plate Camel. The paint should extend about an inch from the edge. 

Mix equal parts Titanium White, water, and flour in a small container. Stir until completely mixed and is the consistency of frosting. If it is too thick to spread, add a few drops of water at a time until it is spreadable. If it is too thin, add a spoon of flour at a time until it resembles frosting. Use the plastic knife to spread the mixture onto the plate, leaving the painted edge exposed.   


Sprinkle glitter onto the wet flour mixture, alternating between gold/yellow, green, and purple. Aim for nine sections (three of each color). 


Let the paint dry completely (overnight is best) then shake off an excess glitter. For extra fun, tape a plastic baby to the underside of your paper plate king cake. (If you find it later, you get to do an extra craft!)

9/10/20

Paper Plate Cauldron

Halloween crafts are some of my absolute favorites! I particularly like ones where each crafter's personality can shine through, like today's Paper Plate Cauldron. I had great fun deciding what to put in my cauldron and eventually I settled on an eyeball, frog leg, finger, and bone. Technically, the spider is on the cauldron and not part of the recipe. Affiliate links below.    


Paper Plate Cauldron


Steps:


Cut a slim arc off a paper plate, then trim two pieces off the arc to make the cauldron feet. Paint the cauldron and the feet black. Glue the feet to the cauldron.

Layer a piece of lime green cardstock on top of a piece of black cardstock. Line them up with the cut edge of the cauldron. Using the arc of the paper plate as a guideline, cut the two papers. Turn the papers the other way so that the arc curves upward instead of down. Then slide the black paper up about 1/2" above the lime green paper. Glue the two papers behind the cauldron. 

Now it's time to fill your cauldron! Anything goes. To make the eyeball, cut a circle of white cardstock, then draw in a black pupil, colorful iris, and wiggly red lines. I cut the frog leg from kelly green cardstock, then bent the end and draped it over the rim. I used my own finger as a guide for cutting the finger and fingernail, then drawing in the lines of the knuckles. After cutting the bone shape, I snipped the end on a sharp angle so that it would look like it was popping up from the liquid. Finally, I cut the spider and glued it on the edge of the cauldron. 

---------

I made today's project as a part of Creative Crafts Halloween Edition, hosted by some of my favorite craft bloggers. Take some time to check out all the creative ideas! Leave comments along the way. Rumor has it, there's a prize for a lucky someone!

9/17/18

Paper Plate American Green Tree Frog

About half of the United States (23 to be exact) have named an official state amphibian. Both Georgia and Louisiana have honored the American Green Tree Frog, which was the inspiration for today's craft. This post contains affiliate links.


---------

Paper Plate American Green Tree Frog


Materials:


Steps:


Cut the paper plate so that the back half forms a gentle point, as shown below. Paint it green. Bend one pipe cleaner into a pi shape for the front legs. Bend two pipe cleaners into N shapes for the back legs.


Draw a three-toed back foot and a four-toed front food on green construction paper. Cut them out with the microtip scissors, then trace them and cut out a second back foot and second front foot. 


Cut two yellow circles for the frog's eyes and two green arcs for the eyelids. Glue them together. Use the Sharpie to add the pupils. Cut two small green rectangles, fold each in half, then glue one end to the back of each eye. You'll use these to attach the eyes to the plate.

Cut a thin strip of red construction paper and roll it around a pencil or other narrow cylinder to make the frog's tongue. 


Glue the eyes to the top of the plate and the tongue underneath the plate. 


Turn the plate upside down and use hot glue to attach the pipe cleaner legs as shown. 


Turn the frog back over the correct direction and glue the feet in place. Now adjust the legs until your tree frog is balanced.


It would be easy to adapt to make other species of frogs. I may just give that a try!