
Time to share another money gift! My nephew, Timothy, turned 21(!) on Friday. I've been giving him a money gift for all gift-giving occasions since 2013 and coming up with something new each time definitely makes me stretch creatively. This time, I made him a set of baseball cards. Sort of.
I've done a play on using the faces on money before, when I made Timothy this version of Air Force One. Now I'm imagining the 'Washington Presidents' as a major league baseball team. I used PicMonkey to design four rookie cards for the people on the $1, $5, $10, and $20 bills. (I included a $2 bill on Air Force One, but couldn't find one this year. So, $36 for Timothy this time instead of $38.)
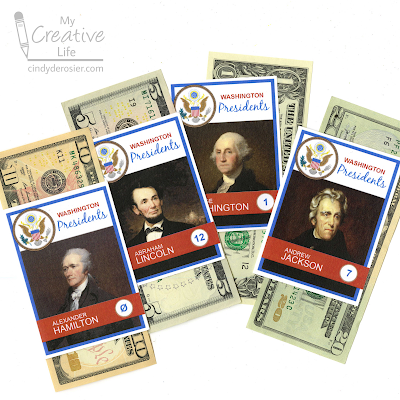
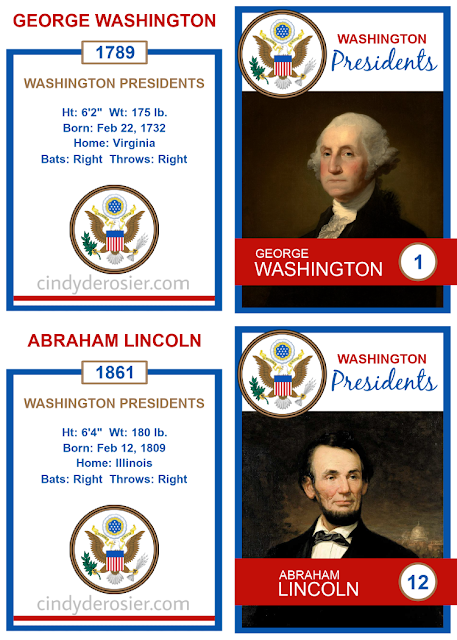
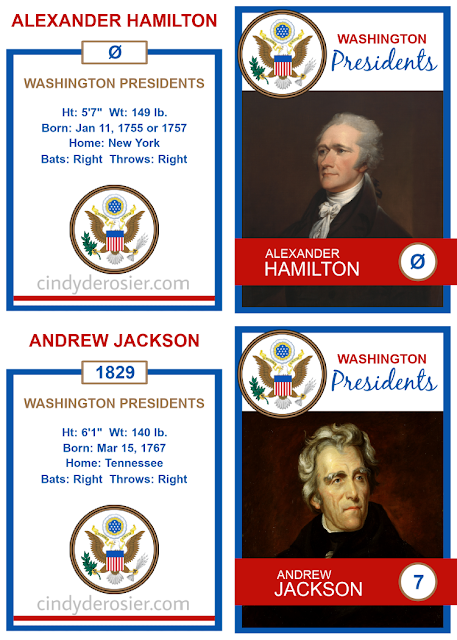
I started by opening up a 2.5" x 3.5" blank canvas. One by one, I added the features of a baseball card: the team name (Washington Presidents) at the top with their logo (the Great Seal) next to it, and a banner across the bottom for the player's name and number. I saved that template, then edited it to add each player's name, picture, and number.
Then I created a template for the back of the cards. I put the player name at the top, then their rookie year, the team name, the player's stats, and the Great Seal. It was surprisingly easy to find each person's height, weight, and birthdate, but it was a lot harder to find their home. Is home the place where they were born, where they grew up, or where they lived when they were signed to the team (er, elected)? I decided home was wherever they were right before their rookie year. Even that proved a bit tricky, so I just listed a state and not a city.
As for their batting and throwing preference... they're all right-handed. Maybe. Prior to the 1900's, being left-handed was considered a disability which was corrected in childhood. Some of these men may naturally have been left-handed, but they certainly would have batted and thrown right in adulthood.
With the fronts and backs completed, the next step was moving them to an 8.5" x 11" blank canvas. I paired the backs and the fronts together and printed them.
I printed on my new Bristol vellum. It worked perfectly, which is fortunate since I have a ream to use up. That's a lot of coloring pages, so I'm glad I can use it for other things.
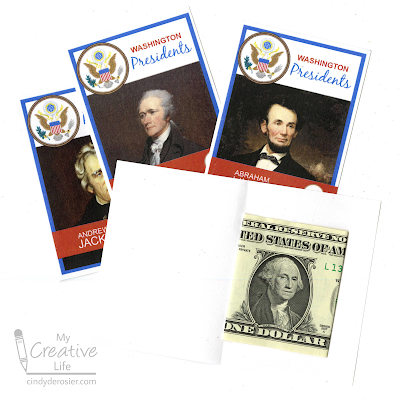
I'm fine with Timothy destroying my creations to get at the money he knows is inside, but if you want your recipient to be able to keep the baseball cards intact, use a repositionable tape runner (affiliate link) instead of glue.
Happy birthday, Timothy! I wish I could have been there to celebrate with you.

These are super fun!
ReplyDeleteLOVE the annual effort you put in to make Tim's birthday special. Great job!
ReplyDelete