Showing posts with label character. Show all posts

3/31/26

Cat in the Hat Easter Egg

You may be wondering why I made a Cat in the Hat Easter egg when I said that this year's eggs are all inspired by state symbols. While the Cat himself is not a state symbol, Dr. Seuss is the official State Children's Author and Illustrator of Massachusetts. We had a fantastic time at the Amazing World of Dr. Seuss Museum in Springfield, Massachusetts a few years ago. If you've never been, make plans to go! In the meantime, try this easy Easter egg idea. Affiliate links below. 


Cat in the Hat Easter Egg


Materials:


Steps: 

Start by making the hat. Slice a 2.5" ring off a cardboard tube. Cut up the side so that you can adjust the circumference of the tube (you'll need to make it smaller to fit the egg). Cut a piece of red cardstock that is slightly taller than the cardboard tube ring and wide enough to wrap around it. Cut two strips of white cardstock and glue them to the red to make the iconic stripes. Glue the cardstock to the cardboard tube, then adjust the tube to the appropriate circumference to fit your egg (about 1"). Clip the ends in place to allow the glue to dry without having to hold it. 


When the glue is dry, cut a circle of white cardstock for the brim of the hat. Snip the inside of the brim and fold up the flaps of cardstock. This gives you a surface to glue to the inside of the hat. 

Use a Sharpie to draw the cat's eyes, eyebrows, nose, whiskers, and smile. Then add light, whispy marks to the area beyond the face. 


Finally, place the hat on top of the egg. 


I can imagine making a whole collection of Seuss-inspired Easter eggs. There are so many fun characters in his books.

8/23/21

Puzzle Piece Minions

From aliens to monarchs, puzzle pieces can be just about anything with a little paint and the proper accessories. They make adorable minions. Affiliate links below. 


Puzzle Piece Minions


Materials:


Steps:


Put a coat of white gesso onto the puzzle pieces. When it is dry, sketch the design you want for each minion, then paint the skin yellow and the overalls blue. 

When the paint is completely dry, use a black Sharpie to color their gloves and add buttons and pockets to the overalls. 


Draw a horizontal band across each face, then glue googly eyes in place (one or two per minion). Draw mouths beneath the eyes. 

Finally, snip short lengths of embroidery floss and glue them behind the heads. Vary the length of the hair from minion to minion, and separate the strands of floss on some and leave them together on others. 


Which minions are your favorites? I'm partial to the two on the top. 

8/20/19

Harry Potter Travel Game Holder

In addition to their annual framed layouts, I made Harry Potter themed travel game holders for my goddaughters' birthdays. Paper House Productions sent me some adorable Harry Potter goodies (affiliate link here and throughout the post) and I couldn't wait to dive in and try them! I made a Hufflepuff tin for Ellia and a Griffindor for Kylinn. 


Inside each: a Magic deck, curated specifically for each girl by Trevor; Tant Fant, and the materials for a Native American stick game. There's plenty of room if they want to add dice, cards, or other game pieces. 


---------


Harry Potter Travel Game Holder


Materials:


Steps:


Cut a strip of black cardstock the length of the lid. Apply red line tape and secure it in place. Punch a black circle and apply the desired house sticker to it. Use the dies to cut a label from gold cardstock. Attach the black circle to the center. Add narrow washi tape to the center of the black cardstock, then edge it with wider washi. Attach the label in the center. 


Obviously, you can change up the decorations any way you'd like. For Ellia's Hufflepuff tin, I put the narrow washi on both edges of the black cardstock, then added the wider washi below. I used a different label die and adhered it horizontally instead of vertically.  


Fill the tin with games (or collectibles, money, or anything else) and your gift is ready to give!

6/10/19

Peanuts Birthday Party

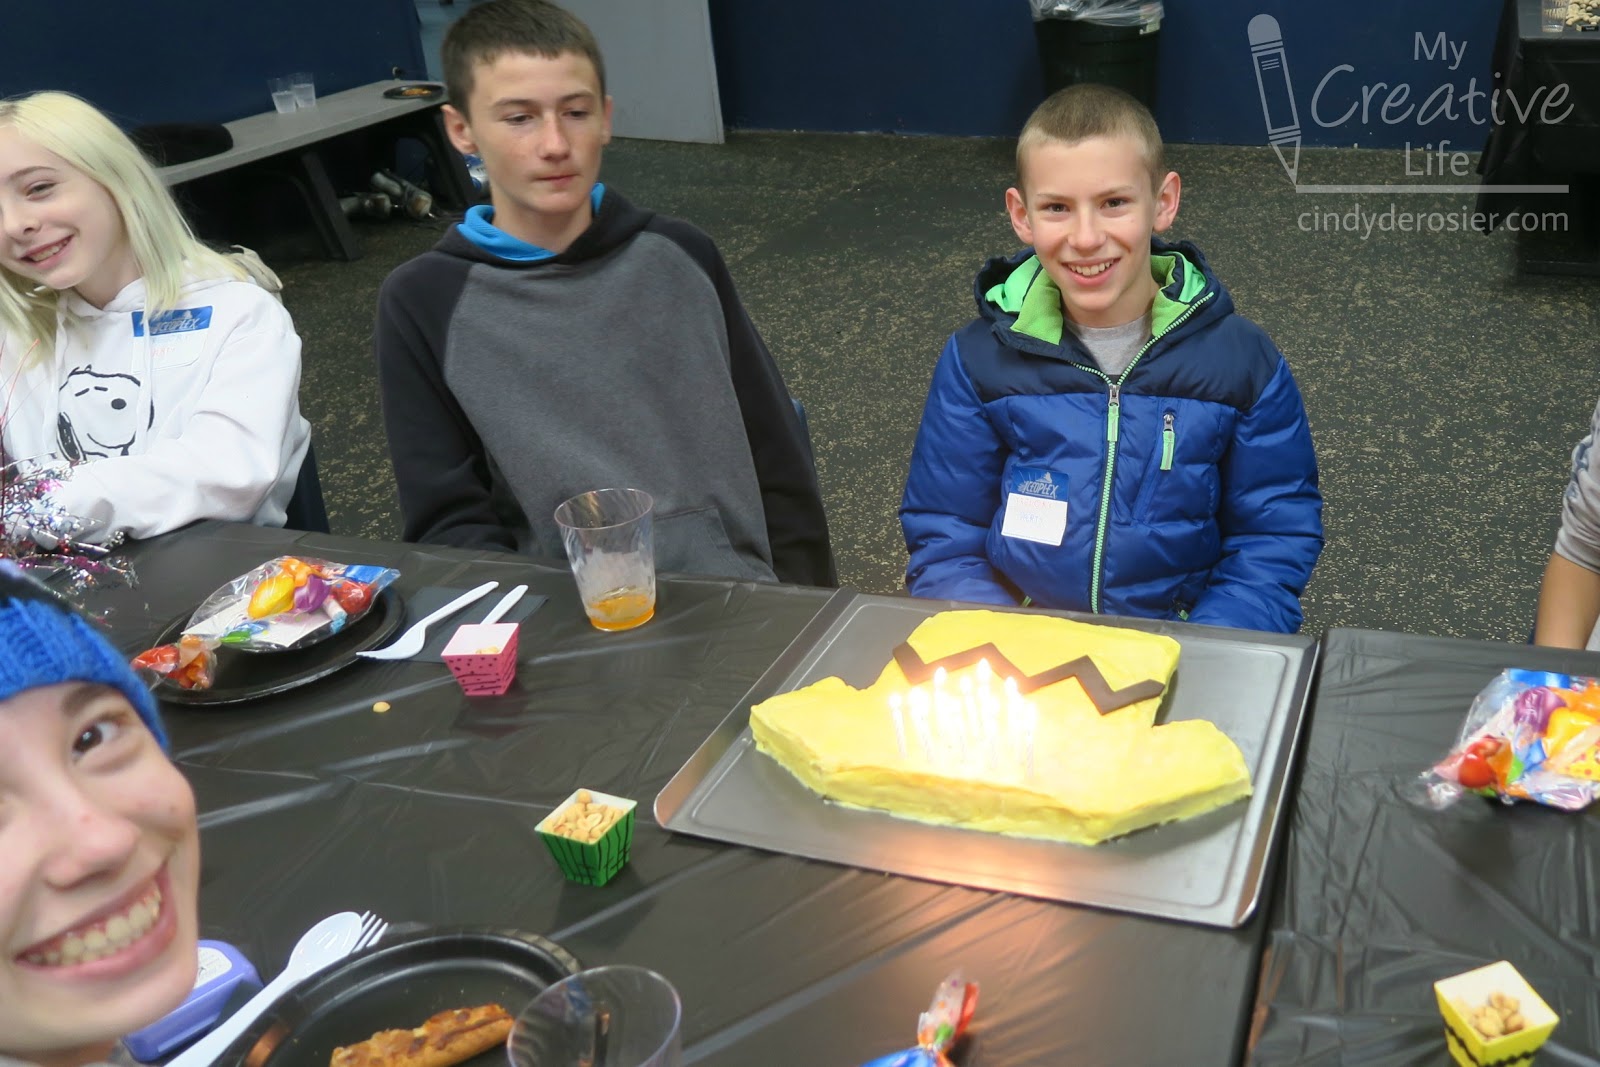
We celebrated Trevor's 13th birthday last Friday with a Peanuts-themed party at the ice rink. It was awesome. 


This is one of the easiest and most fun party themes I've done. The first step was making the invitation. I designed it using PicMonkey. Affiliate links below. 


With the invitations out, I turned my attention to party favors and decor. I started with plain treat cups, then painted each with Folk Art Multi-Surface Paint. I did two coats to get good coverage. When the paint was dry, I used a Sharpie to draw on the details. Can you name each of the characters?   


The top row is Linus, Charlie Brown, and Lucy. The bottom row is Snoopy, Sally, and Peppermint Patty. I filled them with peanuts for the party. They were a hit. 


I'd planned to make Peanuts-themed candy bar wrappers, but I discovered these amazing chocolates from the Vermont Country Store for way cheaper than I could have made them. I bought all that they had (sorry), but hopefully they'll restock them. 

Next, I made a banner featuring the same six characters. I cut triangles from colored cardstock, decorated them with a Sharpie, then used Glue Lines to attach them to yarn. (It's a bunch of chain stitches. I've been practicing since my crochet lesson.)


Here's the completed banner hanging above the cake. 


The cake was really easy to make. Whenever I make a cake that is a different shape than my pan, I cut a piece of paper to the size of the pan, then experiment with how to cut it to get the shape I want. I baked my cake in a 9"x13" pan. To make it into a shirt, I cut a strip off the bottom, then cut that on the diagonal to make two sleeves.  


The sleeves were a little too long, so when I cut the actual cake, I had a piece left over. Good thing, since it allowed me to do some cake quality control. (It passed.) I thought I had cake boards on hand that would fit my cake, but I didn't. So I had to build the cake on a baking sheet.


I used Wilton's gel food colors to get the frosting to just the right shade of yellow. I rolled out Satin Ice Modeling Chocolate between two pieces of parchment and used a sharp knife to cut the zig zag design.   


Far from perfect, but definitely recognizable!


The birthday boy was very happy with how it turned out. Check out the glow of 13 candles! 


Everyone had a really good time, which is all that matters.


 Happy 13th birthday, Trevor!

10/23/18

Cardboard Tube Tin Man

Cardboard Tube Dorothy and Cardboard Tube Scarecrow have a new friend.


While he has a great personality (all heart, that guy), he is not very photogenic. I mean, he has a nice smile and all, but he tends to reflect everything around him, making it hard to see the real him. 


---------


Cardboard Tube Tin Man 


Materials:


Steps:


Cut a piece of Oly*Fun that is slightly taller and slightly wider than the cardboard tube. Line it up flush with one opening of the cardboard tube and use tape to hold it in place temporarily so it doesn't shift. Wrap the Oly*Fun around the tube, securing it with hot glue. The edges will overlap. Set the Tin Man's body with the flush end down on the table. There will be excess fabric on the end that will be his head. Fold the excess fabric over the top and down into the cardboard tube. Remove the tape.

Cut a 2" high strip of Oly*Fun and curl it into a tight tube with the shiny side out. Glue it closed. Tape the tube to the dull side of a larger rectangle of Oly*Fun (about 2" x 8"), as shown below.


Curl the rectangle to form an open cone shape, as shown below. Put a piece of tape to hold it in place. Now make adjustments. You might need to curl it more tightly or loosely. You might need to raise or lower the tight tube. When everything looks good, secure it in place with hot glue. You can remove the tape or leave it. 


Trim the edges of the cone, then use hot glue to secure it on top of the Tin Man's head. 


Use craft glue to add googly eyes. Draw on a nose and a mouth. Finally, glue rhinestones down the front of the Tin Man to mimic the rivets.  


I chose to glue them rhinestone-side down because the flat side looked more like rivets to me. Not that you can tell in the photo, because they're all reflecting something. 


This trio of friends will be meeting someone new fairly soon. I am confident he will be less reflective, if nothing else. Right now he is just a piece of faux fur with a major shedding problem. Stay tuned!

9/13/18

Cardboard Tube Scarecrow

When you see this cardboard tube scarecrow, do you think of fall...


....  or do you think of The Wizard of Oz? Because really, it could go either way. 


---------

Cardboard Tube Scarecrow


Materials: 

  • cardboard tube
  • scissors
  • construction paper (green, brown, black, red)
  • craft glue
  • burlap
  • scotch tape
  • light brown yarn
  • googly eyes
  • black Sharpie
  • dried hay bits (plenty of those here, thanks to Trouble!)


Steps: 


Wrap a piece of brown construction paper around the bottom third of the cardboard tube. Glue it in place. Wrap a piece of green construction paper around the middle third, slightly overlapping the brown. Glue it in place. Wrap a piece of burlap around the top third. Tape it in place temporarily. 

Cut two pieces of yarn. Tie one piece around the scarecrow's waist and another around his neck. 


Push the portion of burlap that sticks up past the edge of the cardboard tube down into the tube. Remove the tape from the burlap; it should stay in place. 

Create a hat by cutting a rectangle of black construction paper that is about 2" x 6". Fold one edge up, then wrap the construction paper around the scarecrow's head, forming a cone shape by overlapping one end of the construction paper over the other. Add tape to temporarily hold the cone shape. Remove the hat from the scarecrow, trim the excess construction paper, then add glue along the overlapped section. Keep the tape in place until the glue is dry, then remove it. Put a generous amount of glue on the inside of the hat and glue it to the scarecrow's head. 

Cut a small red triangle and two red squares. Glue the triangle where the nose would be. Glue the squares onto the scarecrow's pants. 


Cut a smile from the scraps from the hat and glue it in place. Add the googly eyes. Then use the Sharpie to draw the scarecrow's legs and the stitch marks on the patches. Finally, glue little tufts of hay (or straw) to the scarecrow. Raffia would work, too.


Yes, of course I have tutorials for Cardboard Tube Dorothy and Cardboard Tube Toto. More characters coming soon!


9/10/18

Paper Plate Cheshire Cat

To me, there is only one acceptable movie version of Alice in Wonderland, and that is the 1951 Disney cartoon. I'm sure there's merit to the versions that have come after it, but this will forever be the Cheshire Cat to me.


I remember seeing Disney's Alice in Wonderland as a kid, and I remember enjoying the Alice in Wonderland ride at Disneyland. I also read Lewis Carroll's books. (Side note: Did you know that Lewis Carroll is a pen name? I had no idea until just now when I was hunting for a link.) I think I saw the movie before reading the books, and I'm almost certain I rode the ride before either seeing the movie or reading the books, so it's no surprise that my mental images of the characters are the ones that Disney introduced in 1951. 

--------- 


Paper Plate Cheshire Cat


Materials:

  • paper plate
  • scissors
  • paint (light and dark pink, yellow, black)
  • black Sharpie
  • craft glue

Steps:


Cut the paper plate into this basic shape. 


Use the scraps to cut out six whiskers, two circles, and an oval. If your scraps aren't large enough for all of that, use cardstock or construction paper. Either is fine. Paint the ears and the area around the smile with light pink. Let it dry. 


Paint the two circles yellow. Then paint the oval, the main part of the face, and the outer portions of the ears dark pink. 


Trim the fluffs around the ears to look, well, fluffy. Paint pupils in the center of each eye, then glue them in place. Paint black eyebrows above the eyes, then add nostrils to the nose. Paint the whiskers black. 


Glue the whiskers behind the nose, then glue the nose in place. When the paint is dry, outline the mouth with a black sharpie, then add smile lines. 


It's hard not to smile looking at this guy. 


9/3/18

Cardboard Tube Wizard of Oz: Dorothy and Toto

When I was cleaning out my scraps last week, I came across a blue gingham paper that totally reminded me of Dorothy's dress in the Wizard of Oz. So naturally, I used the paper to make Cardboard Tube Dorothy Gale. (Isn't that what anyone would do? No?)


---------


Cardboard Tube Dorothy Gale


Materials:

  • cardboard tube
  • skin tone paint
  • brown yarn
  • scissors
  • white paper
  • gingham paper
  • coffee filter
  • red paper
  • red Stickles
  • brown paper
  • googly eyes
  • black Sharpie
  • craft glue


Steps:


Paint the cardboard tube with the skin tone paint. Set it aside to dry.

Cut about twenty 6" lengths of yarn. Gather them together, then use two more pieces of yarn to tie the bundle together, approximately 1" from each side. Cut off the excess from the yarn you used to tie knots. Cut two skinny strips of gingham paper and glue them around the yarn at the two locations where you tied it. 

Cut the coffee filter so that you have an arc. It will be the underskirt of Dorothy's dress.


Use the coffee filter to trace the shape of Dorothy's skirt. Extend the inner and outer arcs a bit so that there is enough paper to wrap around the back of the tube. Cut out the skirt. 

Cut a strip of white paper and glue it to the cardboard tube where the neck would be. Glue a strip of gingham paper 1/2" below that. Cut two skinny strips and glue them to the front of the dress to make the straps. 

Wrap the coffee filter around the bottom of the tube, gluing it at the top only. You want the bottom to billow out like a skirt. 


Wrap the skirt piece around the tube, leaving 1/4" of the coffee filter underskirt showing. 

Cut two cone-shaped pieces of red paper for Dorothy's slippers. Add a thin coat of Stickles to the pointed ends for sparkle. Set them aside to dry.


Put a line of glue around the top of the head, then place it upside down on a piece of brown paper. Let it dry, then trim the edges flush with the tube. (This is to give the hair a place to stick.)


Glue the googly eyes in place, then use the Sharpie to add a nose and a mouth. Add a generous amount of glue to the head and place the yarn on top. (In retrospect, it might look better if the hair was in two sections, giving her a part. Up to you.) I used a rubber band to hold the hair in place while the glue was drying. 

Fold the red papers so that they have a 90° bend. Position the slippers so that the sparkly toes are sticking out from her dress and the other ends are flush against the inside of the tube. Glue them in place.


That's all there is to it! "But what about Toto?" you may be asking. You can find that tutorial here. I didn't realize at the time that I was making Toto, but he's perfect to accompany Dorothy!


Should I make more Wizard of Oz characters? It might be a fun challenge...

5/7/13

Playing Angry Birds

Like many kids, Trevor loves Angry Birds and asks to play it all the time. Unlike most kids, he isn't talking about the video game... at least, not since we made our own homemade Angry Birds game.


---------


Cardboard Tube Angry Birds Game


Materials: 

7 toilet paper tubes
scissors
paint
q-tip
Sharpie
fuzzy elastic hair bands  


Steps: 

We began by cutting one of the toilet paper rolls into three equal parts. We painted them green, inside and out. When they were dry, we added noses.


We used a q-tip to make white paint circles on either side of the nose.


When the paint dried, we added pupils, eyebrows and a mouth.


Next, we painted the remaining tubes brown, inside and out. When they were dry, we used a brown sharpie to draw wood grain onto them. Then we carefully flattened them first one direction, then the other, so that the tubes had four flat sides and could easily stack.  

To play, we set up a challenge for each other by arranging the pigs and logs on a chair. We try to make each "level" more difficult. The shooter sits about 3 feet away and uses soft, fuzzy hairbands (which don't hurt if you hit someone or if they snap back on you) to send the pigs crashing.  


Trevor absolutely LOVES this game and has spent hours playing it. He's planning to play it during his Angry Birds birthday party. I love that he is so entertained by a bunch of empty toilet paper tubes. Totally awesome.