Showing posts with label craft foam. Show all posts

4/17/25

Rocket Ship Easter Egg

Part of my goal while decorating all these Easter eggs was to use different materials besides traditional dye. Today's Rocket Ship Easter Egg uses paint, pens, and craft foam. Affiliate links below. 


Rocket Ship Easter Egg


Materials:


Steps: 

Paint the pointy end of the egg red. Add a black porthole on one of the sides. 

While the paint is drying, cut out three fins from red craft foam. Cut out yellow and orange craft foam flames. 

Use a silver Sharpie to trace along the outside edge of the porthole and around the edge of the nose cone. Add a blue accent stripe, if desired. 

Glue the three fins to the bottom of the egg. Hold them in place while they dry. If you position them correctly, the egg will stand on its own. 

Add the flames under the rocket. 

7/26/23

The Mystery of the "Maple Syrup on Pancakes" Preschool Craft

Not long ago, I became aware of an unsolved mystery in the world of preschool crafts. It involves a pancake craft. This project looks great for preschoolers. Glue some brown circles to a paper plate, add a small square of yellow for the butter, and drizzle on the faux maple syrup. Cute, easy, and fun!


The mystery is what was used to make the maple syrup. There are no instructions of how to make it or what materials to use. Since I've had maple on my mind ever since our visit to the maple museum and maple farm in Vermont, I put on my detective hat, grabbed my magnifying glass, and took a closer look at the original image to see what clues I could find. (Affiliate links here and throughout the post.)

I decided that the pancakes and butter were made from craft foam. The paper plate was, obviously, a paper plate. But then there's the syrup. Surely it's not real maple syrup? Not only would that be a waste of food, it wouldn't dry and would be covered in ants within the hour. That can't be what it is. 

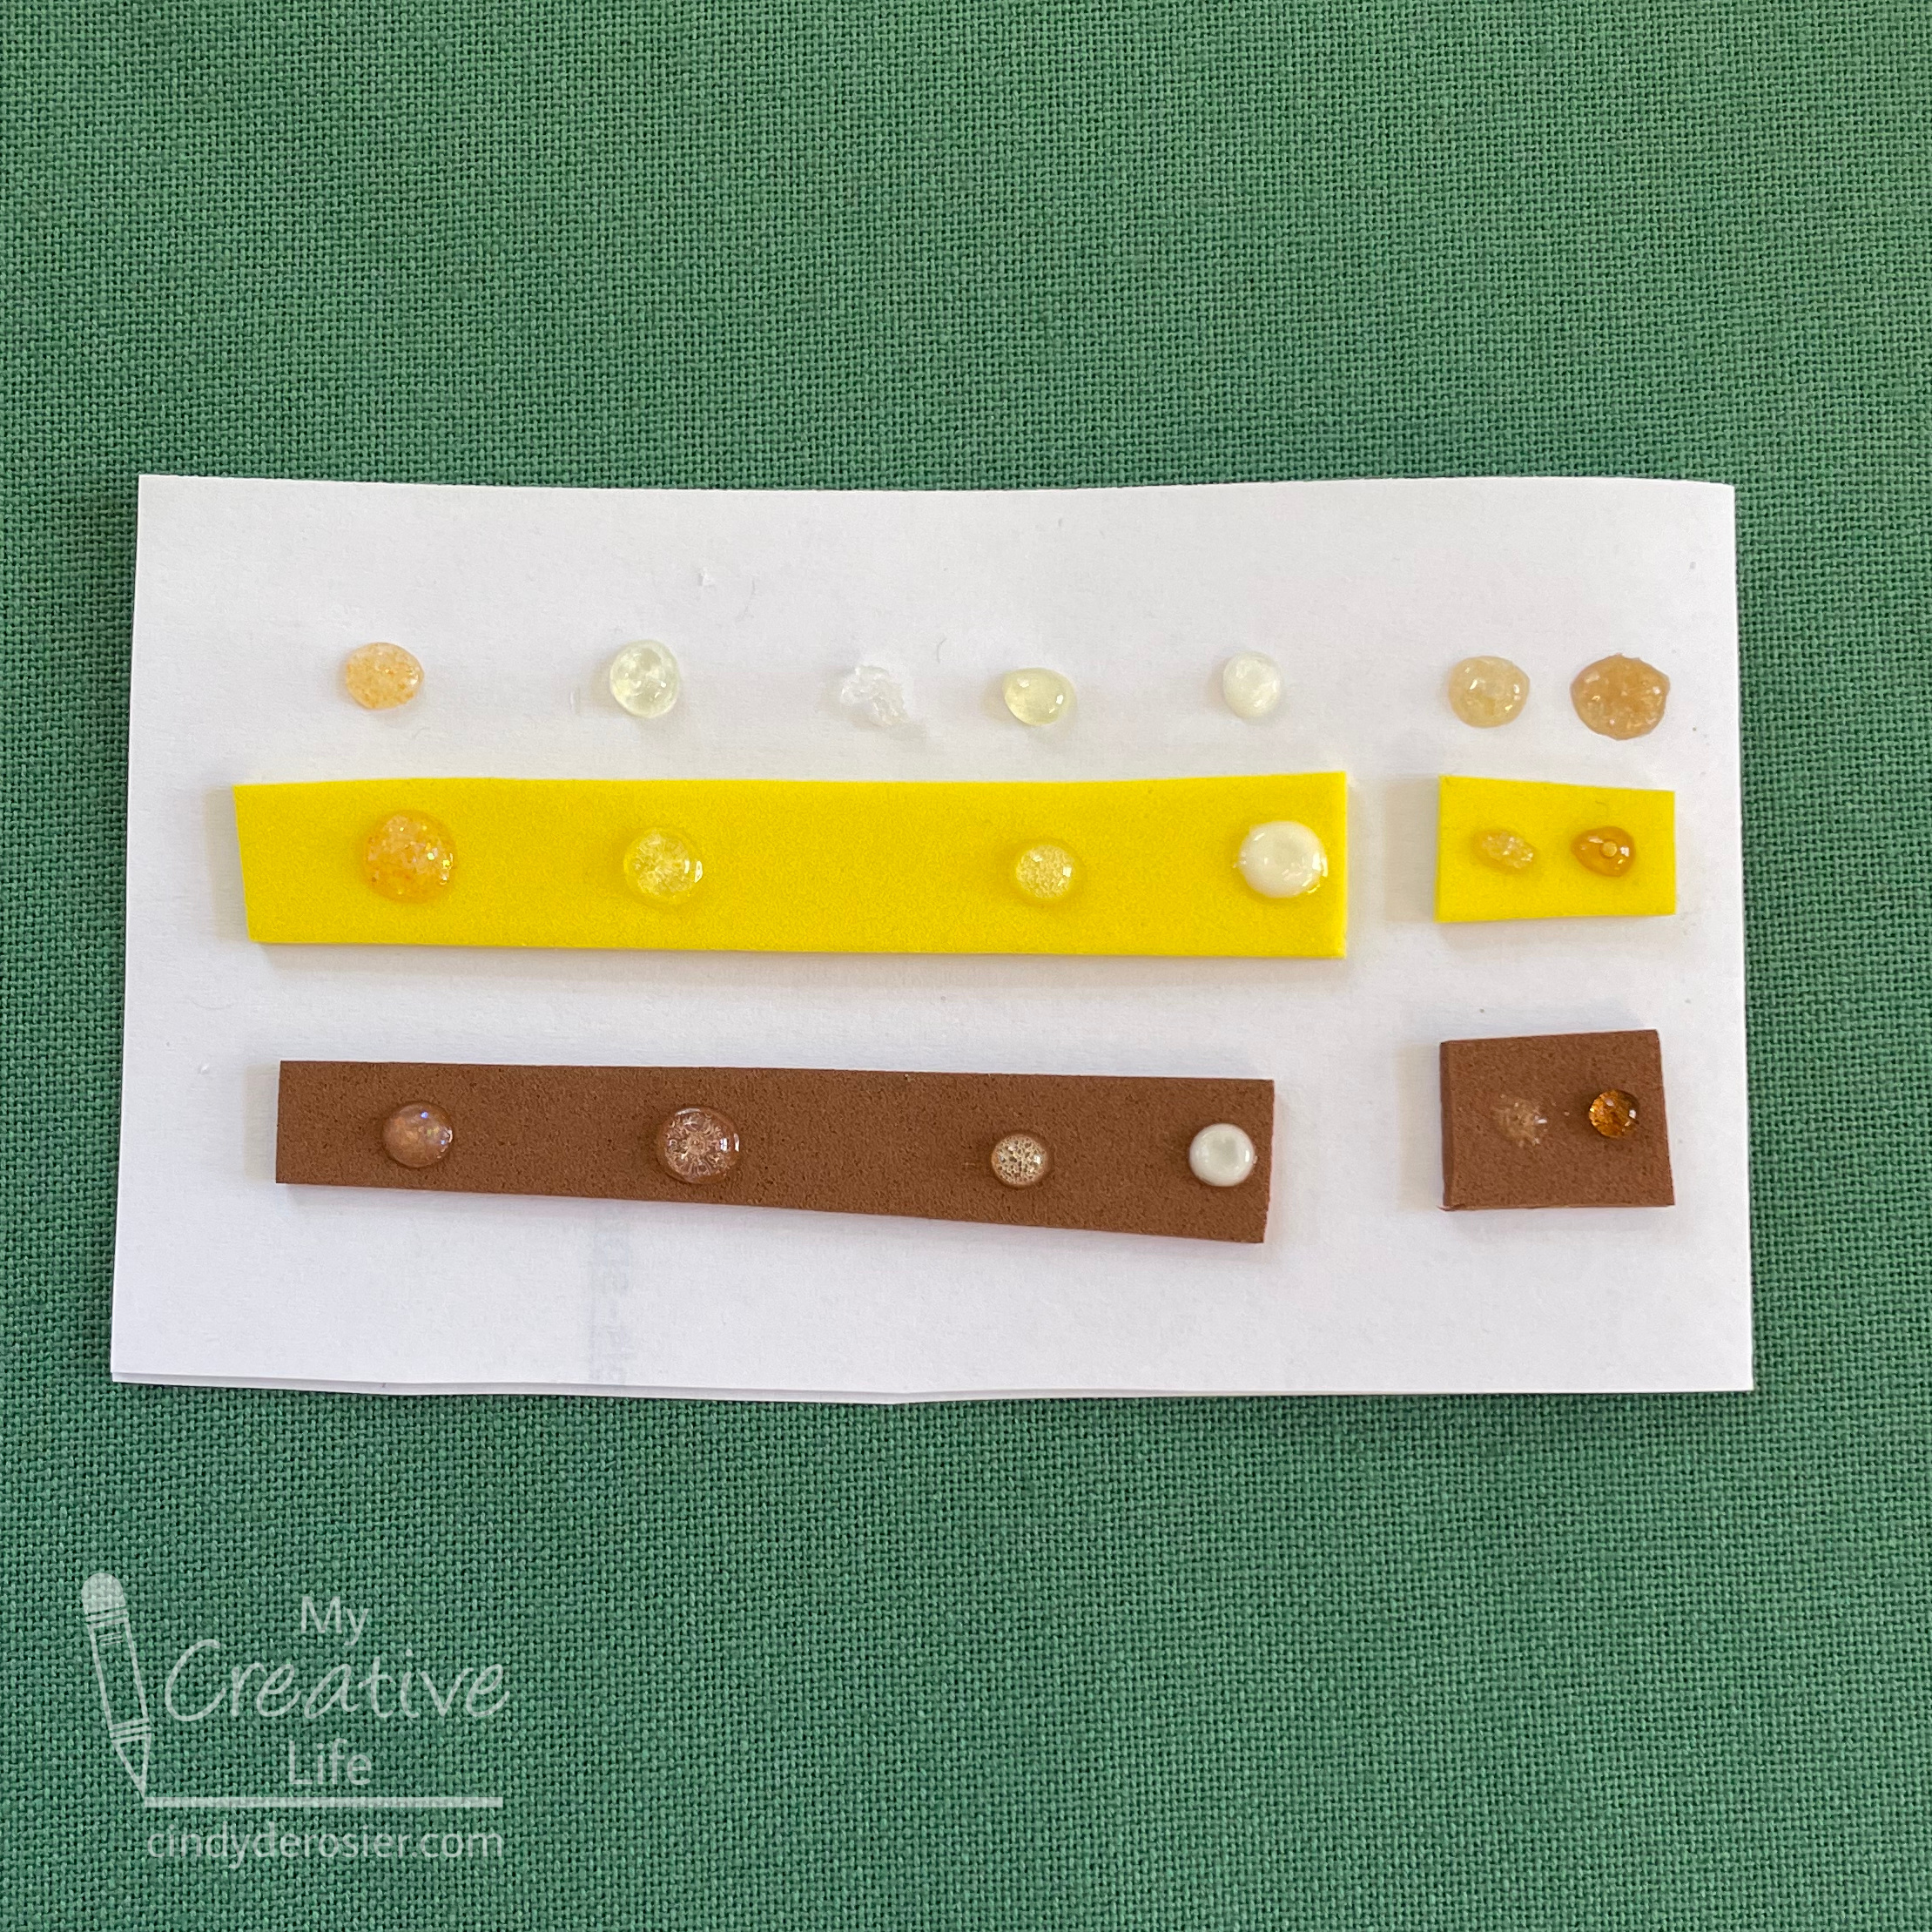
It was time for an experiment, so I removed my detective hat and put on my lab coat. I hoped one of the dimensional adhesives I had on hand might be the maple syrup substitute.


However, after putting a dot of each onto white paper, yellow craft foam, and brown craft foam, I learned that none of them were the answer to the mystery. Just to be certain, I used a pipette to add drops of real maple syrup (two different grades) onto more paper and foam for comparison. None of the adhesives matched the amber color of the syrups. The closest is the Mod Podge.
 

I had one more idea: Gorilla Glue. I ran my test and it was successful! Gorilla Glue looked just like what was used in the photo and was a perfect match for the darker of the two real maple syrups! I drizzled a generous amount onto the faux pancakes I'd prepared and snapped a quick photo. 


It was so satisfying to have solved the mystery. 

But wait! There's a twist... and you won't like it. Because THIS is what the craft looks like after the Gorilla Glue dries. 


As you can see, the Gorilla Glue puffed up significantly and lightened in color. What a disappointment. 

The mystery remains. Did the original crafter use Gorilla Glue and only shared a photo when it was wet? Or was a different product used? Perhaps we'll never know. 

If you make this craft, use Mod Podge Dimensional Magic. It won't look quite as good as the Gorilla Glue while it's wet, but it will look much better after it's dried. If you have another adhesive idea and want me to check it out, let me know in the comments. 

2/13/23

Conversation Heart Valentine Holders

I miss the elementary school version of Valentine's Day. I loved it as a kid, I loved it as a teacher, and I loved it as a parent. I loved making and receiving cards, eating lots of candy (especially conversation hearts!), and doing all sorts of valentine-themed crafting. 

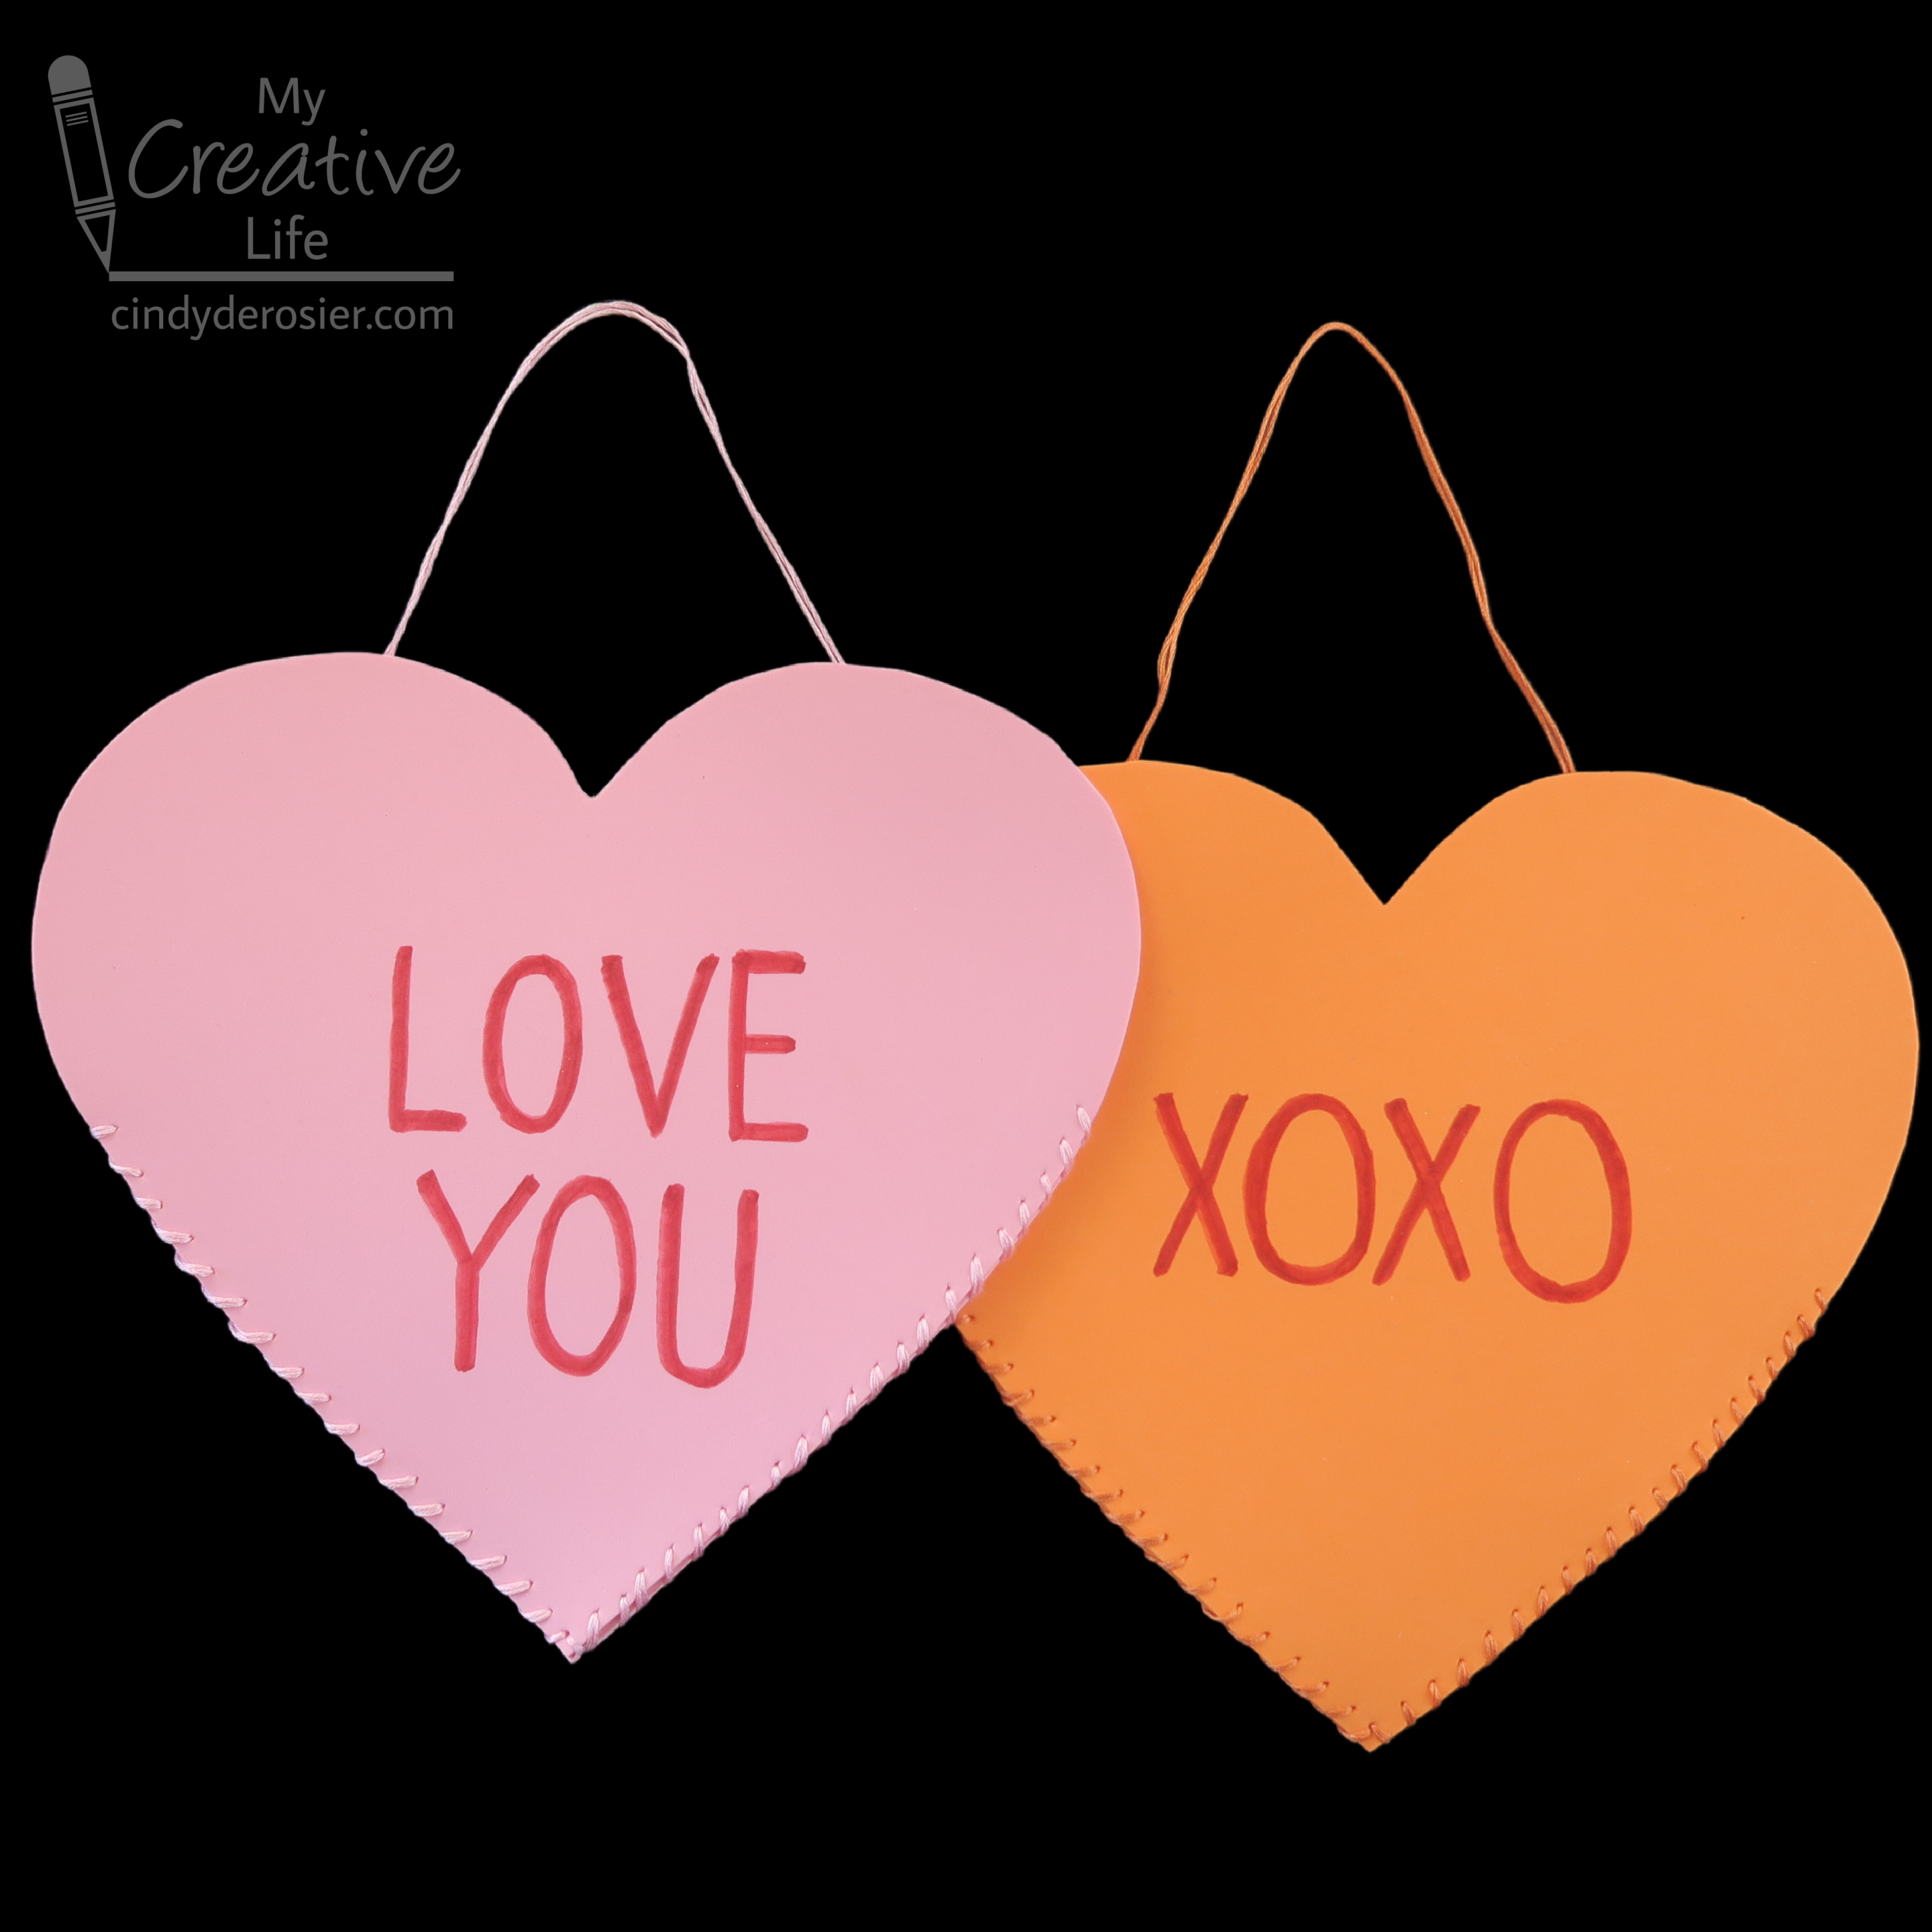
As a bit of a throwback, I made these valentine holders for my two loves, Steve and Trevor. This was the first time I've ever sewn craft foam, something I will definitely be doing again. It's a great way to introduce young crafters to hand sewing. Affiliate links below. 


Conversation Heart Valentine Holders


Materials: 


Steps: 


Create a heart template using scratch paper. It should be big enough to hold cards and whatever else you'll be putting inside. Trace the template onto a sheet of craft foam, then cut out the heart. Repeat this step so that you have two hearts. 

Using conversation hearts as inspiration, think of a message for your valentine holder. You can write the message directly onto the heart with a red pen, or try this trick to make sure you get the spacing even. Write the message on a piece of binder paper, then center the paper onto the heart. Trace over the message with a pencil, pressing firmly. This will make grooves in the craft foam, which you can then trace with the red pen. 


Cut a long strand of embroidery floss. The amount you need depends on the size of your heart, how close you want your stitches to be, and how long you want the hanger to be. I used about 6 feet of floss. I sewed with it doubled up (two 6-strand pieces) but that is optional.  

Tie a knot at the end of the floss. Line up the two pieces of foam and start sewing approximately where your message starts. Don't stitch too high or you won't be able to put stuff into your valentine holder! Conversely, if you stitch too low, your stuff will fall out. Aim for the middle. 

Hide the knot inside the holder, then use a whipstitch to sew down one side toward the point. I went down the left and up the right, but you can do the opposite if you want. 


When you get to the point, do another whipstitch and re-enter the previous hole. Then continue up the other side. 


If you've never sewn craft foam before, let me tell you - it is a dream. Every beginner should learn stitches on craft foam. It's sturdy enough that you don't need to hold it taut like fabric and the needle glides through it with little pressure. 

You're finished sewing when you reach the point opposite where you started. Don't cut the floss yet! To make the hanger, stretch out the amount of floss you want. Put the needle into the very first place you started, but do not pull the floss tight. Bury a knot inside the hanger, then cut off any extra floss. 


Your valentine hanger is ready to fill with cards, candy, stickers, small toys, and other goodies!


Those Peanuts valentines peeking out are leftover from my teaching days (16+ years ago). I went poking on Amazon to see if they still make them, which led me down a path of all sorts of Peanuts-themed valentine stuff. Enjoy!

9/30/22

Scarecrow Mason Jar

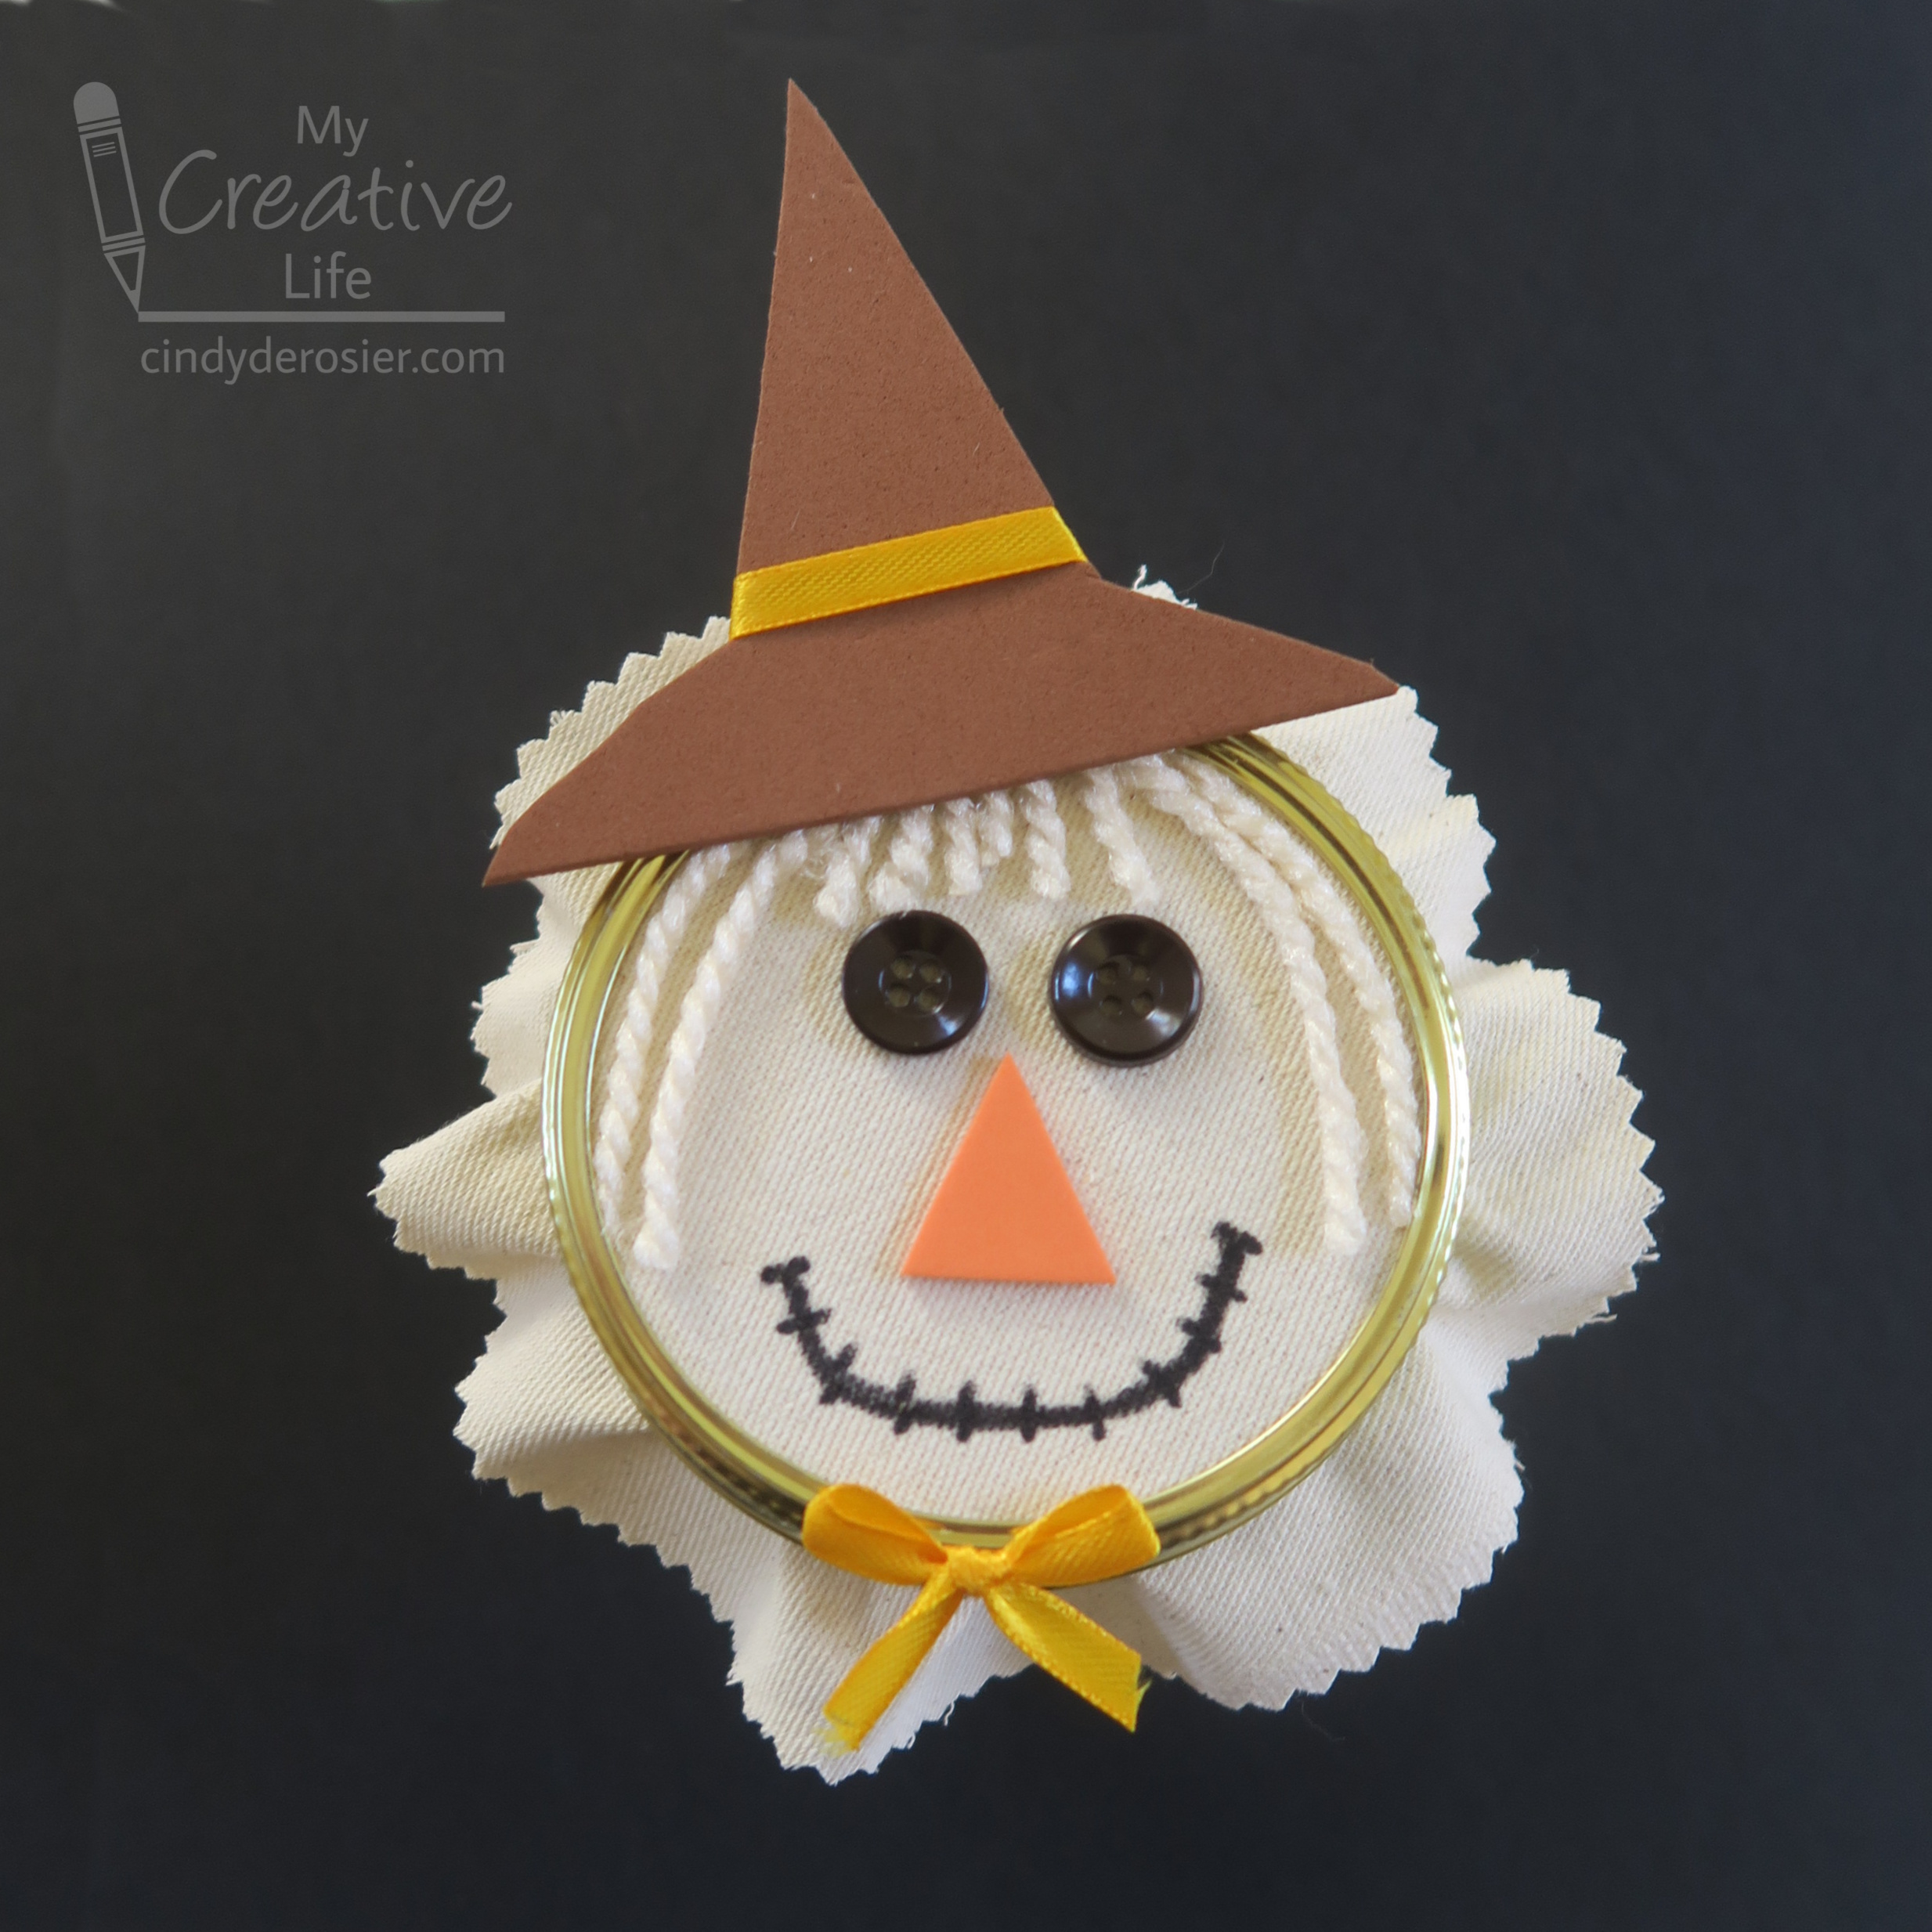
This Scarecrow Mason Jar is such a fun way to share a fall treat with friends! You can fill it with anything you want, but I designed it with Cinnamon Spice Caramel Apple Popcorn in mind. Affiliate links below. 


Scarecrow Mason Jar


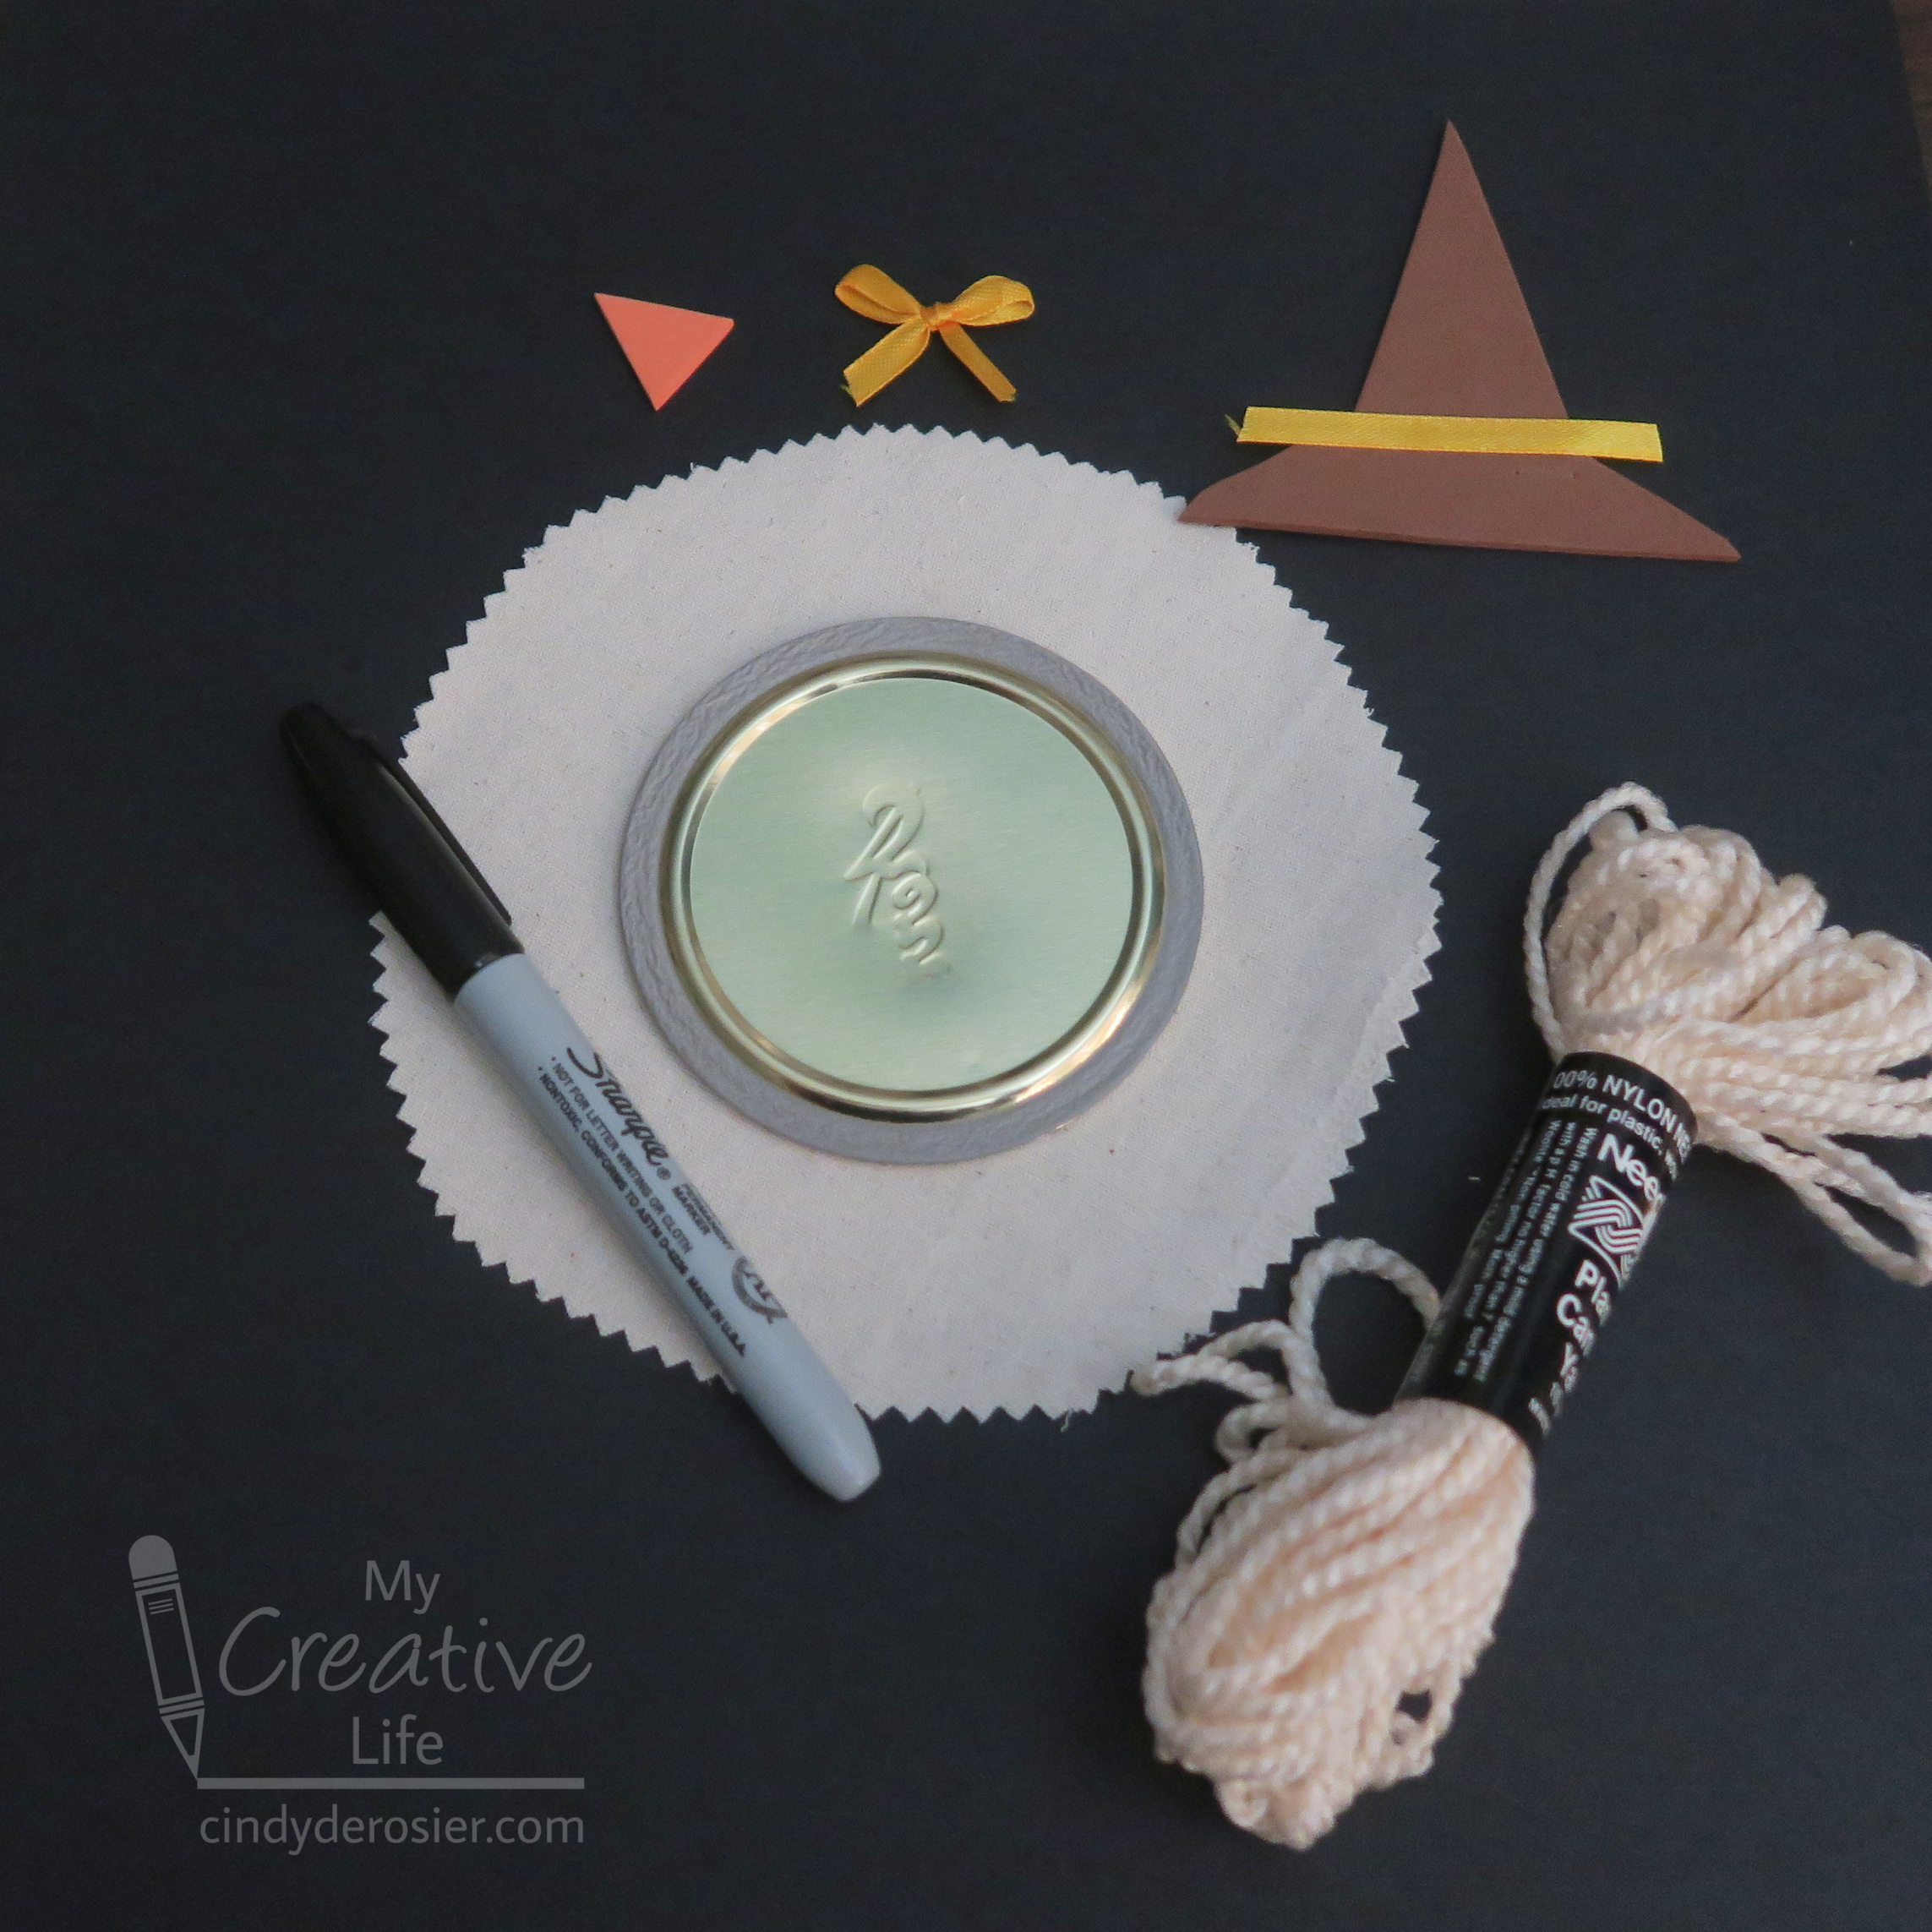
Materials:


Steps: 


Use the pinking shears to cut a circle of fabric approximately 6" in diameter. Glue the lid to the center of the fabric. 

Use regular scissors to cut lengths of yarn for the scarecrow's hair. Then cut a triangle nose from orange craft foam and a pointy hat from brown craft foam. Cut a length of ribbon to make a hat band, then tie another piece of ribbon into a small bow. 


Fill the mason jar with the popcorn or other treat, then add the lid. Screw on the ring tightly. 

Glue lengths of hair to the scarecrow, trimming as necessary. Glue the hat on top. Glue the eyes, nose, and bow into place. Use the Sharpie to draw the scarecrow's mouth. 

4/14/22

Snorkeling Egg

 I made this snorkeling egg guy. And I photographed it. 


But it's not my original idea. This is another of those projects we'd featured at Fun Family Crafts, then the creator deleted their website, leaving us with a link to nothing. It's so frustrating. This craft is all over Pinterest as Dye-ving Dudes, but the materials list and steps to make it are gone. 


That original photo provides some clues to the materials. It's obvious that the snorkel is a bendy straw. Everything else I'm not 100% sure. It looks like the mask is a clear lid, but the strap looks like a rubber band. If the lid is indeed clear, the rubber band would show through, which it doesn't. It looks like the flippers might be a thick, white-core paper. And did they draw the pupils on with a Sharpie? I'm not sure. 

My version may not be exactly the same as the original, but that's perfectly OK. At least now one version of the instructions exist. Affiliate links below. 


Snorkeling Egg


Steps:


Bend the straw 90°, then trim the excess off both ends to make a snorkel. Set it aside. Cut two black flippers from black craft foam, then cut a thin strip of craft foam for the mask strap. 


Use a dot of craft glue on the FRONT of the googly eyes, then place them in the clear lid. Set it aside to dry. Put away the craft glue; you'll use hot glue for the rest of the project. 

Glue the lid to the egg to make the mask. Wrap the strip of craft foam around the egg. Trim it so that it just touches the edges of the lid. Glue it in place. Because it's such a thin area, I put a glob of hot glue onto my craft mat and then used a toothpick to dab it onto the foam before pressing it in place. 

Glue the straw to the front of the mask. This is a change I made from the original, which has the snorkel down by the swim shorts. I prefer it higher. 

Glue the flippers to the bottom of the egg. 

I experimented with different ways to make the egg stand up without toppling. The easiest was to put a glob of hot glue onto the craft mat and balancing the egg onto it as shown here. 


Let it sit for about a minute, then peel it up. Use scissors to trim away any glue that extends beyond the flippers. 

The lid I used wasn't crystal clear, so the mask has a bit of a foggy appearance. If you can find a perfectly clear lid, great. Use that. I don't mind that my mask is foggy, but if you feel like the eyes aren't visible enough, use a Sharpie to color them onto the outside of the mask, as shown below.  


I had a few more egg project ideas I wanted to share with you before Easter, but I'm going to have to save them for 2023. Trevor's Eagle project has been consuming most of my daylight hours this week. While he still has three merit badges to complete, a pile of paperwork to do, and a Board of Review to pass before he reaches the rank of Eagle Scout, Trevor's project is officially done. I'll tell you all about it tomorrow. 

4/8/16

Very Hungry Caterpillar Pencil

Who loves Eric Carle? Everyone, that's who! I love all of his books, but like most people, my favorite is The Very Hungry Caterpillar. In fact, that was the theme for Trevor's 1st birthday party! I had so much fun designing and making the cake way back when. This Very Hungry Caterpillar Pencil would have been such a fun party favor. Too bad I thought of it nine years too late.


The inspiration for this project came from Easy Foam Crafts (affiliate link here and below). The project in the book is the Inch Worm Pencil. I made a few tweaks to the directions to turn it into a Very Hungry Caterpillar Pencil.


-------

Very Hungry Caterpillar Pencil


Materials: 


Steps: 


Begin by cutting the green foam into a long, narrow strip. Mine is around 9" x 1", but it's certainly not exact. Round off the corners, then use the hole punch (I used my Crop-a-Dile) to punch holes. Once again, it's obvious I didn't measure. Close enough! Cut the green scraps to make a roughly gumdrop-shaped nose and two oval inner eyes. Cut two oval outer eyes from yellow, then two antenna from purple.


Thread the green body piece onto the pencil, leaving the writing end free. 


Fold the end of the body over and glue it to the top of the pencil. (Skip this step if you want the eraser to be accessible. I used a color pencil without an eraser.) Glue the head in place. Add the eyes, nose and antenna.


I'm really happy with how my caterpillar looks. I might need to make some foam foods for him to enjoy....

3/26/15

Bunny-Themed Cocoa Kit (Bunny Week, Day 4)

It's Day 4 of Bunny Week!


Trouble loves to watch our art projects. Whenever possible, he's right there with the action. Of course, we supervise carefully to make sure he doesn't eat anything inappropriate or do anything else dangerous. He's always very interested in sniffing our egg dye. He's never spilled it, thankfully.

I did today's project while Trouble was napping in his pear box, far away from the not-safe-for-rabbits materials. It's a cocoa kit!


Materials: white mug, plastic spoons, white Candy Melts, pink sprinkles, cocoa mix, bag and twist tie, mini marshmallows, plastic wrap, googly eyes, pink craft foam, wire, and Glue Dots.

Start by melting Candy Melts and dipping the spoons into them. Immediately add pink sprinkles, then set them aside to harden.


Pour about five servings of your cocoa mix into a food-safe decorative bag and twist it securely. 


Nestle the cocoa in the bottom of the mug. Wrap a bunch of marshmallows in plastic wrap, then place them on top of the cocoa. 


Next, cut a bunny nose and mouth out of pink craft foam. Cut wire to whisker length. Use Glue Dots to attach all the facial features to the bunny. (These materials are designed to be easily removed before using the mug. If you want a permanent design on the mug, use markers designed for ceramics and follow the manufacturer instructions for baking the mug to set the colors.)

When the candy spoons are completely set, wrap them with plastic wrap, then nestle them into the mug. Use loose marshmallows to provide support if necessary.


The lucky recipient can enjoy hot cocoa with mini marshmallows, a candy spoon, or both!

3/23/15

Kool-Aid Bunny Craft (Bunny Week, Day 1)

Welcome to the 3rd annual Bunny Week here at My Creative Life! 


All week long, I'll be sharing rabbit-themed crafts and information. It's like Shark Week, only fuzzier. If you're a new reader this year, I'd recommend going back and reading previous years' Bunny Week posts. Or, you can see all my rabbit-themed crafts, scrapbook layouts, videos, foods, and more here.

Bunny Week 2013

Bunny Week 2014


OK, let's start Bunny Week 2015 off with a fun and easy kids' craft!


These cute bunnies started life as Kool-Aid containers! The wrapper slides right off, revealing an unmarked container. You can either make the bunny with a full container of Kool-Aid (like my pink rabbit above)....


... or, you can wash and dry the container and fill it with a treat. Trevor chose to put Kix in his bunny. The only other materials are white craft foam, pink craft foam, googly eyes, ribbon and a glue gun.

Start by cutting out white craft foam ears. You'll want a slanted base on each ear. Adjust the angle until you're happy with them. Cut a small triangle from pink craft foam for the nose. Glue each feature in place. Hold the ears upright for a few seconds until the glue sets. Finally, tie a ribbon around your bunny's neck. I opted to add a bow to my girl bunny. Cute, right?! And so easy.

.....

And, as promised, it's time to pick a winner for the "Rescue is My Favorite Breed" t-shirt, benefitting Contra Costa Rabbit Rescue! Random.org chose #12, so the lucky winner is Miriam! Congratulations! Send me your t-shirt size and address at cindy.derosier at gmail.com.

3/21/14

Bunny Donuts (Bunny Week, Day 5)

It's the last day of Bunny Week 2014! If you've missed any of my rabbit-related posts from this year's Bunny Week, last year's Bunny Week, or anything in between, you can find them here.

Today's project is inspired by this fabulous project at Jean's Craft Corner. When I saw her bunnies, I knew that Trevor and I would have a lot of fun making our own versions. The first step was finding the mini donut packs without printing on them. After looking at multiple stores, we couldn't find the brand she mentioned or an appropriate substitute. Eventually, we found an 8-count box of chocolate and powdered mini donuts at Walmart without printing. We set the chocolate ones aside for a different project and started brainstorming supplies for our white bunnies.

After some trial and error, we made our bunnies with the following supplies: powdered donut packs, white craft foam, pink craft foam, scissors, googly eyes, a Sharpie, pom poms, and a hot glue gun.


We cut outer ears and a tummy from the white foam, inner ears and a nose from the pink foam, glued everything in place, and then drew on a mouth. Of course, the tail is a pom pom. The tummy is there to cover the small printed serial number.


Here's Trevor's bunny:


As you can see, I've photographed these packages standing on their end. Of the four in the box, two were able to stand on end and the other two wouldn't. Just FYI, if you're planning to make these.  

I wanted to wrap up Bunny Week with a cute video of Trouble's antics. This video is about two years old, but I haven't shared it before. It perfectly illustrates Trouble's personality, particularly his curiosity.


Happy Bunny Week!


3/19/14

Bunny Popcorn Cups (Bunny Week, Day 3)

People ask me where I get the ideas for my projects.  Sometimes I don't know - ideas just pop into my head all the time and I don't know why or how.  Other times, I know exactly what inspired an idea.  Such is the case with my Bunny Popcorn Cups.

I saw these adorable Snowman Popcorn Cups at Creative Kid Snacks:

  Source 

.... and I knew right away that I wanted to make a rabbit version.  


Materials: clear plastic cup, white and pink craft foam, googly eyes, pink Jelly Belly, monofilament or white cardstock, a white pom pom, scissors, black craft foam or a Sharpie, and a hot glue gun. And popcorn, of course.

Begin by cutting ears from craft foam.  Make whiskers from thin strips of cardstock (like I did above) or from monofilament (like Trevor did below).  Cut a mouth from black craft foam (like I did above) or draw a mouth with a Sharpie (like Trevor did below).  Heat up the glue gun and attach the ears to the inner rim of the cup, then add the eyes, whiskers, nose, mouth (if using craft foam), and pom pom tail.  Fill with popcorn for a tasty treat.


I should clarify that popcorn is a treat for humans, not for rabbits.  I've seen videos of people giving popcorn to rabbits and they seem to love it, but popcorn is not safe for them.  Appropriate treats for rabbits include tiny amounts of dried fruits (Trouble especially loves raisins and Craisins), fresh fruits (banana, apple, peach, etc), and sweet vegetables (carrots).  Check out the House Rabbit Society's food page for excellent information about exactly what to feed rabbits to keep them healthy and happy. 

Speaking of healthy and happy rabbits, I was working upstairs the other day and heard Trouble doing a Super Run so I grabbed the camera and raced to the stairs to try to catch it on video.  I missed the Super Run and instead got to watch him go from sitting to lounging.  It's pretty cute.  He does it all the time, but I've never managed to record it before.