Showing posts with label origami. Show all posts

7/16/18

Between the Folds

Our family just watched an amazing documentary about origami called 'Between the Folds.' It came out in 2009, so it's possible some of you have already seen it, but in case any of you have not, I just had to tell you about it. 

"Origami: It's no longer just paper cranes. A determined group of theoretical scientists and fine artists have abandoned conventional careers to forge unlikely new lives as modern paper folders. These intrepid individuals are interpreting the world in paper, creating a wild mix of sensibilities that redefine art, science and creativity."
This fascinating documentary looks at ten people, scientists and artists, who are exploring origami in new ways. The ten are as different as could be and their origami reflects their unique perspectives, interests, and talents. Any one of them is interesting enough for a stand-alone documentary, but together they show the breadth of what paper folding has been, is, and might become. Some of the origami they create is stunningly beautiful. Others are shockingly time-consuming and more precise than you'd expect a human could do. Some are practical, like the scientist who explained the role origami has in figuring out the best way to pack an airbag so that it is compact and unfolds in the most efficient way. Every story was so interesting.

I honestly can't imagine anyone not enjoying this documentary. Even children, particularly those who have tried origami, will like it. The theoretical concepts will go over their heads, but heck, they went over mine too, and I still loved it.

Today is Amazon Prime Day, which makes it the perfect time to order Between the Folds. (These links, and the others in this paragraph are affiliate links. If you make a purchase, I receive a small commission.) This riveting show is free with a Prime membership. If you're not a Prime member, you can rent or buy Between the Folds quite inexpensively. Or, try a 30-day free trial and see if Prime is right for you.

If you do watch Between the Folds, let me know what you think. And if you have any recommendations for must-see documentaries, I'll happily take them!

5/1/18

Exploring Illinois Through Little Passports

Trevor and I are now 35/50 of the way through the Little Passports USA Edition and enjoying it just as much as when we started! Our most recent virtual trip took us to a state I've visited in person, but Trevor has not: Illinois. We started by learning about four of Chicago's skyscrapers and building a model of Chicago's skyline. Someday I want to take Trevor to Willis Tower. I went to the top in 1988, when it was Sears Tower and the tallest building in the world. They didn't have those glass boxes sticking out from the 103rd floor back then. I *think* Trevor and I would be OK stepping into them, but I know for sure that Steve would NOT be joining us! 

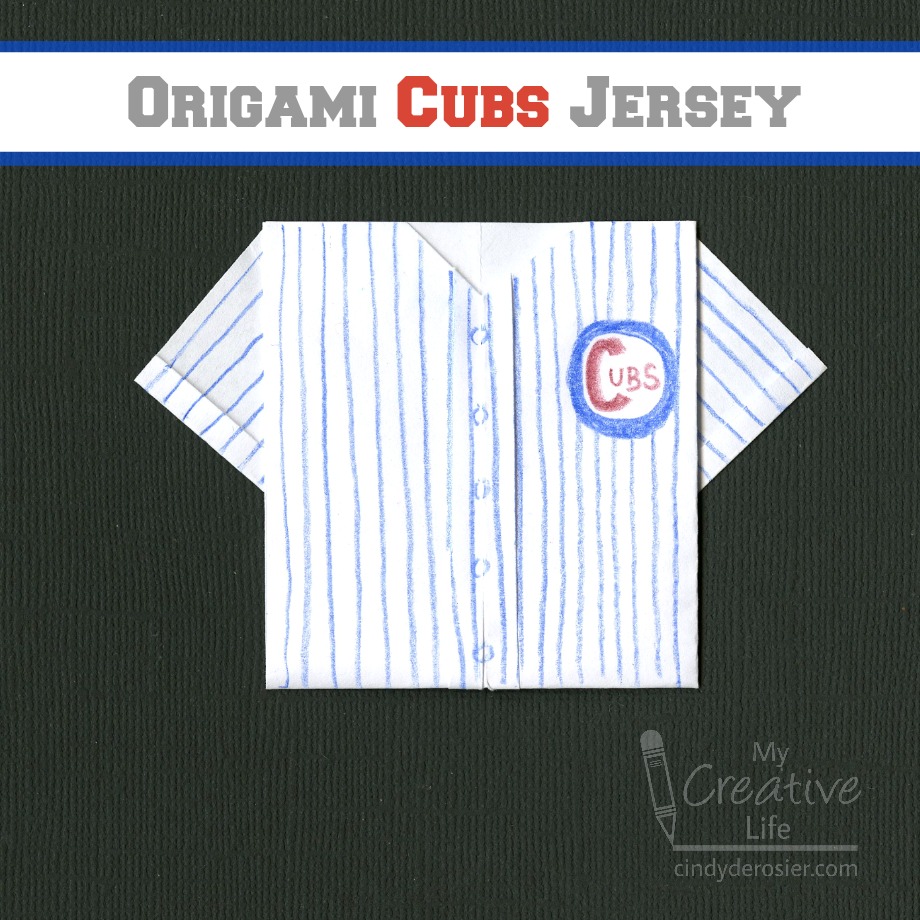
Next, we worked on the craft - an origami baseball jersey. Chicago has two baseball teams, so Trevor made one team's jersey and I made the other. Continue on to learn how to make your own!


---------

Origami Baseball Jersey


Materials:

  • white copy paper, cut into a square (ours were 5" x 5")
  • ruler
  • pencil
  • colored pencils

Steps:


Fold the paper in half horizontally, open it up, and then fold it in half vertically. Use the ruler to fold just the very edge of each side inward. Make sure to crease the folds well. 


Turn the paper over. Fold each side in so that they meet at the middle fold line. 


Fold the bottom half of each side outward to make a triangle, as shown below. 


Fold the triangles you just created backwards along the fold line that's already there. 


Fold in the top corners of the jersey to create a v-neck collar. Now it's ready to decorate! To make the Cubs jersey, draw a blue circle on the player's left. In red, add a large C inside the circle, then add a smaller UBS next to the C. With the blue pencil, draw buttons down the placket. Finally, use the ruler to add vertical stripes.


Here's Trevor decorating the White Sox jersey. He used a regular pencil, but you may prefer a black colored pencil. 


Draw the Sox logo on the player's left. Add buttons down the placket. Finally, use the ruler to add vertical stripes.


Obviously, you could decorate your jersey with whatever team you like. We live in the Bay Area, where the Giants and A's are the hometown favorites. 

Our next activity in the Little Passports State Journal was a Sodoku puzzle that taught us fun facts about Chicago. We solved a logic puzzle inspired by the Cahokia Mounds in Collinsville, Illinois, believed to be one of the first Native American cities. We read about the Mazon Creek fossils, including the Tully Monster, first discovered in 1958 and now the state fossil. Speaking of the state fossil, the next activity was a hidden picture puzzle featuring Illinois' other state symbols. I love that the official Illinois State Snack Food is popcorn (and I love that they have an official snack food!).

Trevor did a dot-to-dot about President Abraham Lincoln (who spent many years living in Illinois and is buried in Springfield). Then we learned that Ronald Reagan was born and raised in Illinois. There are a lot of places in the state that celebrate his life. We did a clever overlapping word search, then inserted the words we found into a story about Reagan's life.

We read all about the important events in Illinois history, looked over the timeline, and then solved a puzzle about the Route 66 attractions in Illinois. And then it was time to cook. The recipe? Deep-dish pizza! YUM!


We had such a good time on our virtual journey through The Prairie State and I look forward to eventually taking Trevor there. Thanks again, Little Passports!


3/25/13

Bunny Week, Day 1: Origami Bunny

It's Bunny Week, here at My Creative Life!  It's a whole week of all things rabbit. It's like Shark Week, but fuzzier.

Being major rabbit-fans, we're always on the lookout for a cute bunny craft. When I found instructions for bunny origami, I knew Trevor would want to try it. Aren't they adorable? 


They're really easy to make! Start with a square piece of paper. We used a 6-inch square for the white bunny on the left and a 5-inch square for the grey bunny on the right. We used ordinary copy paper, which worked fine but didn't fold quite as cleanly as origami paper would.  

Step 1: Fold the paper in half diagonally to make a triangle.

 
Step 2: Fold down the diagonal edge. This will form the ears, so a wider fold will make wider ears.  

 
Step 3: Rotate the triangle so that the ears are on the bottom. Fold up the left side to meet the point at the top.

 
Step 4: Repeat with the right side.

 
Step 5: Fold up the bottom point. This will make the base the bunny will sit on.

 
Step 6: Turn the bunny over. Fold the top point in to finish the shape of the face.

 
Here's what it looks like from the back.

 
Step 7: Add a face! These are mine. The ones at the top of the post are Trevor's.  

 
Here's Trevor with all four of our bunnies. He lined them all up, gave them names and had them talk with each other. Adorable.


Here are a few other rabbit crafts and projects you might enjoy!
See you tomorrow for Day 2 of Bunny Week!

12/14/11

'German Bells' Christmas Card Ornament

We're finally starting to receive 'real' Christmas cards in the mail. For a couple of weeks, all we've been receiving are the preprinted ones from the newspaper carrier, chiropractor, dentist, and insurance agent. I usually don't display these. Instead, I use the most beautiful ones to make ornaments.


---------

Origami Christmas Card Ornaments (German Bells)


Materials:


  • Christmas card 
  • scissors or paper trimmer
  • craft glue
  • rubber band
  • yarn or ribbon

Steps:


Cut the card into a square. It doesn't matter how large the square is, though the ornament is somewhat easier to make with a larger square. You can center the main image or not. I usually don't. 

Fold the card in half from top to bottom with the right side showing. Open it back up and fold it in half from left to right, again with the right side showing. Open the card fully and look at the back- the fold lines should make a plus sign.

Fold the card in half on one diagonal. Open and fold it along the other diagonal. These fold lines make an X.

Here is what the inside of your card should look like. I used a pencil to darken the lines for the purposes of the picture; yours won't have pencil lines.


Starting at one corner, make a 'paper airplane' fold. Unfold, then repeat for the three remaining corners.


Here's what your fold lines will look like when you are done with all the folds.

Hold the card in one hand and pinch the sides together as shown. Continue pinching until the points meet at the top.


Make a loop of ribbon to form a hanger. Slip the knot of the ribbon into one of the points of the ornament so that it gets trapped under the fold.

Add glue along the sides of the ornament and secure with a rubber band. Set aside until dry.


You can hang these ornaments from the tree, use them to decorate presents, or even place a small gift inside of one! 


Give it a try!