Showing posts with label Illinois. Show all posts

8/29/25

Design a Square Dance Outfit Coloring Page

There are a whopping 24 states that have named square dance as their official state dance (or folk dance). These include: Alabama, Arkansas, California, Colorado, Connecticut, Georgia, Idaho, Illinois, Louisiana, Maryland, Massachusetts, Mississippi, Missouri, Nebraska, New Jersey, North Dakota, Oklahoma, Oregon, South Carolina, Tennessee, Texas, Utah, Virginia, and Washington. The point of state symbols is supposed to be to highlight what sets one state apart from the other 49, so I'm not crazy about the fact that 24 states share a state symbol. But it's not a coincidence: starting in the 1960's, square dancers across the country petitioned to make their hobby the official national dance. Despite many attempts, it never passed (the story is fascinating) and square dancers turned their attention to state legislatures. Obviously, that was far more successful. 

Because of the popularity of square dancing throughout American history and its status as a state symbol for so many, I wanted to design a craft inspired by it. I settled on the most iconic aspect: the outfits. Students can use my coloring page to design clothing for a square dance couple standing in promenade. I opted not to add faces or hair, as if the clothes were on mannequins. Feel free to add in whatever features you'd like.  


Square Dance Outfit Coloring Page


The first thing I did before making my coloring page was to research square dance outfits. Square Up Fashions gave me a good idea of what's popular amongst square dancers. Check out some of the dresses and skirts they currently have for sale: 


I used the basic shape of the outfits to draw a very simplified couple.


I scanned and copied my drawing. I put two couples on one page (so I could try different designs) and printed it out. 


I colored in both images with my Ohuhu Honolulus, then added details with a black fineliner. The first design (purple and black) is at the top of the post. Here's one in shades of blue. 


I tried to make the two couples look as different from each other as possible, while still staying true to what square dancers might actually wear. It was a lot of fun. As is square dancing! The last time I did square dancing was at Trevor's 4th grade Gold Rush camp in 2016. I'm overdue to do some square dancing again!

5/21/25

Standing White-Tailed Deer

Native to North, Central, and South America, the white-tailed deer is one of the most widely distributed land mammals in the world. They are crepuscular, consume a wide variety of plant materials, and are highly adaptable to different habitats. White-tailed deer can sprint at speeds of 40 miles per hour, sustain speeds up to 30 miles an hour, and jump 9 feet high and 30 feet forward. 

The white-tailed deer is culturally important in the US (and beyond). It is the state animal of Arkansas, Georgia, Illinois, Michigan, Mississippi, Nebraska, New Hampshire, Ohio, Pennsylvania, and South Carolina, the state game animal of Oklahoma, and the wildlife symbol of Wisconsin. It appears on the flag of Vermont and is the mascot of the Milwaukee Bucks. Bambi is a white-tailed deer (in the Disney movie - in the Austrian book that inspired the film, Bambi is a roe deer.)

Read on to learn how to make a family of white-tailed deer that stand on their own. Affiliate links below. 


Standing White-Tailed Deer


Materials:


Steps:

You will need four basic shapes to make an adult male white-tailed deer: a body, legs (2), ears (2), and antlers (2). If you want to make an adult female or a baby, you don't need the antlers. Cut the body parts from cardstock, then use colored pencil to add details: a black nose, a black eye, black hooves, black shading on one ear, and white shading around the nose, under the belly, under the tail, and inside the ear. If you are making a fawn, add white dots all over its back. 


For the adult make, fold the legs in half, then glue them to the back of the deer's body. Adjust them until the deer can stand on its own. Glue one ear to the front of the deer and one to the back, then glue the antlers in place. Use the same steps, minus the antlers, for an adult female or a fawn. 

4/25/25

The Best Tour in Every State, Part 2

This is the second part in my series about the best tour I've taken in every state. I recommend starting with the first post, which provides important background information, including my definition of a tour. 


-------


Hawaii


The best tour I've taken in Hawaii was The Best of Hilo. Highlights of the tour included the Tropical Botanical Garden, Rainbow Falls, Mauna Loa Macadamia Nut factory, Volcanoes National Park, and walking through a lava tube. It was fantastic.


Idaho


I've been to Idaho seven times in the last ten years to visit my family, so you'd think I would have taken at least one tour. Nope. While we've done a lot of fun activities in Idaho, none of them were tours. The closest to a tour would be the World Center for Birds of Prey, where we watched docents and staff give presentations. 


Illinois


The best tour I've taken in Illinois was by the Chicago Trolley and Double Decker Co. We had a fantastic guide who took us to all the best places in Chicago and taught us so much about the history, geography, and culture of the city. 


Indiana


The best tour we took in Indiana was Indy Fun Trolley Tours. Our guide went above and beyond, teaching us everything there is to know about Indianapolis - not just the history and points of interest, but restaurant recommendations, great stores, and even where to get the best donuts in each side of town. 


Iowa


The best tour I've taken in Iowa was a guided tour of the State Capitol. By being with a guide, we were able to go places that self-guided visitors can't go, including up a circular staircase to the dome. We had a great guide who told us so much about both the building itself and those who have worked there over the years. 


Kansas


The best tour I've taken in Kansas was the Dome Tour of the Capitol building in Topeka. Not only was it interesting and informative, but it was quite a workout!


Kentucky


It was really, really hard to pick a favorite tour in Kentucky, as we have taken quite a few excellent ones. Ultimately, I had to pick the guided tour of Churchill Downs as the best. We learned all about the history of the track, the Derby race itself, and the various winners. The highlight was going onto the track and standing in the winner's circle.  


Louisiana


Picking the best tour in Louisiana was very difficult. We had several outstanding tours, but I think I have to pick the guided tour at Mardi Gras World as my favorite. I loved the behind-the-scenes look at everything that goes into making all the incredible Mardi Gras floats, and particularly enjoyed seeing the artists at work. Trying authentic King Cake for the first time made the tour even more fun and memorable.


Maine


The best tour I've taken in Maine was a guided walk at Acadia National Park and Cadillac Mountain. It was absolutely beautiful and our guide was excellent. It was exciting seeing a variety of animals and experiencing multiple biomes during a relatively short walk at Acadia. The views from Cadillac Mountain were stunning. 


Maryland


The best tour we took in Maryland was the guided walking tour at the United States Naval Academy. We learned so much about the Academy and what student life is like. So interesting and a really different college experience than the one I had!


I'll be back on Monday with the best tours I've taken in the next ten states. 

11/12/24

50 State Quarters: Coloring Pages Using Derwent Inktense Pencils

I've completed four more of the 50 State Quarter coloring pages: Arizona, Illinois, Kentucky, and Louisiana. This time, I colored them with Derwent Inktense Pencils and a blender pen. Affiliate links here and below. 


I'm relatively new to Inktense Pencils and there is definitely a learning curve. I found the Derwent Intense Pencils Beginners Guide by My Colourful Country Life very helpful. Once I learned the basics, it was so much fun to use the Inktense pencils on the different coloring pages. I'm eager to get them out again and practice some more.

This set of four brings me to 30/50 completed coloring pages. These are the other art materials I've used so far:

On to the next set of coloring pages!

7/3/24

State Flowers Made from Perler Beads

When Jonna finished making her Perler bead anchor, I was less than a quarter of the way done with my Michigan logo. So she started making state flowers. Aren't they pretty?!?


These small designs work up quickly. They would make a great project for students learning more about their home states, or fifth graders working on state reports.  

This is a forget-me-not, the state flower of Alaska


This is a Black-Eyed Susan, the state flower of Maryland. 


This is an Indian blanket, the state wildflower of Oklahoma


And this is a violet, the state flower of Illinois, New Jersey, Rhode Island, and Wisconsin


You can find Perler beads and boards on Amazon and at Michaels (affiliate links). Happy beading!

7/24/23

Felt Cardinal Pencil Topper

I think it's so weird that we talk about most animals year-round, while there are others we've assigned to a certain season. It's as if rabbits and chicks only exist in the spring, flamingoes and tropical fish disappear if it isn't summer, bats and owls are only alive in the fall, and penguins and polar bears vanish when winter ends. I get that some of that is based on climate; tropical fish live in warm water and polar bears live in cold water. But they live there year-round! 

Despite existing year-round with quite a large range, cardinals are considered part of the winter animal category. If there is an image of a cardinal on a card, the sentiment probably references Christmas or winter. You don't see cardinals on Easter greetings, even though baby cardinals start hatching then, just like baby chickens. It's weird. 

All this to say that I made a cardinal craft during the summer. And you can too. Affiliate links below. 


Felt Cardinal Pencil Topper


Materials:


Steps: 


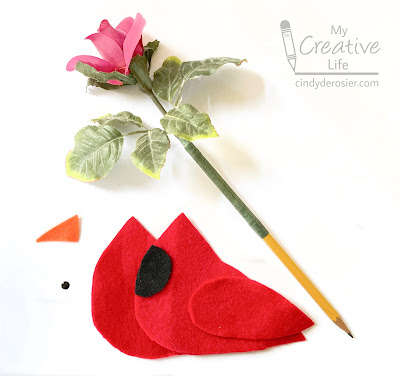
To make the cardinal, you will need two red felt bodies, two red wings, two black faces, and one orange beak. I recommend using scratch paper to make a template for yourself, unless you want to just wing it (pun intended) like I did.


Use floral tape to wrap a stem of leaves to a pencil. I used an artificial rose I had laying around and just pulled the flower off to save for a different use. 

Glue the face and wings to the two body parts.


Add an eye to each face. If you're using self-adhesive enamel dots, proceed. If you're using Enamel Accents, let them dry completely. 

Put a line of glue around the inside of one body piece, leaving the belly area open. Put the beak in place, then add a line of glue onto the part of the beak that will be covered by the second body piece. Set that piece on top of the first, essentially making a beak sandwich. Let the glue dry completely. 

Add as much or as little stuffing as you want, then add a generous amount of glue to the opening. Place it onto the prepared pencil, clamp it closed, and let the glue dry completely.  


Perfect for any time of year! This craft is particularly great if you live in one of the seven states (Illinois, Indiana, Kentucky, North Carolina, Ohio, Virginia, and West Virginia) that have named the cardinal as their state bird, or if you're a fan of the any of the Cardinals sports teams!

4/5/23

Monarch Caterpillar Craft

Sharing the photo of Eric Carle's messy studio got me thinking about the Very Hungry Caterpillar, which in turn got me thinking about actual caterpillars. There are tons of butterfly crafts (here are six of mine) but with the exception of the Very Hungry version, there are not a lot of caterpillar crafts. Since the monarch caterpillar is distinctive, beautiful, AND the larval form of the state insect of 7 states (Alabama, Idaho, Illinois, Minnesota, Texas, Vermont, and West Virginia), it was the perfect choice. 


I chose to use yellow and white paint on black cardstock for my monarch caterpillar. If you use black and yellow paint on white cardstock, you'll get better coverage. If you want to avoid paint altogether, just cut the stripes from the appropriate colors of cardstock or construction paper. 


Monarch Caterpillar Craft


Materials:

  • cardstock or construction paper
  • paint and black pen (optional)
  • scissors
  • glue

Steps:

Cut out the following caterpillar body parts from cardstock or construction paper: 1 oblong body (slimmer than the one below- I trimmed mine later), two large tentacles (filaments) and two smaller ones, four prolegs, and three true legs. Insects, including caterpillars, have six legs but only three will show on each side. 


Paint white stripes onto the caterpillar's body. At this time, add a circle of white onto each proleg. If you are using paper instead, cut strips for the body and circles for the prolegs and glue them in place. 


When the paint has dried, paint every other white stripe yellow. (Or, glue strips of yellow in place.) Let the paint dry, then use the pen to draw black lines on either side of each yellow stripe. At this point, I realized my caterpillar came out a bit more plump than the real thing, so I trimmed it. 

Glue the tentacles, prolegs, and legs into place.  


Indulge me in a brief soapbox moment regarding monarch caterpillars. You may have pleasant memories of raising monarchs as a kid. It is fascinating to see them go through their life cycle and it feels amazing to release them into the wild. This used to be a fairly common practice in elementary classrooms, but captive rearing is now thought to be harmful. Those who care about the future of monarchs should focus on efforts to protect their breeding and overwintering territories. Our kids' kids and their kids deserve to have a world filled with monarchs, too.  


4/26/22

Candy Cardinals

I had some extra black Candy Melts and black Sugar Pearls sitting out after I finished making the Pretzel Raccoons, so I used them to make Candy Cardinals. Can you tell what I used to make the beaks? Affiliate links below.   


Candy Cardinals


Materials:


Steps:


Melt the red candy according to the instructions on the package. Use a spoon to put a dollop of melted candy onto parchment paper, shaping it into the teardrop that makes the cardinal's head. While the candy sets, use a sharp knife to cut orange M&Ms in half. Press straight down firmly; they'll cut without shattering. 

Melt the black candy, then put a dollop onto the head to make the cardinal's face. Place two black sugar pearls and half an M&M onto the black candy to make the eyes and beak. Let the candy set completely, then peel it up from the parchment paper. 

---------


Looking for another cardinal project? I love this tissue paper cardinal craft! The cardinal is the state bird of Illinois, Indiana, Kentucky, North Carolina, Ohio, Virginia, and West Virginia, so it's an especially great choice to make if you live in one of those states. 

3/24/22

Pretzel Monarch Butterflies

I've used pretzels to make a butterfly craft before, but that was a savory project suitable for young children. This is a sweet craft, better for preteens and up. I had a lot of fun figuring it out as I went and I'm happy with the end results. Affiliate links below. 


Pretzel Monarch Butterflies


Materials:


Steps: 


Place a sheet of parchment paper underneath a wire rack. Prepare the black candy melts following the directions on the package. For each butterfly, dip two pretzel twists and one pretzel stick into the melted black candy, then transfer them to the rack. I used a sharp knife to make the pretzel sticks shorter; whether you need to do this or not depends on the brand you use. After the pretzels have sat for 30 seconds, transfer them to a different part of the rack so that they don't stick. Let them set completely. 


You'll be melting more black candy, so don't clean that container yet. 

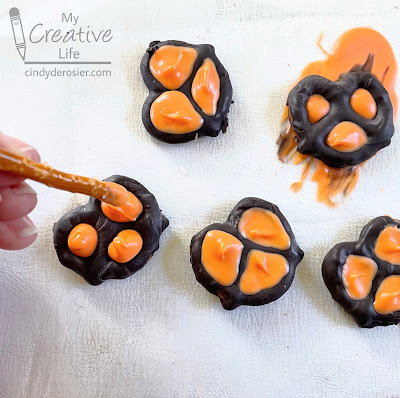
Move the rack, then transfer the pretzels to the parchment paper. Prepare the orange candy melts. I experimented with different methods of filling the holes of the pretzel twists with orange (see failures below). I found the easiest and most effective method was spooning a dollop of melted candy into each opening, then using an extra pretzel stick to push it over the black candy. The goal is to leave a thin border of black between the orange areas. 

In retrospect, I should have used the scribe tool to get rid of the peaks in the orange that the pretzel stick left. 


When the orange has set completely, prepare more black Candy Melts. Use the scribe tool to draw lines of black candy across the orange to mimic the patterns of a monarch butterfly. Symmetry is more important than accuracy, so work on both the left and right wings at the same time so that you end up with matching pairs. Let the black candy set. Don't clean the container or the scribe tool - you'll use both again.  


Prepare a small amount of white Candy Melts in a separate container. Use a clean scribe tool to put dots along the outer edges of the pretzels. Again, work in pairs and focus on symmetry. Let the white candy set. 


Crumple a small piece of foil into a cradle to hold the butterfly wings in the position you want. Do this for each of your butterflies. Carefully remove the pretzel twists, keeping the stick pretzels in position. Melt more black candy. Working on one butterfly at a time, use the scribe tool to paint a line of melted candy along each side of the stick pretzel, then gently place the pretzel twists back into position.  


Reinforce the wings by adding a bit of extra black candy along the point where the wings meet the body. Let the candy set completely, then remove the butterflies and place them onto frosted cupcakes. 


Happy spring, everyone! Celebrate with a cupcake. 

7/22/21

Puzzle Piece Monarch Butterfly

After you turn a puzzle piece into an alien, the next logical thing to do is to turn one into a butterfly. A monarch, to be specific. Affiliate links below. 


Puzzle Piece Monarch Butterfly


Materials:


Steps:


Prep the puzzle piece by painting a coat of gesso on the glossy surface. When the gesso has dried, add an orange base coat. Let it dry completely. 

Use a fine-tip Sharpie to color the sides and edges of the puzzle piece black. Then use an ultra-fine Sharpie to add lines that mimic the patterns of a monarch. 
 

With the white Uniball pen, add dots around the outside edges. 


Wrap a pipe cleaner around the puzzle piece to make the body of the butterfly. The top and bottom should extend beyond the puzzle piece, and the ends should be hidden on the back side. 

Cut a piece of Twisteezwire and wrap it around the the top of the pipe cleaner, twisting to secure it. Curl then ends around the body of the pen to create the curl.  


So far, I've turned puzzle pieces into a ladybug, crab, reindeer, girl, wreathalien, and now a butterfly. Trevor has made a spider and a bug. There are still several dozen pieces left from the terrible puzzle - what should I make next?

7/9/21

Handprint Monarch Butterfly

I'm a huge fan of handprint (and footprint) crafts. If you ever see me staring at my hand while twirling it slowly around, I'm probably thinking about a potential handprint craft. Today's is a monarch butterfly. Affiliate links below.


Handprint Monarch Butterfly


Materials: 


Steps:


Paint a clothespin black, then set it aside to dry. 

Dip one hand into orange paint, then use the paintbrush to add black lines on top of the orange paint. Work quickly so that it doesn't dry. 


Press your hand onto the blue paper. Pay attention to which hand you are stamping - the right hand goes on the left and the left hand goes on the right. Repeat the process with the second hand, leaving a small gap between the two handprints.


Use the tip of the paintbrush handle to add tiny white dots along the edges of the handprints. Let the paint dry completely. 

Wrap a length of pipe cleaner around the clothespin and then bend the ends gently to make antennae. Glue the clothespin to the center of the paper between the two handprints. 


The monarch butterfly is the official state insect of Alabama, Idaho, Illinois, Minnesota, Texas, Vermont, and West Virginia, but no matter where you live it's a great craft to make.