5/5/18

Happy National Scrapbook Day!

Happy (Inter)National Scrapbook Day to all my papercrafting friends around the world! I hope you have a wonderful and productive day. I look forward to seeing your creations and hearing how you're celebrating!


I'm not exaggerating when I say NSD is my favorite day of the year. I'm celebrating at home, as always. Not only is it easiest to scrap at home, but it is the best way for me to check in and catch up with as many of my scrapbook friends as possible. When I was scrapbooking in the 90's, I didn't know anyone else who made scrapbooks. Photo albums, sure, but not scrapbooks. Finding online communities of people who share my love of paper products and memory keeping was huge for me. Years later, some of my closest friends are people I met online through forums and message boards and I am forever grateful.

Happy National Scrapbook Day!

5/4/18

Exploring Massachusetts Through Little Passports

Our family has spent exactly one day in Massachusetts, which is clearly not enough time to even get a taste of all that it has to offer. Fortunately, we were able to learn a lot more about the Bay State by taking a virtual trip through Little Passports. We started with a word search of Wampanoag words and their English translations. Then we played a game that was played by the Wampanoag at the time the pilgrims arrived in Plymouth. It's basically the same as this game that we've enjoyed before. 

Trevor was eager to do the science experiment, inspired by the many universities in the greater Boston area. In it, he learned how MIT alumni Herbert Kalmus and Daniel Frost Comstock developed Technicolor and changed motion pictures forever. To begin, Trevor cut out wedges of color from construction paper.


He glued them to a CD.


When the wheel spins, the colors blur to create new colors, much like Technicolor on rapidly-moving film strips. Neat!


Our next activity was a dot-to-dot inspired by Massachusetts sports teams- the Celtics, Revolution, Red Sox, Patriots, and Bruins. Then we worked on a logic puzzle featuring Cape Cod and the surrounding islands. Cape Cod is a great place for seeing humpback, minke, and fin whales. After identifying each, we used the letters to name the top predator in the Atlantic Ocean, the great white shark.

We read all about famous events that happened in Massachusetts and looked at the state's timeline. Then Trevor solved a puzzle about the Tanglewood Music Festival. He matched 4 famous Massachusetts authors to passages they wrote to decode the name of a fifth author's pseudonym. He did a crossword puzzle and solved a maze, both inspired by spots along the Freedom Trail.

Our final activity was to make Boston Cream Pie, the state dessert of Massachusetts. Rather than making one large cake, we tweaked the recipe to make cupcakes instead. Here's Trevor making the custard filling...


... and the chocolate glaze.


He split each cupcake, then filled it with custard, and topped it with glaze. 


They were delicious! This recipe is a keeper. 


As always, Trevor and I had lots of fun learning together using Little Passports!


5/3/18

Cardboard Tube Firefly

Lately, I've become a little bit obsessed with state symbols. I know all of California's, having grown up here and then taught my 4th and 5th graders about them back in my teaching days, but it wasn't until Steve and I started making an effort to take Trevor to all 50 states that I started really caring about other states' symbols. For example, it was very important to me to eat Maryland's state dessert, Smith Island Cake, during our visit last fall. I'm glad I did. It was delicious. 

I noticed that a lot of states (including California) have a butterfly species as their state insect. But only one state, Pennsylvania, has named the firefly as its sole state insect. (Tennessee has named the firefly as one of four state insects.) I did a firefly craft way back when Trevor was in first grade and writing a report about fireflies. They are such interesting insects! I challenged myself to make a cardboard tube version of a firefly. 


I love how my firefly turned out! If I were an elementary school teacher in Pennsylvania or Tennessee, we would make these in the classroom as part of a study of state symbols. Then I would hang a string of blinking Christmas lights on a bulletin board or window, putting one firefly over each lightbulb. Wouldn't that be awesome?! If you know any elementary school teachers in Pennsylvania or Tennessee, tell them about my idea because I really think this should happen!

---------

Cardboard Tube Firefly


Materials:

  • cardboard tube
  • scissors
  • acrylic paint (black, red, yellow)
  • paintbrush
  • black cardstock or construction paper
  • craft glue


Steps:


Cut the cardboard tube in half. You only need one half for each firefly. 


Paint the firefly, using an image for reference. It helps to do a base coat and let it dry completely before adding the other colors. I experimented with different base colors and it didn't make much of a difference. 


I also experimented with rounding off the tube before painting it vs. after. My suggestion is to do the base coat in red or yellow, use the scissors to round off the head, and then paint in the details. When it's dry, use the scissors to perfect the head shape and to add slight rounding to the wings. 


Turn the firefly upside down. Cut eight thin strips of construction paper or cardstock. Two are antennae and six are legs. Glue them in place - antennae on the head and pairs of legs on the in the half closest to the head. 


Now hang some blinking lights and position the fireflies above them. And then send me a photo because I totally want to see how that looks with a whole classroom's worth of fireflies on display! 

5/2/18

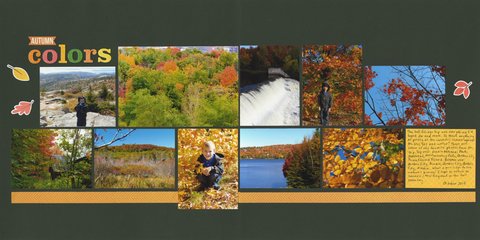
Autumn Colors in Eastern Canada and New England

I've been completely overwhelmed by the prospect of scrapping our epic Canada and New England adventure from fall 2014. I'd already decided to divide the trip into two layouts (the train travel portion and the cruise portion), but I still had too many fabulous photos that I wanted to include. I pulled all of my favorite photos of the gorgeous fall color and put them together into this layout. 

Autumn Colors (affiliate link)

I've selected the photos for the rest of the trip and will be working on those two layouts soon. Stay tuned!

5/1/18

Exploring Illinois Through Little Passports

Trevor and I are now 35/50 of the way through the Little Passports USA Edition and enjoying it just as much as when we started! Our most recent virtual trip took us to a state I've visited in person, but Trevor has not: Illinois. We started by learning about four of Chicago's skyscrapers and building a model of Chicago's skyline. Someday I want to take Trevor to Willis Tower. I went to the top in 1988, when it was Sears Tower and the tallest building in the world. They didn't have those glass boxes sticking out from the 103rd floor back then. I *think* Trevor and I would be OK stepping into them, but I know for sure that Steve would NOT be joining us! 

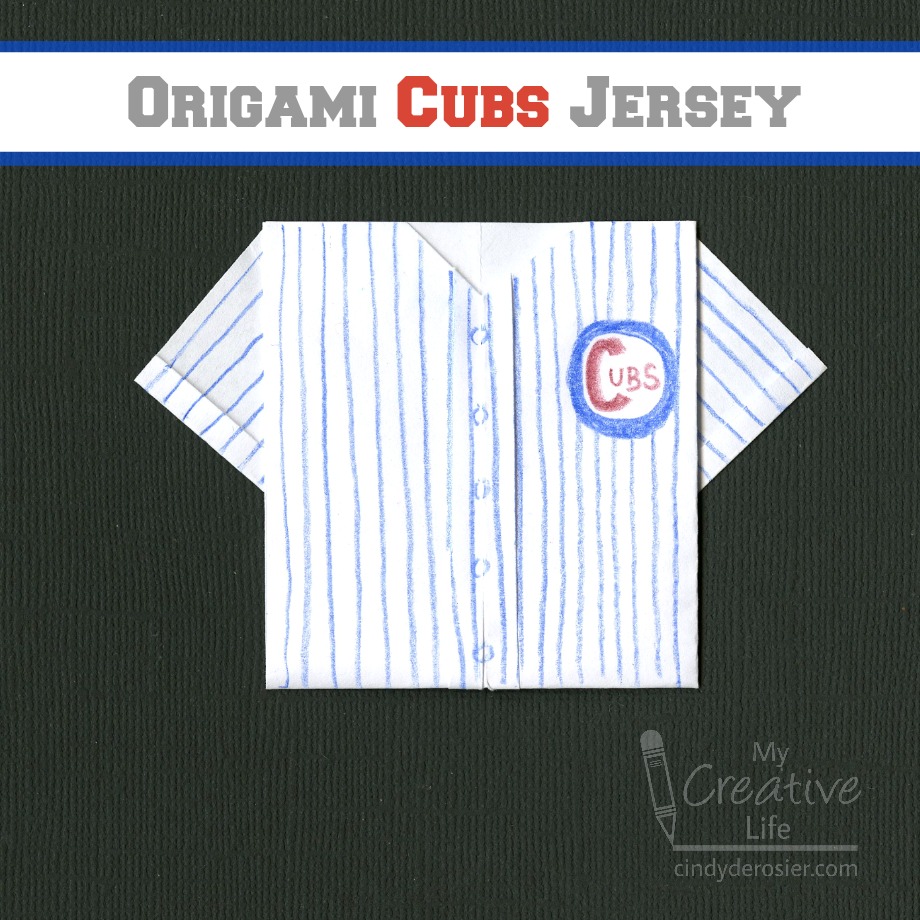
Next, we worked on the craft - an origami baseball jersey. Chicago has two baseball teams, so Trevor made one team's jersey and I made the other. Continue on to learn how to make your own!


---------

Origami Baseball Jersey


Materials:

  • white copy paper, cut into a square (ours were 5" x 5")
  • ruler
  • pencil
  • colored pencils

Steps:


Fold the paper in half horizontally, open it up, and then fold it in half vertically. Use the ruler to fold just the very edge of each side inward. Make sure to crease the folds well. 


Turn the paper over. Fold each side in so that they meet at the middle fold line. 


Fold the bottom half of each side outward to make a triangle, as shown below. 


Fold the triangles you just created backwards along the fold line that's already there. 


Fold in the top corners of the jersey to create a v-neck collar. Now it's ready to decorate! To make the Cubs jersey, draw a blue circle on the player's left. In red, add a large C inside the circle, then add a smaller UBS next to the C. With the blue pencil, draw buttons down the placket. Finally, use the ruler to add vertical stripes.


Here's Trevor decorating the White Sox jersey. He used a regular pencil, but you may prefer a black colored pencil. 


Draw the Sox logo on the player's left. Add buttons down the placket. Finally, use the ruler to add vertical stripes.


Obviously, you could decorate your jersey with whatever team you like. We live in the Bay Area, where the Giants and A's are the hometown favorites. 

Our next activity in the Little Passports State Journal was a Sodoku puzzle that taught us fun facts about Chicago. We solved a logic puzzle inspired by the Cahokia Mounds in Collinsville, Illinois, believed to be one of the first Native American cities. We read about the Mazon Creek fossils, including the Tully Monster, first discovered in 1958 and now the state fossil. Speaking of the state fossil, the next activity was a hidden picture puzzle featuring Illinois' other state symbols. I love that the official Illinois State Snack Food is popcorn (and I love that they have an official snack food!).

Trevor did a dot-to-dot about President Abraham Lincoln (who spent many years living in Illinois and is buried in Springfield). Then we learned that Ronald Reagan was born and raised in Illinois. There are a lot of places in the state that celebrate his life. We did a clever overlapping word search, then inserted the words we found into a story about Reagan's life.

We read all about the important events in Illinois history, looked over the timeline, and then solved a puzzle about the Route 66 attractions in Illinois. And then it was time to cook. The recipe? Deep-dish pizza! YUM!


We had such a good time on our virtual journey through The Prairie State and I look forward to eventually taking Trevor there. Thanks again, Little Passports!