4/14/22

Snorkeling Egg

 I made this snorkeling egg guy. And I photographed it. 


But it's not my original idea. This is another of those projects we'd featured at Fun Family Crafts, then the creator deleted their website, leaving us with a link to nothing. It's so frustrating. This craft is all over Pinterest as Dye-ving Dudes, but the materials list and steps to make it are gone. 


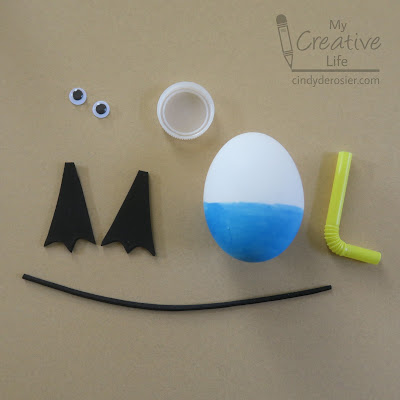
That original photo provides some clues to the materials. It's obvious that the snorkel is a bendy straw. Everything else I'm not 100% sure. It looks like the mask is a clear lid, but the strap looks like a rubber band. If the lid is indeed clear, the rubber band would show through, which it doesn't. It looks like the flippers might be a thick, white-core paper. And did they draw the pupils on with a Sharpie? I'm not sure. 

My version may not be exactly the same as the original, but that's perfectly OK. At least now one version of the instructions exist. Affiliate links below. 


Snorkeling Egg


Steps:


Bend the straw 90°, then trim the excess off both ends to make a snorkel. Set it aside. Cut two black flippers from black craft foam, then cut a thin strip of craft foam for the mask strap. 


Use a dot of craft glue on the FRONT of the googly eyes, then place them in the clear lid. Set it aside to dry. Put away the craft glue; you'll use hot glue for the rest of the project. 

Glue the lid to the egg to make the mask. Wrap the strip of craft foam around the egg. Trim it so that it just touches the edges of the lid. Glue it in place. Because it's such a thin area, I put a glob of hot glue onto my craft mat and then used a toothpick to dab it onto the foam before pressing it in place. 

Glue the straw to the front of the mask. This is a change I made from the original, which has the snorkel down by the swim shorts. I prefer it higher. 

Glue the flippers to the bottom of the egg. 

I experimented with different ways to make the egg stand up without toppling. The easiest was to put a glob of hot glue onto the craft mat and balancing the egg onto it as shown here. 


Let it sit for about a minute, then peel it up. Use scissors to trim away any glue that extends beyond the flippers. 

The lid I used wasn't crystal clear, so the mask has a bit of a foggy appearance. If you can find a perfectly clear lid, great. Use that. I don't mind that my mask is foggy, but if you feel like the eyes aren't visible enough, use a Sharpie to color them onto the outside of the mask, as shown below.  


I had a few more egg project ideas I wanted to share with you before Easter, but I'm going to have to save them for 2023. Trevor's Eagle project has been consuming most of my daylight hours this week. While he still has three merit badges to complete, a pile of paperwork to do, and a Board of Review to pass before he reaches the rank of Eagle Scout, Trevor's project is officially done. I'll tell you all about it tomorrow. 

4/13/22

More Nests: Northern Mockingbird, Western Meadowlark, and Baltimore Oriole

I liked the American Robin nest craft so much I made three more! To make your own, follow the directions for the robin nest, with the following small modifications. 

---------

You will need a 13/16" template for the eggs of the Northern Mockingbird. Paint them a very pale greenish to bluish grey. When the paint is dry, use a stiff brush to pounce a bit of cinnamon colored paint on the eggs. The blotches should be very light at the pointy end and heavier on the rounded end.  

The Northern Mockingbird is the state bird of Arkansas, Florida, Mississippi, Tennessee, and Texas. 
 

---------


You will need a 1-3/16" template for the eggs of the Western Meadowlark. Paint them a creamy off-white. When the paint is dry, put brown paint on a stiff brush, then run your thumb across the bristles to splatter the brown paint onto the eggs. (Do this somewhere that brown paint splatters won't matter.) The splatters should be a bit heavier toward the rounded end. 

The Western Meadowlark is the state bird of Kansas, Montana, Nebraska, North Dakota, Oregon, and Wyoming. 


---------


You will need a 5/8" template for the eggs of the Baltimore Oriole. Paint the eggs a very pale grey. When the paint is dry, use a sharp brown colored pencil to draw squiggles onto the eggs as shown. The squiggly lines are more concentrated toward the rounded end. 

The Baltimore Oriole is the state bird of Maryland. 


---------

While doing my research on state birds, I came across an awesome shop that sells State Pride t-shirts that feature birds (affiliate link). That link goes to my state bird, the California Quail. I chose random states for each of the four birds' nests I made to feature below; if you don't see your state, follow this link to check yours out!


4/12/22

Craft Roundups: Earth Day, Birds, Paper Plates, and Clay Pots

Time to share my latest craft roundups! I made all of these as part of my job as Editor of Fun Family Crafts

First, Earth Day. This one was tricky. Pretty much any craft that involves recycled items (newspaper, cardboard tubes, cereal boxes, lids....) or natural materials (leaves, rocks, pine cones, flowers...) could be considered an Earth Day craft. We have at least 9,000 crafts that fit into one of those categories, so I decided to narrow that way down and pick crafts that are literally about Earth. I ended up with a good assortment. My favorite is that Earth cake. Can you see what's inside? So clever!


Next, bird crafts. We actually already had a bird craft roundup on the site from many years back, so I didn't choose the featured birds. Instead, I used the previous ones on an updated graphic. 


Doing the paper plate craft roundup was fun because with over 300 tutorials, there were so many good options. As always, I tried to showcase the widest variety of crafts. That's my volcano at the top. You may have noticed that recently I've been putting one of the 10 featured crafts into the title block. That allows me to make a nice grid of 9 beneath it instead of a lop-sided grid of 10. 


Finally, clay pot crafts. A lot of the clay pot crafts we have involve painting or decorating the pots before planting something in them. I wanted to showcase some unexpected ways to use clay pots - the wind chimes, lighthouse, and beehives are perfect examples. 


As always, making these roundups is my favorite part of the job. I think the next roundup on my list is butterflies, so be expecting that in the next batch!

4/11/22

Clay Leaf Print Napkin Rings and Coasters

We have beautiful hydrangeas along our side yard that are determined to grow enough to completely block the walkway beside our house. I've explained that they are welcome to grow as high as they'd like and can spread out against the fence, but to please allow us to have the path. I frequently need to do a bit of light pruning to remind them that the flower bed is their territory, but the concrete is our territory. 

I took a few of the pruned hydrangea leaves inside and used them to make leaf prints from oven-bake clay. I LOVE how they turned out!


When I made my clay leaf prints, I hadn't thought about what purpose they could serve, besides just sitting on a table being decorative. And then I realized that they are perfect to use as napkin ring and coasters! Affiliate links below. 


Clay Leaf Print Napkin Rings and Coasters


Materials:


Steps:


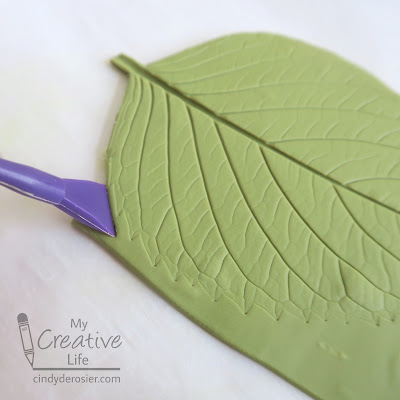
Mix a small amount of Red and a generous amount of Granny Smith together to make your desired color. Roll out the clay 1/4" thick, then place the leaf on top. Gently roll the leaf into the clay, then carefully remove the leaf. 

This was my first attempt. After placing the leaf, I rolled too hard, which made the clay uneven and pushed the stem too deep. Sculpey is infinitely reusable until you bake it, so if your first attempt is not perfect, just re-roll the clay and try again! 


When you have a print you like, use the clay tools to remove the excess clay around the edges. Hydrangea leaves are serrated, but I wanted a smooth edge, so that's how I trimmed it. 


Roll out the excess and make more leaves. I used a large leaf for the coasters and a smaller leaf for the napkin rings. 


Put the leaves on a sheet pan and bake at 275°F for 15 minutes. If you see any bubbles in your baked leaves when you take them out of the oven, immediately press a second sheet pan on top of the hot leaves to flatten them. Let the leaves cool completely. 

Use Supertite to glue the smaller leaves to the napkin rings. 

Note that while Sculpey clay is non-toxic, it has not been tested for food use. So while your coaster is a great place to rest a drinking glass, don't use it as as bread plate or serve any other food directly on it.

4/8/22

Earth Day Nature Collage

There is so much beauty in nature. Some of my favorite crafts are made with fallen leaves, acorns, pinecones, and other found treasures. This project is particularly great for Earth Day, because instead of removing items from nature, you're just rearranging what's already there. There's so much room for creativity. The collage you make is temporary, so be sure to take a photo!


Earth Day Nature Collage


Materials: 

  • leaves, rocks, and other natural materials already on the ground*

Steps: 


Clear a place in the dirt for your collage. I used a place along our fence that has fallen leaves from the neighbor's tree. I pushed them aside to expose a heart-shaped workspace. 

It's easiest to center your project by starting with the R. I made mine out of small rocks. I picked the lightest colored ones I could find so they would contrast with the dirt. I made the A and T next. Then I added the E and the H. Finally, I outlined the shape of the heart with the yellowest of the fallen leaves. 

Don't forget to take a photo! 


*I picked the dandelions (which I was harvesting for Trouble, who LOVES them); everything was already on the ground.