Showing posts with label Christmas tree. Show all posts

12/8/23

Christmas Tree Thank You Cards

When Trevor was little, we had great fun making Christmas-themed thank you notes together. I think these handprint reindeer from 10 years ago were my very favorites. Trevor is no longer interested in making cards with me, but he knows that mailing thank you notes to people who send him gifts is non-negotiable. Now I make the cards by myself. I had a lot of fun with this design, using inks in so many different ways! Affiliate links below. 


Christmas Tree Thank You Cards


Materials: 


Steps: 


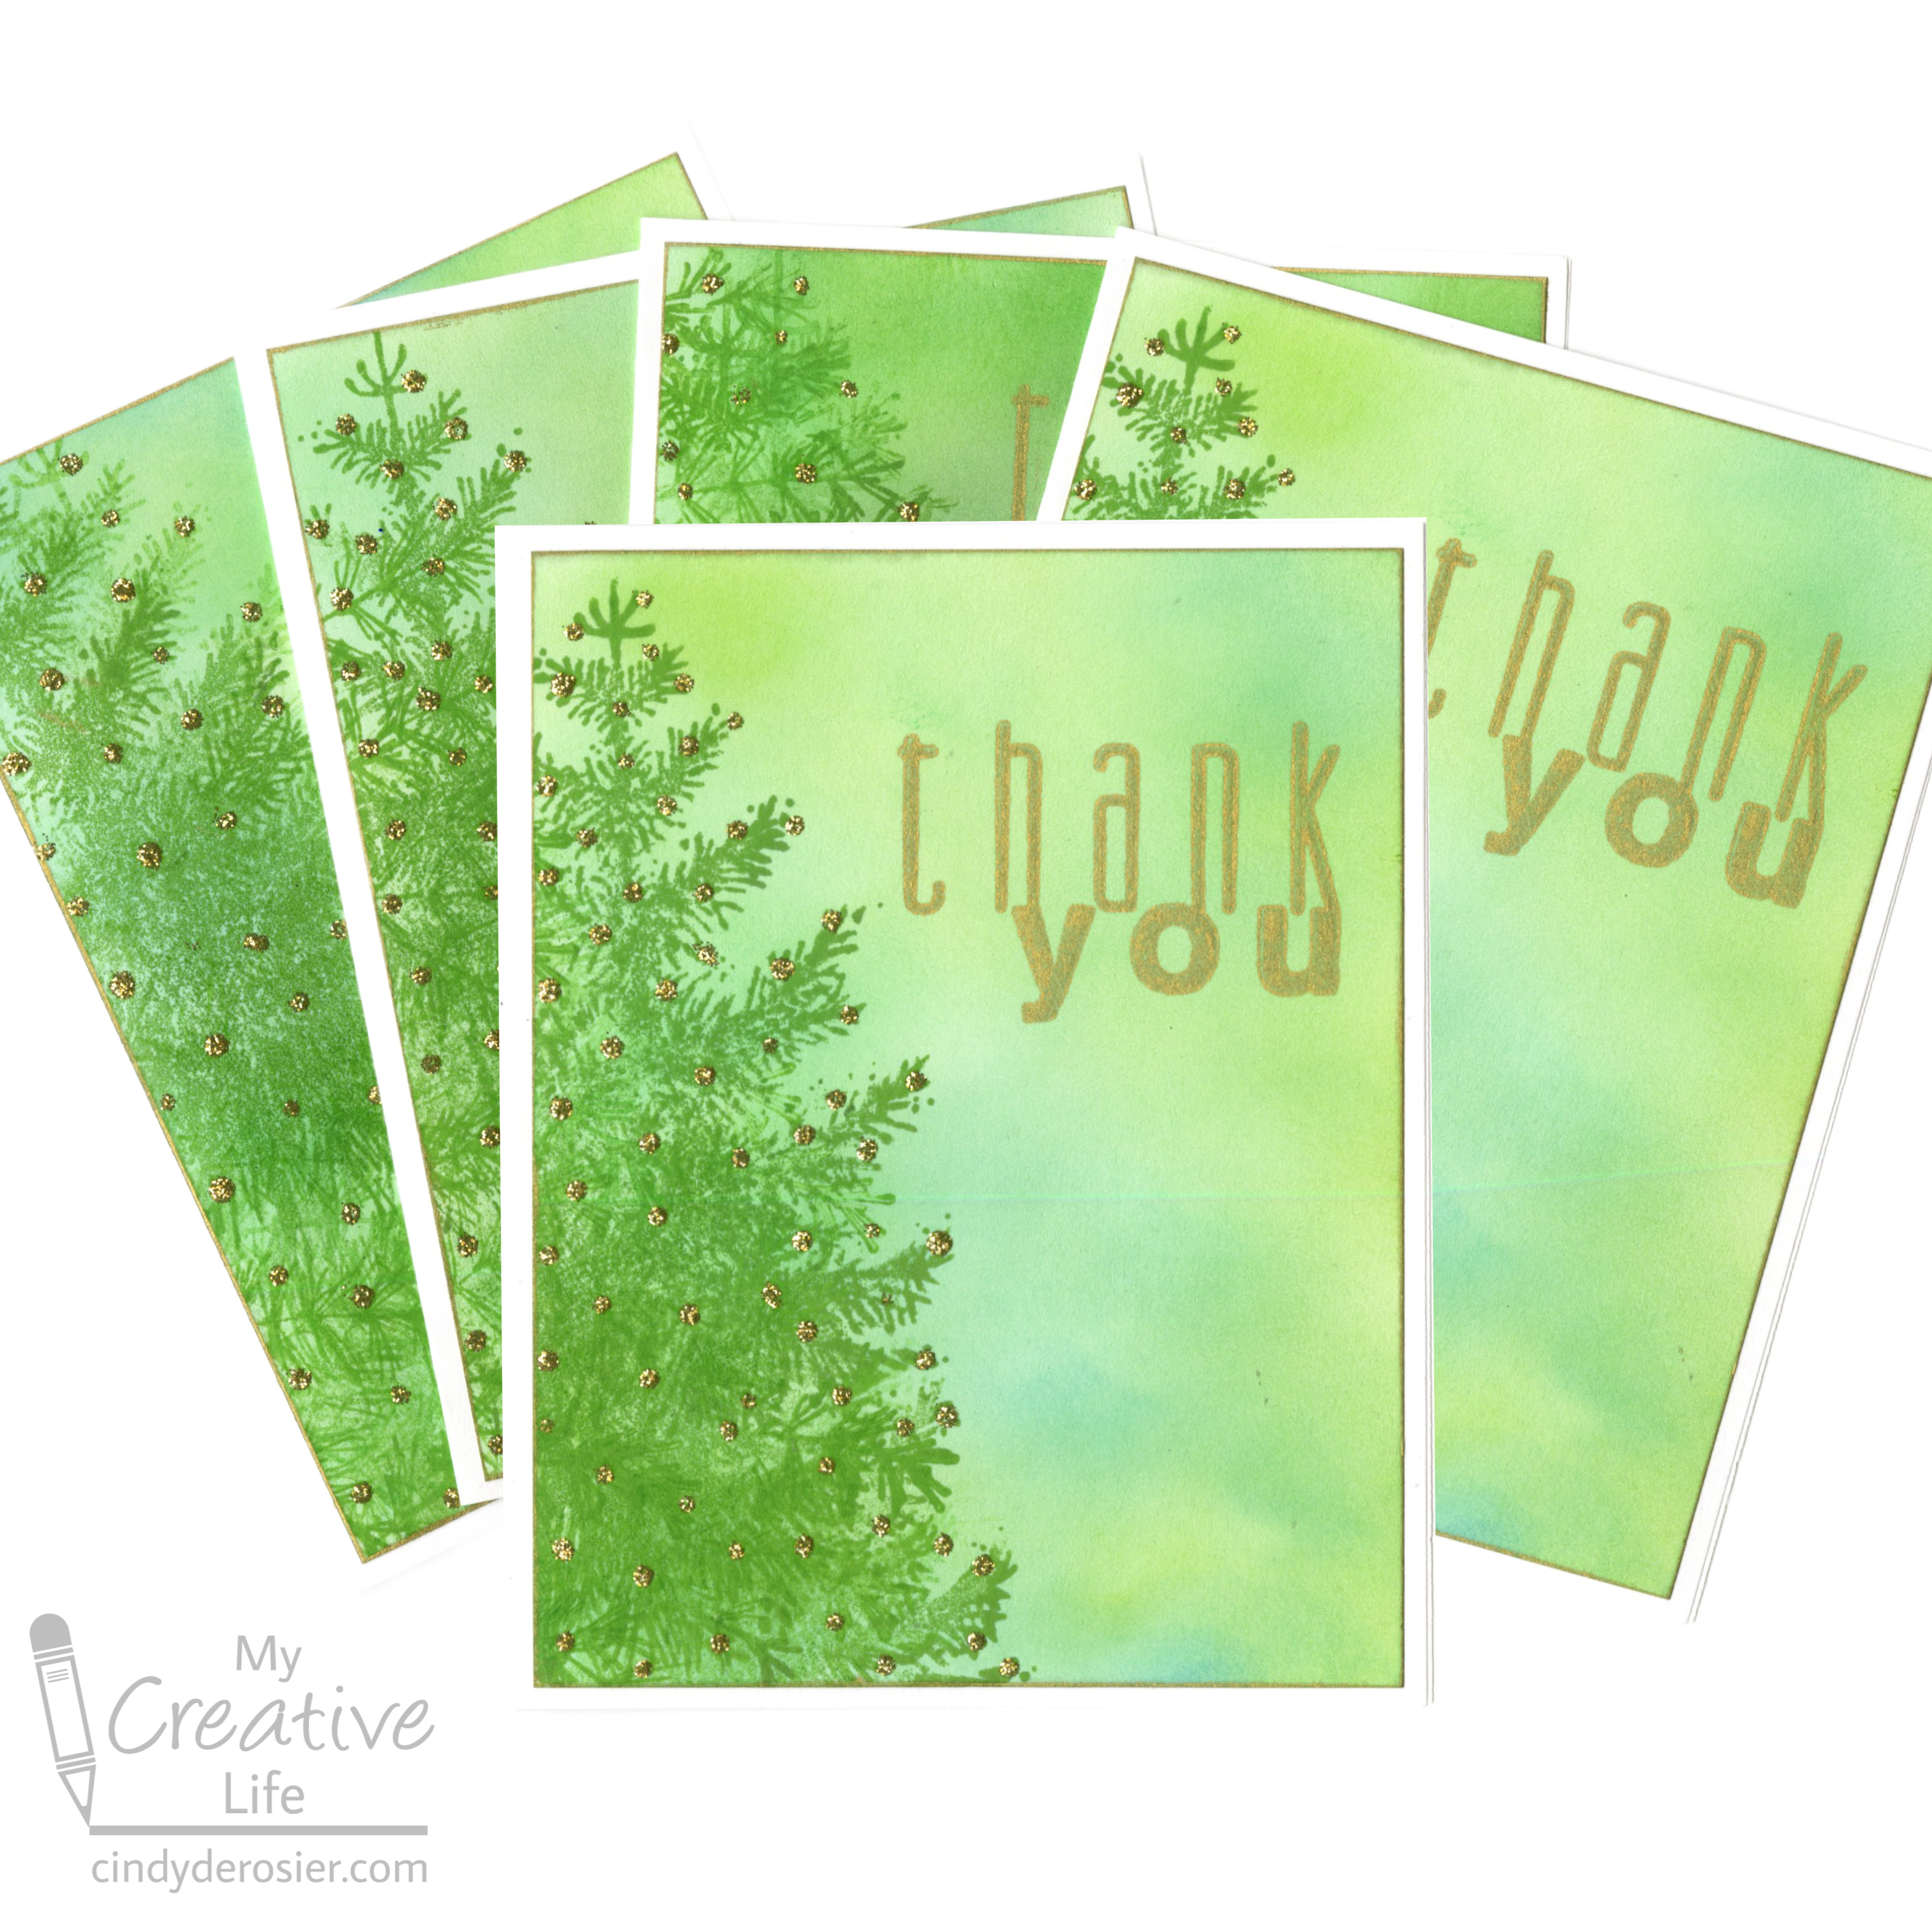
Cut a piece of cardstock in half, then fold each half to make two 4.25" x 5.5" card bases. Use a separate sheet of cardstock to make 4" x 5.25" card faces. Repeat until you have the desired number of card bases and faces. 

Use a blending brush and several shades of green inks to color the card faces. Work on a piece of scratch paper and go all the way to the edges. 


Stamp the tree onto the left side of the paper. My stamp isn't as big as the paper, so I stamped at the top first, then stamped lower and lower to extend the tree to the base of the card. 

Stamp the sentiment in the upper right quadrant, then use the same gold to ink the edges. Add dots of gold Stickles all over the stamped tree. 

When the ink is dry, adhere the card faces to the bases. 

8/29/23

Christmas Tree at Night, Made with Paint Pens

It might be a little early for Christmas crafts, but this idea popped into my head while playing with the Apple Barrel Paint Pens I shared yesterday and I was eager to try it out. It's really easy to do and I love how it turned out! Affiliate links below. 


Christmas Tree at Night


Materials: 


Steps: 


Use painter's tape to form a triangle on the cardstock in the shape of a Christmas tree. Working with one paint pen at at time, add dots of color right up to the edges of the tape. 


Continue until you have filled in the inside of the triangle. Be sure that you've gone up to the edges with your dots of color. 


Peel away the tape and use the yellow paint pen to draw a star at the top of the tree. When that is dry, use a q-tip to outline the tree with yellow pastel chalk to mimic the glow the lights would be giving off. 


I added a few swipes of chalk under the base of the tree to give a hint of the ground it's sitting on. 


I'm having fun playing with the paint pens. Expect to see more projects featuring them some time in the future!

12/14/20

Christmas Tree Mint Cheesecake Mousse

Are you a fan of creamy cheesecake? How does rich, fluffy mousse sound? Perhaps some cool mint? I love all three, so I put them together into one amazing dessert. (If I do say so myself. Which I do. It's really, really good.) And because it's winter, I put served my cheesecake mousse in Christmas tree creme brulee dishes. My dishes are about 15 years old, so I couldn't find an exact match, but here are some similar tree-shaped dishes that should work. Or, try this really cute set of tree dishes (affiliate links here and throughout the post). 


Mint Cheesecake Mousse


Ingredients:


Steps: 


Whip the cream until soft peaks form. Add 1/4 c. powdered sugar and whip until stiff peaks form. Set the whipped cream aside. 

In a separate bowl, whip the cream cheese until light and fluffy, approximately 2 minutes on the highest speed. Add the remaining 1/2 c. of powdered sugar and the mint extract. 

Remove 1/4 c. of the cream cheese mixture and put it into a small bowl. Stir in the cocoa powder, a teaspoon at a time, until the mixture has the consistency of a truffle. Set it aside. 

Return to the mixture of cream cheese, powdered sugar, and mint extract. Add the food color, a small amount at a time, until you get a shade of green that is slightly darker than you want the final color to be. I like to stick a toothpick into the gel, then swirl the toothpick through the mixture until it stops giving off color. Then use a clean toothpick to repeat the process. It usually takes me 2-3 toothpicks' worth to get the shade I want. 

Gently fold the whipped cream into the green mixture. Scoop it into the dishes, then fill in the trunk area with the truffle mix. 


Add a star to the top of each, then add as many sprinkles as you'd like. 


You can serve them immediately, but they're even better after they chill for a few hours. This recipe makes six servings. 


Trust me - this mint cheesecake mousse is DELICIOUS.

12/18/19

Yarn and Pony Bead Christmas Tree Ornament

I had so much fun making this festive Christmas tree ornament! It's really easy to do and, other than the paint drying time, it comes together really quickly. Affiliate links below. 


Yarn and Pony Bead Christmas Tree Ornament


Materials:


Steps: 


Paint the three largest craft sticks green. Paint the mini craft stick half green and half brown. When the paint is dry, glue the large sticks together to make a tree shape. 


Then glue the small stick to the bottom of the tree so that the brown part becomes the trunk. 

Cut a 16 foot length of green yarn and thread pony beads onto one end. I used 28 beads, but you can add more or fewer if you want a different density of 'ornaments' on your finished tree. You can do the same with the yarn. If you want your tree more or less filled in, adjust the length of the yarn. 


Take the yarn end that does not have the beads near it and tie it tightly around the green portion of the tree trunk. Now wind the yarn around and over the tree until it is mostly filled in and you've reached the string of beads. 


Slide one bead down the yarn so that it rests on the tree. As you continue wrapping, slide beads down one at a time. You may need to unwrap and rewrap the yarn a few times to get an arrangement you like.

Tie the yarn end around the trunk of the tree, with the knot on the back side. Weave the yarn tail into the ornament. Add a hook for hanging, or nestle it between branches on the tree. 


I love my new ornament!

12/16/19

The Ultimate Christmas Recycling Craft

Steve thinks I have a problem. Specifically, he thinks that I "hoard trash." Clearly, he doesn't understand how important it is for a kids' craft blogger to have a large stash of cardboard tubes, corks, plastic lids, and empty Tic-Tac containers available for craft emergencies. Obviously, I don't have a problem. I have a perfectly normal collection of valuable crafting materials.

Yet, for someone who accuses me of "hoarding trash," Steve is my biggest enabler. He changed a burned-out light bulb the other day and asked me if I wanted it. Of course I did. Because otherwise, I couldn't have made this:


I'm assuming you spotted the light bulb right away, but can you find any other "trash" in there? Look closely! Did you spot an empty spool? A plastic lid? A Tic-Tac container? I used all of those and more in this project that I'm calling The Ultimate Christmas Recycling Craft. "Hoarding trash." To that I say, "Hogwash!" And anyway, I'm USING the trash important craft stash, not hoarding it.


To make my creation, I painted the light bulb with Classic Green Folk Art acrylic paint (affiliate link here and elsewhere). It took two coats to get good coverage. I added a coat of brown to the empty spool. When those were dry, I added self-adhesive enamel dots to the tree and glued a craft foam star in place. Then I attached the spool to the light bulb using Supertite. I'm a relatively new convert to Supertite. It has the holding power of hot glue, but is repositionable for much longer than hot glue and obviously doesn't have a cord or heating time. I always get it on my fingers though, so I probably should be using my Hot Glue Finger Caps with it, now that I think about it.... 

Anyway, here's a look at my workspace midway through the project. As you can see, my next step is gluing a scrap of felt to a plastic lid. It BARELY fit, but the whole point of my project was to use up stuff, not cut a new piece. 


Once I had my tree skirt, I glued the tree in place. I decorated the presents by wrapping ribbon scraps around them. Finally, I glued them under the tree. 


Clearly, I use recyclable materials cleverly, not "hoard trash." I challenge each of you to make your own version of The Ultimate Christmas Recycling Craft. It's a lot of fun!

12/11/19

Plaid's Let's Paint Live - Handmade Holiday Ornaments (Cindy's Version)

I had a blast with this month's "Let's Paint Live" with Plaid! This time, the project was Handmade Holiday Ornaments. Check out what I made:


Instructor Jessie Pniewski's ornaments look like this:


Astute readers may notice that my projects look a bit different than Jessie's. Perhaps the biggest difference is that I used cork coasters as my substrate rather than wood rounds. (Affiliate links here and throughout the post). I've never painted on cork and was curious to see how it would work. Once I decided to go off-script and use Jessie's instruction as guidance and not gospel, I made a few other modifications.


The trees are more sparsely decorated and I painted the blue background all the way to the edge. (I also put a base coat of white gesso on that coaster, but it turns out that I didn't need to. I didn't use gesso for the other two coasters and there's no obvious difference in coverage.) The buffalo plaid didn't work all that well on the cork, and I changed the deer into a mouse with a sprig of holly on one ear. The wreath got a lot bushier and gained a bow. 

But the most interesting experiment was with the rub-on. I was really curious to see how it would adhere to cork. There were a few tiny cracks, but they're barely noticeable:


I'm trying to decide how best to seal these so I can use them as coasters. My gut is saying Mod Podge Ultra, but I'm not sure what it will do to the rub-on. Only one way to find out, right?!

Anyway, thanks to Plaid for another super fun Let's Paint Live! The next one is coming up on Thursday, January 11 and I can't wait.

11/26/19

Fingerprint Family Christmas Tree

This festive Christmas tree centerpiece is a special keepsake because each portion is decorated with a different family member's fingerprints! Look closely at the base - each person signed their name. Since the two wood pieces come apart, the tree is really easy to store. I wasn't able to find the same tree I used, but there's one I like even better in the materials list. Affiliate links below. 


Fingerprint Family Christmas Tree


Materials:


Steps:


Paint the wood tree pieces and let them dry completely. 

There is space for up to 8 family members to participate per tree. Each tree is made up of two wooden pieces, each with a front and a back, each of which can be divided into left and right. Below, you can see that I signed my name at the left-hand side of one base, then used my fingers to add dots of paints only on the left-hand side of the tree. Someone else will fill in the right-hand side, while two other people do the same with the other wooden piece. 


After those front four sections are dry, the last four family members can complete the left and right sides of the backs of the two trees. 


After all the paint is dry, assemble it to create an 8-sided tree with each family member's name at the bottom. 


I suggest buying multiple trees to allow for your family to expand. As inlaws, children, or others join the family, have them add their signature and fingerprints. Over time, you'll have a priceless keepsake that preserves wonderful memories of those with whom you've celebrated Christmas.