Showing posts with label ink. Show all posts

4/22/25

Toucan Easter Egg

This is my final decorated Easter egg for this year. It's a toucan. Specifically, it's a toco toucan, the largest species of toucan. Endemic to South America, toco toucans live in semi-open habitats at altitudes up to 5740 feet (in contrast to other toucans, who prefer closed-canopy forests). They feed mainly on fruit. They are a least-concern species, still plentiful in the wild. And they're really fun use as inspiration for a decorated egg. Affiliate links below. 


Toucan Easter Egg


Materials:


Steps: 

Paint the egg black, leaving a rounded cone-shaped area white. 

Cut a ring from the cardboard tube. Paint it green. 

Cut a beak from cardstock. Use the blending brushes to add orange ink to the bottom of the beak and yellow ink to the top. Without adding extra ink to the brush, color the white area of the egg, just where the eye will go. Use a Sharpie to color the end of the beak black. 

Cut leaves from green felt and glue them to the cardboard tube ring. Glue the googly eye and beak in place. When the glue is dry, place the toucan amongst the leaves. 

4/10/25

Tape-Resist Cross Easter Eggs

This fun Easter craft combines a more secular symbol of Easter (dyed eggs) with a religious symbol (a cross). They're really fun to make and something crafters of all ages will enjoy. Affiliate links below. 


Tape-Resist Cross Easter Eggs


Materials:


Steps: 


Cut egg shapes out of cardstock. I made a pattern with scratch paper and then used that to cut out multiple eggs at once. 

Cut a strip of painter's tape about half the height of the egg and place it vertically on the egg. Cut a slightly shorter piece of tape to make the cross piece. Press firmly on both to make sure they are flush with the paper. 


Use blending brushes to add ink to the eggs, directly over the tops of the crosses. You can do a single color or blend lots of colors together. Don't leave white spaces or the tape-resist effect won't work as well. 


Peel up the tape and you should have perfectly white crosses on your colorful eggs. Enjoy!

3/31/25

Zen Doodle Name Art

I'm calling this Zen Doodle Name Art. It was really fun to make. Affiliate links below.  


Zen Doodle Name Art


Materials:


Steps: 


Use the letter stickers to spell your name on a piece of paper. The ones I put in the supply list above are repositionable, so you'll be able to remove them later. If you use something else, like I did, stick them to your pant leg a few times to remove some of the adhesive before putting them on the paper. Otherwise you risk tearing the paper when you remove them. 


Use the blending brushes to cover all of the exposed paper with color. I used three colors, but you can obviously do whatever you want. 


Carefully remove the stickers. 


Now fill in each letter with a different pattern. 


That's all there is to it! I love projects like this for groups, because the finished designs will look completely different from one another. Enjoy!

10/2/24

Blackberry Ink with a Feather Quill Pen

Have you ever made your own ink? There are many natural materials that can be boiled or juiced to make inks and dyes in a variety of different colors. Blackberries (the state fruit of both Alabama and Kentucky) produce a beautiful reddish-purple juice that kids can use directly on paper as ink. For extra fun, use a feather as a quill pen! Affiliate links below.     


Blackberry Ink with a Feather Quill


Materials: 


Steps: 


Wrap several very ripe blackberries in cheesecloth. Tie an extra strip of cheesecloth around the bundle to use as a handle (unless you don't mind purple fingers!). Put the bundle in a glass bowl, then press the blackberries with the back of a spoon. Continue to press until you've extracted as much of the juice as you can.


Discard the bundle of blackberries. Place a coffee filter over a second container (hold it in place with a rubber band, if necessary) and slowly pour the juice over the coffee filter. It will catch any bits that made their way through the cheesecloth. Now you can use your ink for drawing, coloring, and writing.

A note about feathers: I used what I had on hand, which were dyed. For a project about natural dyes, I'd use natural feathers, which is what you'll find above in the materials list. I used my feather straight out of the package; occasionally, you'll need to prepare the feather by pulling off any bits near the writing end and possibly trimming the very end to make it smooth. 


If you let the paper dry between layers (naturally or with a heat gun), you can add more ink on top to get darker colors. I did this several times to get my final blackberry drawing, although I didn't trace over my writing. 


Obviously, it is imperative to have extra blackberries on hand for snacking! So good. 


When you are done with the project, discard your ink. Because it wasn't boiled and there are no preservatives, it's not meant to last long-term. If you would like to make ink that will last, I recommend this excellent tutorial by Dana Driscoll. Enjoy!

3/19/24

Easter Morning Empty Tomb Craft

I'm teaching an Easter-themed craft at church on Sunday. I made two versions and I'd love to hear which you prefer. In both cases, the empty tomb and the rolled away stone are popped up, adding dimension to the project.

Choice A is at the very break of dawn, with pinks, oranges, and yellows in the sky. The empty tomb and crosses are black in shadow.  


Choice B is later on Easter morning, with blues, yellows, and just a hint of orange in the sky. The empty tomb and crosses are brown. 


As I said, I'm curious to hear which you prefer. I'm going to have supplies for both options available when I'm teaching. Affiliate links below. 


Easter Morning Empty Tomb Craft


Materials:


Steps:


Print 'He is Risen' in the upper left corner of the white cardstock, then trim it to 8x8" (I chose this size because I can go in a shadowbox). Save the larger scrap; you'll be cutting it to place in the empty tomb. Use the inks and blending brushes to color the top half of the background paper as well as the scrap. 


Tear the black cardstock to make a hill. Trim it so that it is 8" wide and high enough to cover the white at the bottom of the paper. Use the black scraps to cut a tomb, round stone, and small strips for the crosses. I experimented with adding chalk to the tomb and stone, which is what you see below. I ended up cutting them down and using the backs. 


Glue the crosses together, then glue them and the hill to the background paper. Trim the inked scrap so that it fits behind the tomb opening, then glue it in place. 

Use the foam squares to adhere the tomb to the paper. Do the same with the stone; since it goes on top of the edge of the tomb, it will be raised twice as far off the base. 


The steps to make Choice B are basically the same, with one exception: it's difficult to tear chipboard. Use scissors for the hill. 


Remember to tell me in the comments which version you like better! I'm eager to see which the church members choose. 

4/10/23

Bat Flyout Scene in Ink

One of the coolest things I've ever done was witnessing a bat flyout. We live about 30 minutes from the Yolo Causeway, one of the top ten places in the world to see a bat flyout. We recently drove home from Sacramento at just the right time to be driving over the Causeway when hundreds of thousands of bats came pouring out from beneath us. Well, not pouring. They were flying. Hence "flyout" and not "pourout." It was spectacular and incredibly awesome because we totally weren't expecting it. 

I'm always happy to see bats, wherever I am. Every bat I see feasting means fewer mosquitos biting. Bats live all over the world, in a wide variety of habitats. You can find different bat species in forests, deserts, and everything in between. Today's project honors these nocturnal helpers. As a bonus, it gave me the chance to test out my new blending brushes. Affiliate links below. 


Bat Flyout Scene In Ink


Materials:


Steps: 


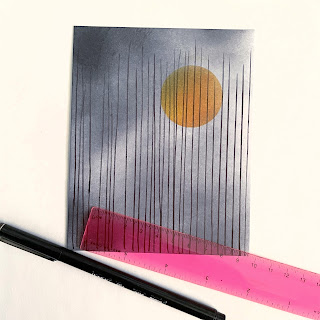
Apply black ink to a blending brush, then add the ink to the cardstock. Use a light hand. You want some small areas of black, but mostly gray with white peeking through. You can see my example in the upper left. Ignore the other backgrounds; I was testing out different ink pads to see how they worked with the brushes. By the way, I LOVE my new blending brushes. They're super comfortable, have great control, and hold just the right amount of ink. 


Punch a circle from some scrap cardstock to make a template for the moon. Blend yellow and orange ink into the open space. 


Use a straight edge to draw tree trunks. To keep them looking natural, keep the spacing irregular and don't have all of them be perfectly vertical. 


Use quick, upward swoops to draw branches and twigs on the trees. As you go, thicken the trunks of a few trees to add variety. 


Now add bats! Start with a central blob and add short wings to each side. You can add as many or as few bats as you want. Finish by adding the ground to anchor your project. 


It's a shame that bats are typically only associated with Halloween. These wonderful creatures deserve to be celebrated year-round.
 

10/19/22

Fall Leaf Luminarias

Luminarias looks so pretty lining a path at night. Use fall leaves to make make your own luminaries to display during autumn. They're particularly nice to set out for Halloween to welcome the trick-or-treaters. Affiliate links below. 


Fall Leaf Luminarias


Materials: 


Steps: 


Spread out the paper bags and arrange the leaves on top of them. I made my luminarias two at a time and used a box to contain the spray. 


Spritz the spray ink over the leaves until the visible white area is mostly covered. If you leave visible white, there won't be contrast when you remove the leaves.  


You can remove the leaves immediately and set the bags aside to dry while you spray the next batch. Continue until you've decorated enough bags to line your walkway. 

Fill the bags with an inch or so of dried beans (or rice or pebbles). You want enough to keep the bags upright and in place. Nestle the tea lights into the beans and arrange the luminarias. Beautiful!


I made these for fall, but luminarias are even more common for the Christmas season in places like New Mexico. I found this fascinating article about the difference between luminarias and farolitos that you might enjoy. You can make a winter version by following the same steps. Try using different elements from nature (holly leaves and berries, for example). You can also use different colors. 
 

6/1/21

Craft Materials Name Art

 More name art! I love name art


---------

Craft Materials Name Art


Materials:


Steps:


Use the craft materials list to determine what material to use for each letter in your name. If you have a duplicate letter, you can either do the same thing twice or use a second material that starts with that letter. 

Glue each word to a strip of colorful cardstock. Mount the strips in order on a separate piece of cardstock so that they spell out your name vertically.