Showing posts with label Gift Card Holders. Show all posts

4/27/21

Teacher Appreciation Day Gift Box

Teacher Appreciation Day is May 4, one week from today. This is a wonderful opportunity to tell those special teachers in your life just how much they mean to you. Teaching can be very challenging; a kind note from a student or a parent may be exactly what a teacher might need to temporarily forget the hard parts and remind themselves what a rewarding job it is. 

When I came across the owl drawing in Quirky Collages to Color, I thought it would be awesome to use it to decorate a gift box for a teacher. So that's exactly what I did.  


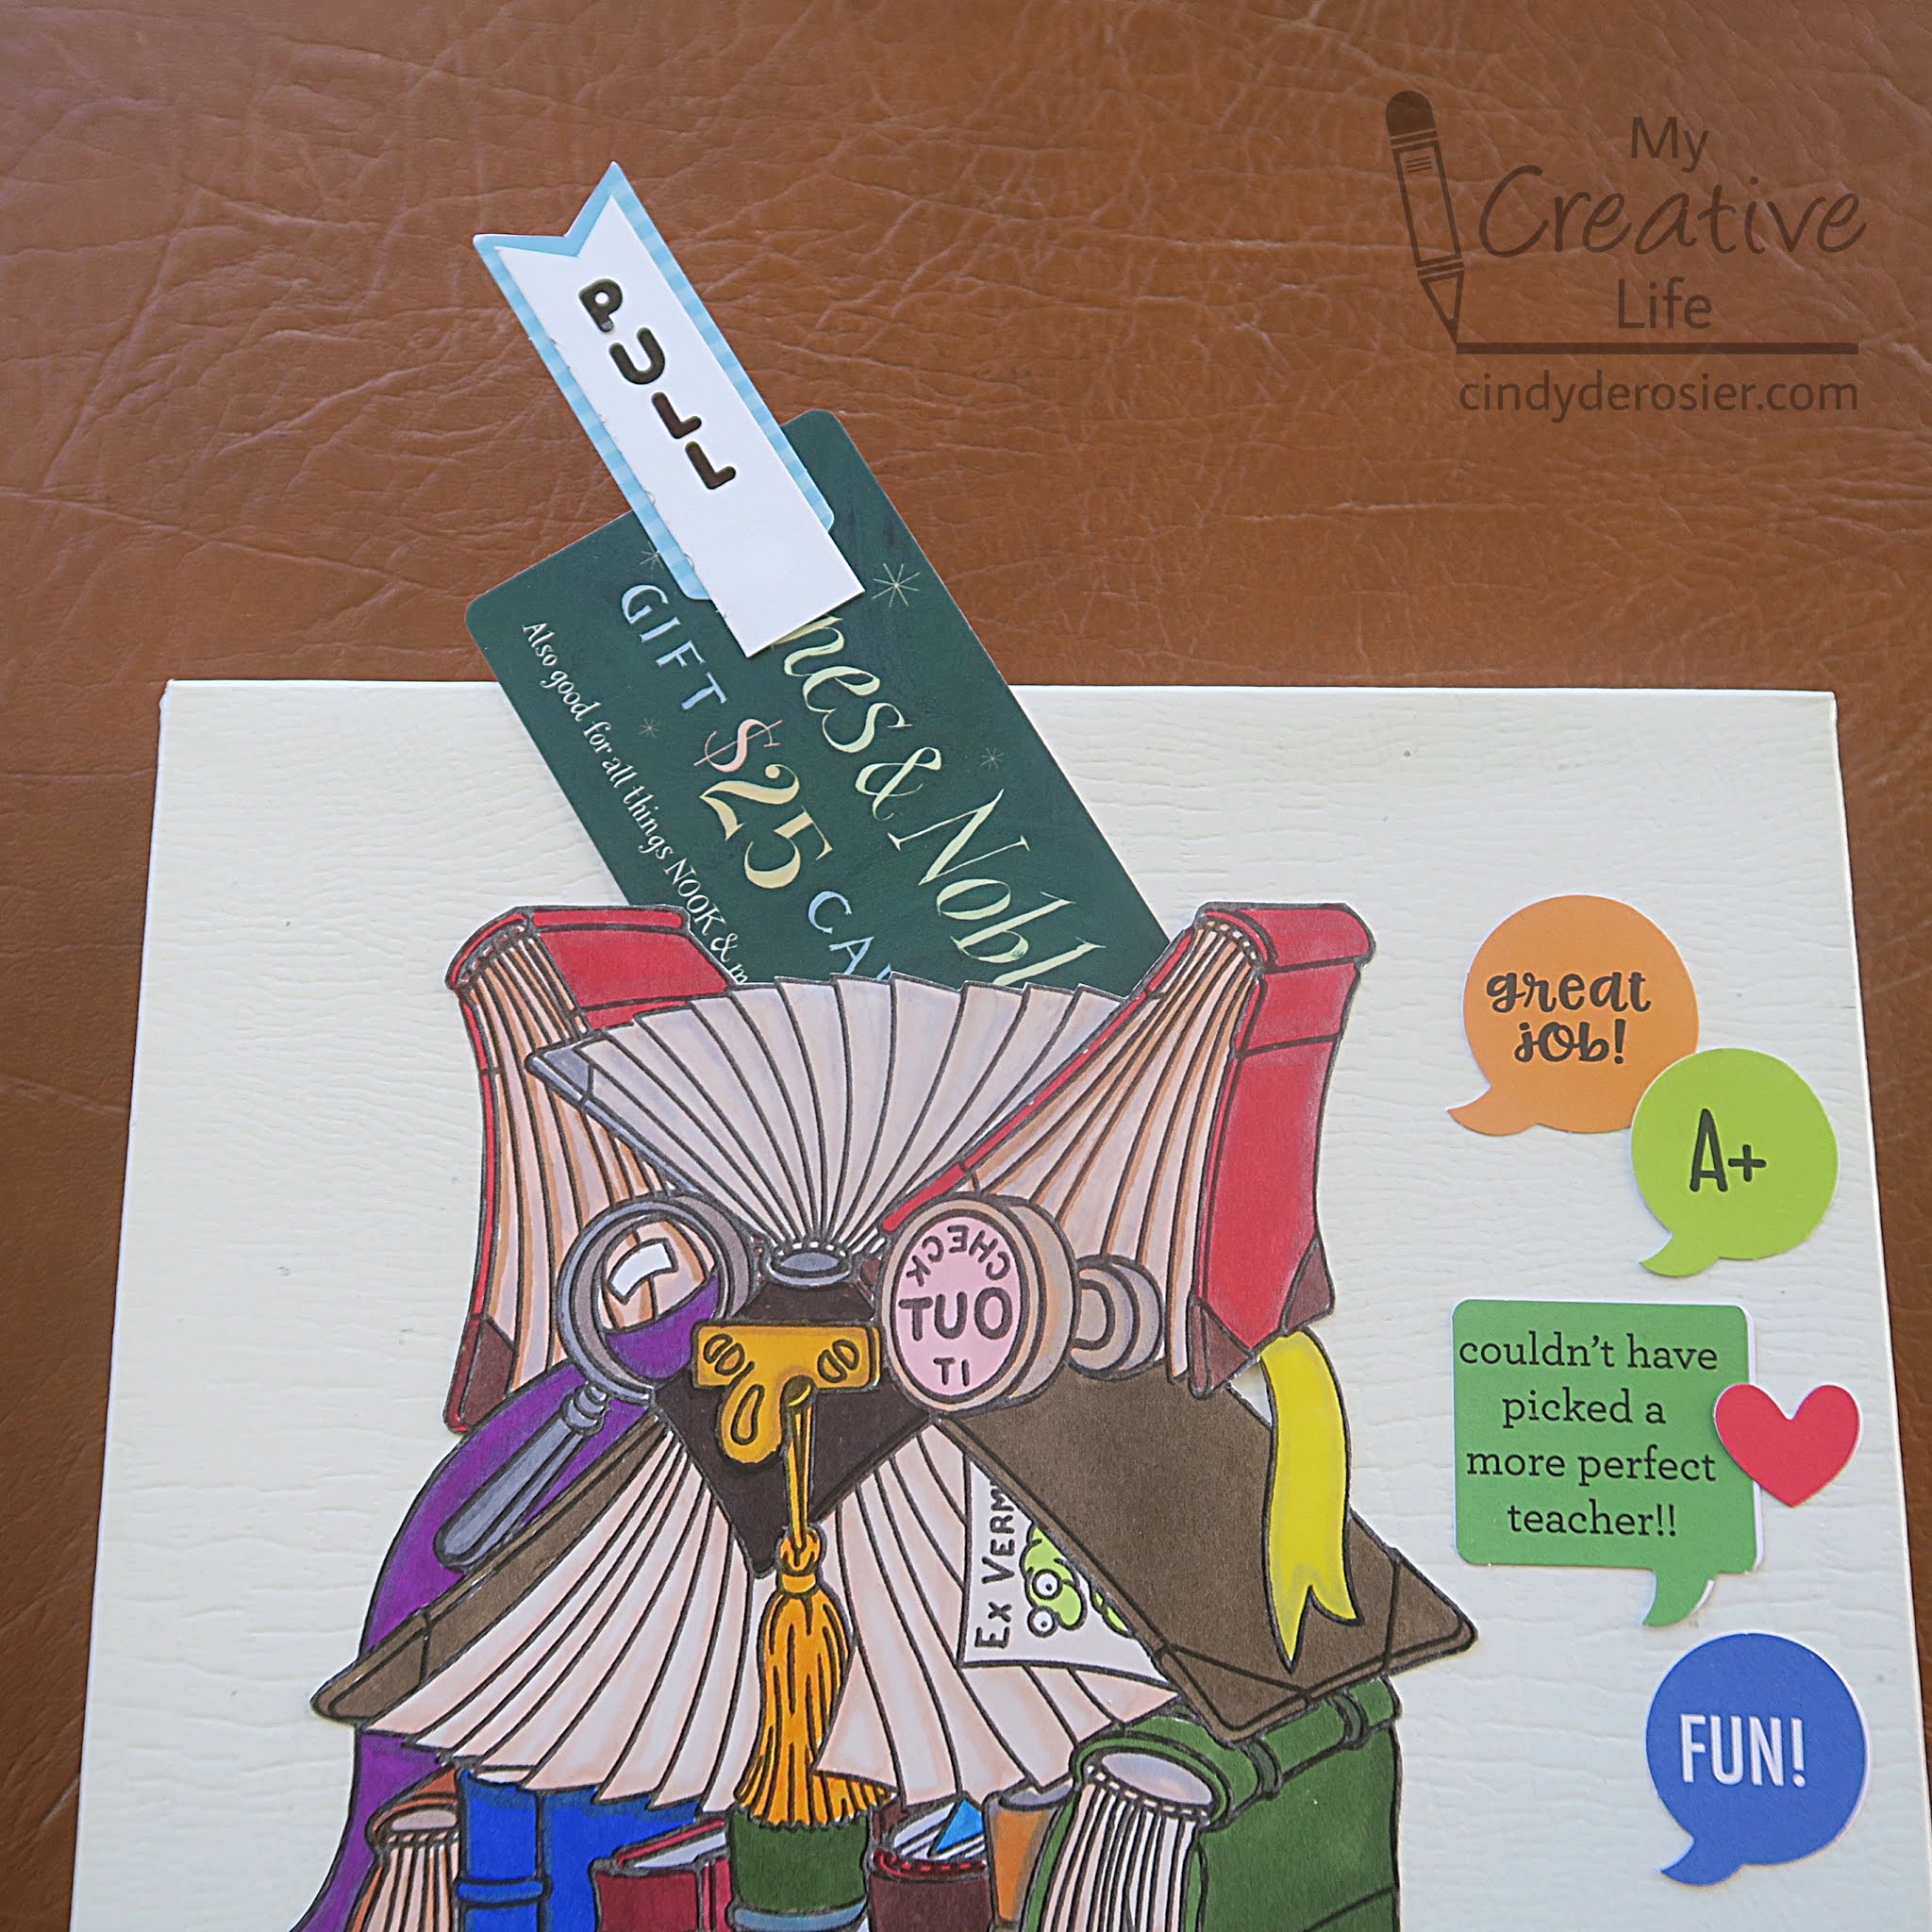
Did you notice the pull tab? It's attached to a bookstore gift card. This is my #1 recommendation when people ask me what gifts teachers want. I've never met a teacher who didn't spend their own money on books for the classroom, or who wouldn't love to buy some books for themselves to enjoy. Affiliate links below. 


Teacher Appreciation Day Gift Box


Materials:


Steps:


Color in the owl image using markers. With microtip scissors, carefully cut out the image. Place it on top of a gift box. Arrange the Chit Chat die cuts to the side of the owl and adhere them in place. Turn the owl upside down and apply adhesive along all the edges EXCEPT for the top edge between the two "ear" books. Carefully adhere the owl to the box. 

Cut a scrap of white paper and write PULL on it, layer it on a Chit Chat banner, then tape it to the end of the gift card. Slide it into place. 


So what should you put inside the box? Here are some ideas, based on what my fellow teachers and I frequently bought for our classrooms, using our own money:


Happy Teacher Appreciation Day to all of my former colleagues and all of the other hardworking teachers out there!

1/12/21

Money Gift Idea: A Rainbow of Hidden Gift Cards

I have another money gift idea for you. Instead of cash, this one uses gift cards. Five, to be exact. Do you see them? 


If you guessed that the rainbow is made up of gift cards, you're right! 

It felt really weird selecting gift cards based on their color. I can't say I've ever done that before! I ended up choosing AMC Theatres (a particularly lame gift during the pandemic, but I liked the red), Amazon (orange), Subway (yellow), Target (blue), and iTunes (looks pink below, but is more purple above). Affiliate links here and throughout the post. 


The first step to making the gift was to stack all the gift cards to create a rainbow. I turned each gift card to get the widest strip of uninterrupted color, which in most cases meant they were upside down. I attached each gift card to the next with a Glue Dot


I used blue cardstock to make a card front, turned it face down, then traced around the gift card stack to see how large of a window I would need. I used my favorite craft knife to cut a window inside of my traced lines, then tested the fit. (Always cut less than you need, as you can always cut more but you can't add cut material back.) I decorated the front with punched clouds, a cake die-cut, and sentiment stickers, then used a pair of Glue Dots to attach the stack of gift cards. Because the gift cards were in a sloped stack, I needed a way to adhere the card front to the base that wouldn't have big gaps. I solved that problem by adding strips of foam adhesive around the perimeter of the card front before attaching it to the card base. Add a message inside the card and it's ready to go!

This would make a wonderful gift for a teen, a friend, a teacher, or pretty much anyone else who likes gift cards (in other words, anyone who is old enough to know what a gift card is - sorry toddlers). I suspect I'll be playing with this idea again in the future because I see a lot of possibilities! 

12/22/16

Microwave Popcorn Penguin Gift Card Holder

We're giving gift cards to some of our friends and family for Christmas. So, of course, we had to come up with a fun way to wrap them. This adorable penguin is made of a package of microwave popcorn and is clutching the wrapped gift card. 


-----------

Microwave Popcorn Penguin Gift Card Holder

Materials: 

  • package of microwave popcorn
  • construction paper or cardstock (black, white and yellow)
  • scissors
  • circle punch
  • black pen
  • adhesive
  • gift card
  • wrapping paper
  • curling ribbon

Instructions: 


1. Cut the black construction paper so that it wraps around the popcorn with a small amount of overlap. Use the scraps of black to cut two wings, each shaped like a rounded triangle. Cut a half-oval of white construction paper for the tummy. Punch two white circles and fill in pupils with the pen. Cut a rounded triangle from yellow to make the beak.


2. Wrap the black construction paper around the popcorn and glue it in place. Add the white tummy, the beak, and the eyes as shown in the photo. 


3. Wrap the gift card with wrapping paper. 


 4. Add a ribbon to the wrapped gift card, then adhere it to the penguin's tummy. Glue the tips of the wings on top of the gift, then wrap each wing around the side of the penguin. Adhere them to the penguin's back.


Not only is this great fun for Christmas gift cards, but it works well for winter birthdays, too. Just choose a festive birthday gift wrap and coordinating ribbon.

3/6/15

Gift Card Bouquet, Version 2

Here's version 2 of the gift card bouquet, using different colors of Pull Flowers from Little B. 


I didn't have an extra pickle jar, but as I was digging around for something to use instead, I found a small glass jar. I didn't want to use floral foam in it since that would be ugly, so I filled it with glass pebbles. Instead of using skewers, I attached the gift cards to floral picks that I had on hand. (There are significant advantages to being a craft hoarder having a well-stocked craft room.) I put Glue Dots on the bottom of each pick and stuck them into the vase. I added a second Glue Dot to each pick to anchor it where I wanted along the lip of the vase. It worked like a charm!


Then it was time for the flowers. I made the flowers and this time I trimmed off the strings. I used Glue Dots to attach the flowers to the fronts of the cards and the floral picks. I used nine flowers to hide the cards and create a pleasing bouquet. Here are the two bouquets, side by side.


I like them both. Expect to see more gift card bouquets from me in the future. 

3/5/15

Gift Card Bouquet

I've been wanting to make a gift card bouquet for a long time. I decided my sister-in-law's birthday was just the occasion. A fun fact: Teri was born on February 29, so three years out of four, her birthdate does not appear on the calendar. While she's been alive for 35 years, she celebrated 8 3/4 on March 1. It's a neat coincidence that Trevor is also 8 3/4 this month, just like his Aunt Teri!

Here is the gift card bouquet I made for her. I'm really happy with it. 


I started with an empty pickle jar. (Trash to treasure!)


I put a disc of Oasis floral foam into the jar. It was a tight squeeze, which was perfect. Then wrapped the jar with this interesting metallic twist stuff. It untwists to exactly the right size for the jar! I attached it with Glue Lines, then wrapped white duct tape around the rim to attach it more securely to the jar.


I dug out the Little B Pull Flowers from my FaveCrafts Blogger swag box and made three yellow roses and six garden mums. As I completed each flower, I tied it off but did not snip the ends of the strings. 


I readied the gift cards and some kitchen skewers....


... and tied the flowers to the cards and dowels. There were five gift cards, so four of the flowers didn't have a card.


With all the skewers prepped, I put them into the floral foam. As I worked, I cut some to different heights, just the way I'd cut the stems of actual flowers if I were arranging them. I added a white bow, which hid the white duct tape. The final step was fluffing the flowers just right and adding a strategic Glue Dot or two to pull a flower to better cover a gift card. You can see a slight difference between this photo and the one at the top of the post.


Here's the back. 


As I headed down the stairs with the bouquet to show Steve, I yelled, "Be ready with a compliment because I spent a lot of time on this!" He, of course, gushed about it like the excellent husband that he is. Then he said that it was so nice that we should postpone the planned birthday gift for his mom until Mother's Day and instead give her a birthday gift card bouquet too. I agreed, despite the fact that I didn't have extras of most of the materials I just used. Fortunately, I have a very well-stocked craft room ("well-stocked craft room" sounds so much better than "hoarding problem"), so I was able to make a different version of the gift card bouquet. I'll show it off tomorrow.

11/11/13

Four Gift Card Holders

On Friday, I shared a fun way to give cash as a gift. One of my friends asked if I had any ideas for giving gift cards to make them a little more creative and personal. I've done a lot of different gift card holders over the years. Here are four ideas:


1) Flatten and decorate an empty cardboard tube to make an upcycled gift card holder.


Upcycled Gift Card Holder


2) Turn patterned paper, a string of beads, and a button into a little purse that holds a gift card.


Purse Gift Card Holder


3) Decorate a small wooden frame and use it to hold a gift card.


Framed Gift Card


4) Make a simple gift card envelope from patterned paper.


Easy Gift Card Holder

Obviously, any of these types of gift card holders will work with any theme. Just change the colors, papers or embellishments to match the occasion. If any of you have other ideas for creative gift card holders, please tell us in the comments!

6/28/13

June Flamingo Four

It's time for another Flamingo Four!  This month, three other designers and I worked with these four items:


                                   1) wood frame- Sheffield Custom Frames
                                   2) snowflake stencil- Tattered Angels
                                   3) dimensional quotes- miscellaneous
                                   4) cupcake topper- miscellaneous

Last month, I struggled with incorporating a very heavy metal clothespin into my project.  This month, it was the cupcake topper that really challenged me.  That and the fact that none of my quotes had any of the same colors as the topper.  Then there's the stencil.  A snowflake stencil would be easy for a winter project, but there are no winter colors in any of the other items... and besides, this is June!  

As I played around with the frame, I realized that the opening was the perfect size to hold a gift card.  I popped a Baskin-Robbins gift card into the frame, then noticed that the pink of their logo matched one of the dimensional quotes I needed to use.  I cut down the quote from "Enjoy your life" to just "Enjoy" and started playing around.  What if I used the blue of the logo to paint the frame, then used just part of the snowflake stencil to stamp in pink?  That would have more of a summery tropical feel instead of a wintery snowflake feel.  It took awhile to mix the perfect shade of pink and to decide what part of the stencil to use as a stamp, but with three items used, the project was definitely coming together.

But what about the green and orange cupcake topper that was nearly as large as the frame?  It just wasn't working.  Eventually, I tore it apart.  I used the chipboard hook end and painted it the same blue as the frame and attached it as a hanger.  I cut the tiny bit of green tissue paper from the orange and used it as an accent color.  Here's the finished project:


When the gift card is removed, the recipient can use it as a frame.

 
I'm not crazy about this project, but it really pushed me creatively which is always a lot of fun.  I haven't stamped with stencils in ages; that's a technique I need to use again.  To see what the other designers made, head over to Flamingo Scraps.  As usual, the projects are all very different from one another!

1/25/13

January Flamingo Four

Ready for another Flamingo Four?  This month, three other designers and I each worked with these products:


       1. Graphic 45 patterned paper - "Well Groomed"
       2. Tim Holtz Giant Tag
       3. Pink Paislee Vintage Vogue buttons
       4. pearl trim

The first thing I did when I saw the supplies was to turn the patterned paper over and check out the B-side, as the A-side is totally not my style.  Fortunately, the B-side is!  I could definitely use the patterned paper and the tag on a scrapbook layout.

But what about the buttons and the trim?  The buttons are really chunky and I don't like putting bulky items like those on scrapbook pages.  So I started thinking about cards. Hmm... what to make?  

Inspiration struck.  I cut into the paper (always a little scary when you only have one piece and you HAVE to use it for an assignment), did some folding, added a button, and accented with Stickles.  Then I headed out into the garage, where I put on the shop glasses, grabbed a hammer, and started pounding on the pearl trim.


I removed about 1/4 of the beads on each end of the trim, headed back to the craftroom, and glued everything together.  When I was done, I had this:

 
The "purse" is fully lined... with the scraps left over from December's Flamingo Four!  

 
And when you pull out the tag... it's holding a gift card.

 
Curious about what the other designers made?  Head on over to Flamingo Scraps to see their projects.  As usual, my project is COMPLETELY different from what the other designers created! 

8/1/11

Christmas in July Part 3

I realize that July ended yesterday.  But since I made these items while it was still July, I think I can go with the Christmas in July theme. 

Both of these were made for challenges during the Fiskateers CHA-in-Spirit crop I co-hosted.  I hadn't planned to play along as my hostessing duties took up a lot of time, but I was so inspired by the neat stuff flooding the gallery that I ended up completing all 24 challenges. 

I made this card for the "Ho Ho Ho" challenge which asked us to get a jump on Christmas preparations by making something Christmasy.  I had lots of fun playing with these SEI papers. 


For the next challenge, we had to choose a cool project from the gallery and use it as inspiration for our own project.  I chose a neat gift card holder made by Nic.  I decided to give mine a Christmas theme, since I often give gift cards to cousins and nephews at Christmas and rush to make gift card holders at the last minute. 

 Super fun, incredibly easy, and very practical.  Win, win, win!

7/20/11

Upcycled Gift Card Holders

When I give a gift card, I like to place it in a homemade card or gift card holder.  It helps make an impersonal gift much more personal.  Here's one I made during the Fiskateers CHA-in-Spirit crop that I've been hosting this week:


It was quick and easy to make.  Even better, it's been upcycled from a surprising item- an empty toilet paper roll!  This is not my original idea.  I'm not sure where I first heard of it, but if you google it you can find many variations.  Here's how I made mine:

Step 1: Use a bone folder to flatten an empty toilet paper roll.  Use a very strong adhesive to secure the bottom end of the tube closed.  I used the double-sided tape in the picture and it held for a few hours, then popped loose.  I tried a few other things and eventually used a glue gun. 


Step 2: Wrap the tube in patterned paper.  I recommend lots of adhesive for a strong hold.  Use a circle punch to create the indentations in the top. 


Step 3: Ink the edges and embellish as desired.


Step 4: Create a tag from matching patterned paper.  Add a ribbon and insert inside tube. 

Step 5: Use a Glue Dot to attach the gift card to the tag.  It's ready to give! 

Here's one more that I made.  This one is for a baby shower.


I love how these turned out!  I can definitely see making more for future gift-giving occasions.