Showing posts with label candle. Show all posts

11/29/21

Paper Plate Advent Wreath

Tis the season of Advent! Yesterday was the first Sunday in Advent and the first day of the new church year. Advent is always a special time as we prepare for Christmas, but this year our family had something extra-special to celebrate - the baptism of our nephew (Trevor's cousin, Ian) and Ian's son, Allen. 

This year, I made a paper plate Advent wreath to mark the season. As you can see, it already has one purple candle for the First Sunday in Advent. For the next three Sundays, we'll add another candle to the wreath (another purple candle, then the pink, then the last purple). While I like Advent chains that count down to Christmas, I prefer the symbolism of adding candles rather than subtracting rings. It's a great visual reminder that Advent is a time to get increasingly prepared to celebrate the birth of Christ. 
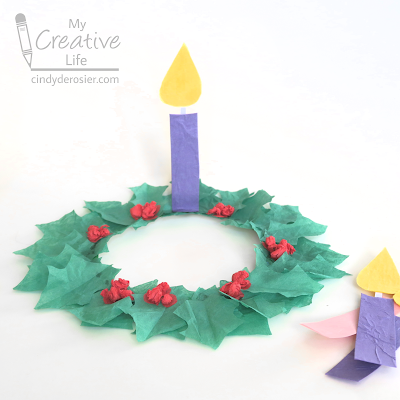


Paper Plate Advent Wreath


Materials:

  • paper plate (I used the dessert size)
  • green paint
  • tissue paper (green, red, purple, pink, yellow)
  • white cardstock
  • scissors
  • glue

Steps: 


Cut out the center of the paper plate. Paint the remaining part of the paint green. While it is drying, stack green tissue paper and cut out holly leaves. 
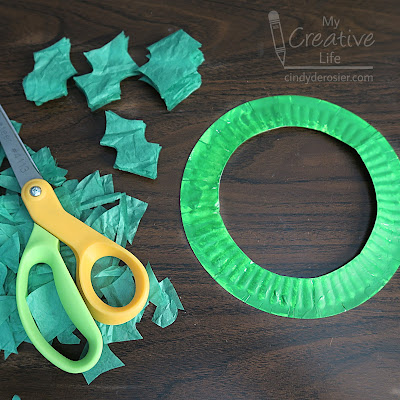
 

Add dots of glue on the wreath, then add a flat layer of holly leaves to cover the paint. Fold the rest of the holly leaves in half. 
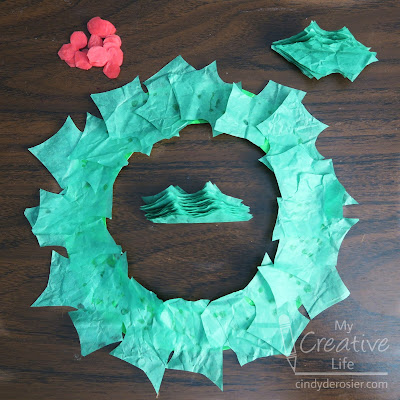

Add a dot of glue to one end of a holly leaf, then glue it to the wreath. (If you glue in more than one place, you lose the dimensionality of the wreath.) Continue until the wreath is sufficiently fluffy and full.

Roll balls of red tissue paper and glue then in clusters amongst the holly leaves. 

Cut out four rectangles for the candles. Use your finger to smooth a layer of glue onto each, then press purple tissue paper onto three of them and pink onto the fourth. Trim the excess tissue paper. To make the flames, cut out four teardrops, smooth glue on them, and press yellow tissue paper onto them. Trim the excess. Cut four tiny rectangle wicks. Glue each onto the back of a candle to connect it to the flame. 
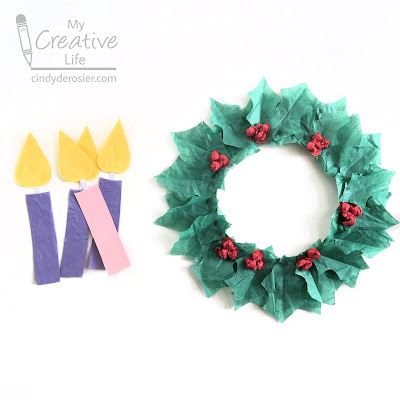

Each Sunday, take the appropriate candle (purple, purple, pink. purple), and fold the bottom slightly to make a tab. Spread glue on the tab and attach it to the wreath. 


Happy Advent, everyone!


CLICK.BUY. CREATE. Shop Michaels.com today!

12/21/20

Edible Advent Wreath

As a professional craft blogger, my job is to design creative projects and then write tutorials to teach you how to make them. Ideally, each project should make my readers want to drop everything and immediately start crafting. For that reason, seasonality is huge. If I publish an adorable Halloween costume on November 1 or a great idea for valentines on February 15, chances are very poor that anyone will drop everything to make them. Just like you'll never see a magazine with Thanksgiving recipes in the December issue, I have the most success when I share projects at least a month ahead of when I expect people would want to make them.

And yet, today I'm sharing an edible Advent wreath. Advent started on November 29. Yesterday was the fourth (and final) Sunday of Advent. Advent ends in in just a few days. By all counts, this is a terrible time to be sharing an Advent idea. 


And yet, the reality of my life as a craft blogger is that what I share IS my life. I'm sharing an Advent wreath because our family celebrates Advent. Yesterday was the fourth Sunday of Advent, so all four candles are lit on my edible wreath. In an ideal world, I would have dreamed up this project two months ago then promoted it in early November. But that's not what happened. 

Thankfully, the projects I share here will live on here, on Pinterest, in Google Images, and elsewhere. So even though I'm late to the game this time, I'm hoping this tutorial will inspire someone in 2021 and beyond. And maybe someone in 2020; after all, Advent doesn't end until Christmas begins. 

---------

Edible Advent Wreath


Materials:


Steps:


Pour approximately 2 cups of flake cereal into bowl. Pick out anything that isn't a flake (such as raisins, or in the case of the cereal I used, dried strawberries)

Prepare the green Candy Melts according to the package directions. I used about 15 wafers. Pour the melted candy over the cereal, stirring until it is completely coated. Spoon it onto a piece of parchment paper, forming the shape of a wreath. Let the candy set for 2 minutes, then apply the round red sprinkles to make the berries. Set the wreath aside to set completely. 

Prepare the blue (or purple - your choice) Candy Melts according to the package directions. I used 4 wafers. Pour the melted candy onto a piece of parchment paper, then roll the Pocky in it to coat. I recommend making extras, but remember to keep at least one Pocky the original pink. 

Prepare the yellow Candy Melts according to the package directions. I used 2 wafers. Drop a tiny puddle of melted candy onto a piece of parchment paper, then drag your scribe tool (or a toothpick) through it to make a candle flame. You'll only need four, but I recommend making extras so you can choose the best ones. 


When everything is completely set, use your scribe tool to make holes where the candles will go. Then use a sharp knife to trim your Pocky candles to the desired length. (I trimmed off the uncoated area you see in the photo below.) You can also use the knife to shave off any puddling on the Pocky candles.


Choose your four best flames and peel them off the parchment paper. Remelt the remaining yellow candy. Add a small dollop of candy to the back of each flame, then attach them to the Pocky candles. When the candles are secure, remelt the extra green candy and put a dollop on each hole, then put the candle in place. 


Happy Advent, everyone!

12/13/19

Hand-Carved Candles

When I was a kid, I was absolutely obsessed with hand-carved candles. I remember the shop on San Francisco's Pier 39 and the fascination I had with watching the talented artist create the gorgeous candles before my very eyes. I was eventually gifted my own beautiful pink and white candle, then another one later in shades of blue.

But as much as I loved watching the candles being made, I really REALLY wanted to try it myself. In the late-90's, my parents got me the Candle Magic Holiday Cut and Carve Candle Kit (sadly, no longer available anywhere that I was able to find, though here's an affiliate link to some other candle kits the same company made still for sale). My kit included everything I needed to make two carved candles. I made one and had a blast. It wasn't exactly stunning, but it was so much fun to do and I was thrilled to finally try a craft I'd wanted to do for years. I put the second set of candle materials away, saving it for a special occasion.

Well, as often happens when I save art supplies for a special occasion, my candle kit sat for years. I hadn't forgotten about it; in fact, I'd thought about making my next candle many times. I finally did and it was just as fun as the first time.

You start by softening the wax in warm water for 20+ minutes. Then you suspend the candle (that's Steve's tripod I'm using) and start carving with a paring knife. 


I took a few photos as I worked, which turned out to be a dumb idea. I should have carved as quickly as possible. The wax cooled rapidly in our chilly house, but I didn't notice until one of the last pieces I carved snapped right off. Oops. 


My finished candle is very uneven and clearly the work of a beginner, but I'm still happy with it. Process, not product... right?  


There are lots of happy memories in my lop-sided candle, and it burns just as bright as a perfect one would. Actually, it burns much brighter, because I could never bring myself to burn such gorgeous works of art!
