Showing posts with label cereal. Show all posts

12/12/23

Edible Christmas Wreath

Three years ago, I shared an edible Advent wreath that was super fun to make and turned out really cute. Today's craft is another wreath. But this time it's a Christmas wreath and it's made from different items. See if you can guess what I used, then scroll down to find out! Affiliate links below. 


Edible Christmas Wreath


Materials:


Steps: 


Cover your work surface with parchment paper, then melt the Dark Green Candy Melts following the instructions on the package. 

Coat a pretzel ring with candy, then use the skewer to set it on the parchment. Sprinkle some nonpareils onto the pretzel, then add sugar sprinkles. If you have a partner to do this, that is very helpful. Working alone, I dipped three pretzels before doing the sprinkles for each. (By the way, you can make your own colored - and flavored - sanding sugar very easily.)


While the mini wreaths are hardening, use a sharp knife to cut a Rice Krispie Treat into thin slices. Use these to make a bow. I took three strips of the same length, curved two to make the loops of the bow, then cut the third in half to make the tails. 


Once you have the basic shape, smoosh the parts together. Then curl the ends slightly. 


Melt the Red Candy Melts, following the instructions on the package. I tried multiple techniques for coating the bows. What worked best was to pour the candy over a bow while it is flat on the parchment paper, then pick it up with skewers, briefly hold it vertically, then set it down on a clean area of the parchment. As soon as you set it down, add the red sprinkles. 

Coat Kix with the melted candy, then place them on the parchment in clumps of three. 

When everything is set, it's time to assemble. You have two choices: either keep everything separate for easy eating (people can grab a single pretzel or two from the wreath) or adhere everything together. I chose the former. The only difference is that you will need melted candy "mortar" to act as glue between everything. 

Arrange one layer of pretzels on a plate (mortar optional), then add three more layers, off-setting each layer from the previous one. Add the Kix-clusters and the bow. 


So how does it taste? Fantastic! A thin candy coating adds just the right amount of sweetness to the salty pretzels. This showstopper will be a hit at any Christmas celebration. 

4/14/21

Cereal Math: Prime Factorization

Did you know that Sesame Street cereal is a thing?! I had no idea! I was really excited when I spotted it in the cereal aisle. It took great restraint, but I only purchased the 123 Berry and not the C is for Cinnamon (affiliate links here and below) because I still have leftover Alphabits and Steve already thinks I have a have an "issue" when it comes to purchasing cereal. (He's wrong. I can stop whenever I want.)

Anyway, when I saw the box of cereal with adorable little number shapes, I thought how fun that would have been back in my teaching days. I pictured students with trays of cereal, doing the same math they'd ordinarily do with paper and pencil, but in a tactile way! They would have loved it. Me too. It's always fun to shake things up a bit and present skills in a new, memorable way.

I poured out some of my new cereal on a tray and started sorting. At first, I was delighted to see how good the numbers looked. Look at the 8 - it is perfect! And the 4, 6, 7, and 9 - spot on! The 1 and 0 are great... but not true of the 2, 3, and 5. They're acceptable at best. Now I know why they designed the box they way they did, lol. Oh well!  

I dug in the pantry and found All-Bran. Together with the 123 Berry, I was ready for some math. I chose my very favorite skill to teach in 5th grade: prime factorization. 

100 = 5 x 2 x 2 x 5, which we write as 100 = 22 x 52.


Same problem, different way of solving it, same answer: 100 = 22 x 52. 


(Fun fact: Now I know how to do superscript tags in HTML!) 

I spent about 30 minutes playing with the cereal making a bunch of different factor trees, which was approximately 25 minutes longer than it took to get the photos I needed. It was fun. I KNOW that students would enjoy using this cereal for math problems. Obviously, you can do all sorts of math with this cereal: adding, subtracting, multiplying, dividing, fractions, and decimals (Grape Nuts would be great for decimal points), just to name a few. If you have kids at home, I definitely recommend giving this a try!

3/16/21

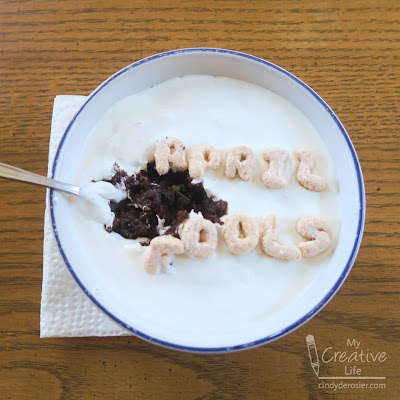
April Fools' Day "Bowl of Cereal"

For a long time, I didn't like April Fools' Day because I don't like mean-spirited pranks. I am not a fan of tricking someone in order to make them look or feel dumb, to create a giant mess, to get their hopes up and crush them, or to get them to eat something disgusting. None of that is fun to me; it feels a lot more like bullying than an appropriate way to 'celebrate.'

I am, however, a big fan of the creative ways that businesses have celebrated April Fools' Day in the past few years, introducing such novel inventions as the Polite Horn, Beautiful Bond Salon, and Tranquility High Adventure Base. I'm also a huge fan of positive pranks - tricking someone in a way that delights them. That is the spirit behind my April Fools' Day "Bowl of Cereal."


Spoiler: It's not a bowl of cereal. 

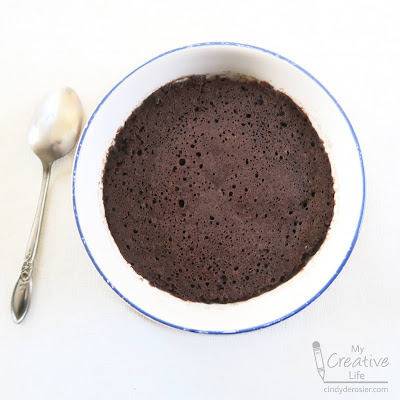
There are a lot of not-funny food pranks out there, like serving cream-filled donuts that are actually filled with Miracle Whip or Oreos with the filling replaced with toothpaste. This is the opposite. The kids think they're getting an ordinary bowl of cereal for breakfast, but they get something even better. When they lift the spoon to have some cereal, they'll find yummy chocolate cake inside instead! 


Read on to learn how easy it is to make. Affiliate links below. 

---------

April Fools' Day "Bowl of Cereal"


Materials:


Steps:


Make a single-serve microwave chocolate cake (Recipe A) in a microwave-safe cereal bowl. Let it cool completely. While it is cooling, sort through the Alphabits to spell out "APRIL FOOLS."


Insert a spoon into the cake so that it sits the way a spoon would sit in a bowl of milky cereal. Follow the package directions to prepare the candy melts, then pour them over the top of the cake so that the surface is completely covered and no chocolate shows through. It should self-level with some gentle jiggling. 

Place the Alphabits onto the melted candy to spell out APRIL FOOLS. 

If you serve it within 15 minutes or so, it will be easy to eat and enjoy. If you let it set much longer, the candy melts can harden to the point that it can be difficult to get the spoon out. If that happens, use a heat gun or hair dryer to warm up the candy melts enough so they soften. Don't put the bowl into the microwave with the spoon still in place!

2/24/21

Name Art Inspired by Alphabits Cereal

Remember how much I love the graphic design on the Alphabits cereal box? I made myself some name art, inspired by the box. It makes me really happy. 


It was surprisingly quick and easy to do. Of course, I used PicMonkey. I found two fonts that most closely matched the original, using the first four letters of my name from Chunk 5 and last letter from Ultra. I used the dropper tool to perfectly match my CIND with their BITS, then chose a red for my Y.  

Then it was time to decorate. They used bee for the letter B, a popsicle (I think that's supposed to be ice cream) for letter I, a tree for letter T, and a spaceship and stars for letter S.  


For my name, I chose a chocolate chip cookie for letter C, an actual ice cream cone for letter I, a narwhal for letter N, a donut and dots for letter D, and a yeti for letter Y. I used the cookie and yeti exactly how they are in PicMonkey. I changed the colors on the ice cream and the donut, but otherwise didn't change them. To make the narwhal, I merged a whale and a unicorn graphic, then changed the colors. I built the dots and the face on the dot of letter I using basic shapes. 

Here's a look at the original and my name together. 


Now I am totally inspired to make name art using other logos! I'll be keeping a lookout at the store for interesting options. Let me know if there are any you think I should definitely do.

2/17/21

Encouragement Toast

As parents, we do everything we can to support our children and encourage them to do their best. Next time your kids have a big test, an important interview, or stressful tryouts or auditions, serve them up a delicious breakfast of Encouragement Toast.  


I dreamed up Encouragement Toast in the cereal aisle at the Safeway by my house. I noticed something I hadn't had since early childhood, Alphabits (affiliate link), and my mind was flooded with ideas for edible crafts. What fun! I tossed the box into the cart, excited to get started. 


As an aside, I absolutely love the design of this box. The notebook paper and fonts are perfect for this kid-oriented cereal. I adore the little bee, ice cream, turtle and space designs on the Bits letters. And using the cereal itself for their motto ("a story in every bowl!") is very clever. Good job, anonymous graphic designer!

I washed my hands, poured a cup of Alphabits onto a plate, and started sorting letters. About 10% of the letters were too misshapen or broken to use, so those went into a container for future breakfasts. As I sorted, I started spelling out my message. 


Then it was just a matter of toasting some bread, spreading peanut butter on top, and adding the letters. I surrounded the toast with orange segments and banana slices. Served with a glass of milk, this is the perfect way to fuel kids for that important test or presentation.  

Expect to see an Alphabits-inspired edible craft from me again. I've got a whole box of possibilities!

1/28/21

Mardi Gras Cereal Treat, Inspired by King Cake

Ready for another Mardi Gras craft? This edible craft, which is about the size of a donut, looks like a mini king cake and features some of the same flavors. Cereal is the main ingredient in this treat... but it's not Rice Krispies! Try making your own for Mardi Gras. Affiliate links below. 


Individual Mardi Gras Cereal Treat


Materials:


Steps:

Melt approximately 4 oz. Candy Melts, following the package instructions. Pour 1.5 cups Golden Grahams into the melted candy, stirring until it is mostly coated.

Spoon the candy-coated cereal onto a piece of parchment paper, making a donut shape. 


While the candy is still melted, sprinkle green, yellow, and purple sanding sugar on top, alternating sections. Don't cover it entirely; you want some of the white 'frosting' to show through. 
 

Let the candy harden completely, then transfer the treat to a separate plate. 


To serve, cut straight down with a sharp knife to break it into pieces. This sweet donut-sized cinnamon treat will satisfy 2-4 people. 


12/21/20

Edible Advent Wreath

As a professional craft blogger, my job is to design creative projects and then write tutorials to teach you how to make them. Ideally, each project should make my readers want to drop everything and immediately start crafting. For that reason, seasonality is huge. If I publish an adorable Halloween costume on November 1 or a great idea for valentines on February 15, chances are very poor that anyone will drop everything to make them. Just like you'll never see a magazine with Thanksgiving recipes in the December issue, I have the most success when I share projects at least a month ahead of when I expect people would want to make them.

And yet, today I'm sharing an edible Advent wreath. Advent started on November 29. Yesterday was the fourth (and final) Sunday of Advent. Advent ends in in just a few days. By all counts, this is a terrible time to be sharing an Advent idea. 


And yet, the reality of my life as a craft blogger is that what I share IS my life. I'm sharing an Advent wreath because our family celebrates Advent. Yesterday was the fourth Sunday of Advent, so all four candles are lit on my edible wreath. In an ideal world, I would have dreamed up this project two months ago then promoted it in early November. But that's not what happened. 

Thankfully, the projects I share here will live on here, on Pinterest, in Google Images, and elsewhere. So even though I'm late to the game this time, I'm hoping this tutorial will inspire someone in 2021 and beyond. And maybe someone in 2020; after all, Advent doesn't end until Christmas begins. 

---------

Edible Advent Wreath


Materials:


Steps:


Pour approximately 2 cups of flake cereal into bowl. Pick out anything that isn't a flake (such as raisins, or in the case of the cereal I used, dried strawberries)

Prepare the green Candy Melts according to the package directions. I used about 15 wafers. Pour the melted candy over the cereal, stirring until it is completely coated. Spoon it onto a piece of parchment paper, forming the shape of a wreath. Let the candy set for 2 minutes, then apply the round red sprinkles to make the berries. Set the wreath aside to set completely. 

Prepare the blue (or purple - your choice) Candy Melts according to the package directions. I used 4 wafers. Pour the melted candy onto a piece of parchment paper, then roll the Pocky in it to coat. I recommend making extras, but remember to keep at least one Pocky the original pink. 

Prepare the yellow Candy Melts according to the package directions. I used 2 wafers. Drop a tiny puddle of melted candy onto a piece of parchment paper, then drag your scribe tool (or a toothpick) through it to make a candle flame. You'll only need four, but I recommend making extras so you can choose the best ones. 


When everything is completely set, use your scribe tool to make holes where the candles will go. Then use a sharp knife to trim your Pocky candles to the desired length. (I trimmed off the uncoated area you see in the photo below.) You can also use the knife to shave off any puddling on the Pocky candles.


Choose your four best flames and peel them off the parchment paper. Remelt the remaining yellow candy. Add a small dollop of candy to the back of each flame, then attach them to the Pocky candles. When the candles are secure, remelt the extra green candy and put a dollop on each hole, then put the candle in place. 


Happy Advent, everyone!

4/16/20

Tic-Tac-Matzo

Every time I make an edible craft, Steve jokingly asks: "Didn't your mom tell you not to play with your food?" As far as I can remember - no, she didn't! I certainly have never told Trevor not to play with his food. Quite the opposite. We play with food all the time in Casa deRosier.

Trevor and I used the last of our seder leftovers to play a game I'm calling Tic-Tac-Matzo. It ended in a cat's game (of course), after which we split the board and enjoyed our treat.


Tic-Tac-Matzo


Materials: 


  • matzo
  • peanut butter
  • chocolate syrup in a squirt bottle
  • two different markers (we used Cheerios and chocolate chips)


Steps:


Spread the peanut butter onto a piece of matzo. Add four lines of chocolate syrup to make the board. Alternate taking turns, trying to place three Cheerios or chocolate chips in a row. Split the game board when you are done playing.


---------

When you search for matzo/matzah on Amazon, you get pages and pages of unleavened bread and soup dumplings, along with plenty of cookbooks. But if you dig deeper, you find all sorts of unexpected treasures, including Tic Tac Toad. I'm a big fan of the juggling balls. And the themed pillow would definitely help with Passover reclining. 

4/13/20

Matzo Lion Snack

On Thursday, our family had the honor of attending a virtual Passover Seder hosted by my friend and co-author, Adam. Over the years, I've been to a handful of Jewish weddings (including Adam's), a Jewish baby naming ceremony at a local synagogue, and a pre-Sukkot party in the sukkah in a coworker's backyard, but otherwise my knowledge of Judaism is limited to my years of Sunday School as a kid, a Judaism class I took in college, and reading the books that Adam has written. (Affiliate link because you should totally read his books.) Experiencing Passover with a real family (around 25-30 people) practicing their faith was awesome. 

Steve, Trevor, and I did our best to join in with the readings, rituals, and songs. We dipped our pinkies in our drinks, broke and hid the middle piece of matzo, and flogged each other with chives (it's supposed to be green onions, but close enough). I even made matzo ball soup for the first time. In every way, we had a wonderful time. 

Despite eating a good amount of matzo during the Seder, we had plenty left over. So naturally, Trevor and I made a Matzo Lion Snack. (And if you didn't think, "Of course that's what Cindy did with leftover matzo" then you aren't reading my blog often enough.)


Matzo Lion Snack


Materials:

  • matzo
  • vanilla frosting, tinted yellow
  • Raisin Bran
  • banana
  • pretzels
  • Popcorners (affiliate link, because you HAVE to try these if you haven't already. YUM!)


Steps:


Gently frost a piece of matzo. Sprinkle Raisin Bran flakes around the outer edge and use raisins for eyes. Cut a triangular banana piece for the nose. Use stick pretzels for whiskers and broken mini pretzels for the mouth. Add Popcorners for the ears. Eat and enjoy!