7/12/19

Fun with Food!

Eagle-eyed readers may have noticed that there is a new tab on my site called FUN WITH FOOD. When you click it, it takes you to a landing page that gives me a place to organize everything food-related on my blog. I've added my Edible Crafts to this tab, along with five other categories. Four of them aren't done yet (going through all my old posts - over 2100 of them - is a huge job), but one is. Recipes from United States History is live.


I've divided the recipes into three categories: Native Americans and Early European Exploration; Colonial America and the Revolutionary War; and Expansion, Civil War, and the Industrial Revolution. I might add more, but for now those are the recipes I've posted since those are the broad categories covered in fifth grade.

While I'm very happy to have all the recipes in one place, I'm cringing at the photography. I'm not a great photographer even under the best of circumstances, but taking a quick snapshot in a dark classroom with 32 kids clamoring for samples leads to some pretty lousy photos. If/when I make these recipes again at home, I'll take the time to redo the photos.

---------

As an Amazon Affiliate, I would be remiss if I didn't remind you that Amazon Prime Day starts on Monday. Find these and thousands of other items at Amazon. I get a small commission for purchases and using my affiliate links won't cost you anything more. Thank you!

7/11/19

Spread Kindness Like Confetti

"Spread kindness like confetti." What a great way to go through life! This quote jumped out at me from the new Kindness Matters Coloring Book by Leisure Arts (affiliate link here and throughout the post) and so I decided to put it on a Plaid Wood Canvas Panel.  


To make your own, start by priming the canvas with white gesso. Brush it all over with Folk Art Hologram Extreme Glitter. When the canvas is dry, tear the page from the coloring book and scribble on the back with a charcoal pencil. Regular pencil works too. 


Carefully position the coloring book page inside the canvas, then trace over the design. Peek to make sure it is transferring. 


Now it's time for color! Use paints, paint pens, or Sharpies to color in the design. 

Use a kneaded eraser to remove any pencil marks or smudges. Then punch a bunch of confetti from colored cardstock and arrange it on the canvas. 


Now pull out the stylus from a Diamond Art kit. While you're at it, gather your extra Diamond Dotz. You'll be using those! Pick up a confetti (confetto?) with the stylus, add a dot of craft glue, and replace the confetti. 


Add coordinating Diamond Dotz to each confetti, using the same technique of picking one up with the stylus, adding a dot of glue, then placing it in the glue. It's hard to capture the sparkle, but the whole thing so glittery and shiny!


But, as sparkly as it is, there's one thing it still needs... more glitter! Use Folk Art Glitterific Paint to bring it to maximum bling. I used my finger to dab on a coat of green, let that dry, then went over the top with hot pink.


I wish you could see this sparkle in the light. 


I need to find a special place to put this where it will inspire others to spread kindness like confetti. 

7/10/19

Scrapping the California Cookie

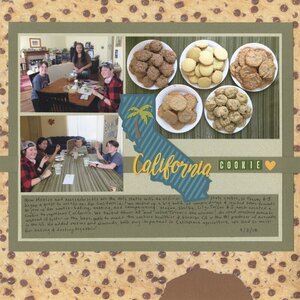
Remember when Trevor and I asked some of his friends to join us in creating a potential State Cookie for California? It was so much fun. And now the memory is forever preserved in the album. 

California Cookie (affiliate link)

The layout design started with a mistake. When I order photo prints, I want the originals, not the ones that I watermark before putting them on my blog. But I accidentally printed the watermarked version of the plates of cookies. Sigh. 

I was determined to make it work. After trying a bunch of different things, I came across the die cut of California I'd received in my VIP goodie bag at Pinners Conference. It covered up the watermark perfectly. I added the letter stickers and heart to finish the title. Having the title so high made the layout unbalanced, but I couldn't lower it without the watermark showing. Inspiration struck and I took a (faux) bite out of the bottom to help balance the page. 

7/9/19

One Point Perspective Name Art

Here's a fun and easy project to introduce one point perspective. (Yes, I'm obsessed with Name Art.)


---------

One Point Perspective Name Art


Materials:

  • paper
  • Sharpie
  • ruler
  • colored pencils

Steps:


Write your name in block letters. It is easiest if you use all capital letters so that you don't have ascenders and descenders. You want a little space between the letters, too. 

Make a single dot below your name. 


Now, you are going to draw lines between each of the corners of your letters and the dot at the bottom. If the line would cross through any of the letters, lift your pen to leave a gap. It's easiest to work from the outsides in so you don't have lines that cross. 


Finally, color in your artwork. I chose five different shades of blue colored pencil to create an ombre effect. The darkest color is on the fronts of the letters, then the shades get lighter toward the dot. Experiment with different ways to color your artwork!

7/8/19

The Reason for Scrapbooking

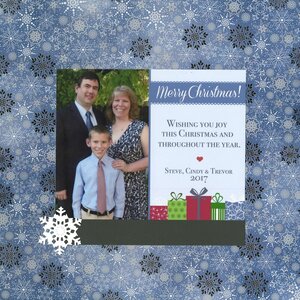
I was hesitant to share this layout here because it barely counts as scrapbooking. Literally all I did was glue our 2017 Christmas card in the center of a piece of patterned paper, add a strip of black cardstock, and stick on a die-cut snowflake. It took 2 minutes, tops.

Christmas 2017 (affiliate link)

But I did decide to share it. Why? Because it IS scrapbooking. There's no title, there's no journaling, there's no artistic arrangement of elements, and there's just one lonely embellishment. (I did design the Christmas card myself, so I guess there's that.) But none of those are mandatory in scrapbooking. My reason for scrapbooking is to record our family's memories. Most of the time, I choose to do that in an artistic manner because I love playing with paper and experimenting with design. But ultimately, I want our scrapbooks to trigger memories and document our lives. Bonus points if the pages turn out looking great.

What's your reason for scrapbooking?