2/28/18

Exploring New Jersey Through Little Passports

We enjoyed a real-life trip to New Jersey last October, so it was great fun to follow it up with a virtual visit through Little Passports! As always, Trevor and I learned a lot and had so much fun doing the activities together. First, we built the model, which was based on the boardwalk. 


We learned that the boardwalk in Atlantic City, four miles long and built in 1870, is one of the oldest and longest in the world. Wow! The map activity taught us about the Absecon Lighthouse, the Steel Pier, and Boardwalk Hall. 

Next, we did an activity about Lucy the Elephant, a sculpture in Margate, NJ. It was built in 1881 and is 6 stories high! There's an entrance in one of the back legs, and 22 windows to view the town as you climb up. Cool! 

The science experiment was inspired by the phonograph, invented by Thomas Edison while working in New Jersey. Here Trevor is testing what happens when you spin a balloon with a hex nut inside. It sounds like the balloon is singing! The balloon represents the needle of the phonograph and the irregular shape of the hex nut is like the grooves of a record. 


Did you know that one of the world's largest spoon collections is in Paterson, NJ? Me neither! There are more than 5400 spoons on display at the Lambert Castle Museum. The activity had Trevor and me looking very carefully at an illustration to find four pairs of identical spoons. It was really difficult to spot the tiny details in a matched pair. 

Next, we did a word search about Ellis Island and a maze about Hoboken. Our final activity, making the salt water taffy that was invented in Atlantic City in the late 1800's. It was a family affair, as all of us (including Grandma who was visiting) spent time pulling the taffy.


It was worth the effort, as the resulting taffy was delicious! 


We had a lot of fun exploring New Jersey through Little Passports and loved the chance to get to know even more about the Garden State.

2/27/18

Sandstone Carving with Artistry by Nature

This post contains affiliate links. 

Those of you who follow Trevor's blog know that he was REALLY excited about Artistry by Nature's sandstone carving kits and desperately hoping I would come home from the Creativation show with one for him to try. Lucky for him, the kind people at Artistry by Nature gave me some sample kits, including this bear!


Each kit comes with a rough-cut block of sandstone, sculpting files, a finishing stone, and instructions. The QR code on the package leads to a handy instructional video. 


Trevor watched the video and then jumped right in to carving. He was surprised by how easy it was to do. I was glad to see that the tools are very kid-friendly and don't require the close supervision that woodcarving does. 


Trevor wanted to carve indoors, which would not have been my first choice. He worked over a scrap poster board and fortunately the Dustbuster did a decent job of vacuuming up the mess. It did clog the filter pretty quickly though. 


Trevor worked on his carving off and on for a few days, making visible progress each time. 


We brought the carving to the park, where Trevor's friends were eager to give it a try. It really is a lot more fun carving outdoors where you don't have to clean up after yourself. 


A lot of people were interested in seeing the carving. There were even strangers who asked if they could give it a try. Of course! 


This is what our bear looks like right now. It's not done by any means, but it's getting there. 


I highly recommend getting your own sandstone carving kit! Artistry by Nature has a variety of animals available, including a bear, buffalo, coyote, eagle, fish, penguin, ram, seahorse, and seal. Each kit comes with everything you need. The kits are safety-tested for kids age 6 and up, though I'd say that unless you have a particularly patient 6-year old, this is better geared for 10+. It's definitely fun for teens and adults, too.

A sandstone carving kit would be perfect for a camping trip or other extended outdoor activity. I could totally see the Scouts working on these sculptures during an outing, and it would be equally fun to do on the porch or by the grill on a warm summer's day. I love discovering a new-to-me craft! Thanks, Artistry by Nature!

2/26/18

Kill a Kit: A Dozen Cards

In scrapbooking lingo, to "kill a kit" means to use up the last remaining bits and pieces of a set of supplies. A typical kit might have a dozen pieces of patterned paper, a sheet of stickers, some die-cuts, and an assortment of other embellishments. Making the first few projects is easy, as there is an abundance of coordinated material to work with. But as you work down toward the end of the kit, you're left with odd-sized scraps, the busier papers, and other items that are more difficult to use.

When it's time to kill a kit, I usually turn to cards. They're smaller than layouts, so dealing with small scraps is less of an issue. And there's no need to coordinate with photos, so busier patterns aren't a problem. Case in point: 12 cards from a pile of scraps, none larger than a card base.


There's a lot of piecing going on in these cards. In most cases, what looks like a solid card base is actually multiple pieces with the gap between them hidden by a narrower strip. I kept going and going until I didn't have enough left to make another card. Kit officially killed!


2/23/18

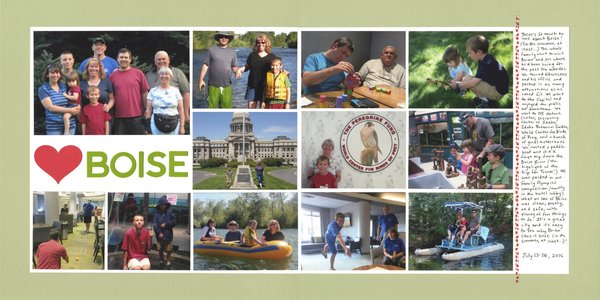
Boise

In 2015, my brother-in-law's job moved to Idaho. That summer, the whole family traveled to see him and explore Boise. We packed a ton of fun activities into our visit. It's a beautiful city, with lots to do... at least during the summer! We had the perfect weather for Trevor's first river rafting experience, a leisurely float (with brief moments of excitement) down the Boise River. 

Boise (affiliate link)

Trevor and I will be returning to Boise next month for spring break and look forward to seeing how Boise in the spring differs from Boise in the summer! 

2/22/18

Coloring Book Jar Toppers

This post contains affiliate links.

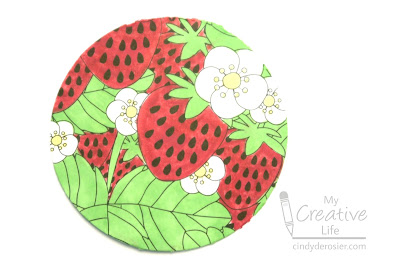
Look at my cute jar of strawberry jam! The topper is made with an image from the same coloring book by Leisure Arts that I used for the cupcake card. This project is ridiculously easy to do, and you can get quite a few toppers from just the one coloring page. Wouldn't this make a great gift?


---------


Strawberry Jam Jar Topper


Materials:


Steps:


Color the strawberry page. Use the punch to cut circles out of the completed coloring page.


Use hot glue to attach a coordinating ribbon to the outside of the jar ring.


Glue the coloring page cut-out to the jar's lid and tighten the ring around it. 


Now give out the jam to friends and family!

2/21/18

Cardboard Cowboy Boot Craft

I'm on a mission to create crafts inspired by each of the 50 states. Is there anything more Texas than a cowboy boot? This one is made from the flap of a cardboard box.


-----------

Cowboy Boot Craft


Materials:

  • cardboard
  • scissors
  • ballpoint pen
  • brown ink
  • q-tip


Steps:


Start by cutting out a boot shape from cardboard. I used the flap of a cardboard box and it was the perfect size. I cut mine freehand (and it looks more like a Christmas stocking with a heel than a cowboy boot); you may want to sketch the shape on the cardboard before you cut it out. 


Now, use the CAPPED ballpoint pen to draw patterns and designs on your boot. Use the same amount of pressure you would if the pen were uncapped. 


You'll end up with lines that look like this:


Rub a brown inkpad on the edges and on the heel. 


At this point, I trimmed the boot to make it less stocking-like (curved the top, pointed the toe up) and re-inked. But I didn't re-photograph. Sigh.

Rub a q-tip in the inkpad and use it to trace the indented patterns on the boot. The q-tip will travel smoothly in the grooves you made with the ballpoint pen. 


Here's how my boot turned out. 


It occurs to me now as I'm blogging about this... those straps I drew in as decoration should probably be attached to a spur. Oh well. We'll just pretend it's decoration, or that my cowboy has spurs that camouflage perfectly with the background. 

2/20/18

Camp Lassen, Year 3

I've gotten another step closer to scrapping the remaining photos from Trevor's time in Cub Scouts. This two-page spread is from 2016, his third and final trip to Camp Lassen as a Cub.

Camp Lassen (affiliate link)

Since I scrapped this about 18 months after the trip, there was no way I could remember the details from a trip I didn't even attend. Thank goodness I keep a daily journal about Trevor's life (412 typed pages and counting). I just searched the document for Camp Lassen, then copied what I'd typed onto the journaling block, as good as if I'd scrapped it the day they'd returned home from camp! 

2/19/18

Storing Scout Patches (And My First Time Designing One)

This post contains affiliate links. 

Patches are a big deal in the Boy Scouts of America. On his uniform, a Boy Scout displays the BSA emblem, the US flag, a council patch, unit numbers, his rank patch, his patrol emblem, a badge of office, and merit badges. But for most Scouts, that long list represents only a small portion of the patches he owns. Scouts get patches for outings, events, and activities, too. 

So if most patches don't go on the uniform, where do they go? Some Scouts sew all their patches onto a blanket. Others put them on a backpack or a jacket. I imagine a lot of Scouts just let the patches pile up in a shoebox or drawer. 

The option that made the most sense to Trevor and me is to store them in a binder. They sell binders with a label on the spine specifically for holding Scout patches. While they look very nice, we went a cheaper route and got a plain heavy-duty binder and a pack of trading card pages. We sorted the photos and put them in pockets... which worked well until we turned the pages and the patches slipped out. So frustrating. 

The solution came from a tool that is common in the scrapbook industry:

We R Memory Keepers - Photo Sleeve Fuse Tool

This is the Fuse tool. It functions similarly to a wood burner to melt page protectors to 'lock' the pockets. We put the patches in place, heated up the tool, and did a quick zip to seal them up. It's a bit hard to see, but you can just make out the horizontal lines above the penguin and cake patches, as well as the diagonal line separating the two. 


Here's a typical page in Trevor's album. As you can see, we labeled the page with the rank and year, then filled in the extra pockets with a Cub Scout emblem and strips of cardstock to match the rank color (in this case, Bear is blue). 


The patches are securely locked in place, but if he ever wants to remove one, we can easily cut or slit the pocket and get a patch out. 

Some of the patches don't fit nicely in pockets. For example, the loops on the temporary hanging patches don't fit the pages we bought. We either folded the flap under (as in the 'Knights of the Round Table' patch above) or let it stick out and fused diagonally around it. 


You might have noticed in the title of this post that I tried designing a patch for the first time. Every so often, there will be a contest to design a patch, usually for a special event or anniversary. In this case, the call went out for a commemorative patch for the 90th anniversary of Camp Wolfeboro. There were four specific rules for the design:


       1) The design must be on a circle 3 inches in diameter
       2) The design must promote the theme of "90th Anniversary"
       3) The following must be incorporated into the patch
                a. "Camp Wolfeboro"
                b. Use the Pine Tree from the Camp Logo
                c. "XC Anniversary" or "XC years" or "90th Anniversary" or "90 years"
                d. "MDSC" or "Mt Diablo Silverado Council"
                e. "Since 1928
       4) The design can include up to six colors


I used PicMonkey (of course!) and came up with this design:


It was a lot of fun to put together. They haven't announced a winner yet, but I'll let you know when I do!

2/16/18

Felt Carrot

This post contains affiliate links.

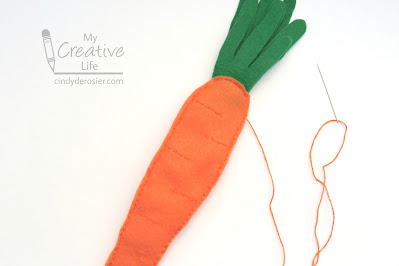
Look at the cover of Kids' Felt Cuties (given to me by Leisure Arts to review) and tell me you are not in love with the Bella's Garden project. It is adorable! Trevor has long since outgrown his pretend kitchen (SO cute), but he would have LOVED this felt garden to harvest before cooking for his diciers years ago. (Where has my baby gone?!)  


Although our days of playing with plastic animals and faux food are behind us, I was inspired to put my own twist on the felt carrot in the book. 


---------

Candy-Stuffed Carrot


Materials:


Steps:


Cut two identical carrots from the orange felt. Set one aside to be the back of the carrot. 

Using three strands, use the embroidery floss to backstitch partial horizontal lines on the front carrot piece. I made a total of 7 lines (alternating sides, starting with the left), but you can do whatever.


Cut three carrot tops from the green felt. These should not be identical, as they look more realistic when they are different. Put all three carrot tops under the embroidered carrot front and use a backstitch to secure them. 


Place the back carrot piece behind the front carrot piece. Stitch the two pieces together, starting about an inch down from the top left, going around the point, and stopping about an inch below the top right. 


It should look like this before you tie off the floss.


Stuff the carrot with Jelly Belly Sours. (Go ahead and eat the red, yellow, and blue ones since they clash with this project. Yum!) Cut two matching lengths of adhesive-backed magnets. Stick them together, then peel the paper off both. Place them between the two carrot tops. The adhesive is strong enough to stick to the felt, and the magnet will prevent Jelly Bellies from escaping.  


This would make a fun addition to an Easter basket, if I did Easter baskets. Maybe I'll just hide the carrot along with the eggs on Easter morning and let Trevor find it. 

---------


I really enjoyed making the carrot and am eager to try one of the other projects from Kids' Felt Cuties. The Piggy Coin Banks and Taco Plushie are particularly adorable. Expect to see more felt projects from me in the near future, inspired by this awesome book!

2/15/18

Webelos 1, Scrapped and in the Album

Trevor has been a Boy Scout for 11 months now, which means that it's about time I finished up the layouts from his time as a Cub Scout. This double-page spread covers his first year of Webelos (2015-2016).

Webelos 1 (affiliate link)

As you can see, I included as many photos as I possibly could, showing the wide variety of activities from the year. I made sure to include the other boys as often as possible, but the focus is definitely on Trevor. I used two fussy-cut photos and the sun sticker to form a visual triangle, but that's about it as far as design goes. 

I should add that I had to piece together the blue backgrounds in the upper left and lower right. All I had were small scraps, but I really wanted to use them up. The yellow text boxes and photos are placed very strategically to hide the seams as best I could!

2/14/18

Sweet Potato Sunflower Seed "Frownies"

This post contains affiliate links. 

A recipe for 4-ingredient flourless healthy sweet potato brownies showed up in the Pinterest feed for work the other day. Hmm... I like sweet potatoes. I like brownies. Healthy is good. I pinned the recipe and ended up making it the same day. 

Well, sort of. You know that I'm pathologically incapable of following a recipe without making changes, right? I mostly followed the recipe, but used sunflower seed butter instead of nut butter. And added a touch more cocoa. And one extra tablespoon (ish) of maple syrup. And I decorated the top with yellow sugar pearls and chocolate covered sunflower seeds


They looked and smelled great. The taste? Well, they're fake brownies. (Or, as Trevor calls them "Frownies.") If you're expecting rich, gooey, chocolatey brownies, you will be disappointed. They are not rich, gooey, or all that chocolatey. But if you're looking for a gluten-free, vegan snack with no refined sugars, they aren't half bad. One little bite helps satisfy my chocolate cravings, so there's that. Thanks, Frownies!


Now I need a recipe for healthy chocolate chip cookies!

2/13/18

Cupcake Card

This post contains affiliate links. 

Leisure Arts sent me their Edible Wonders Color Art book and 30-Pack Premium Colored Pencils to try out. Let me say, I love them both! It was hard to decide what page to color first, but the cupcakes and ice cream jumped out at me. (No surprise there.) I love the colored pencils - so smooth, and with vibrant color. 

I turned my finished coloring page into this card:


You could make a card like this with literally any coloring book. It's one of my favorite way to use completed coloring pages. This card works for a birthday or other celebration, a thank you (just write or stamp 'You're So Sweet!' on the inside, or just to say hi. 

---------


Cupcake Card


Materials:


Steps:


Color in the cupcake page with the colored pencils. Trim the completed coloring page to the size you want your card to be. Back it with blue cardstock, trimmed to 1/4" larger in each direction. Make a card base from the white cardstock that is 1/2" larger in each direction. Adhere the matted coloring page to the card base. Add a message inside and it's ready to send!


2/12/18

Scrapping Christmas Eve

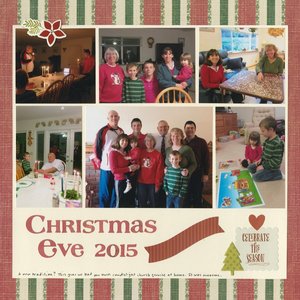
Check it out - a layout about Christmas Eve! No, not the one that just happened. These are the photos from 2015.

Christmas Eve 2015 (affiliate link)

2015 was the first year we changed our lifelong family tradition of attending a Christmas Eve candlelight service at church. The times for the two services didn't work for us for a number of reasons, so we held our own service at home. The kids acted out the Christmas story on the flannel board while Grandma read from the Bible. Then we sang hymns, and lit candles for Silent Night. It was awesome.  

I'm glad to have this page in the album. 

2/9/18

5 Minute Cards using Watercolor Pencils

This post contains affiliate links. 

It took less than 5 minutes to make this card.


At Creativation, I received the Thank You Coloring Notecards, the Birthday Coloring Notecards, and the 30-Pack Watercolor Colored Pencils from Leisure Arts. I put them in my carry-on rather than my checked luggage and I am SO glad I did. They saved me from going crazy during Plane Delay Hell on the way home and even kept me entertained on the plane. 


There aren't too many craft projects you can do on a tray table, but these were perfect. I finished half the cards before my peanuts and ginger ale arrived. (I ALWAYS have ginger ale when I fly and NEVER have it any other time, despite the fact that I love it. It's my special treat for airplanes only. Another weird Cindy quirk.)  

I finished up the rest of the cards at home. Proper light, space beyond a tray table, no turbulence, no one brushing my elbows - crafty heaven!


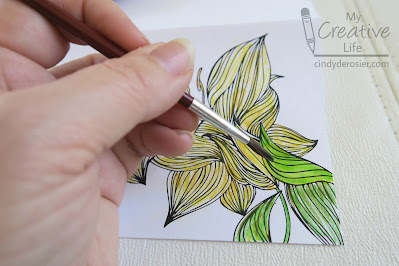
If you've never tried watercolor pencils, I highly recommend these ones from Leisure Arts. They're pre-sharpened, go on beautifully, and blend wonderfully. There are 30 colors (though oddly, no orange). Just use them like regular color pencils, but don't worry about getting into every little area. 


Moisten the included brush and blend the colors. Push the color into any gaps. You can see how the leaf has come to life with a bit of water. The color is so vivid.


I like the cards, but I love the watercolor pencils. They're much better than the previous brand I used. Have you tried watercolor pencils? How do you use them?


Coloring Books 725