10/5/18

Cowboy Costume (with Beaver Belt Buckle)

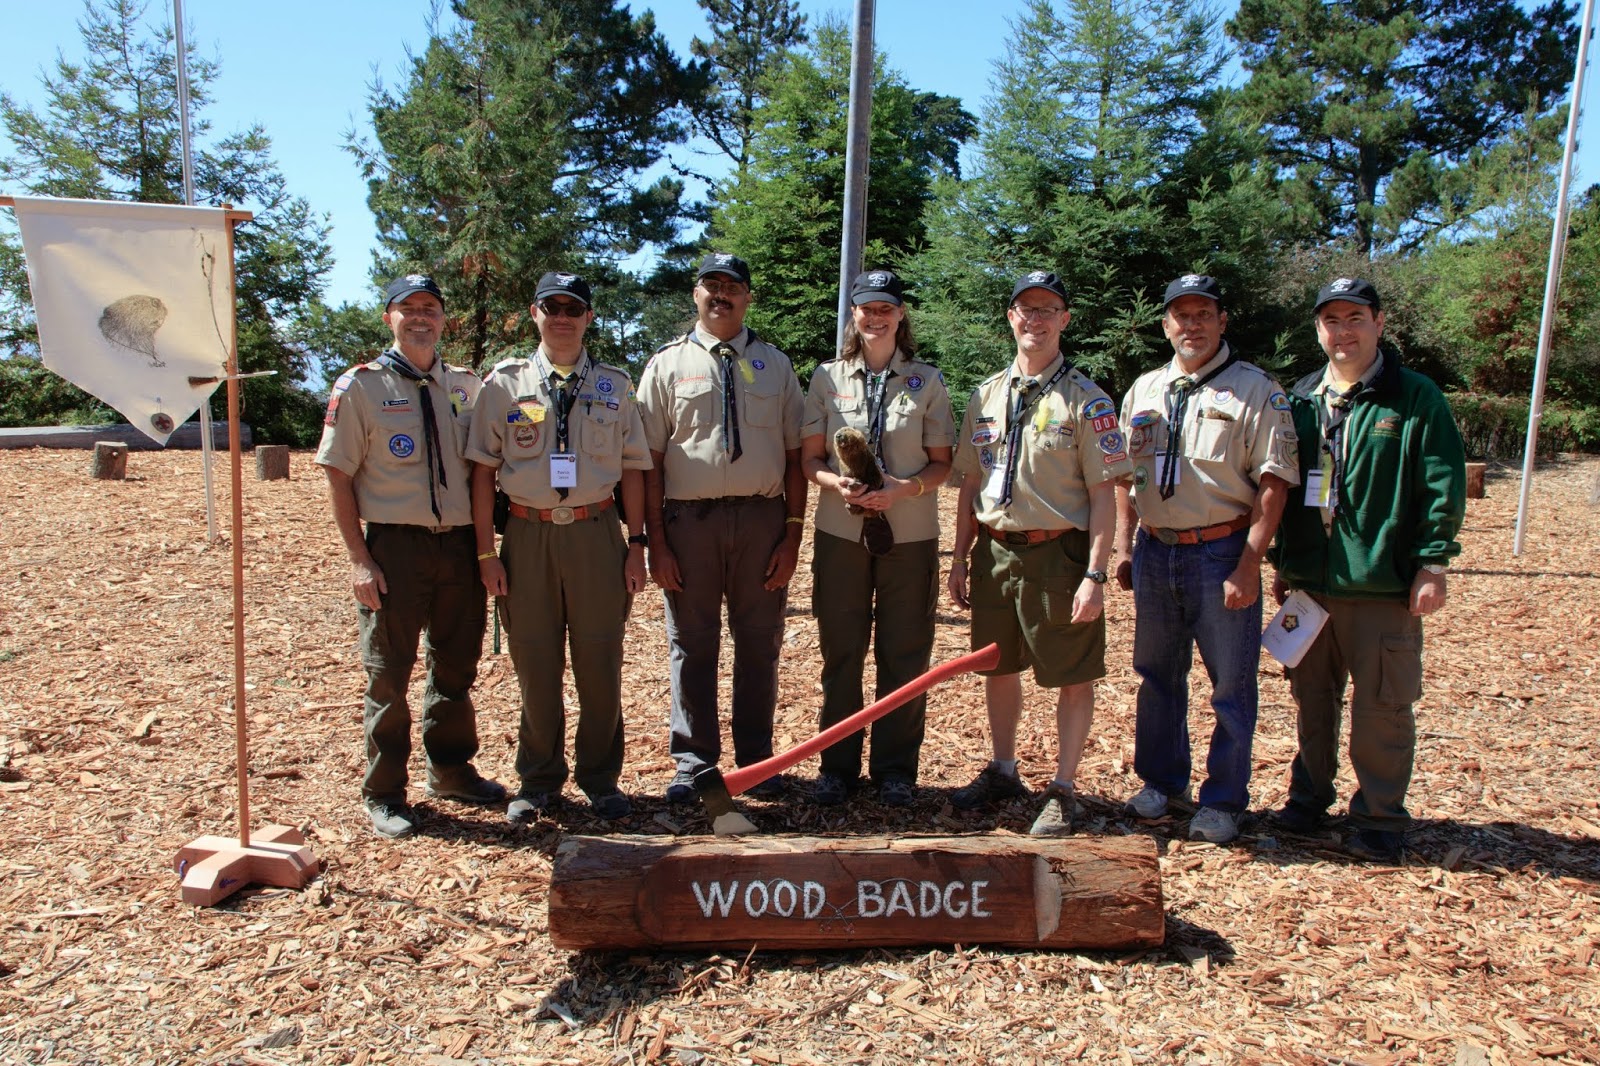
As I mentioned yesterday, Steve is the Beaver troop guide for a Boy Scout Wood Badge course. This picture shows all of the participants, including the trainees (in khaki) and the leaders (in green). 


For reasons that are still not entirely clear to me, the troop guides would be conducting one event in cowboy costumes. Since I'm the one in charge of costumes in the deRosier house, Steve asked me to come up with something for him. I made a mental checklist. We have a cowboy hat and a bandana in the costume box. He could wear his own jeans, shirt, and belt. All he needed was an awesome belt buckle. And naturally, it should feature a beaver.

I cut an oval of heavy chipboard and painted it gold. Then I cut out a beaver from thin chipboard, painted it gold, then glued it to the oval.  


I didn't want to ruin Steve's belt by permanently attaching the belt buckle. It took awhile to figure out how to attach it securely but temporarily. Bobby pins, to the rescue! I used hot glue to attach two bobby pins to the back. Steve would be able to slide the bobby pins onto the loop without causing any damage to the belt. 


If I'd been there, I would have adjusted the beaver belt buckle to cover the regular belt buckle, but other than that, I love how his costume came out. The best part is that I didn't spend any money on that. 


The troop guides look like a great group of people. Steve has really enjoyed working with them.  


More Wood Badge crafting to come!

10/4/18

Pringles Can Beaver Craft

Others see a Pringles can; I see a beaver. It's a weird gift.


I've been doing a lot of beaver-themed crafting recently and there's actually a good reason why. Backing up, you may remember that Steve started an extensive Boy Scout leadership training called Wood Badge in 2016 and completed it at the end of 2017. This year, he is on the staff to train the next batch of leaders. The trainees are split up into 8 patrols, each named after an animal. About a month ago, Steve found out he would be the troop guide for the Beaver Patrol. 


Steve asked me to pick up snacks for the Beavers' first weekend together. Trevor thought up logs (pretzel sticks) and beaver teeth (mini marshmallows), while I came up with the idea of turning snack-sized Pringles containers into beavers. Read on to learn how I made them. There are affiliate links in the materials list; I make a small commission on any purchases you make after clicking a link, at no extra cost to you. 


---------


Pringles Can Beavers

Materials:


Steps: 


Remove the plastic lids from the Pringles cans and save them for a separate craft. 

Start by cutting brown construction paper the same height as the cans. Wrap a piece around each can, then tape it in place. I chose to leave a small gap so that the Beavers could easily see which flavor each can of Pringles held. 

Use the punch to cut circles for the faces. With scissors, cut two ears, one oval nose, and one tail for each beaver. Ink the edges of each. Cut two white rectangle teeth for each beaver.


Working on one face at a time, glue the ears, eyes, nose, and teeth in place. Use a loop of tape to attach it to the top of the can. You could glue them, but with tape you don't need to destroy the beaver to eat the chips. 

Tape the tails to the bottoms of the cans.  


The first thing Steve told me when he got home was that the beavers were a hit with the Beaver Patrol. 


In fact, they repurposed my beavers to decorate their rocket for a competition. I love the creativity! I especially love that their beaver is holding the Scout emblem. 


Great work, Beavers!

10/3/18

The Tale of Cindy and the City Chicken

Once upon a time several months ago, there was a blogger named Cindy who was mildly obsessed with tasting regional foods while traveling. Cindy and her family would be traveling to the exotic wilderness of eastern Ohio, so she did a bunch of research to learn what foods they should try when they got there.

"Wow!" said Cindy. "I learned that Cleveland is famous for something called 'City Chicken.' We must try it when we visit!" Her husband, Steve, who was very supportive of Cindy's increasing insistence to eat what locals eat wherever they went, answered back. "I've been to Ohio many times," he said, "and I've never heard of City Chicken. I will ask my friends who live there. Maybe one of them can recommend the restaurant that serves the best City Chicken. By the way, what is City Chicken?"

Cindy chuckled, as the story of City Chicken is interesting. "Well," said Cindy, "I read that back in the day, chicken was very expensive and hard to come by in Ohio, where pork was much more common. Chicken was only for the most special occasions, but the Ohioans figured out that they could cut chunks of pork, thread them on a skewer so that the shape mimicked a chicken breast, bread it and fry it, and pretend they were eating fancy chicken instead of ordinary pork." "That is interesting!" said Steve. "I would like to try it, too!"

Steve talked with his friends in Ohio. "We have never heard of City Chicken." they all said. Cindy checked the online menus for dozens of restaurants and none of them served City Chicken. She was confused. Was City Chicken merely a myth? "Wait!" said Cindy. "I found two restaurants that serve City Chicken as a weekly special. But it is not offered on the nights we'll be there." "Oh no!" said Steve.

Cindy and her family traveled to Ohio and did not eat City Chicken. But on the last day of their trip, something exciting happened! Cindy relayed the disappointing story of the City Chicken to their lunch companion, Amanda. "I've lived in Ohio my whole life," said Amanda, "and I've never heard of City Chicken. Let me text my dad and see if he's heard of it." PING! "Not only has my dad heard of it, but apparently his wife makes the best City Chicken ever!" said Amanda. "I am going to invite myself over to have her City Chicken some day!"

Alas, Cindy could not invite herself to Amanda's dad's wife's house for dinner. Cindy had no choice but to make City Chicken at home so she could finally try it. She found a promising recipe, bought the ingredients, and got started. The first step was to cut pork tenderloin into 1.5" chunks, then thread them onto skewers. They went into an egg wash, then into Saltine cracker crumbs. Then she seared them on all sides. "So far so good," she thought, "but this doesn't quite look like chicken. I think I put too many pork cubes on each skewer."


Cindy put the seared skewers in a pan, poured a mixture of chicken broth and flour over them, covered the pan with foil, and put it in the oven at 350°F for 50 minutes. "This is weird." said Cindy. "The crispy breading will surely come out soggy. Maybe it's supposed to be that way." While the City Chicken cooked, Cindy made mashed potatoes and green beans. She'd read that they were the proper accompaniments to City Chicken. 

BING! Cindy uncovered the pan and baked the skewers for 10 more minutes, as the recipe stated. But alas, the City Chicken was still soggy. The gravy was a solid instead of a liquid. "Maybe this wasn't the best recipe," Cindy said. "I can't get the City Chicken off the skewer either." "Is it supposed to come off, or do we just eat it off the skewer?" Steve asked. "I don't know!" Cindy answered. 


The City Chicken was delicious and the whole family agreed they'd like to try it again. "I want someone who has a good recipe and knows what they're doing to make it for us next time!" The family agreed. Perhaps someday their wish will come true!

10/2/18

Homemade Bumble Bee Costumes

I put together this graphic of homemade bumble bee costumes for Fun Family Crafts last week. 


As I was looking for costumes to feature, I was disappointed to discover that I'd never posted the instructions for the homemade bumble bee costumes I made back in 2010. I didn't start blogging until 2011, so I guess it's not surprising that I hadn't done a tutorial. Time to change that! 

The materials list below includes affiliate links. I get a small commission for any products you buy after following a link. Thank you!


---------


Easy DIY Bumble Bee Costume


Materials: 


Steps: 


Carefully remove the sleeves from the shirt using the seam ripper. Hem the unfinished edge, or use a fray block.

Use the ruler and the masking tape to mark where you want the black stripes to be. I put six stripes on Steve's shirt (adult large), five on mine (adult medium), and four on Trevor's (child large, hemmed to just above his knees).


Use the stencil brush and an up-and-down motion to work the black paint into the fabric. Let the paint dry, then remove the masking tape. Repeat the process for the back of the shirt, taking care to line up the stripes. 

To make the stinger, sew a cone shape from the black felt. Stuff it with Poly-fil, then add a circle of felt as a cap to hold the stuffing in place. Hand-stitch the stinger to the shirt using black thread. 


Wear black thermals, sweatpants, or tights, and a black long-sleeved shirt, then put the bee costume over it. Add antenna and you're ready to go!


This was such a fun costume! If any of you make your own, please be sure to share photos with me. I'd love to see what you create.

10/1/18

New Logos for the Patenting for Inventors Podcast

This is me in 2016 with my friend and co-author Adam Diament.


Adam, who is a patent attorney, has been hosting a podcast for almost a year. It's called the Patenting for Inventors Podcast. It walks inventors through absolutely everything they need to know to apply for a patent. Despite the fact that I am not an inventor and have no intention of ever getting a patent (because I doubt I should try to patent a Twinkie Narwhal, which is pretty typical of the things I invent), I really enjoy the podcast. I love learning new things and I've always been fascinated with learning more about what other people's careers. Adam is an excellent host. 

Adam needed new podcast cover art, so I happily spent some time playing on PicMonkey until I came up with this:


I thought the magnifying glass was a great way to draw attention to the podcast title. (It's left-handed because I make everything left-handed. Adam is right-handed, one of his few faults.) I chose the colors based on Adam's website and put a lightbulb next to the web address. I sent it off to Adam and waited to hear what he thought. He loved it, so I set out to make the other sizes of graphics he needed. 

The 1920x480 banner posed some challenges. I couldn't put the magnifying glass front and center like in the square graphic. When I shrank it it down, the podcast title didn't fit in it nicely. I decided to move the web address there and stretched the title across the banner. The lightbulb became the letter O in INVENTORS. 


The 1920x1080 size created a new problem. If I kept the magnifying glass and web address on the left and the title on the right, there was an area at the bottom that looked empty. I grabbed Adam's picture from his website and did a quick flip (I had to maintain the left-handed magnifying glass, of course!). I moved the web address to the bottom and everything looked balanced.


I'd strongly recommend the early episodes of the Patenting for Inventors Podcast to pretty much anyone. A huge number of things we use every day are patented. It is fascinating to learn what can be patented and what the process is that inventors (and their attorneys) go through to get those patents. Later episodes dive deeper and are geared more for inventors, but they are still very interesting. Episode 42 is particularly interesting to me. Listen to see why! :) 

Thanks to Adam for trusting me to make his graphics. If any of you need logos made, feel free to contact me at cindy.mycreativelife@gmail.com.