9/9/19

Cub Scout Pack Pride Pin

I've been cleaning out my Cub Scout leader stuff and passing it on to our local pack. I've unearthed some items I'd forgotten about, like the Pack Pride Pins our Cubs made during their Blue & Gold. In that post back in 2013, I told you I'd share a tutorial in a future post. Oops. I guess this counts as a future post, six years later! Affiliate links below.


Cub Scout Pack Pride Pin


Materials:


Steps:


Sort out the beads you will need. Each Pack Pride Pin needs 4 yellow beads, 10 blue beads, and three number beads. 

Cut a piece of lanyard lace approximately 18" long. Fold it in half and use a cow hitch to attach it to the safety pin. You'll now have two cords hanging down securely from the safety pin.

String one yellow bead through both cords and push it up toward the safety pin. 

For Row 1, lace three beads (blue-yellow-blue) on one cord, then lace the other cord through the same beads in reverse order. Pull both cords snugly.

For Rows 2-4, follow the same steps as Row 1, but replace the yellow bead with a number bead (blue-number-blue). Pull snugly after each row. 

For Row 5, repeat the steps from Row 1. 

String the final yellow bead onto both cords and push it toward Row 5. Tie off the ends with an overhand knot or a square knot. Trim the cords if needed. 

9/6/19

Impossible Whopper Taste Test

As you know, the deRosiers are all about trying new foods and love any sort of taste test. So when Steve suggested we try Burger King's new Impossible Whopper and pit it against their standard Whopper, Trevor and I were all in. I can't remember the last time I had food from Burger King. I'd even forgotten what's on a Whopper (lettuce, tomatoes, pickles, white onions, ketchup, and mayo on a sesame seed bun). The Impossible Whopper is the same, but instead of a beef patty, the patty is entirely plant-based.

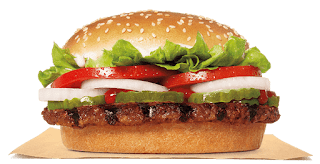
Here's what the two look like on Burger King's website.  Impossible Whopper on the left and standard Whopper on the right:


I'm sure it comes as no surprise to you that the burgers we actually received looked a little different than their styled version. Unlike the menu photos, neither of our Whoppers' patties was overhanging the lower bun and neither Whopper had the same amount or apparent quality of produce. They did, however, look very similar to each other. 

Impossible Whopper on the left and Whopper on the right:


When I removed the top bun, we did notice some differences. The Impossible patty was clearly larger than the beef patty, extending all the way to the edges of the lower bun (but not overhanging, like the menu photo). The Impossible Whopper had more tomato and pickle slices than the regular Whopper, which had more onion. The lettuce and mayo were similar. Neither had visible ketchup. 


I cut each into pieces so we could taste them side-by-side. That's where things got interesting. 


The two burgers tasted identical. There is no way we would have known we weren't eating two regular Whoppers when just biting into them with all the toppings. Interesting!

We carefully scraped away everything and tried just the patties side by side. Now, we could taste a difference. Not a big difference, and certainly not a meat-vs-not-meat difference. While they were a tiny bit different, none of us had a strong preference between them based on flavor or texture. 

So how does the nutritional makeup of the two compare? They aren't all that different. The Whopper has 660 calories, while the Impossible Whopper comes in at 630. There are 40 grams of fat in the Whopper and 34 in the Impossible Whopper. Here's the rest of the stats:

Whopper:


Impossible Whopper:


There's one other difference between the two, which is the price. The Impossible Whopper costs about a dollar more than a Whopper, at least for now during their trial release.

So what conclusion did we reach? All of us enjoyed the Impossible patty and could see getting it again in the future, particularly if it were to make an appearance at our preferred burger places. We like the idea of eating less meat and are glad to see better, more meat-like substitutes being developed. But the Impossible Whopper is far from a healthy choice.

Have you tried the Impossible Whopper? I'd love to hear what you think!

9/5/19

Bear Valley 2019

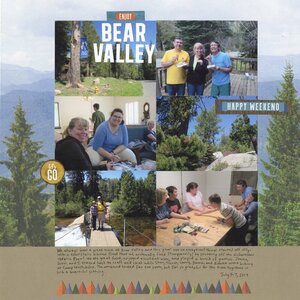
We spent a fantastic weekend in Bear Valley with Trevor's godparents back in July. I was really excited to scrap the trip because Paper House Productions had sent me the PERFECT paper to use with my photos. Check it out:

Bear Valley 2019 (affiliate link here and below)

I don't normally use papers like this "Call of the Wild" paper; it bugs me to cover up so much of the design with photos and I don't like the paper competing with the photos. But in this case, they complement each other beautifully. The title on the patterned paper didn't work for me, so I covered it up with the strip of brown and used it to house my journaling. The rice paper border helped ground the journaling. I put my own title in the upper right, then added a visual triangle of stickers as the final touch. 

9/4/19

Fingerpaint Watermelon Paper Plate Wreath

Summer isn't over yet! If you're not quite ready to leap into fall, here's a fingerpaint craft that celebrates the warm weather and long summer days. 


Fingerpaint Watermelon Paper Plate Wreath


Materials:

  • two paper plates
  • Folk Art acrylic paint (red, white, green, black)
  • scissors
  • glue
  • ribbon


Steps:


Use your fingers to smear red paint in the center of one of the paper plates. Without cleaning your fingers, add a band of white paint around the edge of the red. It will mix slightly and give you pink. Wipe your fingers, then add green around the outside of the plate. When the red is dry, make fingerprints of black randomly in the red section. 


When the paint is completely dry, cut the plate in half. Then cut each half in half, and each half in half again, forming 8 wedges. Cut out the center of the second plate to make the base for your wreath. 


Arrange the watermelon wedges so that they cover the wreath. Glue them in place. 


Add a ribbon to make a hanger, then display your wreath!


How fun would this be to make at a watermelon-themed party? I totally want to plan one!

9/3/19

'God is Love' Alphabet Block Cross

Trevor was baptized thirteen years ago today, on September 3, 2006, just shy of three months old. By fun coincidence, I have a religious kids' craft to share today. 


Two things first though, before my tutorial: an interesting article about why the Evangelical Lutheran Church in America practices infant baptism and the layout I made following Trevor's baptism. I thought I'd shared it on the blog before, but I can't find it. So apparently I didn't. Now I have. 

...and the Lord blessed him (affiliate link here and below)


---------


'God is Love' Alphabet Block Cross


Materials:


Steps:


Arrange the blocks into a cross shape with GOD horizontal and LOVE vertical. If you are happy with the colors, skip the painting steps that follow. Otherwise, add a coat of gesso to the blocks.

Paint the fronts of the blocks in your desired color(s), then paint the other sides black.

Use the glue gun to form the cross.


The cross will stand up on its own, so you can display it on a flat surface, or add an eye hook to turn it into an ornament for the tree or to hang it somewhere else.