
So, Trevor is having a Lego-themed birthday party. And, of course, he wants a Lego-themed piñata. Check out this delightful picture of Legos:

Notice anything particularly un-piñata-like about Legos? If you said, "They aren't shaped like a balloon," then you will immediately understand my dilemma.
I have made several dozen piñatas in my life, but all of them have started life as a balloon. Except for this one:
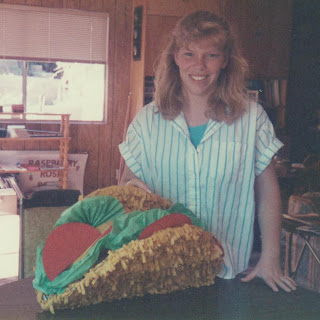
My friend Kathy and I made this awesome taco-shaped piñata for a high school Spanish class in 1988. (I'm 16 in this picture.)
I've blogged about two of my recent piñatas: the (infamous) zebra piñata that tried my patience this time last year, and the strawberry piñata I made with/for my goddaughters' birthdays. (That one tried my patience a bit too. Making piñatas with preschoolers is not for the weak.)
I did some googling and discovered that many people have attempted Lego piñatas with varying degrees of success. The most common method is to simply cover a thick cardboard box with paper mache. Easy yes, but nearly impossible to break open. Not my style. I thought long and hard about what item is shaped like a box, yet fragile enough that young children could break it. I came up with this:

I dug through the pantry to find something to put in the bag to provide the necessary rigidity. I discovered that two boxes of Kashi's Strawberry Fields cereal fit PERFECTLY in my bag. (By the way, that is my new favorite cereal. It is delicious, organic, and no more expensive than most other cereals.)

Trevor and I mixed up the paper mache paste and started covering the bag. FYI, Trevor HATES being messy or dirty. Last year, he would barely touch the paper mache with the tips of his fingers. This year, he would only touch it with the tip of one finger. Since he wasn't being any help at all (other than telling me what to do), I handed him the camera. Here are my disembodied hands.

When we (I) had covered four sides with two layers, I set it outside to dry. I wasn't sure if this was going to work....

Fortunately, it worked like a charm! When it was dry, Trevor opened it up and removed the cereal boxes. Then I added some paper mache to the bottom and let that dry.
The next dilemma was how to add the Lego bumps to the pinata. After a bit of experimentation, we found that cutting down some wax-coated Christmas cups would work pretty well. We glued these in place....

then I added paper mache to those.

And that's where we are right now. Five sides are covered and look pretty good. The next step is to figure out how I'm going to do the hanger. My plan is to use hot glue to attach a thick ribbon down the inside of one side of the piñata, across the bottom, then up the other side. Then I'll glue a sheet of cardboard over the base to further hold it in place. I'll come up with Plan B if necessary. I have high hopes for Plan A.
Stay tuned for further piñata updates!

You are AMAZING!!! Seriously GENIUS!!! Can't wait to see this all done!!!!
ReplyDeleteWow. This is so fun and creative. Can't wait to see the finished project. May just have to do a Lego theme party for Cory next year. :)
ReplyDeleteIts awesome ! So creative
ReplyDeleteCheers
Sonia
cardsandschoolprojects.blogspot.com
Your pinata is coming along nicely! I would've never figured all of that out.
ReplyDeleteThis is very cool. I have only made balloon shaped pinatas: an Easter egg with preschoolers and a giant spider for Halloween. Can't wait to see the finished product!
ReplyDeleteYour ingenuity is so impressive... I'm looking forward to seeing the finished results.
ReplyDeleteVery Cool! it's going to be an awesome party!
ReplyDeleteThanks for the paper bag idea. It's great. I'm making a king cobra piñata for my son's birthday. The bag and boxes provided the perfect base! Can't wait to see the rest of the Lego piñata.
ReplyDelete