Showing posts with label mosaic. Show all posts

12/6/22

Candy Cane Magazine Mosaic

Today's project is the fifth in my series based on crowd-sourced responses to ten questions. This one asked respondents to name something kids like. The top answer was candy, which is what I chose to inspire my project. Just like with yesterday's Picasso, I put a holiday spin on this craft. There are no shortage of candy cane crafts at Fun Family Crafts, plenty of which are mine, but a candy cane was perfect for some mosaic techniques I wanted to try. 


I just finished reading an excellent book, Paper Collage Workshop, by Samuel Price (affiliate link here and below). True to its name, this book feels very much like a workshop, leading the reader through the absolute basics first before progressing to increasingly difficult skills and projects. Check out the detail in this dog portrait. Wow. 


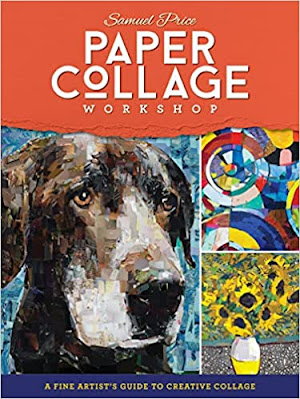
All of the projects toward the back of the book are way (WAY!) beyond my level, but that's fine. I picked up a lot of tips and tricks from Price that I used on my simple candy cane. And I am inspired to eventually try more advanced projects. 


Candy Cane Magazine Mosaic


Materials:


Steps:


Draw a candy cane on the paper. Color in the red stripes, then outline the candy cane with green. No need to be perfect. This will all be covered. And, at least in my case, it still won't be perfect. But no matter!


Go through the magazine to find some large white areas. Cut out the white in the shape of your candy cane. You can do this freehand or by putting the magazine page on top of your sketch and tracing. You will probably use 4-5 different pieces to cover the whole candy cane. Paint a thin layer of glue on the candy cane and place the white pieces where they go.  

Now look through the magazine and pull out sections with red. You may get lucky and find a gardening magazine about tomatoes, as I did. If not, check ads. Lots of then have red since it's attention-grabbing. Cut out the red stripes to fit the shapes, then glue them in place. This is a bit tedious, but again, there's no need for perfection. Here's how mine looked at this point: 


Fill in the background with green. Again, the gardening magazine was great for this; I found a two-page spread that was almost entirely solid green. After I cut out the text and photos, I had a great amount of green to use. I started with cutting pieces to butt up against the candy cane to define its edges and cover my white and red mistakes. Then I just worked my way outward with random squares. 


When the glue is dry, paint a final coat of paint over the entire surface to seal it.  Other than dry time, the project took me about an hour. Obviously, the size of your project and the size you decide to cut your collage pieces will determine how long it will take you. Enjoy!

9/27/21

Bean Mosaic Coaster

Today's project combines two classic kids' crafts, bean mosaics and trash-to-treasure. Follow along as I show you how to turn a plastic lid from the recycle bin into a functional coaster. While this takes only a small amount of time to assemble, drying time is very long. Plan accordingly! Affiliate links below. 


Bean Mosaic Coaster


Materials:


Steps:


Spread the beans onto a work surface. Experiment with design options, or jump right in! I found it easiest to start with the largest beans in my design. 

Put a small puddle of Mod Podge into the lid. Separate the largest beans you'll be using in the design, taking care to make them as similar in size as possible. Then arrange the largest beans where you want them. They'll be supporting your glass in the finished coaster, so consider that when you place them. 

 
Add more Mod Podge so that there is a shallow amount across the whole lid. It should be no deeper than the height of the smallest beans you'll be using. Arrange the rest of the beans in your design. 


Let the Mod Podge dry for several days (over a long weekend, if you're doing this in the classroom). When it looks like this, add a bit more Mod Podge over the top to seal everything in. 


Let the Mod Podge dry until it is completely clear and glossy. It took mine about a week from start to finish, but obviously room temperature and humidity play a big role in drying time. 


Test your coaster at this point. When you set a glass on it, it should feel secure and the water should be level. 


Here's the side view of mine. 


If yours isn't quite level enough for a drink coaster, you can use it as a plant coaster, or as a place to set keys. You could add a hook and hang it as an ornament. Or you can simply use it as a decoration. Lots of possibilities!

7/3/20

Cereal Box Beach Mosaic

It's been a while since I've shared a mosaic, which is surprising because I love making mosaics. I find the process very relaxing. Oddly, I don't find beaches, the subject of today's mosaic, relaxing at all. Forests are much more relaxing to me. Anyway, I'd encourage you to give this project a try. 


Cereal Box Beach Mosaic


Materials:

  • cereal boxes
  • scissors
  • glue


Steps:


Cut a base from the inside of a cereal box. Mine is 5.5" x 6". You can make it whatever size you want, but keep in mind that if it is too small, it's very difficult to show details. If it's too large, it will take a lot of time and a lot of cereal boxes to finish. 

Sketch your design on the plain side of the base, then pick your colors. I cut chunks from a variety of cereal boxes to test what colors I thought I'd be using. I went with Rice Krispies Blue for the sky and the darker Crispix Blue for the water. I originally planned for the umbrella to have Raisin Bran Purple in addition to the Golden Grahams Yellow and Apple Jacks Green that I ended up using. I'd planned to use pictures of cereal for the sand, but eventually went with the sand colors of Cranberry Almond Crunch. 


It's easiest to start with the large sections that won't require special cuts - like the first four rows of the sky. Cut strips of blue, then cut those strips into tiles that are squarish. Add glue to a small section (I did one horizontal line at a time, starting at the top) then place the tiles into the glue. 

Continue working downward until you reach the umbrella. Cut angles off the tiles that touch the umbrella so that they neither leave a gap nor take the space of the umbrella. For now, leave empty spaces where the umbrella will go. 

Next, add the dark blue squares for the water. Again, leave gaps for the umbrella and trim tiles as needed to fit the spaces around the umbrella. 

Fill in the black umbrella handle (from the letters in Apple Jacks) and the purple towel next. 


Begin filling in the sand. Leave the space around the beach ball empty. 


Through trial and error, I discovered that the easiest way to do the umbrella and beach ball are to cut triangle tiles to the shapes you need. The last step is to fill in the remaining sand around the beach ball. 


In retrospect, I'm not happy with how I did the sand around the beach ball. It would have looked better if I'd stuck with square tiles, cut to fit around the beach ball vs. the triangular shapes I used. Other than that, I'm happy with my project and eager to try another cereal box mosaic. 

On a side note, you may be wondering why our family of three has such a diverse collection of cereal boxes. Ordinarily, we don't. We each have a few favorites, but when COVID-19 hit, I started using Amazon Pantry (affiliate link) and going to a store only for fresh or frozen items that wouldn't ship well. With free shipping and fast delivery for Prime members, Amazon Pantry was a no-brainer. In the early days of quarantine with people stocking up on dry goods, our favorites weren't always available, so we started branching out. Thus, plenty of colorful options for cereal box crafting!

11/7/19

StickTogether Custom Portrait

It's been awhile since the last time I mentioned StickTogether here on the blog, and I am so excited to show you my latest StickTogether project!  


Do you recognize that handsome face? It's not just any rabbit. It's Trouble! StickTogether offers custom designs so that you can create a pixelated mosaic poster of a beloved pet, a person, or whatever else you'd like. The process is simple. Contact StickTogether (and tell them Cindy deRosier sent you!) with a photo you'd like to turn into a poster, and they will get back to you with a quote if the design will work when pixelated. 

I sent in this image:


And I got this proof back:


I thought the fence was distracting, so I asked them to take that out and they were happy to do so. My poster arrived in a mailing tube with all the stickers I needed. I've been working on it for awhile and have found that it is a great form of stress relief. And I am so happy with the finished artwork! The photo at the top of the post was taken from up close. Here is what it looks like about 8 feet back: 


And when I back up way into the kitchen, it looks even better. 


I'm planning to frame it and find a place where it can be viewed easily from a distance or up close. Thank you so much to StickTogether for a poster that was fun to make and that I'll treasure for years. 

6/8/18

Mosaic Ice Cream Cone Craft

School is out and it's hot outside, so that means it's time for ice cream! Gather the kids, make homemade ice cream (try my recipes for nectarine ice cream, raspberry ice cream, and "lazzberry" ice cream!), and then create this fun mosaic craft while the ice cream is freezing. 


---------

Mosaic Ice Cream Cone 


Materials:

  • chipboard (an empty cereal box works well)
  • scissors
  • construction paper
  • glue

Steps:


Cut the chipboard to make an ice cream cone. Each portion (cone, scoops, cherry, stem) should be a separate piece. Here are mine, assembled as they'll look for the finished project.


Begin with the cone. Tear tan construction paper into small pieces (mine are about 1/2" square) and glue them to the base, overlapping the pieces slightly. It doesn't matter if any pieces hang over the edge.


Turn the cone over and fold back any overhanging pieces. There's no need to glue them down or trim them unless you want to. 


Make the ice cream scoops the same way. Tear construction paper, glue it down, then fold back the overhanging section. To make mint chip (or other flavors with mix-ins), just add tiny bits of torn construction paper in the appropriate color. 


I used the same mosaic technique for the cherry, but just covered the stem with a sliver of construction paper. It's way too small for mosaic bits. 


Glue all the pieces together and you have your finished cone! If your timing is similar to mine, your homemade ice cream should be ready to eat right around now.


Enjoy! And if you make lazzberry ice cream, be sure to let me know so I can pass it along to Trevor. He's very proud of his creation. As he should be - it's delicious!!